
Manuals
Page 5
Setting Items of IEEE 802.1X for Each Tray...111 Symbols...111 Standard Paper Feed Tray...111 Optional Paper Feed Tray...112 Bypass Tray...113 Envelope Feeder...113 Duplex Unit...114 Supported Paper Types...115 Plain Paper...115 Thick Paper...115 Letterhead...116 Label ......120 Non-Recommended Paper Types...121 Print Area...122 Loading Paper in Trays...124 Loading Paper into a Standard or Optional Paper Feed Tray 124 Loading Paper onto Bypass Tray...133 Loading Envelopes...140 Loading Envelopes into the Bypass Tray 140 Loading Envelopes into the Envelope Feeder Unit 146 Printing on Fixed-...
Setting Items of IEEE 802.1X for Each Tray...111 Symbols...111 Standard Paper Feed Tray...111 Optional Paper Feed Tray...112 Bypass Tray...113 Envelope Feeder...113 Duplex Unit...114 Supported Paper Types...115 Plain Paper...115 Thick Paper...115 Letterhead...116 Label ......120 Non-Recommended Paper Types...121 Print Area...122 Loading Paper in Trays...124 Loading Paper into a Standard or Optional Paper Feed Tray 124 Loading Paper onto Bypass Tray...133 Loading Envelopes...140 Loading Envelopes into the Bypass Tray 140 Loading Envelopes into the Envelope Feeder Unit 146 Printing on Fixed-...
Manuals
Page 7
Appendix Moving and Transporting the Printer...231 Moving the Printer in a Short Distance...231 Consumables...233 Print Cartridge...233 Maintenance Kit...233 Specifications...235 Mainframe...235 Options...237 Trademarks...241 INDEX...243 5 Removing Misfed Bypass Tray...215 Paper Misfeed Message (B)...218 Paper Misfeed Message (C)...220 Paper Misfeed Message (Y1)(Y2)...225 Paper Misfeed Message (Z)...227 Removing Misfed Paper Inside the Cover 227 Removing Misfed Paper Inside the Duplex Unit 229 11.
Appendix Moving and Transporting the Printer...231 Moving the Printer in a Short Distance...231 Consumables...233 Print Cartridge...233 Maintenance Kit...233 Specifications...235 Mainframe...235 Options...237 Trademarks...241 INDEX...243 5 Removing Misfed Bypass Tray...215 Paper Misfeed Message (B)...218 Paper Misfeed Message (C)...220 Paper Misfeed Message (Y1)(Y2)...225 Paper Misfeed Message (Z)...227 Removing Misfed Paper Inside the Cover 227 Removing Misfed Paper Inside the Duplex Unit 229 11.
Manuals
Page 17
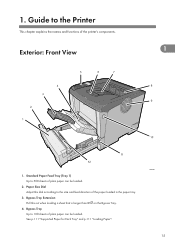
Standard Paper Feed Tray (Tray 1) Up to 100 sheets of plain paper can be loaded. 2. Bypass Tray Up to 500 sheets of plain paper can be loaded. See p.111 "Supported Paper for Each Tray" and p.111 "Loading Paper". Exterior: Front View 1 1. Bypass Tray Extension Pull this dial according to the Printer This chapter explains the names and functions of the paper loaded in the paper tray. 3. 1. CEE001 15 Guide to the size and feed direction of the printer's components. Paper Size Dial Adjust this out when loading a sheet that is longer than B5 on the Bypass Tray. 4.
Standard Paper Feed Tray (Tray 1) Up to 100 sheets of plain paper can be loaded. 2. Bypass Tray Up to 500 sheets of plain paper can be loaded. See p.111 "Supported Paper for Each Tray" and p.111 "Loading Paper". Exterior: Front View 1 1. Bypass Tray Extension Pull this dial according to the Printer This chapter explains the names and functions of the paper loaded in the paper tray. 3. 1. CEE001 15 Guide to the size and feed direction of the printer's components. Paper Size Dial Adjust this out when loading a sheet that is longer than B5 on the Bypass Tray. 4.
Manuals
Page 37
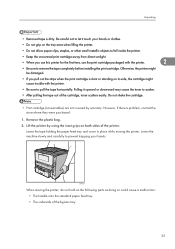
... cartridge might cause trouble with the printer. 2 • Be sure to prevent trapping your hands or clothes. • Do not grip on the tray area when lifting the printer. • Do not allow paper clips, staples, or other small metallic objects to fall inside the printer. • ...the first time, use the print cartridge packaged with the printer. • Be sure to scatter. • After pulling the tape out of the bypass tray. 35 However, if there is dirty. Pulling it touch your hands. Remove the plastic bag. 2. Unpacking • Removed tape is problem, contact the...
... cartridge might cause trouble with the printer. 2 • Be sure to prevent trapping your hands or clothes. • Do not grip on the tray area when lifting the printer. • Do not allow paper clips, staples, or other small metallic objects to fall inside the printer. • ...the first time, use the print cartridge packaged with the printer. • Be sure to scatter. • After pulling the tape out of the bypass tray. 35 However, if there is dirty. Pulling it touch your hands. Remove the plastic bag. 2. Unpacking • Removed tape is problem, contact the...

Manuals
Page 115
... must be selected using the control panel. For details about paper size settings, see p.135 "Specifying standard size paper for the bypass tray". • Approximately 64 - 216 mm (2.52 - 8.50 inches) in width 6 • Approximately 139.7 - 432 mm... C5 Env. , C6 Env. , DL Env. For details about paper size settings, see p.136 "Specifying custom size paper for the bypass tray". Supported Paper for Each Tray Bypass Tray Paper types Plain Paper, Thick Paper, Letterhead, Label Paper, Special Paper, Preprinted Paper, Color Paper, Recycled Paper, OHP (Transparency), Envelope ...
... must be selected using the control panel. For details about paper size settings, see p.135 "Specifying standard size paper for the bypass tray". • Approximately 64 - 216 mm (2.52 - 8.50 inches) in width 6 • Approximately 139.7 - 432 mm... C5 Env. , C6 Env. , DL Env. For details about paper size settings, see p.136 "Specifying custom size paper for the bypass tray". Supported Paper for Each Tray Bypass Tray Paper types Plain Paper, Thick Paper, Letterhead, Label Paper, Special Paper, Preprinted Paper, Color Paper, Recycled Paper, OHP (Transparency), Envelope ...

Manuals
Page 117
... 60 to 130 g/m2 (16 to 35 lb.) Paper type setting using the control panel The [Menu] key > [Paper Input] > [Paper Type: (tray name)] > [No Display (Plain Paper)] > the [OK] key Paper type setting using the printer driver [Plain & Recycled] or [Plain (60 to ...> the [OK] key [Thick (131 to 130 g/m2)] Supported input tray Any input tray can be used . Duplex printing Supported 6 • Tray 1: 500 Note • Tray 2 (Paper feed unit): 500 • Tray 3 (Paper feed unit): 500 • Bypass Tray: 100 Thick Paper Paper weight Paper type setting using the control panel Paper type...
... 60 to 130 g/m2 (16 to 35 lb.) Paper type setting using the control panel The [Menu] key > [Paper Input] > [Paper Type: (tray name)] > [No Display (Plain Paper)] > the [OK] key Paper type setting using the printer driver [Plain & Recycled] or [Plain (60 to ...> the [OK] key [Thick (131 to 130 g/m2)] Supported input tray Any input tray can be used . Duplex printing Supported 6 • Tray 1: 500 Note • Tray 2 (Paper feed unit): 500 • Tray 3 (Paper feed unit): 500 • Bypass Tray: 100 Thick Paper Paper weight Paper type setting using the control panel Paper type...

Manuals
Page 119
...> the [OK] key [Preprinted] Any input tray can be used . Duplex printing Not supported Recycled Paper Paper type setting using the control panel Paper type setting using the control panel The [Menu] key > [Paper Input] > [Paper Type: Bypass Tray] > [OHP (Transparency)] > the [OK]... key 117 Supported OHP transparencies Paper type setting using the printer driver Supported input tray Duplex printing The [Menu] key > [Paper Input] > [Paper Type: (tray name)] > [Recycled Paper] > the [OK] key [...
...> the [OK] key [Preprinted] Any input tray can be used . Duplex printing Not supported Recycled Paper Paper type setting using the control panel Paper type setting using the control panel The [Menu] key > [Paper Input] > [Paper Type: Bypass Tray] > [OHP (Transparency)] > the [OK]... key 117 Supported OHP transparencies Paper type setting using the printer driver Supported input tray Duplex printing The [Menu] key > [Paper Input] > [Paper Type: (tray name)] > [Recycled Paper] > the [OK] key [...

Manuals
Page 120
... panel Paper type setting using the printer driver Supported input tray Duplex printing [Transparency] This paper type can be printed only from the bypass tray. Loading Paper Paper type setting using the printer driver 6 Supported input tray Duplex printing The [Menu] key > [Paper Input] ...> [Paper Type: Tray2] or [Paper Type: Tray3], or [Paper Type: Bypass Tray] > [Envelope] > the [OK] key...
... panel Paper type setting using the printer driver Supported input tray Duplex printing [Transparency] This paper type can be printed only from the bypass tray. Loading Paper Paper type setting using the printer driver 6 Supported input tray Duplex printing The [Menu] key > [Paper Input] ...> [Paper Type: Tray2] or [Paper Type: Tray3], or [Paper Type: Bypass Tray] > [Envelope] > the [OK] key...
Manuals
Page 121
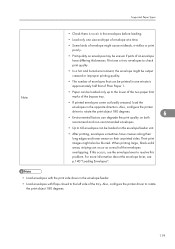
...degrade the print quality on both recommend and non-recommended envelopes. • Up to the lower of the two paper limit marks of the bypass tray. • If printed envelopes come out badly creased, load the envelopes in the opposite direction. For more information about the envelope lever,... • After printing, envelopes sometimes have creases along their unprinted sides. Also, configure the printer driver to the left side of the tray. Print one or two envelopes to resolve this problem. Their print images might be output creased or improper printing quality. • The ...
...degrade the print quality on both recommend and non-recommended envelopes. • Up to the lower of the two paper limit marks of the bypass tray. • If printed envelopes come out badly creased, load the envelopes in the opposite direction. For more information about the envelope lever,... • After printing, envelopes sometimes have creases along their unprinted sides. Also, configure the printer driver to the left side of the tray. Print one or two envelopes to resolve this problem. Their print images might be output creased or improper printing quality. • The ...

Manuals
Page 122
6. Also, configure the printer driver to rotate the print object 180 degrees. • To correctly specify the length of the tray. Improperly stored paper might result in its short edge, be sure to use it. 120 Loading Paper CEE033 • Load envelopes with flaps ...storing paper. Recommendations are as follows: • Avoid storing paper in humid areas. • Avoid exposing paper to direct sunlight. • Store on the bypass tray. • Load envelopes with the print side facing up on a flat surface. • Keep paper in poor print quality, paper misfeeds, or printer damage....
6. Also, configure the printer driver to rotate the print object 180 degrees. • To correctly specify the length of the tray. Improperly stored paper might result in its short edge, be sure to use it. 120 Loading Paper CEE033 • Load envelopes with flaps ...storing paper. Recommendations are as follows: • Avoid storing paper in humid areas. • Avoid exposing paper to direct sunlight. • Store on the bypass tray. • Load envelopes with the print side facing up on a flat surface. • Keep paper in poor print quality, paper misfeeds, or printer damage....
Manuals
Page 135
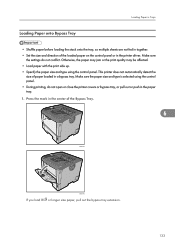
.... • During printing, do not conflict. Press the mark in the center of paper loaded in a bypass tray. Make sure the settings do not open or close the printer covers or bypass tray, or pull out or push in the printer driver. Make sure the paper size and type is selected using... the control panel. Loading Paper in Trays Loading Paper onto Bypass Tray • Shuffle paper before loading the stack onto the tray, so multiple sheets are not fed in together. • Set the size and direction of the loaded paper...
.... • During printing, do not conflict. Press the mark in the center of paper loaded in a bypass tray. Make sure the settings do not open or close the printer covers or bypass tray, or pull out or push in the printer driver. Make sure the paper size and type is selected using... the control panel. Loading Paper in Trays Loading Paper onto Bypass Tray • Shuffle paper before loading the stack onto the tray, so multiple sheets are not fed in together. • Set the size and direction of the loaded paper...

Manuals
Page 136
CEE076 • When loading paper on the bypass tray, make sure the stack does not exceed the limit mark on the inner side of different paper types, see p.115 "Supported Paper Types". 134 Slide the paper guide both sides to fit the paper width. For details about the thicknesses of the paper guides. Adjust the paper guide both sides outward, and then load paper print side up, until it stops. 1 2 6 1 CEE025 3. Loading Paper CEE024 2. 6.
CEE076 • When loading paper on the bypass tray, make sure the stack does not exceed the limit mark on the inner side of different paper types, see p.115 "Supported Paper Types". 134 Slide the paper guide both sides to fit the paper width. For details about the thicknesses of the paper guides. Adjust the paper guide both sides outward, and then load paper print side up, until it stops. 1 2 6 1 CEE025 3. Loading Paper CEE024 2. 6.
Manuals
Page 137
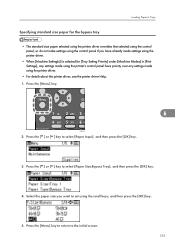
... [ ] or [ ] key to select [Paper Input], and then press the [OK] key. 3. Press the [ ] or [ ] key to select [Paper Size:Bypass Tray], and then press the [OK] key. 4. Press the [Menu] key to return to set using the scroll keys, and then press the [OK] key. 5. Press ... made using the printer driver. • For details about the printer driver, see the printer driver Help. 1. Loading Paper in Trays Specifying standard size paper for the bypass tray • The standard size paper selected using the printer driver overrides that selected using the control panel, so do not make settings...
... [ ] or [ ] key to select [Paper Input], and then press the [OK] key. 3. Press the [ ] or [ ] key to select [Paper Size:Bypass Tray], and then press the [OK] key. 4. Press the [Menu] key to return to set using the scroll keys, and then press the [OK] key. 5. Press ... made using the printer driver. • For details about the printer driver, see the printer driver Help. 1. Loading Paper in Trays Specifying standard size paper for the bypass tray • The standard size paper selected using the printer driver overrides that selected using the control panel, so do not make settings...
Manuals
Page 138
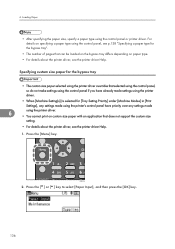
... on specifying a paper type using the control panel, see p.138 "Specifying a paper type for the bypass tray". • The number of pages that can be loaded on the bypass tray differs depending on custom size paper with an application that selected using the control panel, so do not ...using the printer's control panel have priority over any settings made settings using the printer driver. • When [Machine Setting(s)] is selected for the bypass tray • The custom size paper selected using the control panel or printer driver. Press the [ ] or [ ] key to select [Paper Input],...
... on specifying a paper type using the control panel, see p.138 "Specifying a paper type for the bypass tray". • The number of pages that can be loaded on the bypass tray differs depending on custom size paper with an application that selected using the control panel, so do not ...using the printer's control panel have priority over any settings made settings using the printer driver. • When [Machine Setting(s)] is selected for the bypass tray • The custom size paper selected using the control panel or printer driver. Press the [ ] or [ ] key to select [Paper Input],...

Manuals
Page 139
Select [Custom Size] using the scroll keys, and then press the [OK] key. 5. Press the [Menu] key to return to select [Paper Size:Bypass Tray], and then press the [OK] key. 4. Loading Paper in Trays 3. Enter the vertical value, and then press the [OK] key. (mainly Europe and Asia) (mainly North America) 7. Enter the horizontal value, and then press the [OK] key. (mainly Europe and Asia) 6 (mainly North America) 6. Press the [ ] or [ ] key to the initial screen. 137
Select [Custom Size] using the scroll keys, and then press the [OK] key. 5. Press the [Menu] key to return to select [Paper Size:Bypass Tray], and then press the [OK] key. 4. Loading Paper in Trays 3. Enter the vertical value, and then press the [OK] key. (mainly Europe and Asia) (mainly North America) 7. Enter the horizontal value, and then press the [OK] key. (mainly Europe and Asia) 6 (mainly North America) 6. Press the [ ] or [ ] key to the initial screen. 137
Manuals
Page 140
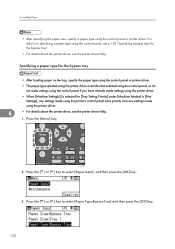
... make settings using the control panel if you have already made settings using the printer driver. • When [Machine Setting(s)] is selected for the bypass tray". • For details about the printer driver, see the printer driver Help. Press the [ ] or [ ] key to select [Paper Input...], and then press the [OK] key. 3. CEE128 2. Press the [ ] or [ ] key to select [Paper Type:Bypass Tray] and then press the [OK] key. 138 6. Press the [Menu] key. Loading Paper • After specifying the paper size, specify a paper type using the control...
... make settings using the control panel if you have already made settings using the printer driver. • When [Machine Setting(s)] is selected for the bypass tray". • For details about the printer driver, see the printer driver Help. Press the [ ] or [ ] key to select [Paper Input...], and then press the [OK] key. 3. CEE128 2. Press the [ ] or [ ] key to select [Paper Type:Bypass Tray] and then press the [OK] key. 138 6. Press the [Menu] key. Loading Paper • After specifying the paper size, specify a paper type using the control...

Manuals
Page 142
... kinds of envelope might be uneven if parts of envelope at a time. • Before loading envelopes, flatten their leading edges (the edge going into the Bypass Tray 1. Open the rear cover. 140 CEE040 6. Otherwise, an injury might occur. • Some of the machine could result in burns. • Check there is no...
... kinds of envelope might be uneven if parts of envelope at a time. • Before loading envelopes, flatten their leading edges (the edge going into the Bypass Tray 1. Open the rear cover. 140 CEE040 6. Otherwise, an injury might occur. • Some of the machine could result in burns. • Check there is no...

Manuals
Page 145
Press the mark in the illustration below. 143 If they are not stuck together. Loading Envelopes CEE002 6 CEE006 9. Before loading envelopes, flatten them . CBK239 When fanning envelopes, make sure the envelope flaps are stuck together, separate them out so that their edges before loading. 8. Fan envelopes, and then align their curl does not exceed that shown in the center of the Bypass Tray.
Press the mark in the illustration below. 143 If they are not stuck together. Loading Envelopes CEE002 6 CEE006 9. Before loading envelopes, flatten them . CBK239 When fanning envelopes, make sure the envelope flaps are stuck together, separate them out so that their edges before loading. 8. Fan envelopes, and then align their curl does not exceed that shown in the center of the Bypass Tray.

Manuals
Page 146
6. Set the envelope in the bypass tray with the printing side facing up. 1 2 1 CEE160 When loading envelopes, be sure to load envelopes in the illustration below. 6 CBK241 If envelopes are severely curled after printing, flatten them by bending them back against the curl. 10. Loading Paper CBK240 If the curl is severe, flatten out the envelopes using your fingers, as shown in the tray with their closed flaps facing the left side of the tray. 144
6. Set the envelope in the bypass tray with the printing side facing up. 1 2 1 CEE160 When loading envelopes, be sure to load envelopes in the illustration below. 6 CBK241 If envelopes are severely curled after printing, flatten them by bending them back against the curl. 10. Loading Paper CBK240 If the curl is severe, flatten out the envelopes using your fingers, as shown in the tray with their closed flaps facing the left side of the tray. 144
Manuals
Page 147
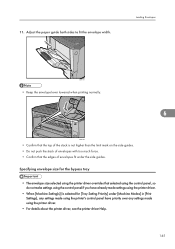
.... Loading Envelopes CEE161 • Keep the envelope lever lowered when printing normally. 6 CEE162 • Confirm that the top of the stack is selected for the bypass tray • The envelope size selected using the printer driver overrides that the edges of envelopes fit under [Machine Modes] in [Print Settings], any settings made...
.... Loading Envelopes CEE161 • Keep the envelope lever lowered when printing normally. 6 CEE162 • Confirm that the top of the stack is selected for the bypass tray • The envelope size selected using the printer driver overrides that the edges of envelopes fit under [Machine Modes] in [Print Settings], any settings made...


