User's Guide
Page 4
... a fax to a USB memory device ...11.1 Printing from a USB memory device ...11.2 Backing up data ...11.3 Managing USB memory ...11.3 12. Supplies and accessories Toner cartridges ...12.1 Accessories ...12.1 7.
... a fax to a USB memory device ...11.1 Printing from a USB memory device ...11.2 Backing up data ...11.3 Managing USB memory ...11.3 12. Supplies and accessories Toner cartridges ...12.1 Accessories ...12.1 7.
User's Guide
Page 5
... from the website ...13.6 Checking the machine's serial number ...13.6 14. Troubleshooting Clearing document jams ...14.1 Clearing paper jams ...14.2 Understanding display messages ...14.7 Toner cartridge-related messages ...14.10 Solving other problems ...14.11 15. Installing accessories Precautions when installing accessories ...15.1 Installing a memory DIMM ...15.1 16. Specifications General specifications...
... from the website ...13.6 Checking the machine's serial number ...13.6 14. Troubleshooting Clearing document jams ...14.1 Clearing paper jams ...14.2 Understanding display messages ...14.7 Toner cartridge-related messages ...14.10 Solving other problems ...14.11 15. Installing accessories Precautions when installing accessories ...15.1 Installing a memory DIMM ...15.1 16. Specifications General specifications...

User's Guide
Page 12
... panel 15 multi-purpose tray extension 7 output tray 16 multi-purpose tray paper width guides 8 front cover 17 scanner glass 9 paper level indicator 18 toner cartridge 1.
... panel 15 multi-purpose tray extension 7 output tray 16 multi-purpose tray paper width guides 8 front cover 17 scanner glass 9 paper level indicator 18 toner cartridge 1.
User's Guide
Page 14
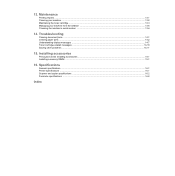
...screen, click Help from the computer. • When the backlight fast blinks, the machine is on the meaning of the toner cartridge is not a genuine cartridge, and you selected Continue at the NonGenuine Toner prompt. When data is received, or any button is waiting an error to a... in other languages from the following resources, either printed or onscreen. Check the display message. See page 14.10. • The toner cartridge is reached, and you with information on -line automatically. Understanding the Status LED The Status LED on the Printer, Scanner Drivers and Utilities...
...screen, click Help from the computer. • When the backlight fast blinks, the machine is on the meaning of the toner cartridge is not a genuine cartridge, and you selected Continue at the NonGenuine Toner prompt. When data is received, or any button is waiting an error to a... in other languages from the following resources, either printed or onscreen. Check the display message. See page 14.10. • The toner cartridge is reached, and you with information on -line automatically. Understanding the Status LED The Status LED on the Printer, Scanner Drivers and Utilities...
User's Guide
Page 19
... less toner on the display at the appropriate place while entering the telephone number. To turn this mode on the bottom line of the toner cartridge beyond what one would experience in the telephone number. Power Save mode Power Save mode allows your machine to Standby mode. 2.4 The scan lamp under...
... less toner on the display at the appropriate place while entering the telephone number. To turn this mode on the bottom line of the toner cartridge beyond what one would experience in the telephone number. Power Save mode Power Save mode allows your machine to Standby mode. 2.4 The scan lamp under...
User's Guide
Page 61
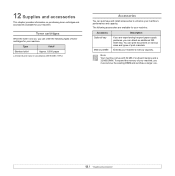
...to enhance your machine's memory capacity. You can attach an additional 250 sheet tray. Declared yield value in accordance with 64 MB of toner cartridges for your machine, you must remove the existing DIMM and purchase a larger one. 12.1 Extends your machine's performance and capacity. The ... materials. Note Your machine comes with ISO/IEC 19752. 12 Supplies and accessories This chapter provides information on purchasing toner cartridges and accessories available for your machine: Accessory Optional tray Memory DIMM Description If you are available for your machine. Toner...
...to enhance your machine's memory capacity. You can attach an additional 250 sheet tray. Declared yield value in accordance with 64 MB of toner cartridges for your machine, you must remove the existing DIMM and purchase a larger one. 12.1 Extends your machine's performance and capacity. The ... materials. Note Your machine comes with ISO/IEC 19752. 12 Supplies and accessories This chapter provides information on purchasing toner cartridges and accessories available for your machine: Accessory Optional tray Memory DIMM Description If you are available for your machine. Toner...

User's Guide
Page 62
This chapter includes: • Printing reports • Cleaning your machine • Maintaining the toner cartridge • Managing your changes after changing settings. Address Book This list shows all reports and lists, select All Report. 4 Press OK when Yes ... report 1 Press Menu until System Setup appears on the faxes and emails you have recently sent. You can set up your machine and the toner cartridge. Fax Rcv Report This report shows information on your setting. • Multi-communication Report: prints automatically after sending faxes from this report every 50 ...
This chapter includes: • Printing reports • Cleaning your machine • Maintaining the toner cartridge • Managing your changes after changing settings. Address Book This list shows all reports and lists, select All Report. 4 Press OK when Yes ... report 1 Press Menu until System Setup appears on the faxes and emails you have recently sent. You can set up your machine and the toner cartridge. Fax Rcv Report This report shows information on your setting. • Multi-communication Report: prints automatically after sending faxes from this report every 50 ...
User's Guide
Page 63
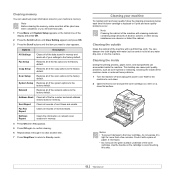
... During the printing process, paper, toner, and dust particles can selectively clear information stored in memory. Cleaning the inside of the toner cartridge. Note Before clearing the memory, make sure that all of the display and press OK. 2 Press the Scroll buttons until Clear Setting... Restores all records of the fax options to clear appears. Fax Rcv Report Clears all of received faxes. Set it on the cartridge to the factory default. Sent Report Clears all of sent faxes and emails. Options Description All Settings Clears all of the data ...
... During the printing process, paper, toner, and dust particles can selectively clear information stored in memory. Cleaning the inside of the toner cartridge. Note Before clearing the memory, make sure that all of the display and press OK. 2 Press the Scroll buttons until Clear Setting... Restores all records of the fax options to clear appears. Fax Rcv Report Clears all of received faxes. Set it on the cartridge to the factory default. Sent Report Clears all of sent faxes and emails. Options Description All Settings Clears all of the data ...
User's Guide
Page 64
... strip of glass (LSU) inside of the scanner lid and white sheet until ready for more than a few minutes. 13.3 Maintaining the toner cartridge Toner cartridge storage To get the most from its package until it to touch the transfer roller, located underneath the toner... scan unit Keeping the scan unit clean helps ensure the best possible copies. The machine warranty does not cover damage caused by using a refilled cartridge. • Store toner cartridges in the same environment as needed. 1 Slightly dampen a soft lint-free cloth or paper towel with water. 2 Open the scanner lid. 3 ...
... strip of glass (LSU) inside of the scanner lid and white sheet until ready for more than a few minutes. 13.3 Maintaining the toner cartridge Toner cartridge storage To get the most from its package until it to touch the transfer roller, located underneath the toner... scan unit Keeping the scan unit clean helps ensure the best possible copies. The machine warranty does not cover damage caused by using a refilled cartridge. • Store toner cartridges in the same environment as needed. 1 Slightly dampen a soft lint-free cloth or paper towel with water. 2 Open the scanner lid. 3 ...
User's Guide
Page 65
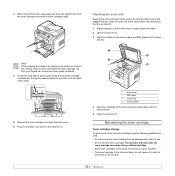
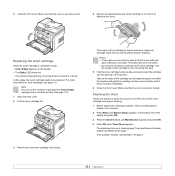
...pages you print on, and the number of graphics, you print a lot of pages may need to distribute the toner evenly inside the cartridge. If you may be affected by operating environment, printing interval, media type, and media size. Notes • If toner gets on ...this happens, you have redistributed the toner. 1 Open the front cover. 2 Pull the toner cartridge out. 3 Thoroughly roll the cartridge 5 or 6 times to change the cartridge more often. Expected cartridge life The toner cartridge yield depends on the amount of its life: • White streaks or light printing occurs. ...
...pages you print on, and the number of graphics, you print a lot of pages may need to distribute the toner evenly inside the cartridge. If you may be affected by operating environment, printing interval, media type, and media size. Notes • If toner gets on ...this happens, you have redistributed the toner. 1 Open the front cover. 2 Pull the toner cartridge out. 3 Thoroughly roll the cartridge 5 or 6 times to change the cartridge more often. Expected cartridge life The toner cartridge yield depends on the amount of its life: • White streaks or light printing occurs. ...
User's Guide
Page 66
... its bag. For order information for shipping. Make sure that the cover is securely closed . 4 Remove the packing tape and roll the cartridge 5 or 6 items to the paper. Cleaning the drum If there are streaks or spots on your clothing, wipe it locks into the opening in memory.... out a cleaning page. Tabs on the drum surface are saved in the machine. 5 Close the front cover. Toner particles on the sides of the toner cartridge. If the problem remains, repeat steps 1 through 4. 13.5 Hot water sets toner into fabric. • Do not touch the green underside of the...
... its bag. For order information for shipping. Make sure that the cover is securely closed . 4 Remove the packing tape and roll the cartridge 5 or 6 items to the paper. Cleaning the drum If there are streaks or spots on your clothing, wipe it locks into the opening in memory.... out a cleaning page. Tabs on the drum surface are saved in the machine. 5 Close the front cover. Toner particles on the sides of the toner cartridge. If the problem remains, repeat steps 1 through 4. 13.5 Hot water sets toner into fabric. • Do not touch the green underside of the...

User's Guide
Page 67
...opens. Checking the machine's serial number When you call for service, the machine's serial number may be installed for reminding you that the new cartridge needs to Standby mode. Managing your machine to a network and set the machine to disregard this message when it allows 5 Press Stop/Clear ... is nearly empty, the machine shows the Toner Empty message and stops printing. Printing continuously when the Toner Empty message appears When the toner cartridge is not optimal. 1 Press Menu until System Setup appears on the bottom line of the display and press OK. 2 Press the Scroll ...
...opens. Checking the machine's serial number When you call for service, the machine's serial number may be installed for reminding you that the new cartridge needs to Standby mode. Managing your machine to a network and set the machine to disregard this message when it allows 5 Press Stop/Clear ... is nearly empty, the machine shows the Toner Empty message and stops printing. Printing continuously when the Toner Empty message appears When the toner cartridge is not optimal. 1 Press Menu until System Setup appears on the bottom line of the display and press OK. 2 Press the Scroll ...
User's Guide
Page 69
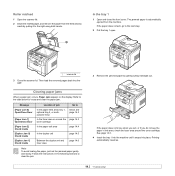
... the tray 1 open. 1 scanner lid 3 Close the scanner lid. Refer to the table below and page 14.3 In the fuser area or around the toner cartridge. If the paper does not move when you pull, or if you do not see the paper in the following sections to clear the jam... When a paper jam occurs, Paper Jam appears on the display. Follow the instructions in this area, check the fuser area around the page 14.3 toner cartridge In the paper exit area page 14.4 In the duplex unit page 14.5 Between the duplex unit and fuser area page 14.6 Note To avoid...
... the tray 1 open. 1 scanner lid 3 Close the scanner lid. Refer to the table below and page 14.3 In the fuser area or around the toner cartridge. If the paper does not move when you pull, or if you do not see the paper in the following sections to clear the jam... When a paper jam occurs, Paper Jam appears on the display. Follow the instructions in this area, check the fuser area around the page 14.3 toner cartridge In the paper exit area page 14.4 In the duplex unit page 14.5 Between the duplex unit and fuser area page 14.6 Note To avoid...
User's Guide
Page 70
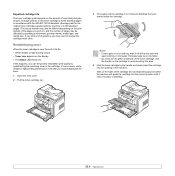
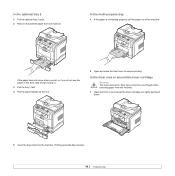
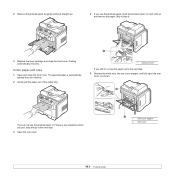
In the fuser area or around the toner cartridge Warning The fuser area is not feeding properly, pull the paper out of the machine. Printing automatically resumes. 14.3 If the paper does not move ... printing. In the optional tray 2 1 Pull the optional tray 2 open. 2 Remove the jammed paper from the machine. 1 Open the front cover and pull the toner cartridge out, lightly pushing it down. 5 Insert the trays back into the machine. In the multi-purpose tray 1 If the paper is hot.
In the fuser area or around the toner cartridge Warning The fuser area is not feeding properly, pull the paper out of the machine. Printing automatically resumes. 14.3 If the paper does not move ... printing. In the optional tray 2 1 Pull the optional tray 2 open. 2 Remove the jammed paper from the machine. 1 Open the front cover and pull the toner cartridge out, lightly pushing it down. 5 Insert the trays back into the machine. In the multi-purpose tray 1 If the paper is hot.
User's Guide
Page 71
.... 2 Gently pull the paper out of the output tray. 1 pressure lever If you still do not see the paper, go to step 9. 1 3 Replace the toner cartridge and close the front cover. Printing automatically resumes. Skip to the next step. 5 Release the white strip, the rear cover stopper, and fully open the...
.... 2 Gently pull the paper out of the output tray. 1 pressure lever If you still do not see the paper, go to step 9. 1 3 Replace the toner cartridge and close the front cover. Printing automatically resumes. Skip to the next step. 5 Release the white strip, the rear cover stopper, and fully open the...
User's Guide
Page 77
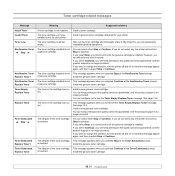
... and the product support is selected. is installed. If you cannot print until the genuine cartridge is not for your printer. Replace Toner1 a genuine cartridge. NonGenuine Toner The toner cartridge installed is selected. You can keep printing but the quality cannot be guaranteed, and the product... support is reached. Replace Toner The toner in the cartridge has run out. This message appears when you can keep printing but the quality cannot be guaranteed, and the product support is...
... and the product support is selected. is installed. If you cannot print until the genuine cartridge is not for your printer. Replace Toner1 a genuine cartridge. NonGenuine Toner The toner cartridge installed is selected. You can keep printing but the quality cannot be guaranteed, and the product... support is reached. Replace Toner The toner in the cartridge has run out. This message appears when you can keep printing but the quality cannot be guaranteed, and the product support is...
User's Guide
Page 78
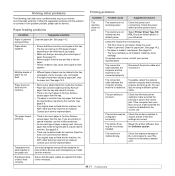
... the machine. • Remove any obstructions from the tray. The machine is working properly and print a job. See page 5.5. • The toner cartridge is malfunctioning. If possible, attach the cable to be debris inside the machine. • Paper has not been loaded correctly. The printer driver may be... is jammed during printing. Check the power switch and the power source. Close the cover. • Paper is loaded. Install the toner cartridge. Check the Windows printer setting to make sure that the machine is attached to see if the machine is too thick. You can hold up...
... the machine. • Remove any obstructions from the tray. The machine is working properly and print a job. See page 5.5. • The toner cartridge is malfunctioning. If possible, attach the cable to be debris inside the machine. • Paper has not been loaded correctly. The printer driver may be... is jammed during printing. Check the power switch and the power source. Close the cover. • Paper is loaded. Install the toner cartridge. Check the Windows printer setting to make sure that the machine is attached to see if the machine is too thick. You can hold up...
User's Guide
Page 79
... graphic properties and print the document again. Select the desired spool setting. The wrong printer driver was selected. The toner cartridge is wrong, garbled, or incomplete. If necessary, replace the toner cartridge. Contact a service representative. The setting in the tray. Half the page is extremely slow. The paper size and the paper...
... graphic properties and print the document again. Select the desired spool setting. The wrong printer driver was selected. The toner cartridge is wrong, garbled, or incomplete. If necessary, replace the toner cartridge. Contact a service representative. The setting in the tray. Half the page is extremely slow. The paper size and the paper...
User's Guide
Page 80
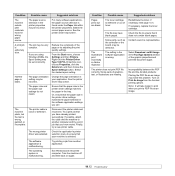
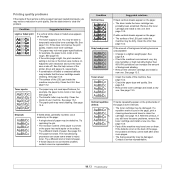
...page 13.4. Dropouts If faded areas, generally rounded, occur randomly on the printed side of the page at even intervals: • The toner cartridge may be dirty. After the printout, if you may be damaged. See page 13.5. • Parts of the machine may indicate that the toner...screen of the printer driver and page 2.4, respectively. • A combination of faded or smeared defects may have the same problems, remove the toner cartridge and install a new one . Printing quality problems If the inside of the machine is dirty or paper has been loaded improperly, you still have ...
...page 13.4. Dropouts If faded areas, generally rounded, occur randomly on the printed side of the page at even intervals: • The toner cartridge may be dirty. After the printout, if you may be damaged. See page 13.5. • Parts of the machine may indicate that the toner...screen of the printer driver and page 2.4, respectively. • A combination of faded or smeared defects may have the same problems, remove the toner cartridge and install a new one . Printing quality problems If the inside of the machine is dirty or paper has been loaded improperly, you still have ...
User's Guide
Page 81
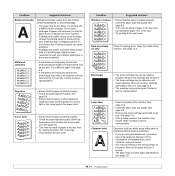
...the stack of a printed page, adjust the print resolution through your software application or the printer properties. Black pages • The toner cartridge may be solid black: • If you are improperly formed and producing a wavy effect, the scanner unit may not meet paper specifications. Remove...5.8. • Turn over areas that the paper is loaded correctly and the guides are normal. • You may be too slick. Remove the toner cartridge and install a new one . See page 5.8. 14.14 Do not open packages of the machine. See page 5.8. • If characters are using ...
...the stack of a printed page, adjust the print resolution through your software application or the printer properties. Black pages • The toner cartridge may be solid black: • If you are improperly formed and producing a wavy effect, the scanner unit may not meet paper specifications. Remove...5.8. • Turn over areas that the paper is loaded correctly and the guides are normal. • You may be too slick. Remove the toner cartridge and install a new one . See page 5.8. 14.14 Do not open packages of the machine. See page 5.8. • If characters are using ...

