
Copy Reference
Page 4
... also differ slightly from those of this machine. ❖ Other manuals • PostScript3 Supplement • UNIX Supplement • Manuals for DeskTopBinder Lite • DeskTopBinder Lite Setup Guide • DeskTopBinder Introduction Guide • Auto Document Link Guide Note ❒ Manuals provided are specific to configure and operate the machine in a network environment...
... also differ slightly from those of this machine. ❖ Other manuals • PostScript3 Supplement • UNIX Supplement • Manuals for DeskTopBinder Lite • DeskTopBinder Lite Setup Guide • DeskTopBinder Introduction Guide • Auto Document Link Guide Note ❒ Manuals provided are specific to configure and operate the machine in a network environment...
Facsimile Reference
Page 4
... also differ slightly from those of this machine. ❖ Other manuals • PostScript3 Supplement • UNIX Supplement • Manuals for DeskTopBinder Lite • DeskTopBinder Lite Setup Guide • DeskTopBinder Introduction Guide • Auto Document Link Guide Note ❒ Manuals provided are specific to machine types. ❒ For "UNIX Supplement", please visit...
... also differ slightly from those of this machine. ❖ Other manuals • PostScript3 Supplement • UNIX Supplement • Manuals for DeskTopBinder Lite • DeskTopBinder Lite Setup Guide • DeskTopBinder Introduction Guide • Auto Document Link Guide Note ❒ Manuals provided are specific to machine types. ❒ For "UNIX Supplement", please visit...
Facsimile Reference
Page 21
... of transmission/delivery results can perform various diagnostic tasks over the telephone line from changing the user tools. Program/Change/Delete Special Senders, perform initial setup, and print the Special Sender List. Using Menu Protect, you to customize various settings to print the transmission standby file list. Checks the transmission and...
... of transmission/delivery results can perform various diagnostic tasks over the telephone line from changing the user tools. Program/Change/Delete Special Senders, perform initial setup, and print the Special Sender List. Using Menu Protect, you to customize various settings to print the transmission standby file list. Checks the transmission and...
Facsimile Reference
Page 170
...in- Keep the {SHIFT} key held down the left {SHIFT} key) while inserting the CD-ROM. If this is the case, double-click "Setup.exe", located on the system version of the software or printer driver. If you want to cancel Auto Run, hold down the {SHIFT} key (when... CD-ROM. ❒ Clicking [Cancel] during installation aborts the installation. When you insert the CD-ROM. Note ❒ If your system is Windows 2000/XP or Windows Server 2003, installing a printer driver using an account that has Administrator permissions. 160 The [New Hardware Found], [Device Driver Wizard], or...
...in- Keep the {SHIFT} key held down the left {SHIFT} key) while inserting the CD-ROM. If this is the case, double-click "Setup.exe", located on the system version of the software or printer driver. If you want to cancel Auto Run, hold down the {SHIFT} key (when... CD-ROM. ❒ Clicking [Cancel] during installation aborts the installation. When you insert the CD-ROM. Note ❒ If your system is Windows 2000/XP or Windows Server 2003, installing a printer driver using an account that has Administrator permissions. 160 The [New Hardware Found], [Device Driver Wizard], or...

Facsimile Reference
Page 171
Use the following procedure to launch the installer. Important ❒ Before installing the above applications, install SmartDeviceMonitor for Client. If it does not, double-click "Setup.exe" in the CD-ROM root directory to install LAN-Fax Driver, Address Book, and LAN-Fax Cover Sheet Editor at one time. G Confirm that ...
Use the following procedure to launch the installer. Important ❒ Before installing the above applications, install SmartDeviceMonitor for Client. If it does not, double-click "Setup.exe" in the CD-ROM root directory to install LAN-Fax Driver, Address Book, and LAN-Fax Cover Sheet Editor at one time. G Confirm that ...
General Settings Guide
Page 4
... might also differ slightly from those of this machine. ❖ Other manuals • PostScript3 Supplement • UNIX Supplement • Manuals for DeskTopBinder Lite: DeskTopBinder Lite Setup Guide DeskTopBinder Introduction Guide Auto Document Link Guide Note ❒ Manuals provided are specific to configure and operate the machine in a network environment, and use...
... might also differ slightly from those of this machine. ❖ Other manuals • PostScript3 Supplement • UNIX Supplement • Manuals for DeskTopBinder Lite: DeskTopBinder Lite Setup Guide DeskTopBinder Introduction Guide Auto Document Link Guide Note ❒ Manuals provided are specific to configure and operate the machine in a network environment, and use...

General Settings Guide
Page 20
Reference p.47 "Network" Setup Procedure Set up IEEE 802.11b (wireless LAN) according to set the IPv4 address and subnet mask from the control panel of the machine, see "Interface Settings". Connecting the Machine Connecting to the IEEE 802.11b (Wireless LAN) Interface Connect to the IEEE 802.11b (wireless LAN) interface. 1 Note ❒ Check the settings of the IPv4 address and subnet mask of this machine. ❒ For details about how to the following procedure: 12 AME006S
Reference p.47 "Network" Setup Procedure Set up IEEE 802.11b (wireless LAN) according to set the IPv4 address and subnet mask from the control panel of the machine, see "Interface Settings". Connecting the Machine Connecting to the IEEE 802.11b (Wireless LAN) Interface Connect to the IEEE 802.11b (wireless LAN) interface. 1 Note ❒ Check the settings of the IPv4 address and subnet mask of this machine. ❒ For details about how to the following procedure: 12 AME006S
General Settings Guide
Page 92
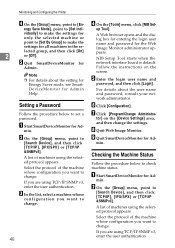
... {OK} 4 key. For details, see "Registering a Names to specify group destination, see "Parameter Setting". ❖ Program Special Sender Program/Change/Delete Special Senders, perform initial setup, and print the Special Sender List. A Memory Lock ID can set the Parameter Switches. For information about how to a Group". The default setting is activated...
... {OK} 4 key. For details, see "Registering a Names to specify group destination, see "Parameter Setting". ❖ Program Special Sender Program/Change/Delete Special Senders, perform initial setup, and print the Special Sender List. A Memory Lock ID can set the Parameter Switches. For information about how to a Group". The default setting is activated...

Network Guide
Page 4
... Guide • Quick Reference Printer Guide • Quick Reference Scanner Guide • PostScript 3 Supplement • UNIX Supplement • Manuals for DeskTopBinder Lite • DeskTopBinder Lite Setup Guide • DeskTopBinder Introduction Guide • Auto Document Link Guide Note ❒ Manuals provided are specific to view the manuals as PDF files. ❒ For...
... Guide • Quick Reference Printer Guide • Quick Reference Scanner Guide • PostScript 3 Supplement • UNIX Supplement • Manuals for DeskTopBinder Lite • DeskTopBinder Lite Setup Guide • DeskTopBinder Introduction Guide • Auto Document Link Guide Note ❒ Manuals provided are specific to view the manuals as PDF files. ❒ For...
Network Guide
Page 7
Appendix When Using Windows Terminal Service / MetaFrame 101 Operating Environment 101 Supported Printer Drivers 101 Limitations ...101 Using DHCP...103 Using AutoNet ...103 Precautions ...104 Connecting a Dial-Up Router to a Network 104 NetWare Printing...105 When the optional IEEE 802.11b interface unit Is Installed 106 Information about Installed Applications 107 RSA® BSAFE ...107 Specifications...108 INDEX...110 v 3. Special Operations under Windows Printing Files Directly from Windows 97 Setup ...97 Using a Host Name Instead of an IPv4 Address 97 Printing Commands 99 4.
Appendix When Using Windows Terminal Service / MetaFrame 101 Operating Environment 101 Supported Printer Drivers 101 Limitations ...101 Using DHCP...103 Using AutoNet ...103 Precautions ...104 Connecting a Dial-Up Router to a Network 104 NetWare Printing...105 When the optional IEEE 802.11b interface unit Is Installed 106 Information about Installed Applications 107 RSA® BSAFE ...107 Specifications...108 INDEX...110 v 3. Special Operations under Windows Printing Files Directly from Windows 97 Setup ...97 Using a Host Name Instead of an IPv4 Address 97 Printing Commands 99 4.

Network Guide
Page 25
... explained with the following environments: • NDS mode in Windows 95/ 98/Me • NDS or Bindery mode in Windows 2000/XP, Windows NT 4.0 Reference p.35 "Installing SmartDeviceMonitor for Admin" ❖ Printers listed by SmartDeviceMonitor for Admin SmartDeviceMonitor for network ... and then click [OK]. 17 B Setting the network interface board. C Setting NetWare. ronment is already prepared for Admin. B Start NIB Setup Tool from the [Start] menu. tion. ❖ Setting procedure • When using the machine as a print server using SmartDeviceMonitor for Admin...
... explained with the following environments: • NDS mode in Windows 95/ 98/Me • NDS or Bindery mode in Windows 2000/XP, Windows NT 4.0 Reference p.35 "Installing SmartDeviceMonitor for Admin" ❖ Printers listed by SmartDeviceMonitor for Admin SmartDeviceMonitor for network ... and then click [OK]. 17 B Setting the network interface board. C Setting NetWare. ronment is already prepared for Admin. B Start NIB Setup Tool from the [Start] menu. tion. ❖ Setting procedure • When using the machine as a print server using SmartDeviceMonitor for Admin...

Network Guide
Page 27
... a print server in the Web browser appears. Wait several minutes before restarting Web Image Monitor. For details about the login user and printer. B Start NIB Setup Tool from the command prompt: Select the printer you want to perform the remaining configuration tasks in NetWare 4.x, NetWare 5 / 5.1, or NetWare 6 / 6.5, set the printer as...
... a print server in the Web browser appears. Wait several minutes before restarting Web Image Monitor. For details about the login user and printer. B Start NIB Setup Tool from the command prompt: Select the printer you want to perform the remaining configuration tasks in NetWare 4.x, NetWare 5 / 5.1, or NetWare 6 / 6.5, set the printer as...

Network Guide
Page 28
.... B Select the object in which the print queue is located in the directory tree, and then click [Create] on the file server using NIB Setup Tool, and then click [Create] on the [Object] menu. E In the [Print Queue Volume] box, click [Browse]. J In the [Printer name] box, enter the printer ...
.... B Select the object in which the print queue is located in the directory tree, and then click [Create] on the file server using NIB Setup Tool, and then click [Create] on the [Object] menu. E In the [Print Queue Volume] box, click [Browse]. J In the [Printer name] box, enter the printer ...
Network Guide
Page 29
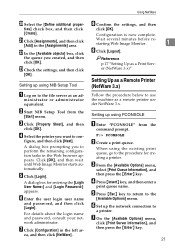
...- For details about the login name and password, consult your network administrator. G Click [Configuration] in the [Assignments] area. B Start NIB Setup Tool from the command prompt. figure, and then click [Next]. A dialog box for creating a printer. D Press {Insert} key, and ... queue. C From the [Available Options] menu, select [Print Queue Information], and then press the {Enter} key. F Set up using NIB Setup Tool A Log on to perform the remaining configuration tasks in the Web browser appears. G On the [Available Options] menu, click [Print Server ...
...- For details about the login name and password, consult your network administrator. G Click [Configuration] in the [Assignments] area. B Start NIB Setup Tool from the command prompt. figure, and then click [Next]. A dialog box for creating a printer. D Press {Insert} key, and ... queue. C From the [Available Options] menu, select [Print Queue Information], and then press the {Enter} key. F Set up using NIB Setup Tool A Log on to perform the remaining configuration tasks in the Web browser appears. G On the [Available Options] menu, click [Print Server ...

Network Guide
Page 30
...T Follow the instructions on the screen to exit PCONSOLE. V Start the print server by the printer. Use the same printer name specified using NIB Setup Tool. I From the [Print Server Information] menu, select [Print Server Configuration]. Use the same printer number specified as a su- S Press the... form, and Queue service mode are assigned. N Press the {Esc} key, and then click [Yes] on to the printer. B Start NIB Setup Tool from the console of the selected printer. The "x" stands for job" appears. Q From [Print Server Configuration Menu], select [Queues Serviced By Printer...
...T Follow the instructions on the screen to exit PCONSOLE. V Start the print server by the printer. Use the same printer name specified using NIB Setup Tool. I From the [Print Server Information] menu, select [Print Server Configuration]. Use the same printer number specified as a su- S Press the... form, and Queue service mode are assigned. N Press the {Esc} key, and then click [Yes] on to the printer. B Start NIB Setup Tool from the console of the selected printer. The "x" stands for job" appears. Q From [Print Server Configuration Menu], select [Queues Serviced By Printer...

Network Guide
Page 32
... To exit CAREE: unload pserver ❖ To start CAREE: load pserver print_server_name Y Enter the printer server name as the remote printer number using NIB Setup Tool. M In the [Available objects] box, click the queue you created, and then click [OK]. T Assign the printer to the created printer... [Create]. P Set up the network connection to a printer. ter the print server name. Use the same print server name specified using NIB Setup Tool. ties] check box, and then click [Create]. Click [Assignments], and then click [Add] in the [Assignments] area. Use the same...
... To exit CAREE: unload pserver ❖ To start CAREE: load pserver print_server_name Y Enter the printer server name as the remote printer number using NIB Setup Tool. M In the [Available objects] box, click the queue you created, and then click [OK]. T Assign the printer to the created printer... [Create]. P Set up the network connection to a printer. ter the print server name. Use the same print server name specified using NIB Setup Tool. ties] check box, and then click [Create]. Click [Assignments], and then click [Add] in the [Assignments] area. Use the same...
Network Guide
Page 33
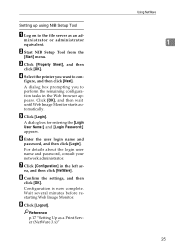
... minutes before restarting Web Image Monitor. E Click [Login]. C Click [Property Sheet], and then click [OK]. I Click [Logout]. Setting up using NIB Setup Tool A Log on to con- B Start NIB Setup Tool from the [Start] menu. H Confirm the settings, and then click [OK]. Reference p.17 "Setting Up as an ad- F Enter the user...
... minutes before restarting Web Image Monitor. E Click [Login]. C Click [Property Sheet], and then click [OK]. I Click [Logout]. Setting up using NIB Setup Tool A Log on to con- B Start NIB Setup Tool from the [Start] menu. H Confirm the settings, and then click [OK]. Reference p.17 "Setting Up as an ad- F Enter the user...

Network Guide
Page 44
... Web Im- G Quit SmartDeviceMonitor for the Web Image Monitor administrator appears. A Web browser opens and the Locking the Menus on the machine's control panel. 2 A NIB Setup Tool starts when the Start SmartDeviceMonitor for Ad- E Enter the login user name and B On the [Group] menu, point to [De- A Web browser opens and...
... Web Im- G Quit SmartDeviceMonitor for the Web Image Monitor administrator appears. A Web browser opens and the Locking the Menus on the machine's control panel. 2 A NIB Setup Tool starts when the Start SmartDeviceMonitor for Ad- E Enter the login user name and B On the [Group] menu, point to [De- A Web browser opens and...
Network Guide
Page 48
... and password, consult your network administrator. A list of the machine whose configuration you want to change . 40 D On the [Tools] menu, click [NIB Set- NIB Setup Tool starts when the network interface board is default. E Enter the login user name and password, and then click [Login]. For details about the setting...
... and password, consult your network administrator. A list of the machine whose configuration you want to change . 40 D On the [Tools] menu, click [NIB Set- NIB Setup Tool starts when the network interface board is default. E Enter the login user name and password, and then click [Login]. For details about the setting...
Network Guide
Page 49
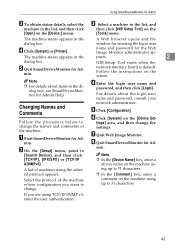
... entering the login user name and password for Admin C To obtain status details, select the machine in the list, and then click [NIB Setup Tool] on the machine using up to change the settings. tings] area, and then change the names and comments of machines using up to... appears in the dialog box. Follow the instructions on the [Device Set- A list of the machine. G Quit Web Image Monitor. pears. 2 NIB Setup Tool starts when the network interface board is default. D Enter the login user name and password, and then click [Login]. Note ❒ For details about...
... entering the login user name and password for Admin C To obtain status details, select the machine in the list, and then click [NIB Setup Tool] on the machine using up to change the settings. tings] area, and then change the names and comments of machines using up to... appears in the dialog box. Follow the instructions on the [Device Set- A list of the machine. G Quit Web Image Monitor. pears. 2 NIB Setup Tool starts when the network interface board is default. D Enter the login user name and password, and then click [Login]. Note ❒ For details about...


