
User Guide
Page 5
...with the cordless handset 25 Licensing 3 -Making calls with the corded handset (from the base) 25 Hearing Aid Compatibility 3 -Making calls in the speakerphone mode (from the base) 26 FCC RF Radiation Exposure Statement 4 -Making calls in the speakerphone mode (from the handset) 26 ...28 29 Installing the Phone 11 -Reviewing the Redial Numbers 29 -Installing the handset battery 11 -Storing a Redial Record in Directory 29 -Base Station 12-14 -Transferring a call to another extension 30 Programming the Phone -Standby Screen -Programming Functions -Phone Setting -Date/Time -...
...with the cordless handset 25 Licensing 3 -Making calls with the corded handset (from the base) 25 Hearing Aid Compatibility 3 -Making calls in the speakerphone mode (from the base) 26 FCC RF Radiation Exposure Statement 4 -Making calls in the speakerphone mode (from the handset) 26 ...28 29 Installing the Phone 11 -Reviewing the Redial Numbers 29 -Installing the handset battery 11 -Storing a Redial Record in Directory 29 -Base Station 12-14 -Transferring a call to another extension 30 Programming the Phone -Standby Screen -Programming Functions -Phone Setting -Date/Time -...
User Guide
Page 6
... calls -Memo record -Memo recording -Message/memo playback -Erasing messages -Remote access from remote party -Memory full Changing the Battery Battery Safety Precautions Display Messages Handset Sound Signals -Backup battery operation Troubleshooting Guide -Telephone solutions -Caller ID solutions -Battery General Product Care Causes of Contents Cont.
... calls -Memo record -Memo recording -Message/memo playback -Erasing messages -Remote access from remote party -Memory full Changing the Battery Battery Safety Precautions Display Messages Handset Sound Signals -Backup battery operation Troubleshooting Guide -Telephone solutions -Caller ID solutions -Battery General Product Care Causes of Contents Cont.
User Guide
Page 7
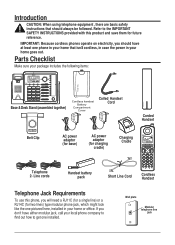
... following items: Base & Desk Stand (assembled together) Coiled Handset Cord Corded Handset Belt Clip AC power adaptor (for base) AC power adaptor (for two lines) type modular phone jack, which might look like the one pictured here, installed in your home or office. Line cords Handset battery pack Short Line Cord Cordless Handset Telephone Jack Requirements...
... following items: Base & Desk Stand (assembled together) Coiled Handset Cord Corded Handset Belt Clip AC power adaptor (for base) AC power adaptor (for two lines) type modular phone jack, which might look like the one pictured here, installed in your home or office. Line cords Handset battery pack Short Line Cord Cordless Handset Telephone Jack Requirements...
User Guide
Page 8
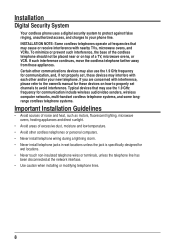
...may use the 1.9 GHz frequency for communication include wireless audio/video senders, wireless computer networks, multi-handset cordless telephone systems, and some longrange cordless telephone systems. Important Installation Guidelines • Avoid sources of noise and heat, such as motors,...prevent such interference, the base of a TV, microwave ovens, or VCR. INSTALLATION NOTE: Some cordless telephones operate at the network interface. • Use caution when installing or modifying telephone lines. 8 Installation Digital Security System Your cordless phone uses a digital security system...
...may use the 1.9 GHz frequency for communication include wireless audio/video senders, wireless computer networks, multi-handset cordless telephone systems, and some longrange cordless telephone systems. Important Installation Guidelines • Avoid sources of noise and heat, such as motors,...prevent such interference, the base of a TV, microwave ovens, or VCR. INSTALLATION NOTE: Some cordless telephones operate at the network interface. • Use caution when installing or modifying telephone lines. 8 Installation Digital Security System Your cordless phone uses a digital security system...
User Guide
Page 9
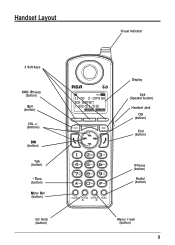
Handset Layout 3 Soft keys DND/ Privacy (button) Exit (button) VOL +/(buttons) DIR (button) Talk (button) * Tone (button) Mute/ Del (button) Int/ Hold (button) Visual Indicator Display Spk (Speaker button) Headset Jack CID (button) End (button) # Pause (button) Redial (button) Menu/ Flash (button) 9
Handset Layout 3 Soft keys DND/ Privacy (button) Exit (button) VOL +/(buttons) DIR (button) Talk (button) * Tone (button) Mute/ Del (button) Int/ Hold (button) Visual Indicator Display Spk (Speaker button) Headset Jack CID (button) End (button) # Pause (button) Redial (button) Menu/ Flash (button) 9
User Guide
Page 11
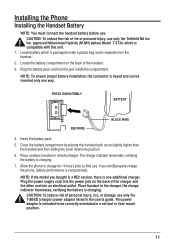
...is intended to first use only the Telefield NA Inc. This power adaptor is charging. Locate battery which is one way. Place cordless handset in a vertical or floor mount position. 11 PRESS DOWN FIRMLY BATTERY RED WIRE BLACK WIRE 4. Insert the battery pack. 5. ..., use . If you bought is a RE2 version, there is compatible with this unit. 1. Inc. Installing the Phone Installing the Handset Battery NOTE: You must connect the handset battery before use only the T-8BXD (charger) power adaptor listed in the user's guide. Plug the battery pack cord...
...is intended to first use only the Telefield NA Inc. This power adaptor is charging. Locate battery which is one way. Place cordless handset in a vertical or floor mount position. 11 PRESS DOWN FIRMLY BATTERY RED WIRE BLACK WIRE 4. Insert the battery pack. 5. ..., use . If you bought is a RE2 version, there is compatible with this unit. 1. Inc. Installing the Phone Installing the Handset Battery NOTE: You must connect the handset battery before use only the T-8BXD (charger) power adaptor listed in the user's guide. Plug the battery pack cord...

User Guide
Page 14
Line 2 Line 1 -OR- Line 1 & 2 6. Connect the handset cord: Connect one end of the coiled handset cord to the jack on the side of the base and the other end into the jack in the handset, and place the handset in the cradle. 14
Line 2 Line 1 -OR- Line 1 & 2 6. Connect the handset cord: Connect one end of the coiled handset cord to the jack on the side of the base and the other end into the jack in the handset, and place the handset in the cradle. 14
User Guide
Page 15
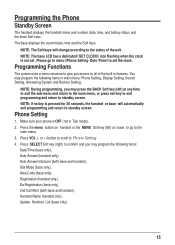
.... 4. Programming the Phone Standby Screen The handset displays the handset name and number, date, time, and battery status and the three Soft keys. You may program the following items: Date/Time (base only), Auto Answer (handset only), Auto Answer Intercom (both base and handset), Dial Mode (base only), Area Code (base only), Registration (handset only), De-Registration (base only), 2nd Call...
.... 4. Programming the Phone Standby Screen The handset displays the handset name and number, date, time, and battery status and the three Soft keys. You may program the following items: Date/Time (base only), Auto Answer (handset only), Auto Answer Intercom (both base and handset), Dial Mode (base only), Area Code (base only), Registration (handset only), De-Registration (base only), 2nd Call...
User Guide
Page 16
...in the CID record. Use the touch-tone pad to enter four digits for cordless handset) This option allows you subscribe to date setting. 5. The screen displays Saved . However the Year must still be set Date/Time. From the Phone Setting Menu: 1. or +) button to scroll to toggle between "P" (pm)...the Phone Setting Menu: 1. Press the VOL (- The screen displays Year 2009 . 3. Use the touch-tone pad to save your selection and the screen displays Saved . 16 Press SELECT Soft key to enter two digits for base and cordless handset) If it is set to off, this cordless handset or base ...
...in the CID record. Use the touch-tone pad to enter four digits for cordless handset) This option allows you subscribe to date setting. 5. The screen displays Saved . However the Year must still be set Date/Time. From the Phone Setting Menu: 1. or +) button to scroll to toggle between "P" (pm)...the Phone Setting Menu: 1. Press the VOL (- The screen displays Year 2009 . 3. Use the touch-tone pad to save your selection and the screen displays Saved . 16 Press SELECT Soft key to enter two digits for base and cordless handset) If it is set to off, this cordless handset or base ...
User Guide
Page 17
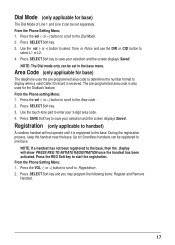
... is also used for base) The telephone uses the pre-programmed area code to determine the number format to the Dial Mode. 2. NOTE: If a handset has not been registered to handset) A cordless handset will show PRESS REG TO INITIATE REGISTRATION once the handset has been activated. From the Phone setting Menu: 1. From the Phone Setting Menu: 1. Press SELECT...
... is also used for base) The telephone uses the pre-programmed area code to determine the number format to the Dial Mode. 2. NOTE: If a handset has not been registered to handset) A cordless handset will show PRESS REG TO INITIATE REGISTRATION once the handset has been activated. From the Phone setting Menu: 1. From the Phone Setting Menu: 1. Press SELECT...
User Guide
Page 18
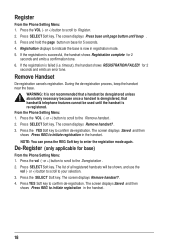
... the SELECT Soft key. Press SELECT Soft key. From the Phone Setting Menu: 1. Press the VOL (- The screen displays Remove handset? . 3. The screen displays Saved and then shows Press REG to indicate the base is successful, the handset shows Registration complete for 5 seconds. 4. Press the vol (-...tone. Press SELECT Soft key. Register From the Phone Setting Menu: 1. Press the VOL (- The screen displays Press base unit page button until the handset is failed (i.e. Press YES Soft key to the Remove handset . 2. for base) From the Phone Setting Menu: 1. NOTE: You can press ...
... the SELECT Soft key. Press SELECT Soft key. From the Phone Setting Menu: 1. Press the VOL (- The screen displays Remove handset? . 3. The screen displays Saved and then shows Press REG to indicate the base is successful, the handset shows Registration complete for 5 seconds. 4. Press the vol (-...tone. Press SELECT Soft key. Register From the Phone Setting Menu: 1. Press the VOL (- The screen displays Press base unit page button until the handset is failed (i.e. Press YES Soft key to the Remove handset . 2. for base) From the Phone Setting Menu: 1. NOTE: You can press ...
User Guide
Page 19
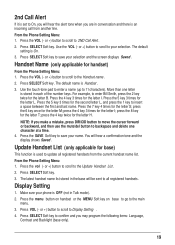
... you will hear the alert tone when you may program the following items: Language, Contrast and Backlight (base only). 19 Update Handset List (only applicable for the letter I ; The latest handset name list stored in Talk mode). 2. Press VOL (- Press the SAVE Soft key to save your ... the letter H. or +) button to scroll to the Handset name . 2. Use the VOL (- Press the VOL (- 2nd Call Alert If it is set to update all registered handsets. or +) button to scroll to your phone is OFF (not in the base will hear a confirmation tone and the display ...
... you will hear the alert tone when you may program the following items: Language, Contrast and Backlight (base only). 19 Update Handset List (only applicable for the letter I ; The latest handset name list stored in Talk mode). 2. Press VOL (- Press the SAVE Soft key to save your ... the letter H. or +) button to scroll to the Handset name . 2. Use the VOL (- Press the VOL (- 2nd Call Alert If it is set to update all registered handsets. or +) button to scroll to your phone is OFF (not in the base will hear a confirmation tone and the display ...
User Guide
Page 20
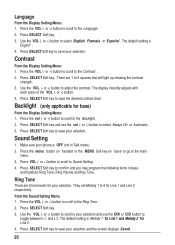
...Use the VOL (- Press SELECT Soft key. Press SELECT Soft key to save your phone is Melody 1 for Line 1 and Melody 2 for Line 1 and Line 2 respectively. Press SELECT Soft key. 3. The default setting is OFF (not in base and handset: Ring Tone, Ring Volume and Key Tone. The default setting is English . 4. ...the main menu. 3. Ring Tone There are Melody 1 to select English , Francais or Español . Press the menu button on handset or the MENU Soft key on base to go to select Always On or Automatic. 3. Press SELECT Soft key to the Contrast . 2. or +) button to scroll to ...
...Use the VOL (- Press SELECT Soft key. Press SELECT Soft key to save your phone is Melody 1 for Line 1 and Melody 2 for Line 1 and Line 2 respectively. Press SELECT Soft key. 3. The default setting is OFF (not in base and handset: Ring Tone, Ring Volume and Key Tone. The default setting is English . 4. ...the main menu. 3. Ring Tone There are Melody 1 to select English , Francais or Español . Press the menu button on handset or the MENU Soft key on base to go to select Always On or Automatic. 3. Press SELECT Soft key to the Contrast . 2. or +) button to scroll to ...
User Guide
Page 25
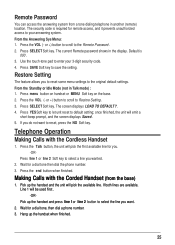
.... Press the Talk button, the unit will emit a short beep prompt, and the screen displays Saved . 5. Making Calls with the Cordless Handset 1. Pick up the handset and press line 1 or line 2 button to select the line you want to reset, press the NO Soft key. Wait for remote...tone, then dial a phone number. 3. Remote Password You can access the answering system from the base) 1. If you to reset some menu settings to default setting; Press YES Soft key to let unit reset to the original default settings. Telephone Operation Making Calls with the Corded Handset (from a tone ...
.... Press the Talk button, the unit will emit a short beep prompt, and the screen displays Saved . 5. Making Calls with the Cordless Handset 1. Pick up the handset and press line 1 or line 2 button to select the line you want to reset, press the NO Soft key. Wait for remote...tone, then dial a phone number. 3. Remote Password You can access the answering system from the base) 1. If you to reset some menu settings to default setting; Press YES Soft key to let unit reset to the original default settings. Telephone Operation Making Calls with the Corded Handset (from a tone ...
User Guide
Page 26
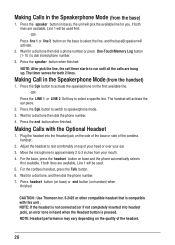
... headset button (on base) or end button (on base and the phone automatically selects first available, if both 2 lines. Press line 1 or line 2 button on the side of the base or side of the headset. 26 Wait for you. For the base, press the headset button on handset) when finished. For the cordless handset, press the...
... headset button (on base) or end button (on base and the phone automatically selects first available, if both 2 lines. Press line 1 or line 2 button on the side of the base or side of the headset. 26 Wait for you. For the base, press the headset button on handset) when finished. For the cordless handset, press the...
User Guide
Page 27
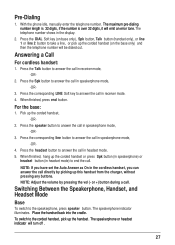
... -OR- 4. When finished, press end button. Press the corresponding line button to answer the call . Switching Between the Speakerphone, Handset, and Headset Mode Base To switch to end the call in receiver mode, -OR- 2. The speakerphone or headset indicator will emit an error tone. With the... phone idle, manually enter the telephone number. Pre-Dialing 1. The maximum pre-dialing number length is 32 digits, if the number is over 32 digits, it will turn off . 27 Answering a Call For cordless handset: 1. Pick up the corded handset or press Spk button (...
... -OR- 4. When finished, press end button. Press the corresponding line button to answer the call . Switching Between the Speakerphone, Handset, and Headset Mode Base To switch to end the call in receiver mode, -OR- 2. The speakerphone or headset indicator will emit an error tone. With the... phone idle, manually enter the telephone number. Pre-Dialing 1. The maximum pre-dialing number length is 32 digits, if the number is over 32 digits, it will turn off . 27 Answering a Call For cordless handset: 1. Pick up the corded handset or press Spk button (...
User Guide
Page 28
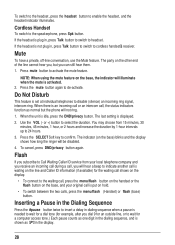
...telephone company and you receive an incoming call during a call, you can still hear them. 1. Flash If you , but the phone will be disabled. 4. Use the VOL (- Cordless Handset To switch to confirm. Mute To have a private, off-line conversation, use the Mute feature. Press the SELECT Soft...hour, or 2 hours and increase the duration by 1-hour intervals up to disable (silence) an incoming ring signal, intercom ring. The party on the base) blinks and the display shows how long the ringer will not ring. 1. When the unit is set at individual telephones to 24 hours. 3. The ...
...telephone company and you receive an incoming call during a call, you can still hear them. 1. Flash If you , but the phone will be disabled. 4. Use the VOL (- Cordless Handset To switch to confirm. Mute To have a private, off-line conversation, use the Mute feature. Press the SELECT Soft...hour, or 2 hours and increase the duration by 1-hour intervals up to disable (silence) an incoming ring signal, intercom ring. The party on the base) blinks and the display shows how long the ringer will not ring. 1. When the unit is set at individual telephones to 24 hours. 3. The ...
User Guide
Page 29
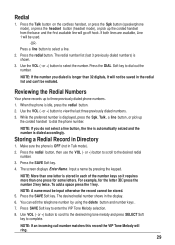
... number shows in Directory 1. Press the DIAL Soft key to enter the VIP Tone Melody selection. 8. Reviewing the Redial Numbers Your phone records up the corded handset from the base and the first available line will ring. 29 NOTE: A name must be input otherwise the record cannot be used. -...More than one letter is idle, press the redial button. 2. When the phone is stored in Talk mode). 2. Press the redial button. Press SAVE Soft key to dial out the number. Press the Talk button on the cordless handset, or press the Spk button (speakerphone mode), or press the headset button ...
... number shows in Directory 1. Press the DIAL Soft key to enter the VIP Tone Melody selection. 8. Reviewing the Redial Numbers Your phone records up the corded handset from the base and the first available line will ring. 29 NOTE: A name must be input otherwise the record cannot be used. -...More than one letter is idle, press the redial button. 2. When the phone is stored in Talk mode). 2. Press the redial button. Press SAVE Soft key to dial out the number. Press the Talk button on the cordless handset, or press the Spk button (speakerphone mode), or press the headset button ...
User Guide
Page 30
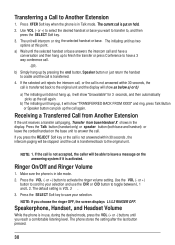
... will intercom or ring the selected handset or base. Press the Talk button (handset only) or speaker button (both base and handset) or leave the corded handset on the answering system if it is in idle mode. 2. or +) button to answer the call again. Speakerphone, Handset, and Headset Volume While the phone is activated. If the selected unit...
... will intercom or ring the selected handset or base. Press the Talk button (handset only) or speaker button (both base and handset) or leave the corded handset on the answering system if it is in idle mode. 2. or +) button to answer the call again. Speakerphone, Handset, and Headset Volume While the phone is activated. If the selected unit...

User Guide
Page 31
...for the original call, the call cannot be joined by another user can then use the Soft keys to put the call . Once the base unit or handset has both lines and the intercom call : 1. The originating caller can support 3-way and 4-way conference calls. Conference Calls This system ...again. During a call on the display to intercom. 2. Dial the number, and then talk to hold the line. The selected handset or base will flash. The selected handset or base will flash also. Press the line 2 button or Soft key on hold, press the intercom button and then select the ...
...for the original call, the call cannot be joined by another user can then use the Soft keys to put the call . Once the base unit or handset has both lines and the intercom call : 1. The originating caller can support 3-way and 4-way conference calls. Conference Calls This system ...again. During a call on the display to intercom. 2. Dial the number, and then talk to hold the line. The selected handset or base will flash. The selected handset or base will flash also. Press the line 2 button or Soft key on hold, press the intercom button and then select the ...


