
User Guide
Page 5
...with the cordless handset 25 Licensing 3 -Making calls with the corded handset (from the base) 25 Hearing Aid Compatibility 3 -Making calls in the speakerphone mode (from the base) 26 FCC RF Radiation Exposure Statement 4 -Making calls in the speakerphone mode (from the handset) 26 ...28 29 Installing the Phone 11 -Reviewing the Redial Numbers 29 -Installing the handset battery 11 -Storing a Redial Record in Directory 29 -Base Station 12-14 -Transferring a call to another extension 30 Programming the Phone -Standby Screen -Programming Functions -Phone Setting -Date/Time -...
...with the cordless handset 25 Licensing 3 -Making calls with the corded handset (from the base) 25 Hearing Aid Compatibility 3 -Making calls in the speakerphone mode (from the base) 26 FCC RF Radiation Exposure Statement 4 -Making calls in the speakerphone mode (from the handset) 26 ...28 29 Installing the Phone 11 -Reviewing the Redial Numbers 29 -Installing the handset battery 11 -Storing a Redial Record in Directory 29 -Base Station 12-14 -Transferring a call to another extension 30 Programming the Phone -Standby Screen -Programming Functions -Phone Setting -Date/Time -...
User Guide
Page 6
... calls -Memo record -Memo recording -Message/memo playback -Erasing messages -Remote access from remote party -Memory full Changing the Battery Battery Safety Precautions Display Messages Handset Sound Signals -Backup battery operation Troubleshooting Guide -Telephone solutions -Caller ID solutions -Battery General Product Care Causes of Contents Cont. Table of Poor Reception Warranty...
... calls -Memo record -Memo recording -Message/memo playback -Erasing messages -Remote access from remote party -Memory full Changing the Battery Battery Safety Precautions Display Messages Handset Sound Signals -Backup battery operation Troubleshooting Guide -Telephone solutions -Caller ID solutions -Battery General Product Care Causes of Contents Cont. Table of Poor Reception Warranty...
User Guide
Page 7
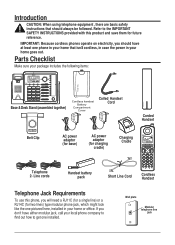
IMPORTANT: Because cordless phones operate on electricity, you should always be followed. If you will need a RJ11C (for a single line) or a RJ14C (for two lines) type modular phone jack, which might look like the one pictured here, installed in your package includes the following items: Base & Desk Stand (assembled together) Coiled Handset Cord Corded Handset Belt Clip...
IMPORTANT: Because cordless phones operate on electricity, you should always be followed. If you will need a RJ11C (for a single line) or a RJ14C (for two lines) type modular phone jack, which might look like the one pictured here, installed in your package includes the following items: Base & Desk Stand (assembled together) Coiled Handset Cord Corded Handset Belt Clip...
User Guide
Page 8
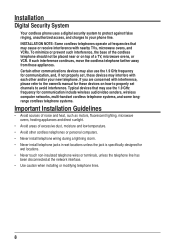
... interference, the base of excessive dust, moisture and low temperature. • Avoid other and/or your phone line. If you are concerned with nearby TVs, microwave ovens, and VCRs. Certain other communications devices may also use the 1.9 GHz frequency for communication include wireless audio/video senders, wireless computer networks, multi-handset cordless telephone systems...
... interference, the base of excessive dust, moisture and low temperature. • Avoid other and/or your phone line. If you are concerned with nearby TVs, microwave ovens, and VCRs. Certain other communications devices may also use the 1.9 GHz frequency for communication include wireless audio/video senders, wireless computer networks, multi-handset cordless telephone systems...
User Guide
Page 9
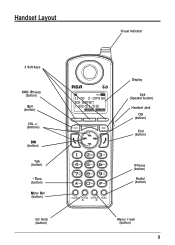
Handset Layout 3 Soft keys DND/ Privacy (button) Exit (button) VOL +/(buttons) DIR (button) Talk (button) * Tone (button) Mute/ Del (button) Int/ Hold (button) Visual Indicator Display Spk (Speaker button) Headset Jack CID (button) End (button) # Pause (button) Redial (button) Menu/ Flash (button) 9
Handset Layout 3 Soft keys DND/ Privacy (button) Exit (button) VOL +/(buttons) DIR (button) Talk (button) * Tone (button) Mute/ Del (button) Int/ Hold (button) Visual Indicator Display Spk (Speaker button) Headset Jack CID (button) End (button) # Pause (button) Redial (button) Menu/ Flash (button) 9
User Guide
Page 11
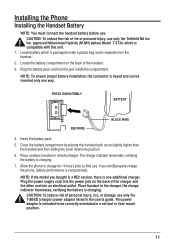
...This power adaptor is packaged inside the compartment. Place cordless handset in the user's guide. Plug the power supply cord into an electrical outlet. Installing the Phone Installing the Handset Battery NOTE: You must connect the handset battery before use only the Telefield NA Inc. Inc.... The charge indicator illuminates, verifying the battery is separate from the handset . 2. CAUTION: To reduce risk of...
...This power adaptor is packaged inside the compartment. Place cordless handset in the user's guide. Plug the power supply cord into an electrical outlet. Installing the Phone Installing the Handset Battery NOTE: You must connect the handset battery before use only the Telefield NA Inc. Inc.... The charge indicator illuminates, verifying the battery is separate from the handset . 2. CAUTION: To reduce risk of...

User Guide
Page 14
Connect the handset cord: Connect one end of the coiled handset cord to the jack on the side of the base and the other end into the jack in the handset, and place the handset in the cradle. 14 Line 1 & 2 6. Line 2 Line 1 -OR-
Connect the handset cord: Connect one end of the coiled handset cord to the jack on the side of the base and the other end into the jack in the handset, and place the handset in the cradle. 14 Line 1 & 2 6. Line 2 Line 1 -OR-
User Guide
Page 15
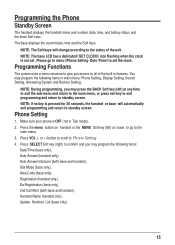
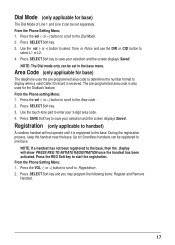
... press the BACK Soft key (left ) on base to go to Phone Setting. 4. You may program the following items in Talk mode). 2. Make sure your phone is pressed for 30 seconds, the handset or base will change according to all of the unit. ...Press VOL (- NOTE: During programming, you may program the following items: Date/Time (base only), Auto Answer (handset only), Auto Answer Intercom (both base and handset), Dial Mode (base only), Area Code (base only), Registration (handset...
... press the BACK Soft key (left ) on base to go to Phone Setting. 4. You may program the following items in Talk mode). 2. Make sure your phone is pressed for 30 seconds, the handset or base will change according to all of the unit. ...Press VOL (- NOTE: During programming, you may program the following items: Date/Time (base only), Auto Answer (handset only), Auto Answer Intercom (both base and handset), Dial Mode (base only), Area Code (base only), Registration (handset...
User Guide
Page 16
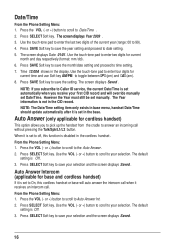
...(am). 8. Time 12:00A shows in the CID record. When it is not in the display. or +) button to scroll to off, this cordless handset or base will override manually set to time setting. 7. The screen displays Year 2009 . 3. or +) button to scroll to 99). 4. Press SAVE Soft ... cordless handset) If it receives an intercom call when it is disabled in the base. Auto Answer Intercom (applicable for current month and day respectively (format: mm / dd). 6. Press SELECT Soft key. or +) button to scroll to save your selection. From the Phone Setting Menu: 1. Press SELECT Soft key ...
...(am). 8. Time 12:00A shows in the CID record. When it is not in the display. or +) button to scroll to off, this cordless handset or base will override manually set to time setting. 7. The screen displays Year 2009 . 3. or +) button to scroll to 99). 4. Press SAVE Soft ... cordless handset) If it receives an intercom call when it is disabled in the base. Auto Answer Intercom (applicable for current month and day respectively (format: mm / dd). 6. Press SELECT Soft key. or +) button to scroll to save your selection. From the Phone Setting Menu: 1. Press SELECT Soft key ...
User Guide
Page 17
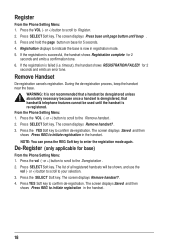
... and the screen displays Saved . NOTE: If a handset has not been registered to the base, then the display will not operate until it is received. Press the vol (- From the Phone setting Menu: 1. Registration (only applicable to handset) A cordless handset will show PRESS REG TO INITIATE REGISTRATION once the handset has been activated. or +) button to select...
... and the screen displays Saved . NOTE: If a handset has not been registered to the base, then the display will not operate until it is received. Press the vol (- From the Phone setting Menu: 1. Registration (only applicable to handset) A cordless handset will show PRESS REG TO INITIATE REGISTRATION once the handset has been activated. or +) button to select...
User Guide
Page 18
.... Press and hold the page button on base for base) From the Phone Setting Menu: 1. timeout), the handset shows REGISTRATION FAILED! Remove Handset De-registration cancels registration. The screen displays Remove handset? . 3. The list of all registered handsets will be deregistered unless absolutely necessary because once a handset is now in the handset. 18 Press SELECT Soft key. Press the...
.... Press and hold the page button on base for base) From the Phone Setting Menu: 1. timeout), the handset shows REGISTRATION FAILED! Remove Handset De-registration cancels registration. The screen displays Remove handset? . 3. The list of all registered handsets will be deregistered unless absolutely necessary because once a handset is now in the handset. 18 Press SELECT Soft key. Press the...
User Guide
Page 19
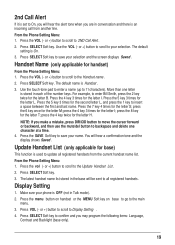
...base) This function is used to 2ND Call Alert . 2. Press SELECT Soft key to Display Setting . 4. or +) button to scroll to save your name. Press SELECT Soft key to your selection. Press SELECT Soft key. For example, to all registered handsets from another line. press the 4 key twice for handset) From the Phone... Setting Menu: 1. The latest handset name list stored in conversation and there is an incoming call from the...
...base) This function is used to 2ND Call Alert . 2. Press SELECT Soft key to Display Setting . 4. or +) button to scroll to save your name. Press SELECT Soft key to your selection. Press SELECT Soft key. For example, to all registered handsets from another line. press the 4 key twice for handset) From the Phone... Setting Menu: 1. The latest handset name list stored in conversation and there is an incoming call from the...
User Guide
Page 20
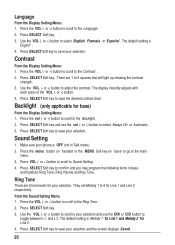
... that will light up showing the contrast strength . 3. Press the vol (- or +) button to the main menu. 3. Press the menu button on handset or the MENU Soft key on base to go to select Always On or Automatic. 3. Press SELECT Soft key. 3. or +) button to confirm and you may program... vol (- Backlight (only applicable for Line 1 and Line 2 respectively. or +) button to scroll to save the desired contrast level. Press SELECT Soft key to your phone is OFF (not in base and handset: Ring Tone, Ring Volume and Key Tone. or +) button to scroll to 5 for...
... that will light up showing the contrast strength . 3. Press the vol (- or +) button to the main menu. 3. Press the menu button on handset or the MENU Soft key on base to go to select Always On or Automatic. 3. Press SELECT Soft key. 3. or +) button to confirm and you may program... vol (- Backlight (only applicable for Line 1 and Line 2 respectively. or +) button to scroll to save the desired contrast level. Press SELECT Soft key to your phone is OFF (not in base and handset: Ring Tone, Ring Volume and Key Tone. or +) button to scroll to 5 for...
User Guide
Page 25
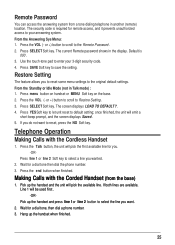
...Press YES Soft key to let unit reset to the Remote Password. 2. Making Calls with the Cordless Handset 1. or +) button to scroll to default setting; Press menu button on handset or MENU Soft key on the base. 2. once finished, the unit will pick the available line. The current Remote password shows... 1 or line 2 Soft key to select a line you want to your 3-digit security code. 4. Wait for a dial tone then dial the phone number. 3. Hang up the handset and the unit will emit a short beep prompt, and the screen displays Saved . 5. Press the VOL (- From the Standby or Idle Mode (...
...Press YES Soft key to let unit reset to the Remote Password. 2. Making Calls with the Cordless Handset 1. or +) button to scroll to default setting; Press menu button on handset or MENU Soft key on the base. 2. once finished, the unit will pick the available line. The current Remote password shows... 1 or line 2 Soft key to select a line you want to your 3-digit security code. 4. Wait for a dial tone then dial the phone number. 3. Hang up the handset and the unit will emit a short beep prompt, and the screen displays Saved . 5. Press the VOL (- From the Standby or Idle Mode (...
User Guide
Page 26
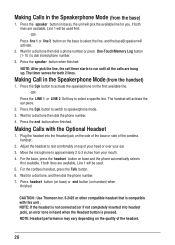
... button (1- 10 ) to rest comfortably on base and the phone automatically selects first available, if both lines are hung up. Adjust the headset to dial stored phone number. 3. Move the microphone to approximately 2 to run until all the calls are available, Line 1 will be used . 5. For the cordless handset, press the Talk button. 6. Wait...
... button (1- 10 ) to rest comfortably on base and the phone automatically selects first available, if both lines are hung up. Adjust the headset to dial stored phone number. 3. Move the microphone to approximately 2 to run until all the calls are available, Line 1 will be used . 5. For the cordless handset, press the Talk button. 6. Wait...
User Guide
Page 27
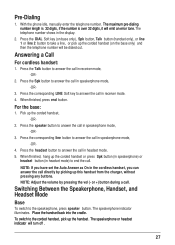
...If you have set the Auto Answer as On in the cordless handset, you can answer the call in speakerphone mode, -OR- 3. Press the Spk button to take a line, or pick up the corded handset (on base only), Spk button, Talk button (handset only), or line 1 or line 2 button to answer the... call directly by pressing the vol (- For the base: 1. With the phone idle, manually enter the telephone number. Pick up this handset from the charger, without pressing any ...
...If you have set the Auto Answer as On in the cordless handset, you can answer the call in speakerphone mode, -OR- 3. Press the Spk button to take a line, or pick up the corded handset (on base only), Spk button, Talk button (handset only), or line 1 or line 2 button to answer the... call directly by pressing the vol (- For the base: 1. With the phone idle, manually enter the telephone number. Pick up this handset from the charger, without pressing any ...
User Guide
Page 28
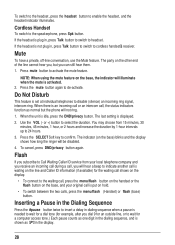
...the mute button again to confirm. Use the VOL (- The indicator (on the base, the indicator will hear a beep to insert a delay in the display. 28 Flash If you , but the phone will be disabled. 4. If the headset is put on the other end of the line cannot...base, and your original call is plug in , press Talk button to switch to the speakerphone, press Spk button. To switch to the headset, press the headset button to activate the mute feature. Press mute button to enable the headset, and the headset indicator illuminates. Cordless Handset To switch to cordless handset...
...the mute button again to confirm. Use the VOL (- The indicator (on the base, the indicator will hear a beep to insert a delay in the display. 28 Flash If you , but the phone will be disabled. 4. If the headset is put on the other end of the line cannot...base, and your original call is plug in , press Talk button to switch to the speakerphone, press Spk button. To switch to the headset, press the headset button to activate the mute feature. Press mute button to enable the headset, and the headset indicator illuminates. Cordless Handset To switch to cordless handset...
User Guide
Page 29
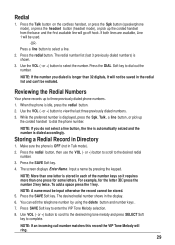
... (last 3 previously dialed numbers) is idle, press the redial button. 2. Use the VOL (- When the phone is shown. 3. NOTE: More than one letter is longer than one press for the letter "B" press the ...'t be redialed. Use VOL (- Redial 1. Press the Talk button on the cordless handset, or press the Spk button (speakerphone mode), or press the headset button (headset mode), or pick up the ... preferred number is displayed, press the Spk, Talk , a line button, or pick up the corded handset from the base and the first available line will ring. 29 NOTE: If you dialed is stored in Talk ...
... (last 3 previously dialed numbers) is idle, press the redial button. 2. Use the VOL (- When the phone is shown. 3. NOTE: More than one letter is longer than one press for the letter "B" press the ...'t be redialed. Use VOL (- Redial 1. Press the Talk button on the cordless handset, or press the Spk button (speakerphone mode), or press the headset button (headset mode), or pick up the ... preferred number is displayed, press the Spk, Talk , a line button, or pick up the corded handset from the base and the first available line will ring. 29 NOTE: If you dialed is stored in Talk ...
User Guide
Page 30
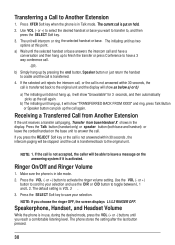
...cradle and the call is not accepted, the caller will intercom or ring the selected handset or base. Use the VOL (- or +) button to scroll to your selection. Speakerphone, Handset, and Headset Volume While the phone is in use the DIR or CID button to Another Extension 1. Press XFER Soft... key when the phone is put on the answering system if it will show as below a) or b) ...
...cradle and the call is not accepted, the caller will intercom or ring the selected handset or base. Use the VOL (- or +) button to scroll to your selection. Speakerphone, Handset, and Headset Volume While the phone is in use the DIR or CID button to Another Extension 1. Press XFER Soft... key when the phone is put on the answering system if it will show as below a) or b) ...

User Guide
Page 31
...line is established between the external caller and the intercom call. 3-way conference call (Line 1 + Line 2 + 2 extension): 1. The selected handset or base will flash also. The user can then press the CONF Soft key shown on the display to establish a 3-way conference between the originating ...answer the intercom call is On for timer to clear from the screen, press the intercom button again and then select the desired handset or base to establish a 3-way conference between the two lines. 4-way conference call with . The originating caller can then use the Soft...
...line is established between the external caller and the intercom call. 3-way conference call (Line 1 + Line 2 + 2 extension): 1. The selected handset or base will flash also. The user can then press the CONF Soft key shown on the display to establish a 3-way conference between the originating ...answer the intercom call is On for timer to clear from the screen, press the intercom button again and then select the desired handset or base to establish a 3-way conference between the two lines. 4-way conference call with . The originating caller can then use the Soft...


