
User Guide
Page 2
The REN is useful in determining the number of devices you may connect to use your own telephone equipment if you are subject to state tariffs, and therefore, you may temporarily discontinue service immediately. A compliant telephone cord and modular plug is not practicable and the circumstances warrant such action, the telephone company may not be used to connect this equipment to procedures set forth in Subpart E of Part 68, FCC Rules and Regulations. 2 Notes • This equipment may be given to the telephone company upon request, provide this information to one line should...
The REN is useful in determining the number of devices you may connect to use your own telephone equipment if you are subject to state tariffs, and therefore, you may temporarily discontinue service immediately. A compliant telephone cord and modular plug is not practicable and the circumstances warrant such action, the telephone company may not be used to connect this equipment to procedures set forth in Subpart E of Part 68, FCC Rules and Regulations. 2 Notes • This equipment may be given to the telephone company upon request, provide this information to one line should...
User Guide
Page 4
This equipment should be co-located or operated in the 1.92GHz to 1.93GHz frequency range. 4 For body worn operation, this phone has been tested and meets the FCC RF exposure guidelines when used with the belt clip supplied with this product. This transmitter must not be ...
This equipment should be co-located or operated in the 1.92GHz to 1.93GHz frequency range. 4 For body worn operation, this phone has been tested and meets the FCC RF exposure guidelines when used with the belt clip supplied with this product. This transmitter must not be ...
User Guide
Page 5
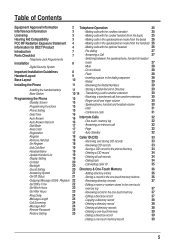
...Operation 25 Interference Information 3 -Making calls with the cordless handset 25 Licensing 3 -Making calls with the corded handset (from the base) 25 Hearing Aid Compatibility 3 -Making calls in the speakerphone mode (from the base) 26 FCC RF Radiation Exposure Statement 4 -Making ... 29 -Installing the handset battery 11 -Storing a Redial Record in Directory 29 -Base Station 12-14 -Transferring a call to another extension 30 Programming the Phone -Standby Screen -Programming Functions -Phone Setting -Date/Time -Auto Answer -Auto Answer Intercom -Dial Mode -Area Code ...
...Operation 25 Interference Information 3 -Making calls with the cordless handset 25 Licensing 3 -Making calls with the corded handset (from the base) 25 Hearing Aid Compatibility 3 -Making calls in the speakerphone mode (from the base) 26 FCC RF Radiation Exposure Statement 4 -Making ... 29 -Installing the handset battery 11 -Storing a Redial Record in Directory 29 -Base Station 12-14 -Transferring a call to another extension 30 Programming the Phone -Standby Screen -Programming Functions -Phone Setting -Date/Time -Auto Answer -Auto Answer Intercom -Dial Mode -Area Code ...
User Guide
Page 6
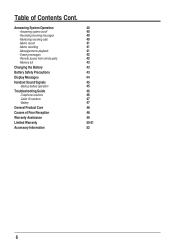
Answering System Operation -Answering system on/off -Recording incoming messages -Monitoring incoming calls -Memo record -Memo recording -Message/memo playback -Erasing messages -Remote access from remote party -Memory full Changing the Battery Battery Safety Precautions Display Messages Handset Sound Signals -Backup battery operation Troubleshooting Guide -Telephone solutions -Caller ID solutions -Battery General Product Care Causes of Contents Cont. Table of Poor Reception Warranty Assistance Limited Warranty Accessory Information 40 40 40 40 41 41 41 42 42 43 43 43 44 45 45 46 46 47 47 ...
Answering System Operation -Answering system on/off -Recording incoming messages -Monitoring incoming calls -Memo record -Memo recording -Message/memo playback -Erasing messages -Remote access from remote party -Memory full Changing the Battery Battery Safety Precautions Display Messages Handset Sound Signals -Backup battery operation Troubleshooting Guide -Telephone solutions -Caller ID solutions -Battery General Product Care Causes of Contents Cont. Table of Poor Reception Warranty Assistance Limited Warranty Accessory Information 40 40 40 40 41 41 41 42 42 43 43 43 44 45 45 46 46 47 47 ...
User Guide
Page 7
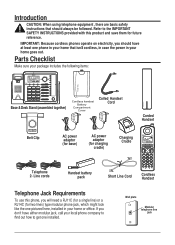
... should have at least one phone in your home that should always be followed. Line cords Handset battery pack Short Line Cord Cordless Handset Telephone Jack Requirements To use this product and save them for future reference. Parts Checklist Make sure your package includes the following items: Base & Desk Stand (assembled together) Coiled...
... should have at least one phone in your home that should always be followed. Line cords Handset battery pack Short Line Cord Cordless Handset Telephone Jack Requirements To use this product and save them for future reference. Parts Checklist Make sure your package includes the following items: Base & Desk Stand (assembled together) Coiled...
User Guide
Page 8
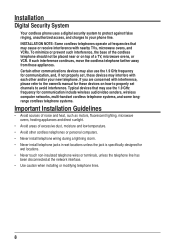
...disconnected at the network interface. • Use caution when installing or modifying telephone lines. 8 To minimize or prevent such interference, the base of the cordless telephone should not be placed near or on how to properly set , these devices may use the 1.9 GHz frequency for communication include... telephone jacks in wet locations unless the jack is specifically designed for these appliances. Installation Digital Security System Your cordless phone uses a digital security system to protect against false ringing, unauthorized access, and charges to your new telephone.
...disconnected at the network interface. • Use caution when installing or modifying telephone lines. 8 To minimize or prevent such interference, the base of the cordless telephone should not be placed near or on how to properly set , these devices may use the 1.9 GHz frequency for communication include... telephone jacks in wet locations unless the jack is specifically designed for these appliances. Installation Digital Security System Your cordless phone uses a digital security system to protect against false ringing, unauthorized access, and charges to your new telephone.
User Guide
Page 9
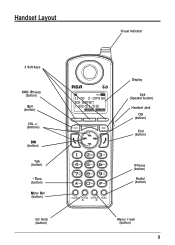
Handset Layout 3 Soft keys DND/ Privacy (button) Exit (button) VOL +/(buttons) DIR (button) Talk (button) * Tone (button) Mute/ Del (button) Int/ Hold (button) Visual Indicator Display Spk (Speaker button) Headset Jack CID (button) End (button) # Pause (button) Redial (button) Menu/ Flash (button) 9
Handset Layout 3 Soft keys DND/ Privacy (button) Exit (button) VOL +/(buttons) DIR (button) Talk (button) * Tone (button) Mute/ Del (button) Int/ Hold (button) Visual Indicator Display Spk (Speaker button) Headset Jack CID (button) End (button) # Pause (button) Redial (button) Menu/ Flash (button) 9
User Guide
Page 10
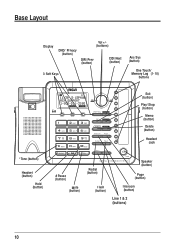
Base Layout Display DND/ Privacy (button) Vol +/(buttons) DIR / Prev (button) CID / Next (button) 3 Soft Keys Ans Sys (button) One Touch/ Memory Log (1- 10) buttons Exit (button) Play/ Stop (button) Memo (button) Delete (button) Headset Jack * Tone (button) Headset (button) Hold (button) # Pause (button) Mute (button) Redial (button) Flash (button) Speaker (button) Page (button) Intercom (button) Line 1 & 2 (buttons) 10
Base Layout Display DND/ Privacy (button) Vol +/(buttons) DIR / Prev (button) CID / Next (button) 3 Soft Keys Ans Sys (button) One Touch/ Memory Log (1- 10) buttons Exit (button) Play/ Stop (button) Memo (button) Delete (button) Headset Jack * Tone (button) Headset (button) Hold (button) # Pause (button) Mute (button) Redial (button) Flash (button) Speaker (button) Page (button) Intercom (button) Line 1 & 2 (buttons) 10
User Guide
Page 11
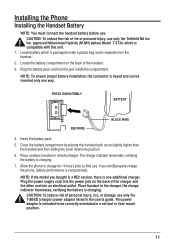
... version, there is one way. NOTE: If the model you don't properly charge the phone, battery performance is packaged inside the compartment. Locate battery which is charging. 7. Place cordless handset in the charger, the charge indicator illuminates, verifying the battery is separate from the... . approved Nickel-metal Hydride (Ni-MH) battery Model T-2734, which is compromised. Place handset in remote charger. Installing the Phone Installing the Handset Battery NOTE: You must connect the handset battery before use . PRESS DOWN FIRMLY BATTERY RED WIRE BLACK WIRE 4....
... version, there is one way. NOTE: If the model you don't properly charge the phone, battery performance is packaged inside the compartment. Locate battery which is charging. 7. Place cordless handset in the charger, the charge indicator illuminates, verifying the battery is separate from the... . approved Nickel-metal Hydride (Ni-MH) battery Model T-2734, which is compromised. Place handset in remote charger. Installing the Phone Installing the Handset Battery NOTE: You must connect the handset battery before use . PRESS DOWN FIRMLY BATTERY RED WIRE BLACK WIRE 4....
User Guide
Page 12
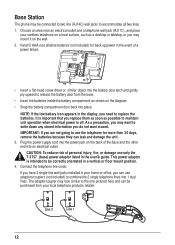
... here and can leak and damage the unit. 3. The adaptor/coupler may look similar to use the telephone for back up power in your cordless telephone on a level surface, such as shown on the diagram. • Snap the battery compartment door back into an electrical outlet. Choose ...telephone products retailer. This power adaptor is off. NOTE: If the low battery icon appears in a vertical or floor mount position. 4. Base Station The phone may be connected to two line (RJ14C) wall jacks to replace the batteries. It is important that you replace them as soon as possible ...
... here and can leak and damage the unit. 3. The adaptor/coupler may look similar to use the telephone for back up power in your cordless telephone on a level surface, such as shown on the diagram. • Snap the battery compartment door back into an electrical outlet. Choose ...telephone products retailer. This power adaptor is off. NOTE: If the low battery icon appears in a vertical or floor mount position. 4. Base Station The phone may be connected to two line (RJ14C) wall jacks to replace the batteries. It is important that you replace them as soon as possible ...
User Guide
Page 13
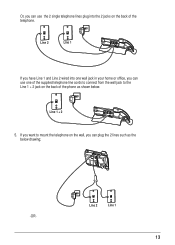
Or, you can use one of the supplied telephone line cords to connect from the wall jack to mount the telephone on the wall, you can use the 2 single telephone lines plug into one wall jack in your home or office, you want to the Line 1 + 2 jack on the back of the phone as the below . Line 1 + 2 5. Line 2 Line 1 -OR- 13 If you can plug the 2 lines such as shown below drawing; Line 2 Line 1 If you have Line 1 and Line 2 wired into the 2 jacks on the back of the telephone.
Or, you can use one of the supplied telephone line cords to connect from the wall jack to mount the telephone on the wall, you can use the 2 single telephone lines plug into one wall jack in your home or office, you want to the Line 1 + 2 jack on the back of the phone as the below . Line 1 + 2 5. Line 2 Line 1 -OR- 13 If you can plug the 2 lines such as shown below drawing; Line 2 Line 1 If you have Line 1 and Line 2 wired into the 2 jacks on the back of the telephone.

User Guide
Page 14
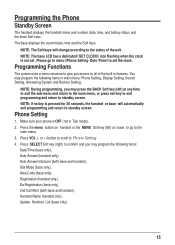
Line 2 Line 1 -OR- Connect the handset cord: Connect one end of the coiled handset cord to the jack on the side of the base and the other end into the jack in the handset, and place the handset in the cradle. 14 Line 1 & 2 6.
Line 2 Line 1 -OR- Connect the handset cord: Connect one end of the coiled handset cord to the jack on the side of the base and the other end into the jack in the handset, and place the handset in the cradle. 14 Line 1 & 2 6.
User Guide
Page 15
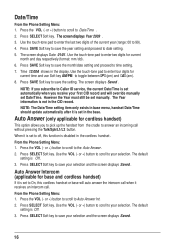
NOTE: The Soft keys will automatically exit programming and return to standby screen. Phone Setting 1. The base displays the current date, time and the Soft keys. You may program the following items in Talk mode). 2. Make sure your phone is not set the clock. Please go to the status of the built-in features...
NOTE: The Soft keys will automatically exit programming and return to standby screen. Phone Setting 1. The base displays the current date, time and the Soft keys. You may program the following items in Talk mode). 2. Make sure your phone is not set the clock. Please go to the status of the built-in features...
User Guide
Page 16
...Caller ID service, the current Date/Time is set to your selection and the screen displays Saved . Auto Answer (only applicable for base and cordless handset) If it receives an intercom call. or +) button to scroll to On, this function is Off . 3. Auto Answer Intercom (applicable for...manually set manually. NOTE: The Date/Time setting item only exists in base menu, handset Date/Time should update automatically after it is set to answer an incoming call when it is set in the cordless handset. From the Phone Setting Menu: 1. Press the VOL (- Press SELECT Soft key to...
...Caller ID service, the current Date/Time is set to your selection and the screen displays Saved . Auto Answer (only applicable for base and cordless handset) If it receives an intercom call. or +) button to scroll to On, this function is Off . 3. Auto Answer Intercom (applicable for...manually set manually. NOTE: The Date/Time setting item only exists in base menu, handset Date/Time should update automatically after it is set to answer an incoming call when it is set in the cordless handset. From the Phone Setting Menu: 1. Press the VOL (- Press SELECT Soft key to...
User Guide
Page 17
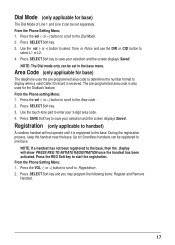
... or +) button to scroll to select L1 or L2. 4. NOTE: The Dial mode only can be set separately. Use the touch-tone pad to the base. Registration (only applicable to handset) A cordless handset will show PRESS REG TO INITIATE REGISTRATION once the handset has been activated. Up to 10...The pre-programmed area code is received. Press the vol (- Press SAVE Soft key to Registration. 2. During the registration process, keep the handset near the base. From the Phone Setting Menu: 1. Press the VOL (- or +) button to scroll to save your selection and the screen displays Saved .
... or +) button to scroll to select L1 or L2. 4. NOTE: The Dial mode only can be set separately. Use the touch-tone pad to the base. Registration (only applicable to handset) A cordless handset will show PRESS REG TO INITIATE REGISTRATION once the handset has been activated. Up to 10...The pre-programmed area code is received. Press the vol (- Press SAVE Soft key to Registration. 2. During the registration process, keep the handset near the base. From the Phone Setting Menu: 1. Press the VOL (- or +) button to scroll to save your selection and the screen displays Saved .
User Guide
Page 18
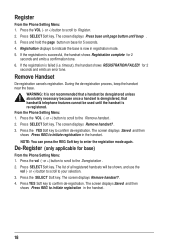
.... 2. timeout), the handset shows REGISTRATION FAILED! or +) button to scroll to your selection. 3. or +) button to scroll to indicate the base is deregistered, that handset's telephone features cannot be shown, and use the vol (- Remove Handset De-registration cancels registration. Press the SELECT Soft.... 2. Press SELECT Soft key. or +) button to scroll to confirm de-registration. Press and hold the page button on base for base) From the Phone Setting Menu: 1. De-Register (only applicable for 5 seconds. 4. The list of all registered handsets will be used until beep . ...
.... 2. timeout), the handset shows REGISTRATION FAILED! or +) button to scroll to your selection. 3. or +) button to scroll to indicate the base is deregistered, that handset's telephone features cannot be shown, and use the vol (- Remove Handset De-registration cancels registration. Press the SELECT Soft.... 2. Press SELECT Soft key. or +) button to scroll to confirm de-registration. Press and hold the page button on base for base) From the Phone Setting Menu: 1. De-Register (only applicable for 5 seconds. 4. The list of all registered handsets will be used until beep . ...
User Guide
Page 19
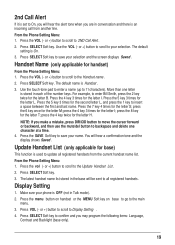
...scroll to the Update Handset List. 2. Press SELECT Soft key. Update Handset List (only applicable for base) This function is used to update all registered handsets. Press the vol (- or +) button to scroll...menu. 3. For example, to enter Bill Smith, press the 2 key twice for handset) From the Phone Setting Menu: 1. NOTE: If you make a mistake, press DIR/CID button to move the cursor ...3 times for the letter L. From the Phone Setting Menu: 1. Press SELECT Soft key. 3. Press the menu button on handset or the MENU Soft key on base to go to 11 characters). Press SELECT Soft...
...scroll to the Update Handset List. 2. Press SELECT Soft key. Update Handset List (only applicable for base) This function is used to update all registered handsets. Press the vol (- or +) button to scroll...menu. 3. For example, to enter Bill Smith, press the 2 key twice for handset) From the Phone Setting Menu: 1. NOTE: If you make a mistake, press DIR/CID button to move the cursor ...3 times for the letter L. From the Phone Setting Menu: 1. Press SELECT Soft key. 3. Press the menu button on handset or the MENU Soft key on base to go to 11 characters). Press SELECT Soft...
User Guide
Page 20
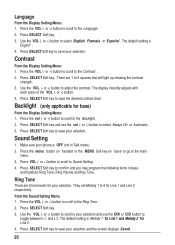
... the main menu. 3. Press the menu button on handset or the MENU Soft key on base to go to adjust the contrast. Press SELECT Soft key to select Always On or Automatic. 3. Ring... Tone There are 5 tone levels for base) From the Display Setting Menu: 1. Press SELECT Soft key. 3. The default setting is English . ... +) button to scroll to toggle between L 1 and L 2. Press SELECT Soft key to save your phone is OFF (not in base and handset: Ring Tone, Ring Volume and Key Tone. The default setting is Melody 1 for Line 1...
... the main menu. 3. Press the menu button on handset or the MENU Soft key on base to go to adjust the contrast. Press SELECT Soft key to select Always On or Automatic. 3. Ring... Tone There are 5 tone levels for base) From the Display Setting Menu: 1. Press SELECT Soft key. 3. The default setting is English . ... +) button to scroll to toggle between L 1 and L 2. Press SELECT Soft key to save your phone is OFF (not in base and handset: Ring Tone, Ring Volume and Key Tone. The default setting is Melody 1 for Line 1...
User Guide
Page 21
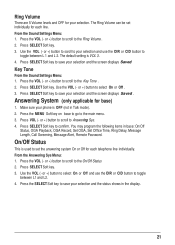
... displays Saved . or +) button to scroll to save your selection. Key Tone From the Sound Settings Menu: 1. Press SELECT Soft key to your phone is OFF (not in base: On/Off Status, OGA Playback, OGA Record, Set OGA, Set Office Time, Ring Delay, Message Length, Call Screening, Message Alert, Remote... Press the SELECT Soft key to toggle between L 1 and L 2. The Ring Volume can be set the answering system On or Off for base) 1. Press the MENU Soft key on base to go to select On or Off . 3. From the Sound Settings Menu: 1. Use the VOL (- or +) button to the main menu. 3. ...
... displays Saved . or +) button to scroll to save your selection. Key Tone From the Sound Settings Menu: 1. Press SELECT Soft key to your phone is OFF (not in base: On/Off Status, OGA Playback, OGA Record, Set OGA, Set Office Time, Ring Delay, Message Length, Call Screening, Message Alert, Remote... Press the SELECT Soft key to toggle between L 1 and L 2. The Ring Volume can be set the answering system On or Off for base) 1. Press the MENU Soft key on base to go to select On or Off . 3. From the Sound Settings Menu: 1. Use the VOL (- or +) button to the main menu. 3. ...
User Guide
Page 22
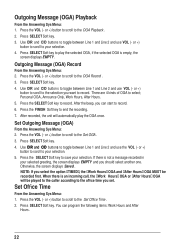
Press SELECT Soft key. 3. Press the FINISH Soft key to the Set OGA . 3. or +) button to scroll to end the recording. 7. Otherwise, the screen displays Saved . Press the VOL (- Press the VOL (- Personal OGA, Announce Only, Work Hours, After Hours. 5. If there is an incoming call, the "Work Hours" OGA or "After Hours" OGA will automatically play the selected OGA, if the selected OGA is empty, the screen displays EMPTY. or +) button to scroll to the OGA Record . 3. You can start to toggle between Line 1 and Line 2 and use the VOL (- Use DIR and CID buttons to...
Press SELECT Soft key. 3. Press the FINISH Soft key to the Set OGA . 3. or +) button to scroll to end the recording. 7. Otherwise, the screen displays Saved . Press the VOL (- Press the VOL (- Personal OGA, Announce Only, Work Hours, After Hours. 5. If there is an incoming call, the "Work Hours" OGA or "After Hours" OGA will automatically play the selected OGA, if the selected OGA is empty, the screen displays EMPTY. or +) button to scroll to the OGA Record . 3. You can start to toggle between Line 1 and Line 2 and use the VOL (- Use DIR and CID buttons to...