
User Guide
Page 5
...Operation 25 Interference Information 3 -Making calls with the cordless handset 25 Licensing 3 -Making calls with the corded handset (from the base) 25 Hearing Aid Compatibility 3 -Making calls in the speakerphone mode (from the base) 26 FCC RF Radiation Exposure Statement 4 -Making ... 29 -Installing the handset battery 11 -Storing a Redial Record in Directory 29 -Base Station 12-14 -Transferring a call to another extension 30 Programming the Phone -Standby Screen -Programming Functions -Phone Setting -Date/Time -Auto Answer -Auto Answer Intercom -Dial Mode -Area Code ...
...Operation 25 Interference Information 3 -Making calls with the cordless handset 25 Licensing 3 -Making calls with the corded handset (from the base) 25 Hearing Aid Compatibility 3 -Making calls in the speakerphone mode (from the base) 26 FCC RF Radiation Exposure Statement 4 -Making ... 29 -Installing the handset battery 11 -Storing a Redial Record in Directory 29 -Base Station 12-14 -Transferring a call to another extension 30 Programming the Phone -Standby Screen -Programming Functions -Phone Setting -Date/Time -Auto Answer -Auto Answer Intercom -Dial Mode -Area Code ...
User Guide
Page 7
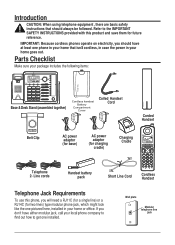
... (assembled together) Coiled Handset Cord Corded Handset Belt Clip AC power adaptor (for base) AC power adaptor (for future reference. Line cords Handset battery pack Short Line Cord Cordless Handset Telephone Jack Requirements To use this product and save them for charging cradle) ... CAUTION: When using telephone equipment, there are basic safety instructions that should have at least one phone in your home that isn't cordless, in case the power in your home or office. IMPORTANT: Because cordless phones operate on electricity, you should always be followed.
... (assembled together) Coiled Handset Cord Corded Handset Belt Clip AC power adaptor (for base) AC power adaptor (for future reference. Line cords Handset battery pack Short Line Cord Cordless Handset Telephone Jack Requirements To use this product and save them for charging cradle) ... CAUTION: When using telephone equipment, there are basic safety instructions that should have at least one phone in your home that isn't cordless, in case the power in your home or office. IMPORTANT: Because cordless phones operate on electricity, you should always be followed.
User Guide
Page 8
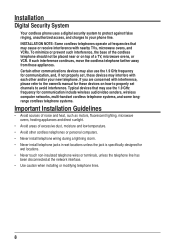
...new telephone. Installation Digital Security System Your cordless phone uses a digital security system to protect against false ringing, unauthorized access, and charges to avoid interference. To minimize or prevent such interference, the base of the cordless telephone should not be placed near or... non-insulated telephone wires or terminals, unless the telephone line has been disconnected at frequencies that may interfere with each other cordless telephones or personal computers. • Never install telephone wiring during a lightning storm. • Never install telephone jacks in...
...new telephone. Installation Digital Security System Your cordless phone uses a digital security system to protect against false ringing, unauthorized access, and charges to avoid interference. To minimize or prevent such interference, the base of the cordless telephone should not be placed near or... non-insulated telephone wires or terminals, unless the telephone line has been disconnected at frequencies that may interfere with each other cordless telephones or personal computers. • Never install telephone wiring during a lightning storm. • Never install telephone jacks in...
User Guide
Page 11
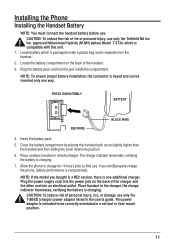
...compatible with this unit. 1. CAUTION: To reduce risk of fire or personal injury, use . PRESS DOWN FIRMLY BATTERY RED WIRE BLACK WIRE 4. Place cordless handset in a vertical or floor mount position. 11 This power adaptor is intended to first use only the T-8BXD (charger) power adaptor listed...then sliding the cover down into the jack inside a plastic bag and is keyed and can be correctly orientated in remote charger. Allow the phone to charge for 14 hours prior to be inserted only one additional charger. Plug the power supply cord into the power jack on the ...
...compatible with this unit. 1. CAUTION: To reduce risk of fire or personal injury, use . PRESS DOWN FIRMLY BATTERY RED WIRE BLACK WIRE 4. Place cordless handset in a vertical or floor mount position. 11 This power adaptor is intended to first use only the T-8BXD (charger) power adaptor listed...then sliding the cover down into the jack inside a plastic bag and is keyed and can be correctly orientated in remote charger. Allow the phone to charge for 14 hours prior to be inserted only one additional charger. Plug the power supply cord into the power jack on the ...
User Guide
Page 12
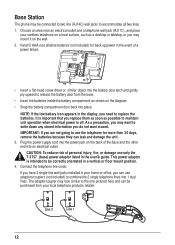
...Install 5 AAA-size alkaline batteries (not included) for more than 30 days, remove the batteries because they can be purchased from the base. • Insert the batteries inside the battery compartment as possible to maintain unit operation when electrical power is intended to be connected to ...may be correctly orientated in the event of the base and the other end into 1 dual lines. Base Station The phone may mount it on the wall. 2. Connect the telephone line cords: If you need to release the battery door from your cordless telephone on a level surface, such as a desktop...
...Install 5 AAA-size alkaline batteries (not included) for more than 30 days, remove the batteries because they can be purchased from the base. • Insert the batteries inside the battery compartment as possible to maintain unit operation when electrical power is intended to be connected to ...may be correctly orientated in the event of the base and the other end into 1 dual lines. Base Station The phone may mount it on the wall. 2. Connect the telephone line cords: If you need to release the battery door from your cordless telephone on a level surface, such as a desktop...
User Guide
Page 16
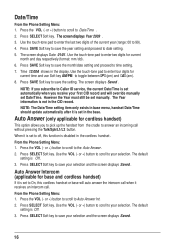
... key. From the Phone Setting Menu: 1. Press SELECT Soft key. or +) button to scroll to On, this function is set to save your selection. Use the touch-tone pad to enter two digits for base and cordless handset) If it is not in the cordless handset. Auto Answer ...Intercom (applicable for current month and day respectively (format: mm / dd). 6. Date/Time From the Phone Setting Menu: 1. Press the VOL (- or +) button to scroll...
... key. From the Phone Setting Menu: 1. Press SELECT Soft key. or +) button to scroll to On, this function is set to save your selection. Use the touch-tone pad to enter two digits for base and cordless handset) If it is not in the cordless handset. Auto Answer ...Intercom (applicable for current month and day respectively (format: mm / dd). 6. Date/Time From the Phone Setting Menu: 1. Press the VOL (- or +) button to scroll...
User Guide
Page 17
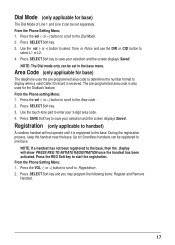
...screen displays Saved. Press SAVE Soft key to enter your selection and the screen displays Saved . Up to 10 cordless handsets can be registered to handset) A cordless handset will show PRESS REG TO INITIATE REGISTRATION once the handset has been activated. or +) button to scroll ... (- Press the vol (- Registration (only applicable to one base. NOTE: If a handset has not been registered to the base. Dial Mode (only applicable for the Dialback feature. From the Phone Setting Menu: 1. Area Code (only applicable for base) The telephone uses the pre-programmed area code to determine ...
...screen displays Saved. Press SAVE Soft key to enter your selection and the screen displays Saved . Up to 10 cordless handsets can be registered to handset) A cordless handset will show PRESS REG TO INITIATE REGISTRATION once the handset has been activated. or +) button to scroll ... (- Press the vol (- Registration (only applicable to one base. NOTE: If a handset has not been registered to the base. Dial Mode (only applicable for the Dialback feature. From the Phone Setting Menu: 1. Area Code (only applicable for base) The telephone uses the pre-programmed area code to determine ...
User Guide
Page 25
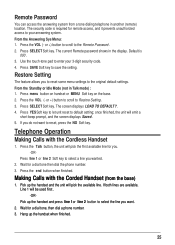
...the Standby or Idle Mode (not in the display. or +) button to scroll to the Remote Password. 2. Wait for a dial tone then dial the phone number. 3. or +) button to scroll to Restore Setting. 3. Restore Setting The feature allows you do not want . 2. Press the VOL (- The screen... Press YES Soft key to let unit reset to save the setting. The security code is 000 . 3. Making Calls with the Cordless Handset 1. Remote Password You can access the answering system from the base) 1. Hang up the handset and press line 1 or line 2 button to enter your answering system.
...the Standby or Idle Mode (not in the display. or +) button to scroll to the Remote Password. 2. Wait for a dial tone then dial the phone number. 3. or +) button to scroll to Restore Setting. 3. Restore Setting The feature allows you do not want . 2. Press the VOL (- The screen... Press YES Soft key to let unit reset to save the setting. The security code is 000 . 3. Making Calls with the Cordless Handset 1. Remote Password You can access the answering system from the base) 1. Hang up the handset and press line 1 or line 2 button to enter your answering system.
User Guide
Page 26
... pick the available line for a dial tone then dial a phone number or press One-Touch/Memory Log button (1- 10 ) to select a specific line. For the base, press the headset button on the side of the base or side of the cordless handset . 2. For the cordless handset, press the Talk button. 6. Plug the headset into...
... pick the available line for a dial tone then dial a phone number or press One-Touch/Memory Log button (1- 10 ) to select a specific line. For the base, press the headset button on the side of the base or side of the cordless handset . 2. For the cordless handset, press the Talk button. 6. Plug the headset into...
User Guide
Page 27
...) to answer the call directly by pressing the vol (- or +) button during a call . With the phone idle, manually enter the telephone number. When finished, hang up the corded handset (on base only), Spk button, Talk button (handset only), or line 1 or line 2 button to the speakerphone,...number will be dialed out. Press the corresponding LINE Soft key to answer the call in speakerphone mode, -OR- 4. Answering a Call For cordless handset: 1. Press the speaker button to the corded handset, pick up the corded handset, -OR- 2. To switch to answer the call in ...
...) to answer the call directly by pressing the vol (- or +) button during a call . With the phone idle, manually enter the telephone number. When finished, hang up the corded handset (on base only), Spk button, Talk button (handset only), or line 1 or line 2 button to the speakerphone,...number will be dialed out. Press the corresponding LINE Soft key to answer the call in speakerphone mode, -OR- 4. Answering a Call For cordless handset: 1. Press the speaker button to the corded handset, pick up the corded handset, -OR- 2. To switch to answer the call in ...
User Guide
Page 28
...party on the other end of the line cannot hear you, but the phone will illuminate when the mute is activated. 2. Press the mute button again ...two calls, press the menu/flash (Handset) or flash (base) button. Press the SELECT Soft key to 24 hours. 3. When there is put on the base, the indicator will not ring. 1. When the unit is displayed. ...45 minutes, 1 hour, or 2 hours and increase the duration by 1-hour intervals up to confirm. Cordless Handset To switch to activate the mute feature. Press mute button to the speakerphone, press Spk button. or +) button...
...party on the other end of the line cannot hear you, but the phone will illuminate when the mute is activated. 2. Press the mute button again ...two calls, press the menu/flash (Handset) or flash (base) button. Press the SELECT Soft key to 24 hours. 3. When there is put on the base, the indicator will not ring. 1. When the unit is displayed. ...45 minutes, 1 hour, or 2 hours and increase the duration by 1-hour intervals up to confirm. Cordless Handset To switch to activate the mute feature. Press mute button to the speakerphone, press Spk button. or +) button...
User Guide
Page 29
... dialed accordingly. NOTE: If you dialed is stored in Talk mode). 2. Use VOL (- Reviewing the Redial Numbers Your phone records up the corded handset from the base and the first available line will not be stored. 5. Press the SAVE Soft key. 4. Use the VOL (- For example, for some...select a line button, the line is automatically seized and the number is idle, press the redial button. 2. Press the Talk button on the cordless handset, or press the Spk button (speakerphone mode), or press the headset button (headset mode), or pick up to view the last three ...
... dialed accordingly. NOTE: If you dialed is stored in Talk mode). 2. Use VOL (- Reviewing the Redial Numbers Your phone records up the corded handset from the base and the first available line will not be stored. 5. Press the SAVE Soft key. 4. Use the VOL (- For example, for some...select a line button, the line is automatically seized and the number is idle, press the redial button. 2. Press the Talk button on the cordless handset, or press the Spk button (speakerphone mode), or press the headset button (headset mode), or pick up to view the last three ...
User Guide
Page 46
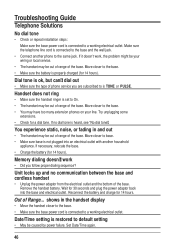
...; Make sure the battery is heard, see "No dial tone". If no communication between the base and cordless handset • Unplug the power adaptor from the electrical outlet and the bottom of the base. Unit locks up and no dial tone is properly charged (for 14 hours). shows in and out •... the battery and charge for 30 seconds and plug the power adaptor back into an electrical outlet with another phone to the base. • Make sure the base power cord is TONE or PULSE. You experience static, noise, or fading in the handset display • Move the handset closer to the same...
...; Make sure the battery is heard, see "No dial tone". If no communication between the base and cordless handset • Unplug the power adaptor from the electrical outlet and the bottom of the base. Unit locks up and no dial tone is properly charged (for 14 hours). shows in and out •... the battery and charge for 30 seconds and plug the power adaptor back into an electrical outlet with another phone to the base. • Make sure the base power cord is TONE or PULSE. You experience static, noise, or fading in the handset display • Move the handset closer to the same...


