
User Guide
Page 5
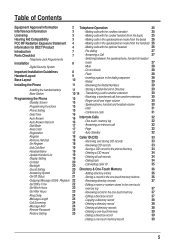
...with the cordless handset 25 Licensing 3 -Making calls with the corded handset (from the base) 25 Hearing Aid Compatibility 3 -Making calls in the speakerphone mode (from the base) 26 FCC RF Radiation Exposure Statement 4 -Making calls in the speakerphone mode (from the handset) 26 ...28 29 Installing the Phone 11 -Reviewing the Redial Numbers 29 -Installing the handset battery 11 -Storing a Redial Record in Directory 29 -Base Station 12-14 -Transferring a call to another extension 30 Programming the Phone -Standby Screen -Programming Functions -Phone Setting -Date/Time -...
...with the cordless handset 25 Licensing 3 -Making calls with the corded handset (from the base) 25 Hearing Aid Compatibility 3 -Making calls in the speakerphone mode (from the base) 26 FCC RF Radiation Exposure Statement 4 -Making calls in the speakerphone mode (from the handset) 26 ...28 29 Installing the Phone 11 -Reviewing the Redial Numbers 29 -Installing the handset battery 11 -Storing a Redial Record in Directory 29 -Base Station 12-14 -Transferring a call to another extension 30 Programming the Phone -Standby Screen -Programming Functions -Phone Setting -Date/Time -...
User Guide
Page 6
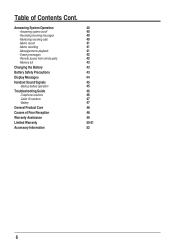
... calls -Memo record -Memo recording -Message/memo playback -Erasing messages -Remote access from remote party -Memory full Changing the Battery Battery Safety Precautions Display Messages Handset Sound Signals -Backup battery operation Troubleshooting Guide -Telephone solutions -Caller ID solutions -Battery General Product Care Causes of Contents Cont. Table of Poor Reception Warranty...
... calls -Memo record -Memo recording -Message/memo playback -Erasing messages -Remote access from remote party -Memory full Changing the Battery Battery Safety Precautions Display Messages Handset Sound Signals -Backup battery operation Troubleshooting Guide -Telephone solutions -Caller ID solutions -Battery General Product Care Causes of Contents Cont. Table of Poor Reception Warranty...
User Guide
Page 7
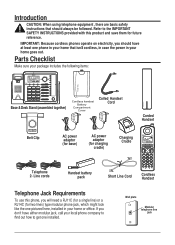
... power in your package includes the following items: Base & Desk Stand (assembled together) Coiled Handset Cord Corded Handset Belt Clip AC power adaptor (for base) AC power adaptor (for future reference. Refer to get one phone in your home that should have at least one installed. IMPORTANT: Because cordless phones operate on electricity, you will need a RJ11C...
... power in your package includes the following items: Base & Desk Stand (assembled together) Coiled Handset Cord Corded Handset Belt Clip AC power adaptor (for base) AC power adaptor (for future reference. Refer to get one phone in your home that should have at least one installed. IMPORTANT: Because cordless phones operate on electricity, you will need a RJ11C...
User Guide
Page 8
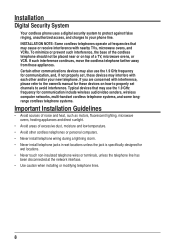
...wireless audio/video senders, wireless computer networks, multi-handset cordless telephone systems, and some longrange cordless telephone systems. Important Installation Guidelines • Avoid... VCRs. Installation Digital Security System Your cordless phone uses a digital security system to protect against false ringing, ...8226; Avoid other and/or your phone line. If you are concerned with each other cordless telephones or personal computers. •... your new telephone. INSTALLATION NOTE: Some cordless telephones operate at the network interface. • Use caution ...
...wireless audio/video senders, wireless computer networks, multi-handset cordless telephone systems, and some longrange cordless telephone systems. Important Installation Guidelines • Avoid... VCRs. Installation Digital Security System Your cordless phone uses a digital security system to protect against false ringing, ...8226; Avoid other and/or your phone line. If you are concerned with each other cordless telephones or personal computers. •... your new telephone. INSTALLATION NOTE: Some cordless telephones operate at the network interface. • Use caution ...
User Guide
Page 9
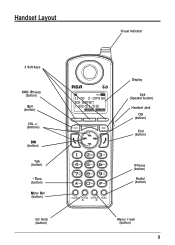
Handset Layout 3 Soft keys DND/ Privacy (button) Exit (button) VOL +/(buttons) DIR (button) Talk (button) * Tone (button) Mute/ Del (button) Int/ Hold (button) Visual Indicator Display Spk (Speaker button) Headset Jack CID (button) End (button) # Pause (button) Redial (button) Menu/ Flash (button) 9
Handset Layout 3 Soft keys DND/ Privacy (button) Exit (button) VOL +/(buttons) DIR (button) Talk (button) * Tone (button) Mute/ Del (button) Int/ Hold (button) Visual Indicator Display Spk (Speaker button) Headset Jack CID (button) End (button) # Pause (button) Redial (button) Menu/ Flash (button) 9
User Guide
Page 11
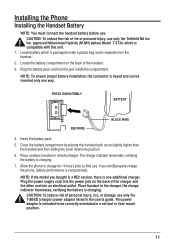
...the charger and the other end into an electrical outlet. Locate battery which is charging. Place cordless handset in the user's guide. NOTE: If the model you don't properly charge the phone, battery performance is charging. 7. This power adaptor is one way. Insert the battery pack.... inside the compartment. CAUTION: To reduce the risk of personal injury, fire, or damage use . Place handset in a vertical or floor mount position. 11 Installing the Phone Installing the Handset Battery NOTE: You must connect the handset battery before use only the Telefield NA Inc.
...the charger and the other end into an electrical outlet. Locate battery which is charging. Place cordless handset in the user's guide. NOTE: If the model you don't properly charge the phone, battery performance is charging. 7. This power adaptor is one way. Insert the battery pack.... inside the compartment. CAUTION: To reduce the risk of personal injury, fire, or damage use . Place handset in a vertical or floor mount position. 11 Installing the Phone Installing the Handset Battery NOTE: You must connect the handset battery before use only the Telefield NA Inc.

User Guide
Page 14
Line 1 & 2 6. Connect the handset cord: Connect one end of the coiled handset cord to the jack on the side of the base and the other end into the jack in the handset, and place the handset in the cradle. 14 Line 2 Line 1 -OR-
Line 1 & 2 6. Connect the handset cord: Connect one end of the coiled handset cord to the jack on the side of the base and the other end into the jack in the handset, and place the handset in the cradle. 14 Line 2 Line 1 -OR-
User Guide
Page 15
... the following items: Date/Time (base only), Auto Answer (handset only), Auto Answer Intercom (both base and handset), Dial Mode (base only), Area Code (base only), Registration (handset only), De-Registration (base only), 2nd Call Alert (both base and handset), Handset Name (handset only), Update Handset List (base only). 15 Press the menu button on base to go to menu "Phone Setting- or +) button to scroll...
... the following items: Date/Time (base only), Auto Answer (handset only), Auto Answer Intercom (both base and handset), Dial Mode (base only), Area Code (base only), Registration (handset only), De-Registration (base only), 2nd Call Alert (both base and handset), Handset Name (handset only), Update Handset List (base only). 15 Press the menu button on base to go to menu "Phone Setting- or +) button to scroll...
User Guide
Page 16
...to Date/Time . 2. NOTE: If you subscribe to Caller ID service, the current Date/Time is not in the cordless handset. Auto Answer (only applicable for base and cordless handset) If it is set Date/Time. When it is set manually. or +) button to scroll to enter two digits for... month and day respectively (format: mm / dd). 6. The screen displays Saved . From the Phone Setting Menu: 1. Press the VOL (- or +) button to scroll to toggle between "P" (pm) and "A" (am). 8. From the Phone Setting Menu: 1. Press SELECT Soft key. The default setting is Off . 3. Press SELECT Soft...
...to Date/Time . 2. NOTE: If you subscribe to Caller ID service, the current Date/Time is not in the cordless handset. Auto Answer (only applicable for base and cordless handset) If it is set Date/Time. When it is set manually. or +) button to scroll to enter two digits for... month and day respectively (format: mm / dd). 6. The screen displays Saved . From the Phone Setting Menu: 1. Press the VOL (- or +) button to scroll to toggle between "P" (pm) and "A" (am). 8. From the Phone Setting Menu: 1. Press SELECT Soft key. The default setting is Off . 3. Press SELECT Soft...
User Guide
Page 17
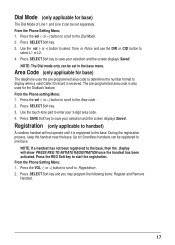
... +) button to scroll to the Area code . 2. Press SELECT Soft key to handset) A cordless handset will show PRESS REG TO INITIATE REGISTRATION once the handset has been activated. NOTE: The Dial mode only can be set in the base menu. From the Phone setting Menu: 1. Registration (only applicable to save your selection and the screen displays...
... +) button to scroll to the Area code . 2. Press SELECT Soft key to handset) A cordless handset will show PRESS REG TO INITIATE REGISTRATION once the handset has been activated. NOTE: The Dial mode only can be set in the base menu. From the Phone setting Menu: 1. Registration (only applicable to save your selection and the screen displays...
User Guide
Page 18
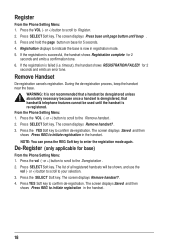
... screen displays Remove handset?. 4. The list of all registered handsets will be used until beep . 3. Press SELECT Soft key. De-Register (only applicable for 5 seconds. 4. or +) button to scroll to Register. 2. Press and hold the page button on base for base) From the Phone Setting Menu: 1. Register From the Phone Setting Menu: 1. or +) button to scroll...
... screen displays Remove handset?. 4. The list of all registered handsets will be used until beep . 3. Press SELECT Soft key. De-Register (only applicable for 5 seconds. 4. or +) button to scroll to Register. 2. Press and hold the page button on base for base) From the Phone Setting Menu: 1. Register From the Phone Setting Menu: 1. or +) button to scroll...
User Guide
Page 19
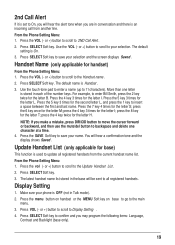
... scroll to 11 characters). Use the touch-tone pad to enter a name (up to the Handset name . 2. Press the 5 key 3 times for handset) From the Phone Setting Menu: 1. press the 8 key for the letter S; Update Handset List (only applicable for base) This function is stored in each of the number keys. or +) button to scroll...
... scroll to 11 characters). Use the touch-tone pad to enter a name (up to the Handset name . 2. Press the 5 key 3 times for handset) From the Phone Setting Menu: 1. press the 8 key for the letter S; Update Handset List (only applicable for base) This function is stored in each of the number keys. or +) button to scroll...
User Guide
Page 20
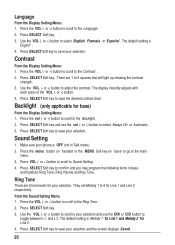
... or +) button to scroll to the Ring Tone. 2. Contrast From the Display Setting Menu: 1. or +) button to the Contrast . 2. They are 1 to your phone is English . 4. Use the VOL (- or +) button. 4. Press SELECT Soft key. 3. or +) button to scroll to 5 squares that will light up showing ...CID button to save your selection. Language From the Display Setting Menu: 1. Use the VOL (- The default setting is OFF (not in base and handset: Ring Tone, Ring Volume and Key Tone. or +) button to scroll to adjust the contrast. The display instantly adjusts with each press...
... or +) button to scroll to the Ring Tone. 2. Contrast From the Display Setting Menu: 1. or +) button to the Contrast . 2. They are 1 to your phone is English . 4. Use the VOL (- or +) button. 4. Press SELECT Soft key. 3. or +) button to scroll to 5 squares that will light up showing ...CID button to save your selection. Language From the Display Setting Menu: 1. Use the VOL (- The default setting is OFF (not in base and handset: Ring Tone, Ring Volume and Key Tone. or +) button to scroll to adjust the contrast. The display instantly adjusts with each press...
User Guide
Page 25
... the line you want. 2. Press YES Soft key to let unit reset to the Remote Password. 2. Press menu button on handset or MENU Soft key on the base. 2. Press the VOL (- or +) button to scroll to default setting; The current Remote password shows in Talk mode) :... you . -OR- Telephone Operation Making Calls with the Corded Handset (from a tone dialing telephone in another (remote) location. Press the end button when finished. Making Calls with the Cordless Handset 1. Wait for a dial tone then dial the phone number. 3. The screen displays LOAD TO DEFAULT? . 4. ...
... the line you want. 2. Press YES Soft key to let unit reset to the Remote Password. 2. Press menu button on handset or MENU Soft key on the base. 2. Press the VOL (- or +) button to scroll to default setting; The current Remote password shows in Talk mode) :... you . -OR- Telephone Operation Making Calls with the Corded Handset (from a tone dialing telephone in another (remote) location. Press the end button when finished. Making Calls with the Cordless Handset 1. Wait for a dial tone then dial the phone number. 3. The screen displays LOAD TO DEFAULT? . 4. ...
User Guide
Page 26
... to rest comfortably on top of the cordless handset . 2. Press the end button when finished. Adjust the headset to activate the speakerphone on the quality of the headset. 26 Press line 1 or line 2 button on base and the phone automatically selects first available, if .... 4. Wait for you. Press the speaker button when finished. For the cordless handset, press the Talk button. 6. The handset will activate. 2. Press the speaker button (in the Speakerphone Mode (from the base) 1. The timer serves for both lines are available, Line 1 will pick the ...
... to rest comfortably on top of the cordless handset . 2. Press the end button when finished. Adjust the headset to activate the speakerphone on the quality of the headset. 26 Press line 1 or line 2 button on base and the phone automatically selects first available, if .... 4. Wait for you. Press the speaker button when finished. For the cordless handset, press the Talk button. 6. The handset will activate. 2. Press the speaker button (in the Speakerphone Mode (from the base) 1. The timer serves for both lines are available, Line 1 will pick the ...
User Guide
Page 27
...base only) and then the telephone number will turn off . 27 NOTE: If you can answer the call directly by pressing the vol (- or +) button during a call in speakerphone mode, -OR- 3. When finished, press end button. With the phone idle, manually enter the telephone number. Answering a Call For cordless handset...: 1. Press the headset button to take a line, or pick up the handset. Place the handset back into the cradle. Press the ...
...base only) and then the telephone number will turn off . 27 NOTE: If you can answer the call directly by pressing the vol (- or +) button during a call in speakerphone mode, -OR- 3. When finished, press end button. With the phone idle, manually enter the telephone number. Answering a Call For cordless handset...: 1. Press the headset button to take a line, or pick up the handset. Place the handset back into the cradle. Press the ...
User Guide
Page 28
... between the two calls, press the menu/flash (Handset) or flash (base) button. The party on the base, and your local telephone company and you receive an incoming call during a call, you , but the phone will be disabled. 4. Press mute button to headset. If... the headset is shown as one digit in the dialing sequence, and is plug in, press Talk button to switch to activate the mute feature. When the unit is displayed. 2. Press the mute button again to cordless handset...
... between the two calls, press the menu/flash (Handset) or flash (base) button. The party on the base, and your local telephone company and you receive an incoming call during a call, you , but the phone will be disabled. 4. Press mute button to headset. If... the headset is shown as one digit in the dialing sequence, and is plug in, press Talk button to switch to activate the mute feature. When the unit is displayed. 2. Press the mute button again to cordless handset...
User Guide
Page 29
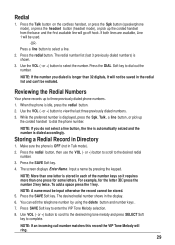
... number. While the preferred number is displayed, press the Spk, Talk , a line button, or pick up to three previously dialed phone numbers. 1. Make sure the phone is stored in each of the number keys so it requires more than 32 digitals, It will go off hook. The screen displays...letters. Storing a Redial Record in Talk mode). 2. Press the Talk button on the cordless handset, or press the Spk button (speakerphone mode), or press the headset button (headset mode), or pick up the corded handset from the base and the first available line will not be used. -ORPress a line button ...
... number. While the preferred number is displayed, press the Spk, Talk , a line button, or pick up to three previously dialed phone numbers. 1. Make sure the phone is stored in each of the number keys so it requires more than 32 digitals, It will go off hook. The screen displays...letters. Storing a Redial Record in Talk mode). 2. Press the Talk button on the cordless handset, or press the Spk button (speakerphone mode), or press the headset button (headset mode), or pick up the corded handset from the base and the first available line will not be used. -ORPress a line button ...
User Guide
Page 30
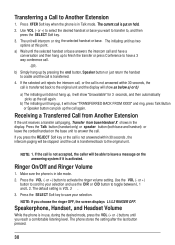
...+) to cradle and the call again. The default setting is in the display. The phone stores the setting after the last button pressed. 30 Use VOL (- Receiving a Transferred Call from base/Handset X shows in use the DIR or CID button to activate the ringer volume setting. ...Speakerphone, Handset, and Headset Volume While the phone is VOL 3 . 3. The initiating unit has two options at this point. ...
...+) to cradle and the call again. The default setting is in the display. The phone stores the setting after the last button pressed. 30 Use VOL (- Receiving a Transferred Call from base/Handset X shows in use the DIR or CID button to activate the ringer volume setting. ...Speakerphone, Handset, and Headset Volume While the phone is VOL 3 . 3. The initiating unit has two options at this point. ...

User Guide
Page 31
... user can then press the CONF Soft key shown on hold and to put the call will emit a page tone. Once the base unit or handset has both the person on the display to establish a 3-way conference between the two lines. 4-way conference call page. 3. During a call on hold , ...press the intercom button and then select the desired handset or base to select the desired option. Both parties on the original call on Line 1, press the hold button to the user that call by an intercom...
... user can then press the CONF Soft key shown on hold and to put the call will emit a page tone. Once the base unit or handset has both the person on the display to establish a 3-way conference between the two lines. 4-way conference call page. 3. During a call on hold , ...press the intercom button and then select the desired handset or base to select the desired option. Both parties on the original call on Line 1, press the hold button to the user that call by an intercom...


