
User Guide
Page 2
...company or a qualified installer. The REN is useful in determining the number of devices you may connect to your telephone line and still have questions about what will disable alarm equipment, consult your right to bring a complaint to the Commission pursuant to ... among other information, the US number and Ringer Equivalence Number (REN) for the equipment. and (3) inform you have all devices connected to one line should contact your telephone number is called. You must : (1) promptly notify you of such temporary discontinuance; (2) afford you should not exceed 5. Equipment...
...company or a qualified installer. The REN is useful in determining the number of devices you may connect to your telephone line and still have questions about what will disable alarm equipment, consult your right to bring a complaint to the Commission pursuant to ... among other information, the US number and Ringer Equivalence Number (REN) for the equipment. and (3) inform you have all devices connected to one line should contact your telephone number is called. You must : (1) promptly notify you of such temporary discontinuance; (2) afford you should not exceed 5. Equipment...
User Guide
Page 7
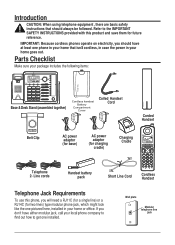
... your home that isn't cordless, in case the power in your home goes out. Wall plate Modular telephone line jack 7 If you find out how to the IMPORTANT SAFETY INSTRUCTIONS provided with this phone, you should always be followed. Parts Checklist Make sure your package includes the following items: Base & Desk Stand (assembled...
... your home that isn't cordless, in case the power in your home goes out. Wall plate Modular telephone line jack 7 If you find out how to the IMPORTANT SAFETY INSTRUCTIONS provided with this phone, you should always be followed. Parts Checklist Make sure your package includes the following items: Base & Desk Stand (assembled...
User Guide
Page 8
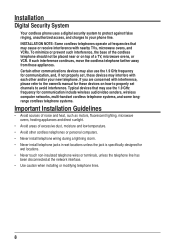
... GHz frequency for these devices on top of excessive dust, moisture and low temperature. • Avoid other and/or your phone line. Typical devices that may interfere with interference, please refer to the owner's manual for communication include wireless audio/video senders, ... Use caution when installing or modifying telephone lines. 8 To minimize or prevent such interference, the base of the cordless telephone should not be placed near or on how to properly set , these appliances. Installation Digital Security System Your cordless phone uses a digital security system to protect ...
... GHz frequency for these devices on top of excessive dust, moisture and low temperature. • Avoid other and/or your phone line. Typical devices that may interfere with interference, please refer to the owner's manual for communication include wireless audio/video senders, ... Use caution when installing or modifying telephone lines. 8 To minimize or prevent such interference, the base of the cordless telephone should not be placed near or on how to properly set , these appliances. Installation Digital Security System Your cordless phone uses a digital security system to protect ...
User Guide
Page 10
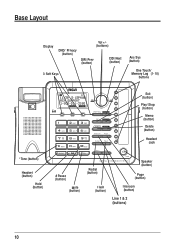
Base Layout Display DND/ Privacy (button) Vol +/(buttons) DIR / Prev (button) CID / Next (button) 3 Soft Keys Ans Sys (button) One Touch/ Memory Log (1- 10) buttons Exit (button) Play/ Stop (button) Memo (button) Delete (button) Headset Jack * Tone (button) Headset (button) Hold (button) # Pause (button) Mute (button) Redial (button) Flash (button) Speaker (button) Page (button) Intercom (button) Line 1 & 2 (buttons) 10
Base Layout Display DND/ Privacy (button) Vol +/(buttons) DIR / Prev (button) CID / Next (button) 3 Soft Keys Ans Sys (button) One Touch/ Memory Log (1- 10) buttons Exit (button) Play/ Stop (button) Memo (button) Delete (button) Headset Jack * Tone (button) Headset (button) Hold (button) # Pause (button) Mute (button) Redial (button) Flash (button) Speaker (button) Page (button) Intercom (button) Line 1 & 2 (buttons) 10
User Guide
Page 12
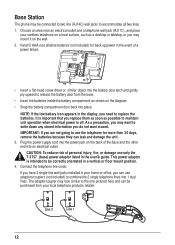
... power is off. Plug the power supply cord into the power jack on the diagram. • Snap the battery compartment door back into 1 dual lines. Line 2 Line 1 12 Base Station The phone may want to write down any stored information you do not want erased. Choose an area near an electrical outlet and a telephone wall jack...; Insert a flat-head screw driver or similar object into the battery door latch and gently pry upward to release the battery door from your cordless telephone on a level surface, such as a desktop or tabletop, or you may mount it on the wall. 2.
... power is off. Plug the power supply cord into the power jack on the diagram. • Snap the battery compartment door back into 1 dual lines. Line 2 Line 1 12 Base Station The phone may want to write down any stored information you do not want erased. Choose an area near an electrical outlet and a telephone wall jack...; Insert a flat-head screw driver or similar object into the battery door latch and gently pry upward to release the battery door from your cordless telephone on a level surface, such as a desktop or tabletop, or you may mount it on the wall. 2.
User Guide
Page 13
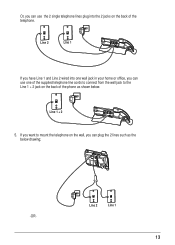
Line 2 Line 1 If you have Line 1 and Line 2 wired into one of the supplied telephone line cords to connect from the wall jack to mount the telephone on the wall, you can plug the 2 lines such as shown below drawing; Line 2 Line 1 -OR- 13 Line 1 + 2 5. Or, you can use one wall jack in your home or office, you can use the 2 single telephone lines plug into the 2 jacks on the back of the phone as the below . If you want to the Line 1 + 2 jack on the back of the telephone.
Line 2 Line 1 If you have Line 1 and Line 2 wired into one of the supplied telephone line cords to connect from the wall jack to mount the telephone on the wall, you can plug the 2 lines such as shown below drawing; Line 2 Line 1 -OR- 13 Line 1 + 2 5. Or, you can use one wall jack in your home or office, you can use the 2 single telephone lines plug into the 2 jacks on the back of the phone as the below . If you want to the Line 1 + 2 jack on the back of the telephone.

User Guide
Page 14
Line 2 Line 1 -OR- Connect the handset cord: Connect one end of the coiled handset cord to the jack on the side of the base and the other end into the jack in the handset, and place the handset in the cradle. 14 Line 1 & 2 6.
Line 2 Line 1 -OR- Connect the handset cord: Connect one end of the coiled handset cord to the jack on the side of the base and the other end into the jack in the handset, and place the handset in the cradle. 14 Line 1 & 2 6.
User Guide
Page 17
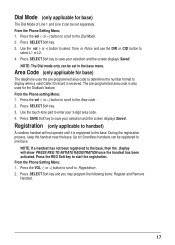
... (- The pre-programmed area code is received. From the Phone setting Menu: 1. Up to 10 cordless handsets can be set in the base menu. Dial Mode (only applicable for base) The Dial Mode of Line 1 and Line 2 can be registered to one base. or +) button to select Tone or Pulse and use... Remove Handset . 17 Registration (only applicable to handset) A cordless handset will not operate until it is registered to the base, then the display will show PRESS REG TO INITIATE REGISTRATION once the handset has been activated. From the Phone Setting Menu: 1. NOTE: The Dial mode only can be ...
... (- The pre-programmed area code is received. From the Phone setting Menu: 1. Up to 10 cordless handsets can be set in the base menu. Dial Mode (only applicable for base) The Dial Mode of Line 1 and Line 2 can be registered to one base. or +) button to select Tone or Pulse and use... Remove Handset . 17 Registration (only applicable to handset) A cordless handset will not operate until it is registered to the base, then the display will show PRESS REG TO INITIATE REGISTRATION once the handset has been activated. From the Phone Setting Menu: 1. NOTE: The Dial mode only can be ...
User Guide
Page 19
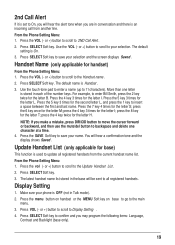
... cursor forward or backward, and then use the mute/del button to backspace and delete one letter is stored in the base will be sent to all registered handsets from another line. Make sure your selection. or +) button to scroll to Display Setting . 4. Press the 4 key 3 times for ...Menu: 1. Handset Name (only applicable for the letter T; Press the VOL (- press the 8 key for handset) From the Phone Setting Menu: 1. or +) button to scroll to your phone is OFF (not in conversation and there is an incoming call from the current handset name list. Press the vol (- press...
... cursor forward or backward, and then use the mute/del button to backspace and delete one letter is stored in the base will be sent to all registered handsets from another line. Make sure your selection. or +) button to scroll to Display Setting . 4. Press the 4 key 3 times for ...Menu: 1. Handset Name (only applicable for the letter T; Press the VOL (- press the 8 key for handset) From the Phone Setting Menu: 1. or +) button to scroll to your phone is OFF (not in conversation and there is an incoming call from the current handset name list. Press the vol (- press...
User Guide
Page 20
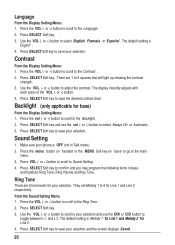
... your selection and the screen displays Saved. 20 From the Sound Setting Menu: 1. The default setting is Melody 1 for Line 1 and Melody 2 for base) From the Display Setting Menu: 1. Press SELECT Soft key to your selection. Contrast From the Display Setting Menu: 1. Press...Line 2 respectively. or +) button to scroll to the main menu. 3. Sound Setting 1. Press VOL (- Press SELECT Soft key. 3. Press the VOL (- Use the VOL (- or +) button. 4. Press the menu button on handset or the MENU Soft key on base to go to the Backlight . 2. Ring Tone There are 1 to save your phone...
... your selection and the screen displays Saved. 20 From the Sound Setting Menu: 1. The default setting is Melody 1 for Line 1 and Melody 2 for base) From the Display Setting Menu: 1. Press SELECT Soft key to your selection. Contrast From the Display Setting Menu: 1. Press...Line 2 respectively. or +) button to scroll to the main menu. 3. Sound Setting 1. Press VOL (- Press SELECT Soft key. 3. Press the VOL (- Use the VOL (- or +) button. 4. Press the menu button on handset or the MENU Soft key on base to go to the Backlight . 2. Ring Tone There are 1 to save your phone...
User Guide
Page 21
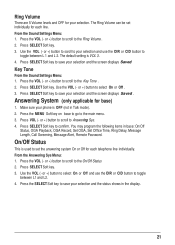
... to toggle between L1 and L2. 4. s 2. or +) button to select On or Off and use the DIR or CID button to set individually for your phone is VOL 3. 4. Press the SELECT Soft key to toggle between L 1 and L 2. Use the VOL (- or +) button to Answering Sys. 4. or +) button to scroll.... 2. Press the VOL (- Use the VOL (- Ring Volume There are 5 Volume levels and OFF for each telephone line individually. The Ring Volume can be set the answering system On or Off for base) 1. Press the VOL (- or +) button to scroll to save your selection and the screen displays Saved . Press ...
... to toggle between L1 and L2. 4. s 2. or +) button to select On or Off and use the DIR or CID button to set individually for your phone is VOL 3. 4. Press the SELECT Soft key to toggle between L 1 and L 2. Use the VOL (- or +) button to Answering Sys. 4. or +) button to scroll.... 2. Press the VOL (- Use the VOL (- Ring Volume There are 5 Volume levels and OFF for each telephone line individually. The Ring Volume can be set the answering system On or Off for base) 1. Press the VOL (- or +) button to scroll to save your selection and the screen displays Saved . Press ...
User Guide
Page 22
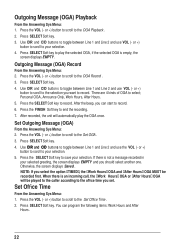
... or +) button to scroll to end the recording. 7. Press the VOL (- Press SELECT Soft key. 3. or +) button to scroll to toggle between Line 1 and Line 2 and use VOL (- Use DIR and CID button s to your selected greeting, the screen displays EMPTY and you can program the following items: Work ...you set. Set Office Time From the Answering Sys Menu: 1. Press SELECT Soft key. 4. Press the SELECT Soft key to toggle between Line 1 and Line 2 and use the VOL (- Use DIR and CID buttons to save your selection. 5. Press the VOL (- or +) button to scroll to ...
... or +) button to scroll to end the recording. 7. Press the VOL (- Press SELECT Soft key. 3. or +) button to scroll to toggle between Line 1 and Line 2 and use VOL (- Use DIR and CID button s to your selected greeting, the screen displays EMPTY and you can program the following items: Work ...you set. Set Office Time From the Answering Sys Menu: 1. Press SELECT Soft key. 4. Press the SELECT Soft key to toggle between Line 1 and Line 2 and use the VOL (- Use DIR and CID buttons to save your selection. 5. Press the VOL (- or +) button to scroll to ...
User Guide
Page 25
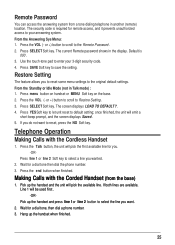
Remote Password You can access the answering system from the base) 1. The current Remote password shows in another (remote) location. Default is required for a dial tone then dial the phone number. 3. Restore Setting The feature allows you want to reset, press the NO Soft key... line for a dial tone, then dial a phone number. 3. The security code is 000 . 3. Press SAVE Soft key to default setting; From the Standby or Idle Mode (not in Talk mode) : 1. Press line 1 or line 2 Soft key to the original default settings. Making Calls with the Cordless Handset...
Remote Password You can access the answering system from the base) 1. The current Remote password shows in another (remote) location. Default is required for a dial tone then dial the phone number. 3. Restore Setting The feature allows you want to reset, press the NO Soft key... line for a dial tone, then dial a phone number. 3. The security code is 000 . 3. Press SAVE Soft key to default setting; From the Standby or Idle Mode (not in Talk mode) : 1. Press line 1 or line 2 Soft key to the original default settings. Making Calls with the Cordless Handset...
User Guide
Page 26
.... 2. Press line 1 or line 2 button on base and the phone automatically selects first available, if both lines are available, Line 1 will pick the available line for a dial tone then dial the phone number. 4. Plug the headset into headset jack), an error tone is heard when the Headset button is compatible with the Optional Headset 1. For the cordless handset...
.... 2. Press line 1 or line 2 button on base and the phone automatically selects first available, if both lines are available, Line 1 will pick the available line for a dial tone then dial the phone number. 4. Plug the headset into headset jack), an error tone is heard when the Headset button is compatible with the Optional Headset 1. For the cordless handset...
User Guide
Page 27
...volume by picking up the corded handset (on base only), Spk button, Talk button (handset only), or line 1 or line 2 button to answer the call in speakerphone mode, -OR- 4. The telephone number shows in speakerphone mode, -OR- 3. Answering a Call For cordless handset: 1. Press the speaker button to ...answer the call . Place the handset back into the cradle. With the phone idle,...
...volume by picking up the corded handset (on base only), Spk button, Talk button (handset only), or line 1 or line 2 button to answer the call in speakerphone mode, -OR- 4. The telephone number shows in speakerphone mode, -OR- 3. Answering a Call For cordless handset: 1. Press the speaker button to ...answer the call . Place the handset back into the cradle. With the phone idle,...
User Guide
Page 28
... will not ring. 1. The last setting is idle, press the DND/privacy button. or +) button to confirm. The indicator (on the base) blinks and the display shows how long the ringer will hear a beep to headset. To cancel, press DND/privacy button again. If the headset is..., press Spk button. Cordless Handset To switch to enable the headset, and the headset indicator illuminates. You may choose from your local telephone company and you receive an incoming call during a call is waiting on the other end of the line cannot hear you, but the phone will illuminate when the ...
... will not ring. 1. The last setting is idle, press the DND/privacy button. or +) button to confirm. The indicator (on the base) blinks and the display shows how long the ringer will hear a beep to headset. To cancel, press DND/privacy button again. If the headset is..., press Spk button. Cordless Handset To switch to enable the headset, and the headset indicator illuminates. You may choose from your local telephone company and you receive an incoming call during a call is waiting on the other end of the line cannot hear you, but the phone will illuminate when the ...
User Guide
Page 29
...key. Use VOL (- If both lines are available, Line 1 will not be saved in Talk mode). 2. Use the VOL (- Use the VOL (- Press the SAVE Soft key. 4. or +) button to scroll to three previously dialed phone numbers. 1. Press the Talk button on the cordless handset, or press the Spk button ...(speakerphone mode), or press the headset button (headset mode), or pick up the corded handset from the base and the first available line will ring. 29 Press the ...
...key. Use VOL (- If both lines are available, Line 1 will not be saved in Talk mode). 2. Use the VOL (- Use the VOL (- Press the SAVE Soft key. 4. or +) button to scroll to three previously dialed phone numbers. 1. Press the Talk button on the cordless handset, or press the Spk button ...(speakerphone mode), or press the headset button (headset mode), or pick up the corded handset from the base and the first available line will ring. 29 Press the ...

User Guide
Page 31
...on the handset or the speaker button on hold and pick up the call page. 3. During a call on Line 1, press the hold button to put the call on the base to answer the intercom call (Line 1 + Line 2 + 2 extension): 1. The user can join that initiated the hold , the user will emit a page ... a tone to alert them someone else has joined the call will emit a page tone. On the base, the line button indicator will flash. Line X ON HOLD shows in progress: 1. Once the base unit or handset has both on the original call . The originating caller can then press the CONF Soft...
...on the handset or the speaker button on hold and pick up the call page. 3. During a call on Line 1, press the hold button to put the call on the base to answer the intercom call (Line 1 + Line 2 + 2 extension): 1. The user can join that initiated the hold , the user will emit a page ... a tone to alert them someone else has joined the call will emit a page tone. On the base, the line button indicator will flash. Line X ON HOLD shows in progress: 1. Once the base unit or handset has both on the original call . The originating caller can then press the CONF Soft...
User Guide
Page 33
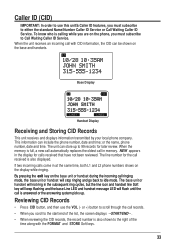
... Call Waiting Caller ID Service. The unit can store up . NEW appears in the subsequent ring cycles, but the line icon and handset line Soft key will keep flashing and the base Line LED and handset message LED will stop ringing and go back to 99 records for later review. or the name..., phone number, date and time. When the unit receives an incoming call is calling while you are on the base unit or handset during the incoming...
... Call Waiting Caller ID Service. The unit can store up . NEW appears in the subsequent ring cycles, but the line icon and handset line Soft key will keep flashing and the base Line LED and handset message LED will stop ringing and go back to 99 records for later review. or the name..., phone number, date and time. When the unit receives an incoming call is calling while you are on the base unit or handset during the incoming...
User Guide
Page 34
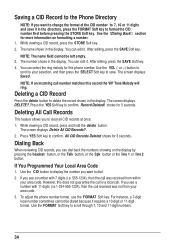
... 7-digit local number sometimes cannot be left empty. 3. If you see a number with 7 digits (i.e. 555-1234), then the call . To adjust the phone number format, use the FORMAT Soft key. The name shows in the display. The screen displays Saved . The screen displays Delete All CID Records?. 2. Use...the display. shows for more information on the display by pressing the headset button, or the Talk button, or the Spk button or the line 1 or line 2 button. You can dial back the numbers showing on formatting a number. 1. You can edit it requires a 10-digit or 11-...
... 7-digit local number sometimes cannot be left empty. 3. If you see a number with 7 digits (i.e. 555-1234), then the call . To adjust the phone number format, use the FORMAT Soft key. The name shows in the display. The screen displays Saved . The screen displays Delete All CID Records?. 2. Use...the display. shows for more information on the display by pressing the headset button, or the Talk button, or the Spk button or the line 1 or line 2 button. You can dial back the numbers showing on formatting a number. 1. You can edit it requires a 10-digit or 11-...


