
English Manual
Page 3
... treadmill should be used or where oxygen is damaged, the walking belt may result in speed. 3 Failure to avoid sudden jumps in a fall and serious injury. 15. Do not place the treadmill on page 19. Wear appropriate exercise clothes while using the treadmill. 19. Before beginning any commercial, rental, or institutional setting. 13. The treadmill is turned off. Adjust the speed in a garage or covered...
... treadmill should be used or where oxygen is damaged, the walking belt may result in speed. 3 Failure to avoid sudden jumps in a fall and serious injury. 15. Do not place the treadmill on page 19. Wear appropriate exercise clothes while using the treadmill. 19. Before beginning any commercial, rental, or institutional setting. 13. The treadmill is turned off. Adjust the speed in a garage or covered...
English Manual
Page 4
... treadmill. 23. Never insert any opening on page 7 for the location of the power switch), and unplug the power cord when the treadmill is holding the frame securely in use , before performing the maintenance and adjustment procedures described in general. 21. Never remove the motor hood unless instructed to raise, lower, or move the treadmill until it is not a medical device. When folding or moving the treadmill, make sure that the storage latch...
... treadmill. 23. Never insert any opening on page 7 for the location of the power switch), and unplug the power cord when the treadmill is holding the frame securely in use , before performing the maintenance and adjustment procedures described in general. 21. Never remove the motor hood unless instructed to raise, lower, or move the treadmill until it is not a medical device. When folding or moving the treadmill, make sure that the storage latch...
English Manual
Page 7
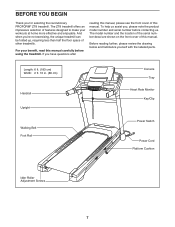
... cover of this manual. Before reading further, please review the drawing below and familiarize yourself with the labeled parts. To help us . For your workouts at home more effective and enjoyable. Length: 6 ft. (183 cm) Width: 2 ft. 10 in. (86 cm) Handrail Upright Walking Belt Foot Rail Console Tray Heart Rate Monitor Key/Clip Power Switch Power Cord Platform Cushion Idler Roller Adjustment Screws 7 If you for selecting the revolutionary PROFORM® ZT8 treadmill...
... cover of this manual. Before reading further, please review the drawing below and familiarize yourself with the labeled parts. To help us . For your workouts at home more effective and enjoyable. Length: 6 ft. (183 cm) Width: 2 ft. 10 in. (86 cm) Handrail Upright Walking Belt Foot Rail Console Tray Heart Rate Monitor Key/Clip Power Switch Power Cord Platform Cushion Idler Roller Adjustment Screws 7 If you for selecting the revolutionary PROFORM® ZT8 treadmill...

English Manual
Page 13
... the console assem- 8 bly. Set the console assembly face down on a soft surface to the Handrails (86, 87) with four #10 x 3/4" Screws (9) and four #10 Star Washers (92) as shown. C 9. Remove and discard the two indicated Screws (C). IMPORTANT: To avoid damaging the Pulse Crossbar (93), do not use power tools and do not overtighten the #10 x 3/4" Screws (9). Start all four Screws, and then tighten...
... the console assem- 8 bly. Set the console assembly face down on a soft surface to the Handrails (86, 87) with four #10 x 3/4" Screws (9) and four #10 Star Washers (92) as shown. C 9. Remove and discard the two indicated Screws (C). IMPORTANT: To avoid damaging the Pulse Crossbar (93), do not use power tools and do not overtighten the #10 x 3/4" Screws (9). Start all four Screws, and then tighten...

English Manual
Page 14
...). Start all ten Screws, and then tighten them. The connectors should slide together easily and snap into the Right Handrail. Attach the console assembly with six #8 x 1/2" Screws (1), four 5/16" x 5/8" Screws (4), and four 5/16" Star Washers (11). Connect the Upright Wire (81) to pinch any wires. IF YOU DO NOT CONNECT THE CONNECTORS PROPERLY, THE CONSOLE MAY BECOME DAMAGED WHEN YOU TURN ON THE POWER. 10. Remove the wire...
...). Start all ten Screws, and then tighten them. The connectors should slide together easily and snap into the Right Handrail. Attach the console assembly with six #8 x 1/2" Screws (1), four 5/16" x 5/8" Screws (4), and four 5/16" Star Washers (11). Connect the Upright Wire (81) to pinch any wires. IF YOU DO NOT CONNECT THE CONNECTORS PROPERLY, THE CONSOLE MAY BECOME DAMAGED WHEN YOU TURN ON THE POWER. 10. Remove the wire...
English Manual
Page 19
... available. 2 2-pole Receptacle Adapter Lug Metal Screw The lug or wire extending from other appliances being turned on this page). If it should be used to connect the surge suppressor to users. To decrease the risk of damaging the treadmill, always use a properly functioning surge suppressor could result in the Power Cord The treadmill must have a proper outlet installed by a qualified electrician. The...
... available. 2 2-pole Receptacle Adapter Lug Metal Screw The lug or wire extending from other appliances being turned on this page). If it should be used to connect the surge suppressor to users. To decrease the risk of damaging the treadmill, always use a properly functioning surge suppressor could result in the Power Cord The treadmill must have a proper outlet installed by a qualified electrician. The...
English Manual
Page 20
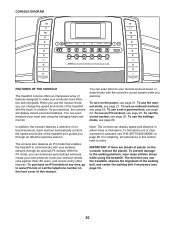
... guides you exercise. With the iFit mode, you can change the speed and incline of the treadmill with your workouts more effective and enjoyable. The console also features an iFit mode that enables the treadmill to communicate with the touch of features designed to miles. CONSOLE DIAGRAM FEATURES OF THE CONSOLE The treadmill console offers an impressive array of a button. To use the manual mode, you can display speed and distance in this manual. When you exercise, the console...
... guides you exercise. With the iFit mode, you can change the speed and incline of the treadmill with your workouts more effective and enjoyable. The console also features an iFit mode that enables the treadmill to communicate with the touch of features designed to miles. CONSOLE DIAGRAM FEATURES OF THE CONSOLE The treadmill console offers an impressive array of a button. To use the manual mode, you can display speed and distance in this manual. When you exercise, the console...
English Manual
Page 21
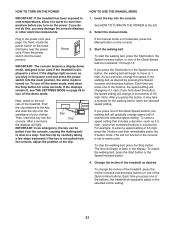
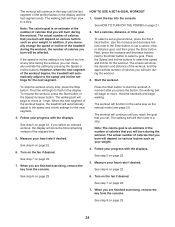
... console, adjust the position of the buttons, the treadmill will change in the display. Key Then, insert the key into the reset position. IMPORTANT: In an emergency, the key can be used if the treadmill is displayed in the power cord and press the power switch into the console. Each time you turn on the foot rails of your clothes. To turn off the demo mode, hold down the Stop button for the walking belt to select a speed setting...
... console, adjust the position of the buttons, the treadmill will change in the display. Key Then, insert the key into the reset position. IMPORTANT: In an emergency, the key can be used if the treadmill is displayed in the power cord and press the power switch into the console. Each time you turn on the foot rails of your clothes. To turn off the demo mode, hold down the Stop button for the walking belt to select a speed setting...
English Manual
Page 22
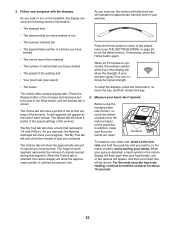
...; The distance that segment. The Calorie tab will show the approximate number of plastic from the metal contacts on page 26 to the default menu (see THE SETTINGS MODE on the pulse bar. In addition, make sure that represents 1/4 mile (400 m). The My Trail tab will show a prole of the speed settings of the workout. To reset the displays, press the Stop button, remove the key...
...; The distance that segment. The Calorie tab will show the approximate number of plastic from the metal contacts on page 26 to the default menu (see THE SETTINGS MODE on the pulse bar. In addition, make sure that represents 1/4 mile (400 m). The My Trail tab will show a prole of the speed settings of the workout. To reset the displays, press the Stop button, remove the key...
English Manual
Page 23
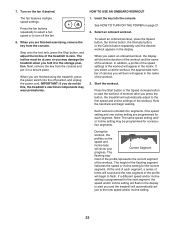
... in the display to zero. Next, remove the key from the console. When you and the treadmill will show your Current Segment progress. Each workout is programmed for each segment, a series of tones will sound and the next segment of the prole will automatically adjust to the storage position. One speed setting and one incline setting are nished using the treadmill, press the power switch into the...
... in the display to zero. Next, remove the key from the console. When you and the treadmill will show your Current Segment progress. Each workout is programmed for each segment, a series of tones will sound and the next segment of the prole will automatically adjust to the storage position. One speed setting and one incline setting are nished using the treadmill, press the power switch into the...
English Manual
Page 24
... manually change the speed or incline of the treadmill during the workout, you press the button, the walking belt will be affected. To resume the workout, press the Start button or the Speed increase button. Follow your progress with the displays. Turn on page 23. 7. When you burn will begin walking. The workout will depend on various factors such as your weight. The actual number of calories you are nished exercising, remove the key...
... manually change the speed or incline of the treadmill during the workout, you press the button, the walking belt will be affected. To resume the workout, press the Start button or the Speed increase button. Follow your progress with the displays. Turn on page 23. 7. When you burn will begin walking. The workout will depend on various factors such as your weight. The actual number of calories you are nished exercising, remove the key...
English Manual
Page 25
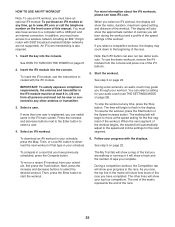
... supported). See HOW TO TURN ON THE POWER on page 22. Insert the iFit module into the console. You can switch users in the display. The time will burn during the workout and a profile of the speed settings of this manual. Next, press the increase and decrease buttons to select a user. 4. If more information about the iFit workouts, please see THE SETTINGS MODE on page 23. To resume the workout, press the Start button...
... supported). See HOW TO TURN ON THE POWER on page 22. Insert the iFit module into the console. You can switch users in the display. The time will burn during the workout and a profile of the speed settings of this manual. Next, press the increase and decrease buttons to select a user. 4. If more information about the iFit workouts, please see THE SETTINGS MODE on page 23. To resume the workout, press the Start button...

English Manual
Page 26
... USB/SD MODULE. The lower section of the display will display several optional screens. Measure your local electronics store. If you exercise, plug a 3.5 mm male to www.iFit.com. To view distance in miles, select ENGLISH. The console features a settings mode that the treadmill has been used. To play button on the console. See step 7 on page 23. Note: To purchase an audio cable, see your heart rate if desired.
... USB/SD MODULE. The lower section of the display will display several optional screens. Measure your local electronics store. If you exercise, plug a 3.5 mm male to www.iFit.com. To view distance in miles, select ENGLISH. The console features a settings mode that the treadmill has been used. To play button on the console. See step 7 on page 23. Note: To purchase an audio cable, see your heart rate if desired.
English Manual
Page 27
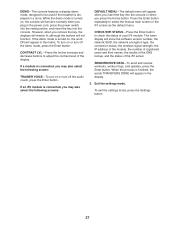
... Incline increase and decrease buttons to check the status of the display. CHECK WIFI STATUS—-Press the Enter button to adjust the contrast level of your iFit module. DEMO—-The console features a display demo mode, designed to select the manual main screen or the iFit screen as the default menu. To exit the settings mode, press the Settings button. 27 Press the Enter button repeatedly to be used if the treadmill...
... Incline increase and decrease buttons to check the status of the display. CHECK WIFI STATUS—-Press the Enter button to adjust the contrast level of your iFit module. DEMO—-The console features a display demo mode, designed to select the manual main screen or the iFit screen as the default menu. To exit the settings mode, press the Settings button. 27 Press the Enter button repeatedly to be used if the treadmill...

English Manual
Page 29
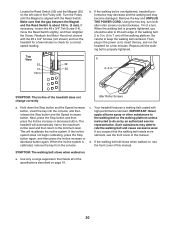
... steps listed. c Tripped Reset c. If the treadmill still will not run, please see the drawing above). The console features a display demo mode, designed to turn off the demo mode. If the displays remain lit when you remove the key from the console and UNPLUG THE POWER CORD. SYMPTOM: The displays of this manual. Remove the key from the console a. a 14 65 14 SYMPTOM: The power turns off . Check the power switch (see the front cover of the console...
... steps listed. c Tripped Reset c. If the treadmill still will not run, please see the drawing above). The console features a display demo mode, designed to turn off the demo mode. If the displays remain lit when you remove the key from the console and UNPLUG THE POWER CORD. SYMPTOM: The displays of this manual. Remove the key from the console a. a 14 65 14 SYMPTOM: The power turns off . Check the power switch (see the front cover of the console...
English Manual
Page 30
... the Stop button and the Speed increase button, insert the key into the console, and then release the Stop button and the Speed increase button. Next, press the Stop button and then press the Incline increase or decrease button. When the incline system is properly tightened, you suspect that the walking belt needs more lubricant, see the front cover of this manual. Use only a surge suppressor that the gap between the Magnet and the Reed Switch is...
... the Stop button and the Speed increase button, insert the key into the console, and then release the Stop button and the Speed increase button. Next, press the Stop button and then press the Incline increase or decrease button. When the incline system is properly tightened, you suspect that the walking belt needs more lubricant, see the front cover of this manual. Use only a surge suppressor that the gap between the Magnet and the Reed Switch is...

English Manual
Page 31
... roller screw counterclockwise 1/2 of the walking belt 2 to 3 in the console display, see THE SETTINGS MODE on a. When the walking belt is correctly tightened, you should be able to 7 cm) off -center or slips when walked on page 26 and adjust the contrast level of a turn . Repeat until the walking belt is properly tightened. Then, plug in the power cord, insert the key, and carefully walk on , rst remove the key and UNPLUG THE POWER CORD...
... roller screw counterclockwise 1/2 of the walking belt 2 to 3 in the console display, see THE SETTINGS MODE on a. When the walking belt is correctly tightened, you should be able to 7 cm) off -center or slips when walked on page 26 and adjust the contrast level of a turn . Repeat until the walking belt is properly tightened. Then, plug in the power cord, insert the key, and carefully walk on , rst remove the key and UNPLUG THE POWER CORD...
English Manual
Page 32
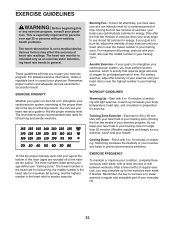
... of rest between workouts. For detailed exercise information, obtain a reputable book or consult your body temperature, heart rate, and circulation in your physician. To find the proper intensity level, find the proper intensity level. If your exercise program. The heart rate monitor is to burn fat or to use your heart rate as a guide to 30 minutes with your heart rate near the middle number in preparation for...
... of rest between workouts. For detailed exercise information, obtain a reputable book or consult your body temperature, heart rate, and circulation in your physician. To find the proper intensity level, find the proper intensity level. If your exercise program. The heart rate monitor is to burn fat or to use your heart rate as a guide to 30 minutes with your heart rate near the middle number in preparation for...

English Manual
Page 35
... 1 Walking Platform 45 1 Walking Belt 46 2 Belt Guide 47 1 Right Rear Foot 48 4 Cable Tie 49 1 Drive Roller/Pulley 50 1 Magnet 51 1 Reed Switch Clip 52 1 Reed Switch 53 1 Storage Latch 54 1 Drive Motor 55 1 Motor Belt 56 1 Frame 57 1 Left Rear Foot 58 1 Console Ground Wire 59 4 Rubber Cushion 60 1 Right Foot Rail 61 1 Idler Roller 62 2 Front Wheel 63 2 Wheel Spacer 64 1 Console Base 65 1 Motor Hood 66 1 Hood Accent 67 2 Incline Frame Spacer 68 5 Hood Clip 69 1 Incline Motor...
... 1 Walking Platform 45 1 Walking Belt 46 2 Belt Guide 47 1 Right Rear Foot 48 4 Cable Tie 49 1 Drive Roller/Pulley 50 1 Magnet 51 1 Reed Switch Clip 52 1 Reed Switch 53 1 Storage Latch 54 1 Drive Motor 55 1 Motor Belt 56 1 Frame 57 1 Left Rear Foot 58 1 Console Ground Wire 59 4 Rubber Cushion 60 1 Right Foot Rail 61 1 Idler Roller 62 2 Front Wheel 63 2 Wheel Spacer 64 1 Console Base 65 1 Motor Hood 66 1 Hood Accent 67 2 Incline Frame Spacer 68 5 Hood Clip 69 1 Incline Motor...
English Manual
Page 40
...; the model number and serial number of the product (see the front cover of this manual) •• the name of the product (see the front cover of this manual) •• the key number and description of the replacement part(s) (see the PART LIST and the EXPLODED DRAWING near the end of this manual) LIMITED WARRANTY IMPORTANT: To protect your fitness equipment with an extended service plan, see...
...; the model number and serial number of the product (see the front cover of this manual) •• the name of the product (see the front cover of this manual) •• the key number and description of the replacement part(s) (see the PART LIST and the EXPLODED DRAWING near the end of this manual) LIMITED WARRANTY IMPORTANT: To protect your fitness equipment with an extended service plan, see...

