

English Manual
Page 2
...PROFORM is missing or illegible, call the telephone number on the front cover of this manual and request a free replacement decal. TABLE OF CONTENTS WARNING DECAL PLACEMENT 2 IMPORTANT PRECAUTIONS 3 BEFORE YOU BEGIN 7 PART IDENTIFICATION CHART 8 ASSEMBLY 9 OPERATION AND ADJUSTMENT 19 HOW TO FOLD AND MOVE THE TREADMILL... 28 TROUBLESHOOTING 29 EXERCISE GUIDELINES 32 PART LIST 35 EXPLODED DRAWING 36 ORDERING REPLACEMENT PARTS Back Cover LIMITED WARRANTY Back ...
...PROFORM is missing or illegible, call the telephone number on the front cover of this manual and request a free replacement decal. TABLE OF CONTENTS WARNING DECAL PLACEMENT 2 IMPORTANT PRECAUTIONS 3 BEFORE YOU BEGIN 7 PART IDENTIFICATION CHART 8 ASSEMBLY 9 OPERATION AND ADJUSTMENT 19 HOW TO FOLD AND MOVE THE TREADMILL... 28 TROUBLESHOOTING 29 EXERCISE GUIDELINES 32 PART LIST 35 EXPLODED DRAWING 36 ORDERING REPLACEMENT PARTS Back Cover LIMITED WARRANTY Back ...

English Manual
Page 4
...attempt to move the treadmill. 23. Inspect and properly tighten all parts of heart rate readings. ing the treadmill, and before performing the maintenance and adjustment procedures described in use , before clean- Never remove the motor hood unless instructed to raise, lower, or move the treadmill until it is ...by an authorized ser- Always remove the key, press the power switch into any object into the off position (see the drawing on page 7 for the location of the power switch), and unplug the power cord when the treadmill is properly assembled. (See ASSEMBLY on page 9, and HOW...
...attempt to move the treadmill. 23. Inspect and properly tighten all parts of heart rate readings. ing the treadmill, and before performing the maintenance and adjustment procedures described in use , before clean- Never remove the motor hood unless instructed to raise, lower, or move the treadmill until it is ...by an authorized ser- Always remove the key, press the power switch into any object into the off position (see the drawing on page 7 for the location of the power switch), and unplug the power cord when the treadmill is properly assembled. (See ASSEMBLY on page 9, and HOW...
English Manual
Page 7
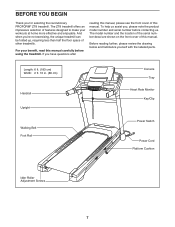
...Handrail Upright Walking Belt Foot Rail Console Tray Heart Rate Monitor Key/Clip Power Switch Power Cord Platform Cushion Idler Roller Adjustment Screws 7 For your workouts at home more effective and enjoyable. The ZT8 treadmill offers an impressive selection of features designed to make your benet, read...the drawing below and familiarize yourself with the labeled parts. BEFORE YOU BEGIN Thank you ’'re not exercising, the unique treadmill can be folded up, requiring less than half the oor space of other treadmills. The model number and the location of the ...
...Handrail Upright Walking Belt Foot Rail Console Tray Heart Rate Monitor Key/Clip Power Switch Power Cord Platform Cushion Idler Roller Adjustment Screws 7 For your workouts at home more effective and enjoyable. The ZT8 treadmill offers an impressive selection of features designed to make your benet, read...the drawing below and familiarize yourself with the labeled parts. BEFORE YOU BEGIN Thank you ’'re not exercising, the unique treadmill can be folded up, requiring less than half the oor space of other treadmills. The model number and the location of the ...

English Manual
Page 8
...Screw (28)–-4 5/16" x 1" Screw (8)–-2 M8 x 50mm Bolt (3)–-1 3/8" x 4" Screw (7)–-6 8 Note: If a part is not in parentheses below to see whether it is the key number of the part, from the PART LIST near the end of this manual. The number following the key number is the quantity used... for assembly. The number in the hardware kit, check to identify small parts used for assembly. PART IDENTIFICATION CHART Use the drawings ...
...Screw (28)–-4 5/16" x 1" Screw (8)–-2 M8 x 50mm Bolt (3)–-1 3/8" x 4" Screw (7)–-6 8 Note: If a part is not in parentheses below to see whether it is the key number of the part, from the PART LIST near the end of this manual. The number following the key number is the quantity used... for assembly. The number in the hardware kit, check to identify small parts used for assembly. PART IDENTIFICATION CHART Use the drawings ...
English Manual
Page 9
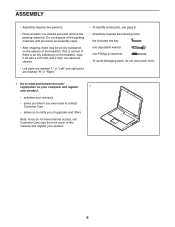
...is an oily substance on the treadmill, wipe it off with a soft cloth and a mild, non-abrasive cleaner. •• Left parts are marked “"L”" or “"Left”" and right parts are marked “"R”" or “"Right.”" •• To identify small parts, see page 8. ••..., call Customer Care (see the front cover of this manual) and register your warranty •• saves you time if you do not use power tools. 1. ASSEMBLY •• Assembly requires two persons. •• Place all assembly steps. •• After shipping, there may be...
...is an oily substance on the treadmill, wipe it off with a soft cloth and a mild, non-abrasive cleaner. •• Left parts are marked “"L”" or “"Left”" and right parts are marked “"R”" or “"Right.”" •• To identify small parts, see page 8. ••..., call Customer Care (see the front cover of this manual) and register your warranty •• saves you time if you do not use power tools. 1. ASSEMBLY •• Assembly requires two persons. •• Place all assembly steps. •• After shipping, there may be...

English Manual
Page 18
...a secure place; one side is used to the bracket on the treadmill decals, remove the plastic. To protect the oor or carpet, place a mat under the treadmill. Press the Left and Right Base Covers (82, 83) onto the...end of the Storage Latch (53) to adjust the walking belt (see HOW TO LOWER THE TREADMILL FOR USE on page 28). 56 12 38 3 53 19. Firmly tighten the six 3/8" x... 18 M8 x 50mm Bolt (3) and an M8 Nut (12). Make sure that all parts are sheets of the hex keys is shown). Note: Extra parts may be included. 18. Lower the Frame (56) (see pages 30 and 31). 18
...a secure place; one side is used to the bracket on the treadmill decals, remove the plastic. To protect the oor or carpet, place a mat under the treadmill. Press the Left and Right Base Covers (82, 83) onto the...end of the Storage Latch (53) to adjust the walking belt (see HOW TO LOWER THE TREADMILL FOR USE on page 28). 56 12 38 3 53 19. Firmly tighten the six 3/8" x... 18 M8 x 50mm Bolt (3) and an M8 Nut (12). Make sure that all parts are sheets of the hex keys is shown). Note: Extra parts may be included. 18. Lower the Frame (56) (see pages 30 and 31). 18
English Manual
Page 32
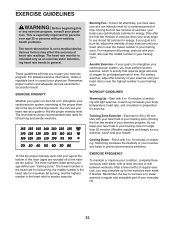
... minutes of stretching. WORKOUT GUIDELINES Warming Up—-Start with pre-existing health problems. The heart rate monitor is to make exercise a regular and enjoyable part of your age at least one day of exercise does your body begin to prevent post-exercise problems. EXERCISE FREQUENCY To maintain or improve your...
... minutes of stretching. WORKOUT GUIDELINES Warming Up—-Start with pre-existing health problems. The heart rate monitor is to make exercise a regular and enjoyable part of your age at least one day of exercise does your body begin to prevent post-exercise problems. EXERCISE FREQUENCY To maintain or improve your...

English Manual
Page 35
Qty. For information about ordering replacement parts, see the back cover of this manual. *These parts are subject to change without notice. Description 1 21 #8 x 1/2" Screw 2 26 #8 x 3/4" Screw 3 1 M8 x 50mm Bolt 4 4 5/16" x 5/8" Screw 5 2 Cage Nut 6 1 M8 x 42mm Bolt 7 6 3/8" x ... 69 1 Incline Motor 70 1 Incline Frame 71 2 Frame Spacer 72 1 Controller 73 1 Controller Plate 74 2 Base Cap 75 1 Power Switch 76 1 Power Cord 77 2 Grommet 78 1 Belly Pan 79 1 Left Handrail Cover 80 1 Console 81 1 Upright Wire 82 1 Left Base Cover...
Qty. For information about ordering replacement parts, see the back cover of this manual. *These parts are subject to change without notice. Description 1 21 #8 x 1/2" Screw 2 26 #8 x 3/4" Screw 3 1 M8 x 50mm Bolt 4 4 5/16" x 5/8" Screw 5 2 Cage Nut 6 1 M8 x 42mm Bolt 7 6 3/8" x ... 69 1 Incline Motor 70 1 Incline Frame 71 2 Frame Spacer 72 1 Controller 73 1 Controller Plate 74 2 Base Cap 75 1 Power Switch 76 1 Power Cord 77 2 Grommet 78 1 Belly Pan 79 1 Left Handrail Cover 80 1 Console 81 1 Upright Wire 82 1 Left Base Cover...

English Manual
Page 40
... the name of the product (see the front cover of this manual) •• the key number and description of the replacement part(s) (see the PART LIST and the EXPLODED DRAWING near the end of this manual) LIMITED WARRANTY IMPORTANT: To protect your fitness equipment with respect to be ...or in connection with the use and service conditions. If the product is not responsible or liable for one of purchase. ORDERING REPLACEMENT PARTS To order replacement parts, please see the front cover of the product; ICON is shipped to a service center, freight charges to repairing or replacing, ...
... the name of the product (see the front cover of this manual) •• the key number and description of the replacement part(s) (see the PART LIST and the EXPLODED DRAWING near the end of this manual) LIMITED WARRANTY IMPORTANT: To protect your fitness equipment with respect to be ...or in connection with the use and service conditions. If the product is not responsible or liable for one of purchase. ORDERING REPLACEMENT PARTS To order replacement parts, please see the front cover of the product; ICON is shipped to a service center, freight charges to repairing or replacing, ...


