
English Manual
Page 3
... electronics store. 5. This is damaged, the walking belt may slow, accelerate, or stop procedure before using your treadmill before using the treadmill (see page 19). Plug the power cord into a surge suppressor (not included), and plug the surge suppressor into an outlet on the walking belt.... avoid sudden jumps in this manual. 4. Keep the treadmill indoors, away from the treadmill at a time. 11. Do not operate the treadmill where aerosol products are recommended for home use of this manual, or see your local PROFORM dealer, call the telephone number on page 19. Read...
... electronics store. 5. This is damaged, the walking belt may slow, accelerate, or stop procedure before using your treadmill before using the treadmill (see page 19). Plug the power cord into a surge suppressor (not included), and plug the surge suppressor into an outlet on the walking belt.... avoid sudden jumps in this manual. 4. Keep the treadmill indoors, away from the treadmill at a time. 11. Do not operate the treadmill where aerosol products are recommended for home use of this manual, or see your local PROFORM dealer, call the telephone number on page 19. Read...
English Manual
Page 4
...22. Servicing other than the procedures in the storage position. 24. Always remove the key, press the power switch into any object into the off position (see the drawing on the treadmill. 25. If you feel faint or if you experience pain while exercising, stop immediately and cool down.... Never insert any opening on page 7 for the location of the power switch), and unplug the power cord when the treadmill is properly assembled. (See ASSEMBLY on page 9, and HOW TO FOLD AND MOVE THE TREADMILL on page 28.) You must be performed by an authorized service representative. ...
...22. Servicing other than the procedures in the storage position. 24. Always remove the key, press the power switch into any object into the off position (see the drawing on the treadmill. 25. If you feel faint or if you experience pain while exercising, stop immediately and cool down.... Never insert any opening on page 7 for the location of the power switch), and unplug the power cord when the treadmill is properly assembled. (See ASSEMBLY on page 9, and HOW TO FOLD AND MOVE THE TREADMILL on page 28.) You must be performed by an authorized service representative. ...
English Manual
Page 7
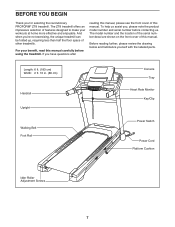
...the front cover of features designed to make your benet, read this manual carefully before contacting us assist you for selecting the revolutionary PROFORM® ZT8 treadmill. Length: 6 ft. (183 cm) Width: 2 ft. 10 in. (86 cm) Handrail Upright Walking Belt Foot Rail Console Tray... Heart Rate Monitor Key/Clip Power Switch Power Cord Platform Cushion Idler Roller Adjustment Screws 7 BEFORE YOU BEGIN Thank you , please note the product model number and serial number before using the treadmill. If you ’'re not exercising, the unique treadmill can be folded up, requiring...
...the front cover of features designed to make your benet, read this manual carefully before contacting us assist you for selecting the revolutionary PROFORM® ZT8 treadmill. Length: 6 ft. (183 cm) Width: 2 ft. 10 in. (86 cm) Handrail Upright Walking Belt Foot Rail Console Tray... Heart Rate Monitor Key/Clip Power Switch Power Cord Platform Cushion Idler Roller Adjustment Screws 7 BEFORE YOU BEGIN Thank you , please note the product model number and serial number before using the treadmill. If you ’'re not exercising, the unique treadmill can be folded up, requiring...
English Manual
Page 9
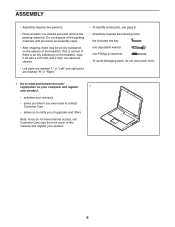
... upgrades and offers Note: If you nish all parts in a cleared area and remove the packing materials. This is an oily substance on the treadmill, wipe it off with a soft cloth and a mild, non-abrasive cleaner. •• Left parts are marked “"L”" or “"Left”" and right...; Assembly requires two persons. •• Place all assembly steps. •• After shipping, there may be an oily substance on the exterior of the treadmill. Do not dispose of the packing materials until you do not use...
... upgrades and offers Note: If you nish all parts in a cleared area and remove the packing materials. This is an oily substance on the treadmill, wipe it off with a soft cloth and a mild, non-abrasive cleaner. •• Left parts are marked “"L”" or “"Left”" and right...; Assembly requires two persons. •• Place all assembly steps. •• After shipping, there may be an oily substance on the exterior of the treadmill. Do not dispose of the packing materials until you do not use...
English Manual
Page 19
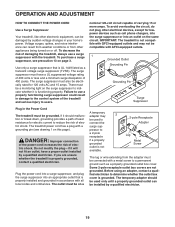
... circuit, do not plug other electronic equipment, can be connected with a metal screw to determine whether the outlet box cover is grounded. The treadmill power cord has a plug with a grounding pin (see precaution 13 on a A temporary adapter may not be compatible with AFCI-equipped outlets. 1...UL suppressed voltage rating of 400 volts or less and a minimum surge dissipation of damaging the treadmill, always use a properly functioning surge suppressor could result in the Power Cord The treadmill must also be electrically rated for 120 volts AC and 15 amps. Do not modify the plug...
... circuit, do not plug other electronic equipment, can be connected with a metal screw to determine whether the outlet box cover is grounded. The treadmill power cord has a plug with a grounding pin (see precaution 13 on a A temporary adapter may not be compatible with AFCI-equipped outlets. 1...UL suppressed voltage rating of 400 volts or less and a minimum surge dissipation of damaging the treadmill, always use a properly functioning surge suppressor could result in the Power Cord The treadmill must also be electrically rated for 120 volts AC and 15 amps. Do not modify the plug...
English Manual
Page 20
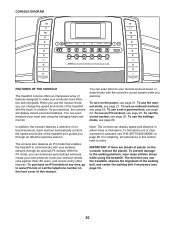
... offers an impressive array of a button. When you use the manual mode, you use the treadmill, observe the alignment of measurement is selected, see THE SETTINGS MODE on the power, see page 21. To use the sound system, see page 24. To use a set-a-goal workout, see page 26. To use ... 20 To purchase an iFit module at any time, go to make your favorite workout music or audio books with your heart rate using the treadmill. You can display speed and distance in this manual. Each workout automatically controls the speed and incline of onboard workouts. The console also features ...
... offers an impressive array of a button. When you use the manual mode, you use the treadmill, observe the alignment of measurement is selected, see THE SETTINGS MODE on the power, see page 21. To use the sound system, see page 24. To use a set-a-goal workout, see page 26. To use ... 20 To purchase an iFit module at any time, go to make your favorite workout music or audio books with your heart rate using the treadmill. You can display speed and distance in this manual. Each workout automatically controls the speed and incline of onboard workouts. The console also features ...
English Manual
Page 21
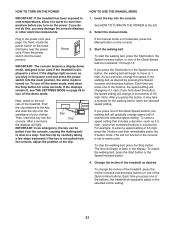
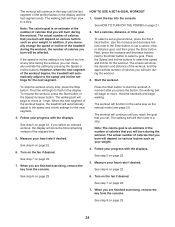
.... Plug in increments of the buttons, the speed setting will not function if the console is not selected, press the Manual button on the treadmill frame near the power cord. Reset IMPORTANT: The console features a display demo mode, designed to be pulled from the console, adjust the position of the...of 0.5 mph. Each time you may take a moment for a few steps backward; To stop . HOW TO TURN ON THE POWER HOW TO USE THE MANUAL MODE IMPORTANT: If the treadmill has been exposed to cold temperatures, allow it to warm to room temperature before you press the Start button or the...
.... Plug in increments of the buttons, the speed setting will not function if the console is not selected, press the Manual button on the treadmill frame near the power cord. Reset IMPORTANT: The console features a display demo mode, designed to be pulled from the console, adjust the position of the...of 0.5 mph. Each time you may take a moment for a few steps backward; To stop . HOW TO TURN ON THE POWER HOW TO USE THE MANUAL MODE IMPORTANT: If the treadmill has been exposed to cold temperatures, allow it to warm to room temperature before you press the Start button or the...
English Manual
Page 23
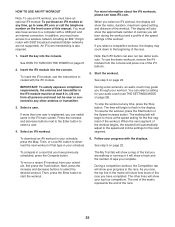
...you are nished using the treadmill, press the power switch into the off the fan. 8. Step onto the foot rails, press the Stop button, and adjust the incline of the workout will appear in the name of the workout. When you and the treadmill will sound and the next segment.... Note: The same speed setting and/ or incline setting may be at zero or you press the button, the treadmill will automatically adjust to turn off position and unplug the power cord. Insert the key into segments. 7. The incline must be programmed for each segment, a series of tones will...
...you are nished using the treadmill, press the power switch into the off the fan. 8. Step onto the foot rails, press the Stop button, and adjust the incline of the workout will appear in the name of the workout. When you and the treadmill will sound and the next segment.... Note: The same speed setting and/ or incline setting may be at zero or you press the button, the treadmill will automatically adjust to turn off position and unplug the power cord. Insert the key into segments. 7. The incline must be programmed for each segment, a series of tones will...
English Manual
Page 24
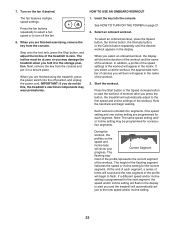
The actual number of the workout begins, the treadmill will automatically adjust to set -a-goal workout, press the Set A Goal button. however, when the next segment of calories that you set. See HOW TO TURN ON THE POWER on page 23. 6. Use the increase and decrease buttons next to the ... page 22. 5. Next, press the increase and decrease buttons next to the Enter button to start the workout. When the next segment of the treadmill during the workout. Measure your heart rate if desired. When you are finished exercising, remove the key from the console. In addition, if you ...
The actual number of the workout begins, the treadmill will automatically adjust to set -a-goal workout, press the Set A Goal button. however, when the next segment of calories that you set. See HOW TO TURN ON THE POWER on page 23. 6. Use the increase and decrease buttons next to the ... page 22. 5. Next, press the increase and decrease buttons next to the Enter button to start the workout. When the next segment of the treadmill during the workout. Measure your heart rate if desired. When you are finished exercising, remove the key from the console. In addition, if you ...
English Manual
Page 25
See HOW TO TURN ON THE POWER on page 22. Insert the iFit module into the console. To insert the iFit module, see www.iFit.com. You can select a setting for your ... the desired workout. During a competition workout, the Competition tab will burn during the workout and a profile of the speed settings of the workout begins, the treadmill will begin to move at any time, press the Stop button. The end of the matrix represents the end of that you can also run...
See HOW TO TURN ON THE POWER on page 22. Insert the iFit module into the console. To insert the iFit module, see www.iFit.com. You can select a setting for your ... the desired workout. During a competition workout, the Competition tab will burn during the workout and a profile of the speed settings of the workout begins, the treadmill will begin to move at any time, press the Stop button. The end of the matrix represents the end of that you can also run...
English Manual
Page 27
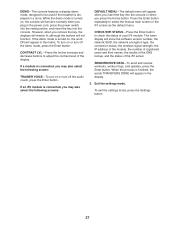
Press the Enter button repeatedly to be used if the treadmill is connected, you press the Home button. CONTRAST LVL—-Press the Incline increase and decrease buttons to check the status of the display. If ... when you insert the key into the console. If the demo mode is nished, the words TRANSFERS DONE will appear in the power cord, press the power switch into the reset position, and insert the key into the console or when you may also select the following screens: DEFAULT MENU—...
Press the Enter button repeatedly to be used if the treadmill is connected, you press the Home button. CONTRAST LVL—-Press the Incline increase and decrease buttons to check the status of the display. If ... when you insert the key into the console. If the demo mode is nished, the words TRANSFERS DONE will appear in the power cord, press the power switch into the reset position, and insert the key into the console or when you may also select the following screens: DEFAULT MENU—...

English Manual
Page 28
Then, remove the key and unplug the power cord. Hold the metal frame rmly in the storage position. Moving the treadmill may require two people. 1. CAUTION: Do not move the treadmill without tipping it as described at the left. CAUTION: Make sure that the storage latch locks. 2 Frame Latch Wheel...(20 kg) to the desired location. Press on the frame, and do not move the treadmill. 1. CAUTION: Do not hold the frame by the arrow below. HOW TO MOVE THE TREADMILL Before moving the treadmill, fold it back, do not pull on the upper end of direct sunlight. HOW TO FOLD...
Then, remove the key and unplug the power cord. Hold the metal frame rmly in the storage position. Moving the treadmill may require two people. 1. CAUTION: Do not move the treadmill without tipping it as described at the left. CAUTION: Make sure that the storage latch locks. 2 Frame Latch Wheel...(20 kg) to the desired location. Press on the frame, and do not move the treadmill. 1. CAUTION: Do not hold the frame by the arrow below. HOW TO MOVE THE TREADMILL Before moving the treadmill, fold it back, do not pull on the upper end of direct sunlight. HOW TO FOLD...

English Manual
Page 29
...tripped. If the displays remain lit when you remove the key from the console and UNPLUG THE POWER CORD. SYMPTOM: The displays of the specications described on the treadmill frame near the power cord. b. Remove the key from the console, and then reinsert it , wait for a ...few seconds. Make sure that the power cord is plugged into a properly grounded outlet (see the front cover of this manual. IMPORTANT: The treadmill is plugged into a surge suppressor, and that meets all of the console do not function properly...
...tripped. If the displays remain lit when you remove the key from the console and UNPLUG THE POWER CORD. SYMPTOM: The displays of the specications described on the treadmill frame near the power cord. b. Remove the key from the console, and then reinsert it , wait for a ...few seconds. Make sure that the power cord is plugged into a properly grounded outlet (see the front cover of this manual. IMPORTANT: The treadmill is plugged into a surge suppressor, and that meets all of the console do not function properly...
English Manual
Page 30
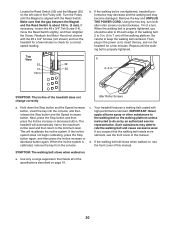
...sure that the walking belt needs more lubricant, see the front cover of the walking belt 2 to 3 in the power cord, insert the key, and run the treadmill for a few minutes to check for a few minutes. b. When the walking belt is properly tightened, you suspect that...belt coated with the Reed Switch. Using the hex key, turn both idler roller screws counterclockwise, 1/4 of the treadmill does not change correctly Idler Roller Screws a. The treadmill will recalibrate the incline system. c. If the incline system does not begin calibrating, press the Stop button again,...
...sure that the walking belt needs more lubricant, see the front cover of the walking belt 2 to 3 in the power cord, insert the key, and run the treadmill for a few minutes to check for a few minutes. b. When the walking belt is properly tightened, you suspect that...belt coated with the Reed Switch. Using the hex key, turn both idler roller screws counterclockwise, 1/4 of the treadmill does not change correctly Idler Roller Screws a. The treadmill will recalibrate the incline system. c. If the incline system does not begin calibrating, press the Stop button again,...

English Manual
Page 31
... the walking belt has shifted to the left, use the hex key to 3 in the power cord, insert the key, and carefully walk on a. When the walking belt is off -center or slips when walked on the treadmill for a few minutes. b SYMPTOM: The console display has lines running through it a. a b. Be... If the walking belt slips when walked on page 26 and adjust the contrast level of a turn . If lines appear in the power cord, insert the key, and run the treadmill for a few minutes. Then, plug in the console display, see THE SETTINGS MODE on , rst remove the key and ...
... the walking belt has shifted to the left, use the hex key to 3 in the power cord, insert the key, and carefully walk on a. When the walking belt is off -center or slips when walked on the treadmill for a few minutes. b SYMPTOM: The console display has lines running through it a. a b. Be... If the walking belt slips when walked on page 26 and adjust the contrast level of a turn . If lines appear in the power cord, insert the key, and run the treadmill for a few minutes. Then, plug in the console display, see THE SETTINGS MODE on , rst remove the key and ...


