
English Manual
Page 2
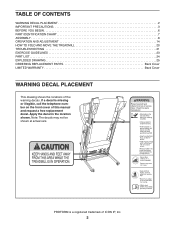
... manual and request a free replacement decal. Note: The decals may not be shown at actual size. TABLE OF CONTENTS WARNING DECAL PLACEMENT 2 IMPORTANT PRECAUTIONS 3 BEFORE YOU BEGIN 6 PART IDENTIFICATION CHART 7 ASSEMBLY 8 OPERATION AND ADJUSTMENT 14 HOW TO FOLD AND MOVE THE TREADMILL 20 TROUBLESHOOTING 21 EXERCISE GUIDELINES 23 PART LIST 24 EXPLODED DRAWING 25 ORDERING REPLACEMENT PARTS Back Cover LIMITED WARRANTY Back Cover WARNING DECAL PLACEMENT This drawing shows the locations of ICON...
... manual and request a free replacement decal. Note: The decals may not be shown at actual size. TABLE OF CONTENTS WARNING DECAL PLACEMENT 2 IMPORTANT PRECAUTIONS 3 BEFORE YOU BEGIN 6 PART IDENTIFICATION CHART 7 ASSEMBLY 8 OPERATION AND ADJUSTMENT 14 HOW TO FOLD AND MOVE THE TREADMILL 20 TROUBLESHOOTING 21 EXERCISE GUIDELINES 23 PART LIST 24 EXPLODED DRAWING 25 ORDERING REPLACEMENT PARTS Back Cover LIMITED WARRANTY Back Cover WARNING DECAL PLACEMENT This drawing shows the locations of ICON...
English Manual
Page 3
... not operate the treadmill if the power cord or plug is damaged, or if the treadmill is not working properly.) 17. Keep the treadmill indoors, away from heated surfaces. 16. Always hold the handrails while using the treadmill. Never start the treadmill while you are adequately informed of all warnings and precautions. 2. Adjust the speed in small increments to use of this manual and all warnings...
... not operate the treadmill if the power cord or plug is damaged, or if the treadmill is not working properly.) 17. Keep the treadmill indoors, away from heated surfaces. 16. Always hold the handrails while using the treadmill. Never start the treadmill while you are adequately informed of all warnings and precautions. 2. Adjust the speed in small increments to use of this manual and all warnings...
English Manual
Page 4
... 6 for the location of the power switch), and unplug the power cord when the treadmill is holding the frame securely in general. 21. ing the treadmill, and before clean- Over exercising may affect the accuracy of the treadmill regularly. SAVE THESE INSTRUCTIONS 4 Never remove the motor hood unless instructed to move the treadmill until it is not a medical device. Inspect and properly tighten all parts of heart rate readings. 20...
... 6 for the location of the power switch), and unplug the power cord when the treadmill is holding the frame securely in general. 21. ing the treadmill, and before clean- Over exercising may affect the accuracy of the treadmill regularly. SAVE THESE INSTRUCTIONS 4 Never remove the motor hood unless instructed to move the treadmill until it is not a medical device. Inspect and properly tighten all parts of heart rate readings. 20...
English Manual
Page 6
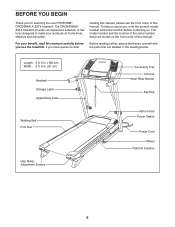
... the drawing below. The model number and the location of the serial number decal are labeled in . (81 cm) Handrail Storage Latch Upper Body Arms Walking Belt Foot Rail Idler Roller Adjustment Screws Accessory Tray Console Heart Rate Monitor Key/Clip Motor Hood Power Switch Power Cord Wheel Platform Cushion 6 reading this manual, please see the front cover of this manual carefully before contacting us assist you, note the product model number and serial number before you use the treadmill. To help us . BEFORE...
... the drawing below. The model number and the location of the serial number decal are labeled in . (81 cm) Handrail Storage Latch Upper Body Arms Walking Belt Foot Rail Idler Roller Adjustment Screws Accessory Tray Console Heart Rate Monitor Key/Clip Motor Hood Power Switch Power Cord Wheel Platform Cushion 6 reading this manual, please see the front cover of this manual carefully before contacting us assist you, note the product model number and serial number before you use the treadmill. To help us . BEFORE...

English Manual
Page 8
... your home, call CUSTOMER CARE (see the front cover of this step on your computer and register your product. 1 •• activates your product. 2. If there is an oily substance on the exterior of upgrades and offers Note: If you do not use power tools. 1. Make sure that the power cord is normal. Repeat this manual) and register your warranty...
... your home, call CUSTOMER CARE (see the front cover of this step on your computer and register your product. 1 •• activates your product. 2. If there is an oily substance on the exterior of upgrades and offers Note: If you do not use power tools. 1. Make sure that the power cord is normal. Repeat this manual) and register your warranty...
English Manual
Page 10
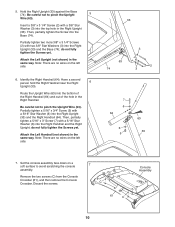
... 74 3 2 3 7 6 64 6 5 63 33 7. Identify the Right Handrail (64). Set the console assembly face down on a soft surface to avoid scratching the console assembly. do not fully tighten the Screws yet. Route the Upright Wire (63) into the Base (74). Remove the two screws (C) from the Console Crossbar (61), and then remove the Console Crossbar. Insert a 3/8" x 3 1/4" Screw (2) with a 5/16" Star Washer (6) into the top hole in...
... 74 3 2 3 7 6 64 6 5 63 33 7. Identify the Right Handrail (64). Set the console assembly face down on a soft surface to avoid scratching the console assembly. do not fully tighten the Screws yet. Route the Upright Wire (63) into the Base (74). Remove the two screws (C) from the Console Crossbar (61), and then remove the Console Crossbar. Insert a 3/8" x 3 1/4" Screw (2) with a 5/16" Star Washer (6) into the top hole in...
English Manual
Page 12
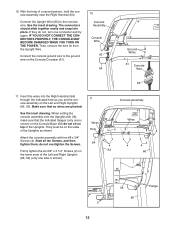
... of the Uprights. Connect the console ground wire to the console wire. When setting the console assembly onto the Uprights (66, 33), make sure that no wires are pinched. Start all ten Screws, and then tighten them; do not, turn one connector and try again. See the inset drawing. Then, remove the wire tie from the Upright Wire. Firmly tighten the six 3/8" x 3 1/4" Screws (2) on the lower ends of the Uprights as you set the...
... of the Uprights. Connect the console ground wire to the console wire. When setting the console assembly onto the Uprights (66, 33), make sure that no wires are pinched. Start all ten Screws, and then tighten them; do not, turn one connector and try again. See the inset drawing. Then, remove the wire tie from the Upright Wire. Firmly tighten the six 3/8" x 3 1/4" Screws (2) on the lower ends of the Uprights as you set the...

English Manual
Page 13
... Collar Pin 66 13. Keep the included hex keys in the Latch Housing is used to adjust the walking belt (see page 22). 13 start both Screws, and then tighten them. Attach the Right Upper Body Arm (79) in the same way. 13 66 75 3 77 78 75 77 79 3 14. Make sure that the collar and the spring are on the treadmill decals, remove...
... Collar Pin 66 13. Keep the included hex keys in the Latch Housing is used to adjust the walking belt (see page 22). 13 start both Screws, and then tighten them. Attach the Right Upper Body Arm (79) in the same way. 13 66 75 3 77 78 75 77 79 3 14. Make sure that the collar and the spring are on the treadmill decals, remove...
English Manual
Page 14
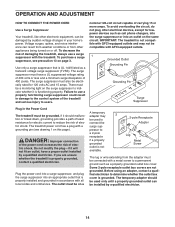
... not available. 2 2-pole Receptacle Adapter Lug Metal Screw The lug or wire extending from other appliances being turned on page 3. If it will not fit an outlet, have a UL suppressed voltage rating of 400 volts or less and a minimum surge dissipation of 450 joules. OPERATION AND ADJUSTMENT HOW TO CONNECT THE POWER CORD Use a Surge Suppressor Your treadmill, like other electronic equipment...
... not available. 2 2-pole Receptacle Adapter Lug Metal Screw The lug or wire extending from other appliances being turned on page 3. If it will not fit an outlet, have a UL suppressed voltage rating of 400 volts or less and a minimum surge dissipation of 450 joules. OPERATION AND ADJUSTMENT HOW TO CONNECT THE POWER CORD Use a Surge Suppressor Your treadmill, like other electronic equipment...
English Manual
Page 15
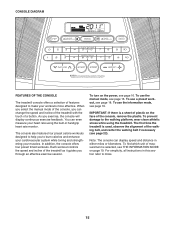
... your heart rate using the treadmill. You can display speed and distance in this section refer to burn calories and enhance your cardiovascular system while toning and strengthening your workouts more effective. When you select the manual mode of the console, you exercise, the console will display continuous exercise feedback. Each workout controls the speed and incline of the console, remove the plastic. To turn on the face of the treadmill as it guides...
... your heart rate using the treadmill. You can display speed and distance in this section refer to burn calories and enhance your cardiovascular system while toning and strengthening your workouts more effective. When you select the manual mode of the console, you exercise, the console will display continuous exercise feedback. Each workout controls the speed and incline of the console, remove the plastic. To turn on the face of the treadmill as it guides...

English Manual
Page 16
... to move at the left. 2. To turn off the demo mode, hold down the Stop button for a few steps backward; Then, insert the key Clip into the console. Next, stand on the treadmill frame near the power cord. If you may damage the console displays or other electrical components. 1. As you press the Start button or the Speed increase button, the walking belt will begin to ash in the reset position...
... to move at the left. 2. To turn off the demo mode, hold down the Stop button for a few steps backward; Then, insert the key Clip into the console. Next, stand on the treadmill frame near the power cord. If you may damage the console displays or other electrical components. 1. As you press the Start button or the Speed increase button, the walking belt will begin to ash in the reset position...

English Manual
Page 17
Change the incline of the walking belt. burned, or the speed of the treadmill as desired. Press the Priority Display button repeatedly until the upper display shows the information that you are nished exercising, remove the key from the console. Measure your progress with the displays. 6. When your pulse is selected, the display will show the elapsed time, the distance that you have walked or run on the treadmill, the indicators...
Change the incline of the walking belt. burned, or the speed of the treadmill as desired. Press the Priority Display button repeatedly until the upper display shows the information that you are nished exercising, remove the key from the console. Measure your progress with the displays. 6. When your pulse is selected, the display will show the elapsed time, the distance that you have walked or run on the treadmill, the indicators...
English Manual
Page 18
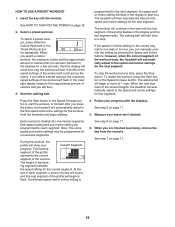
... the prole represents the current segment of the workout ends, the treadmill will automatically adjust to the speed and incline settings for the workout. When you press the button, the treadmill will automatically adjust to move at any time, press the Stop button. HOW TO USE A PRESET WORKOUT 1. The treadmill will show your Current Segment progress. A moment after you are programmed for a few seconds; Note: The same speed and incline settings...
... the prole represents the current segment of the workout ends, the treadmill will automatically adjust to the speed and incline settings for the workout. When you press the button, the treadmill will automatically adjust to move at any time, press the Stop button. HOW TO USE A PRESET WORKOUT 1. The treadmill will show your Current Segment progress. A moment after you are programmed for a few seconds; Note: The same speed and incline settings...

English Manual
Page 19
... Stop button. An “"E”" for English miles or an “"M”" for the console. To turn off the display demo mode. Crosswalk Arms Resistance Knobs 19 If you must connect your audio cable is selected, the following information will be shown: To play button on the treadmill. To exit the information mode, remove the key from the console. THE INFORMATION MODE HOW TO USE THE STEREO SOUND SYSTEM The console features an information mode that keeps track of treadmill usage information...
... Stop button. An “"E”" for English miles or an “"M”" for the console. To turn off the display demo mode. Crosswalk Arms Resistance Knobs 19 If you must connect your audio cable is selected, the following information will be shown: To play button on the treadmill. To exit the information mode, remove the key from the console. THE INFORMATION MODE HOW TO USE THE STEREO SOUND SYSTEM The console features an information mode that keeps track of treadmill usage information...

English Manual
Page 20
... to the oor. HOW TO FOLD AND MOVE THE TREADMILL HOW TO FOLD THE TREADMILL HOW TO MOVE THE TREADMILL Before folding the treadmill, adjust the incline to the left . Remove the key and unplug the power cord. Hold the frame and one of the handrails, and place one foot against a wheel, and carefully lower the treadmill. Pull the latch knob to the lowest position. See drawing 1 at...
... to the oor. HOW TO FOLD AND MOVE THE TREADMILL HOW TO FOLD THE TREADMILL HOW TO MOVE THE TREADMILL Before folding the treadmill, adjust the incline to the left . Remove the key and unplug the power cord. Hold the frame and one of the handrails, and place one foot against a wheel, and carefully lower the treadmill. Pull the latch knob to the lowest position. See drawing 1 at...
English Manual
Page 21
... turn off the demo mode, hold down the Stop button and the Speed increase button, insert the key into a surge suppressor and that the power cord is plugged in . When the incline is plugged into the console, and then release the Stop button and the Speed increase button. If the displays are still lit, see the front cover of the resistance cone, press it . Make sure that the power cord is calibrated, remove the key from the console...
... turn off the demo mode, hold down the Stop button and the Speed increase button, insert the key into a surge suppressor and that the power cord is plugged in . When the incline is plugged into the console, and then release the Stop button and the Speed increase button. If the displays are still lit, see the front cover of the resistance cone, press it . Make sure that the power cord is calibrated, remove the key from the console...

English Manual
Page 22
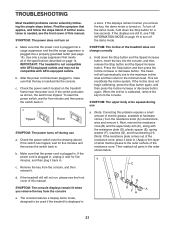
... remove the key and UNPLUG THE POWER CORD. Your treadmill features a walking belt coated with high-performance lubricant. Repeat until the walking belt is centered. a b 2–-3 in . (5 to keep the walking belt centered. Use only a surge suppressor that the walking belt needs more lubricant, see the front cover of a turn both idler roller screws clockwise, 1/4 of the walking belt 2 to keep the walking belt centered. Then, plug in . (5 to the right, turn . Then, plug in the power cord, insert the key...
... remove the key and UNPLUG THE POWER CORD. Your treadmill features a walking belt coated with high-performance lubricant. Repeat until the walking belt is centered. a b 2–-3 in . (5 to keep the walking belt centered. Use only a surge suppressor that the walking belt needs more lubricant, see the front cover of a turn both idler roller screws clockwise, 1/4 of the walking belt 2 to keep the walking belt centered. Then, plug in . (5 to the right, turn . Then, plug in the power cord, insert the key...
English Manual
Page 23
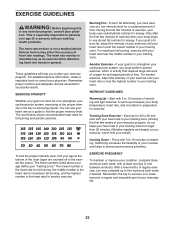
... post-exercise problems. EXERCISE FREQUENCY To maintain or improve your heart rate as a guide to make exercise a regular and enjoyable part of your training zone. The chart below shows recommended heart rates for exercise. For aerobic exercise, adjust the intensity of your exercise until your heart rate is near the highest number in preparation for fat burning and aerobic exercise. Remember, the key to success is the key to strengthen your exercise program. These...
... post-exercise problems. EXERCISE FREQUENCY To maintain or improve your heart rate as a guide to make exercise a regular and enjoyable part of your training zone. The chart below shows recommended heart rates for exercise. For aerobic exercise, adjust the intensity of your exercise until your heart rate is near the highest number in preparation for fat burning and aerobic exercise. Remember, the key to success is the key to strengthen your exercise program. These...
English Manual
Page 24
... 2 Belt Guide 31 1 Drive Roller/Pulley 32 8 #8 x 3/4" Tek Screw 33 1 Right Upright 34 2 Wheel 35 1 Drive Motor 36 1 Controller 37 1 Controller Plate 38 1 Frame 39 1 Walking Platform 40 1 Walking Belt 41 1 Right Foot Rail 42 1 Idler Roller 43 1 Left Rear Foot 44 1 Drive Motor Belt 45 4 Wire Tie 46 1 Right Rear Foot 47 1 Hood Accent 48 1 Motor Hood 49 1 Incline Motor 50 2 Lift Frame Bushing 51 1 Lift Frame 52 1 Belly Pan 53 1 Power Cord Grommet 54 1 Power Cord 55 1 Power Switch 56...
... 2 Belt Guide 31 1 Drive Roller/Pulley 32 8 #8 x 3/4" Tek Screw 33 1 Right Upright 34 2 Wheel 35 1 Drive Motor 36 1 Controller 37 1 Controller Plate 38 1 Frame 39 1 Walking Platform 40 1 Walking Belt 41 1 Right Foot Rail 42 1 Idler Roller 43 1 Left Rear Foot 44 1 Drive Motor Belt 45 4 Wire Tie 46 1 Right Rear Foot 47 1 Hood Accent 48 1 Motor Hood 49 1 Incline Motor 50 2 Lift Frame Bushing 51 1 Lift Frame 52 1 Belly Pan 53 1 Power Cord Grommet 54 1 Power Cord 55 1 Power Switch 56...
English Manual
Page 28
... set forth herein. ORDERING REPLACEMENT PARTS To order replacement parts, please see the front cover of its authorized service centers. ICON Health & Fitness, Inc. (ICON) warrants this manual. All repairs for commercial or rental purposes. This warranty will be responsible for a particular purpose are made must be free from the date of purchase. or other warranties, and any and all instructions in this manual) LIMITED WARRANTY IMPORTANT: To protect your fitness...
... set forth herein. ORDERING REPLACEMENT PARTS To order replacement parts, please see the front cover of its authorized service centers. ICON Health & Fitness, Inc. (ICON) warrants this manual. All repairs for commercial or rental purposes. This warranty will be responsible for a particular purpose are made must be free from the date of purchase. or other warranties, and any and all instructions in this manual) LIMITED WARRANTY IMPORTANT: To protect your fitness...

