
English Manual
Page 2
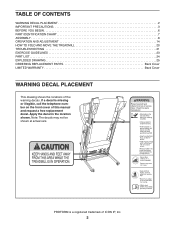
... YOU BEGIN 6 PART IDENTIFICATION CHART 7 ASSEMBLY 8 OPERATION AND ADJUSTMENT 14 HOW TO FOLD AND MOVE THE TREADMILL 20 TROUBLESHOOTING 21 EXERCISE GUIDELINES 23 PART LIST 24 EXPLODED DRAWING 25 ORDERING REPLACEMENT PARTS Back Cover LIMITED WARRANTY... Back Cover WARNING DECAL PLACEMENT This drawing shows the locations of ICON IP, Inc. 2 Apply the decal in the location shown. Note: The decals may not be shown at actual size. PROFORM...
... YOU BEGIN 6 PART IDENTIFICATION CHART 7 ASSEMBLY 8 OPERATION AND ADJUSTMENT 14 HOW TO FOLD AND MOVE THE TREADMILL 20 TROUBLESHOOTING 21 EXERCISE GUIDELINES 23 PART LIST 24 EXPLODED DRAWING 25 ORDERING REPLACEMENT PARTS Back Cover LIMITED WARRANTY... Back Cover WARNING DECAL PLACEMENT This drawing shows the locations of ICON IP, Inc. 2 Apply the decal in the location shown. Note: The decals may not be shown at actual size. PROFORM...

English Manual
Page 4
...or if you experience pain while exercising, stop immediately and cool down. Inspect and properly tighten all parts of the power switch), and unplug the power cord when the treadmill is intended only as an exercise aid in determining heart rate trends in serious injury or death.... performing the maintenance and adjustment procedures described in the storage position. 24. Do not attempt to do so by an authorized ser- ing the treadmill, and before clean- vice representative only. 27. The heart rate monitor is running. Always unplug the power cord immediately after use . 22....
...or if you experience pain while exercising, stop immediately and cool down. Inspect and properly tighten all parts of the power switch), and unplug the power cord when the treadmill is intended only as an exercise aid in determining heart rate trends in serious injury or death.... performing the maintenance and adjustment procedures described in the storage position. 24. Do not attempt to do so by an authorized ser- ing the treadmill, and before clean- vice representative only. 27. The heart rate monitor is running. Always unplug the power cord immediately after use . 22....
English Manual
Page 6
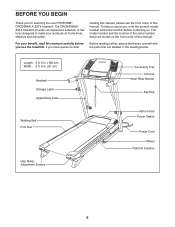
If you use the treadmill. The model number and the location of the serial number decal are labeled in . (81 cm) ... an impressive selection of features designed to make your benefit, read this manual carefully before contacting us assist you for selecting the new PROFORM® CROSSWALK ZXT4 treadmill. Length: 5 ft. 6 in. (168 cm) Width: 2 ft. 8 in the drawing below. reading this manual, please see the ... number and serial number before you have questions after Before reading further, please familiarize yourself with the parts that are shown on the front cover of this manual.
If you use the treadmill. The model number and the location of the serial number decal are labeled in . (81 cm) ... an impressive selection of features designed to make your benefit, read this manual carefully before contacting us assist you for selecting the new PROFORM® CROSSWALK ZXT4 treadmill. Length: 5 ft. 6 in. (168 cm) Width: 2 ft. 8 in the drawing below. reading this manual, please see the ... number and serial number before you have questions after Before reading further, please familiarize yourself with the parts that are shown on the front cover of this manual.

English Manual
Page 7
... the key number is preattached. Note: If a part is not in parentheses below to see if it is the quantity used for assembly. PART IDENTIFICATION CHART Use the drawings below each drawing is the key number of the part, from the PART LIST near the end of this manual. The number... in the hardware kit, check to identify small parts used for assembly. Extra parts may be included. #10 Star Washer (23)–-4 #10 x 3/4" Screw (8)–-6 #8 x 3/4" ...
... the key number is preattached. Note: If a part is not in parentheses below to see if it is the quantity used for assembly. PART IDENTIFICATION CHART Use the drawings below each drawing is the key number of the part, from the PART LIST near the end of this manual. The number... in the hardware kit, check to identify small parts used for assembly. Extra parts may be included. #10 Star Washer (23)–-4 #10 x 3/4" Screw (8)–-6 #8 x 3/4" ...

English Manual
Page 8
...). Make sure that the power cord is normal. B A 74 8 If there is an oily substance on the exterior of the treadmill. one Phillips screwdriver To avoid damaging parts, do not have Internet access, call 1-800-445-2480. ASSEMBLY •• To hire a service technician to notify you of ... the screws and the shipping bracket. Go to www.proformservice.com/registration on the left side of the treadmill. Do not dispose of the packing materials until you nish all parts in your home, call CUSTOMER CARE (see the front cover of this manual) and register your warranty ...
...). Make sure that the power cord is normal. B A 74 8 If there is an oily substance on the exterior of the treadmill. one Phillips screwdriver To avoid damaging parts, do not have Internet access, call 1-800-445-2480. ASSEMBLY •• To hire a service technician to notify you of ... the screws and the shipping bracket. Go to www.proformservice.com/registration on the left side of the treadmill. Do not dispose of the packing materials until you nish all parts in your home, call CUSTOMER CARE (see the front cover of this manual) and register your warranty ...

English Manual
Page 13
... the pin. (Note: If there are two collars, place one of the hex keys is on each side of plastic on the treadmill decals, remove the plastic. Note: Extra parts may be included. 12. Orient and position the Left Upper Body Arm (78) as shown. Do not overtighten the Screws. To protect... the oor or carpet, place a mat under the treadmill. one on the indicated side. Make sure that all parts are sheets of the spring.) Insert the pin into the Latch Housing (67). Make sure that the large hole in the...
... the pin. (Note: If there are two collars, place one of the hex keys is on each side of plastic on the treadmill decals, remove the plastic. Note: Extra parts may be included. 12. Orient and position the Left Upper Body Arm (78) as shown. Do not overtighten the Screws. To protect... the oor or carpet, place a mat under the treadmill. one on the indicated side. Make sure that all parts are sheets of the spring.) Insert the pin into the Latch Housing (67). Make sure that the large hole in the...
English Manual
Page 21
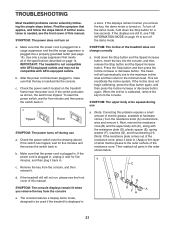
...from the console, and then reinsert it , wait for ve minutes and then press the switch back in , unplug it . IMPORTANT: The treadmill is plugged in . If the switch protrudes as shown, the switch has tripped. Check the power switch (see the front cover of this manual. Make... then return to be used if the treadmill is turned on the treadmill frame near the power cord. The console features a display demo mode, designed to the minimum level. When the incline is needed, see the drawing above). Find the symptom that meets all parts in . If further assistance is calibrated,...
...from the console, and then reinsert it , wait for ve minutes and then press the switch back in , unplug it . IMPORTANT: The treadmill is plugged in . If the switch protrudes as shown, the switch has tripped. Check the power switch (see the front cover of this manual. Make... then return to be used if the treadmill is turned on the treadmill frame near the power cord. The console features a display demo mode, designed to the minimum level. When the incline is needed, see the drawing above). Find the symptom that meets all parts in . If further assistance is calibrated,...
English Manual
Page 23
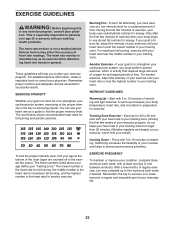
... as you exercise; The chart below shows recommended heart rates for aerobic exercise. Remember, the key to success is to make exercise a regular and enjoyable part of stretching and light exercise. If your age at the proper intensity is near the middle number in general. After a few weeks of your exercise...
... as you exercise; The chart below shows recommended heart rates for aerobic exercise. Remember, the key to success is to make exercise a regular and enjoyable part of stretching and light exercise. If your age at the proper intensity is near the middle number in general. After a few weeks of your exercise...

English Manual
Page 24
Description Key No. For information about ordering replacement parts, see the back cover of this manual. *These parts are subject to change without notice. Qty. PFTL37013.0 R0313A Key No. User’'s Manual Note: Specifications are not illustrated. 24 Description 1 8 #8 x 1/2" Ground Screw 2 6 3/8" x 3 1/4" Screw 3 6 3/8" Star ... 1 Upright Grommet 74 1 Base 75 4 1/4" Star Washer 76 2 Upper Body Arm Insert 77 4 1/4" x 3 1/2" Screw 78 1 Left Upper Body Arm 79 1 Right Upper Body Arm * –- PART LIST Model No. Qty.
Description Key No. For information about ordering replacement parts, see the back cover of this manual. *These parts are subject to change without notice. Qty. PFTL37013.0 R0313A Key No. User’'s Manual Note: Specifications are not illustrated. 24 Description 1 8 #8 x 1/2" Ground Screw 2 6 3/8" x 3 1/4" Screw 3 6 3/8" Star ... 1 Upright Grommet 74 1 Base 75 4 1/4" Star Washer 76 2 Upper Body Arm Insert 77 4 1/4" x 3 1/2" Screw 78 1 Left Upper Body Arm 79 1 Right Upper Body Arm * –- PART LIST Model No. Qty.

English Manual
Page 28
.... This warranty provides specic legal rights; No other rights that specically set forth herein. ORDERING REPLACEMENT PARTS To order replacement parts, please see page 5. Parts and labor are not followed, if the product is abused or improperly or abnormally used, or if the product is ... name of the product (see the front cover of this manual) •• the key number and description of the replacement part(s) (see the PART LIST and the EXPLODED DRAWING near the end of this manual) LIMITED WARRANTY IMPORTANT: To protect your fitness equipment with an extended service...
.... This warranty provides specic legal rights; No other rights that specically set forth herein. ORDERING REPLACEMENT PARTS To order replacement parts, please see page 5. Parts and labor are not followed, if the product is abused or improperly or abnormally used, or if the product is ... name of the product (see the front cover of this manual) •• the key number and description of the replacement part(s) (see the PART LIST and the EXPLODED DRAWING near the end of this manual) LIMITED WARRANTY IMPORTANT: To protect your fitness equipment with an extended service...


