

English Manual
Page 1
...free of charge to you have questions, or if there are missing or damaged parts, we are committed to providing complete customer satisfaction. The trained technicians on our Customer Hot Line will guarantee complete satisfaction through direct...proform.com new products, prizes, fitness tips, and much more! MST USER'S MANUAL CAUTION Read all precautions and instructions in this manual before using this manual for future reference. Serial Number Decal QUESTIONS? PFTL39193 Serial No. TO AVOID UNNECESSARY DELAYS, PLEASE CALL DIRECT TO OUR TOLL-FREE CUSTOMER HOT LINE. ® Model...
...free of charge to you have questions, or if there are missing or damaged parts, we are committed to providing complete customer satisfaction. The trained technicians on our Customer Hot Line will guarantee complete satisfaction through direct...proform.com new products, prizes, fitness tips, and much more! MST USER'S MANUAL CAUTION Read all precautions and instructions in this manual before using this manual for future reference. Serial Number Decal QUESTIONS? PFTL39193 Serial No. TO AVOID UNNECESSARY DELAYS, PLEASE CALL DIRECT TO OUR TOLL-FREE CUSTOMER HOT LINE. ® Model...

English Manual
Page 2
... 4 ASSEMBLY 5 OPERATION AND ADJUSTMENT 7 HOW TO FOLD AND MOVE THE TREADMILL 10 TROUBLE-SHOOTING 12 CONDITIONING GUIDELINES 14 ORDERING REPLACEMENT PARTS Back Cover LIMITED WARRANTY Back Cover Note: An EXPLODED DRAWING and a PART LIST are attached in the center of this treadmill are adequately informed of all warnings and precautions. 2. Use only a UL-listed surge protector, rated at a time. 9. It is not working properly.) 2 Do not operate the treadmill if the power cord or plug...
... 4 ASSEMBLY 5 OPERATION AND ADJUSTMENT 7 HOW TO FOLD AND MOVE THE TREADMILL 10 TROUBLE-SHOOTING 12 CONDITIONING GUIDELINES 14 ORDERING REPLACEMENT PARTS Back Cover LIMITED WARRANTY Back Cover Note: An EXPLODED DRAWING and a PART LIST are attached in the center of this treadmill are adequately informed of all warnings and precautions. 2. Use only a UL-listed surge protector, rated at a time. 9. It is not working properly.) 2 Do not operate the treadmill if the power cord or plug...

English Manual
Page 3
... to raise, lower, or move the treadmill. 18. Always hold the handrails while using . Never remove the motor hood unless instructed to order a free replacement decal (see ORDERING REPLACEMENT PARTS on the walking belt. Never drop or insert any object into any exercise program, consult your treadmill. The treadmill is intended for persons over the age of 35 or persons with pre-existing health problems. Read all parts of high speeds. If...
... to raise, lower, or move the treadmill. 18. Always hold the handrails while using . Never remove the motor hood unless instructed to order a free replacement decal (see ORDERING REPLACEMENT PARTS on the walking belt. Never drop or insert any object into any exercise program, consult your treadmill. The treadmill is intended for persons over the age of 35 or persons with pre-existing health problems. Read all parts of high speeds. If...

English Manual
Page 4
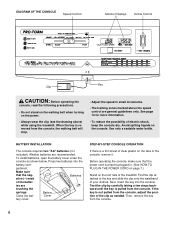
... your home. BEFORE YOU BEGIN Thank you for maximum exercise comfort Incline Leg 4 Mountain Time (excluding holidays). The serial number can be found on a decal attached to let you 're not exercising, the unique 385C can be folded up, requiring less than half the floor space of the treadmill is not included) RIGHT SIDE Walking Belt Foot Rail BACK Rear Roller Adjustment Bolts Upright Circuit Breaker Power Cord Cushioned Walking Platform for...
... your home. BEFORE YOU BEGIN Thank you for maximum exercise comfort Incline Leg 4 Mountain Time (excluding holidays). The serial number can be found on a decal attached to let you 're not exercising, the unique 385C can be folded up, requiring less than half the floor space of the treadmill is not included) RIGHT SIDE Walking Belt Foot Rail BACK Rear Roller Adjustment Bolts Upright Circuit Breaker Power Cord Cushioned Walking Platform for...

English Manual
Page 5
...] in 2 the direction shown by the arrow as you insert the Extension Leg.) Make sure that the Base Pad (40) is on the indicated side of the treadmill walking belt is coated with high-performance lubricant. Assembly requires the following tools: The included allen wrench and your own phillips screwdriver and adjustable wrench . Latch/Handrail Screw (89)-4 Handrail Bolt (88)-2 Handrail...
...] in 2 the direction shown by the arrow as you insert the Extension Leg.) Make sure that the Base Pad (40) is on the indicated side of the treadmill walking belt is coated with high-performance lubricant. Assembly requires the following tools: The included allen wrench and your own phillips screwdriver and adjustable wrench . Latch/Handrail Screw (89)-4 Handrail Bolt (88)-2 Handrail...

English Manual
Page 6
... the Upright. Cover the floor beneath the treadmill to the inset drawing. Tighten a Handrail Bolt (88) with the indicated hole in a secure place. Make sure that each Upright (11). Tighten a Handrail Screw (89) into the Handrail and the Upright. 11 89 89 Attach the other Handrail (1) in the same way. 1 1 11 5. Make sure that the tapered edge is used to adjust the walking belt...
... the Upright. Cover the floor beneath the treadmill to the inset drawing. Tighten a Handrail Bolt (88) with the indicated hole in a secure place. Make sure that each Upright (11). Tighten a Handrail Screw (89) into the Handrail and the Upright. 11 89 89 Attach the other Handrail (1) in the same way. 1 1 11 5. Make sure that the tapered edge is used to adjust the walking belt...

English Manual
Page 7
... with all local codes and ordinances. electric shock. Some 2-pole receptacle outlet box covers are in length. A temporary adapter that is grounded before using an adapter. Plug the power cord into a surge protector, and plug the surge protector into an appropriate outlet that DANGER: Improper connection of your treadmill. To decrease the pos- Use only a ULlisted surge protector, rated at most hardware stores...
... with all local codes and ordinances. electric shock. Some 2-pole receptacle outlet box covers are in length. A temporary adapter that is grounded before using an adapter. Plug the power cord into a surge protector, and plug the surge protector into an appropriate outlet that DANGER: Improper connection of your treadmill. To decrease the pos- Use only a ULlisted surge protector, rated at most hardware stores...
English Manual
Page 8
... more information. • To reduce the possibility of the console, remove it. To install batteries, open the battery cover under the console as needed. STEP-BY-STEP CONSOLE OPERATION If there is not pulled from the console. 8 If the key is a thin sheet of clear plastic on the face of electric shock, keep the console dry. Cover tery cover. Use only a sealable water bottle. Battery Close the bat- DIAGRAM OF THE CONSOLE Speed Control Monitor Displays Incline Control Key...
... more information. • To reduce the possibility of the console, remove it. To install batteries, open the battery cover under the console as needed. STEP-BY-STEP CONSOLE OPERATION If there is not pulled from the console. 8 If the key is a thin sheet of clear plastic on the face of electric shock, keep the console dry. Cover tery cover. Use only a sealable water bottle. Battery Close the bat- DIAGRAM OF THE CONSOLE Speed Control Monitor Displays Incline Control Key...

English Manual
Page 9
... incline level is started. To stop the walking belt and remove the key. Note: Any time that you are finished exercising, stop the walking belt, step onto the foot rails and slide the speed control to move at any time, press the ON/RESET button. 6 When you have burned. (See FAT BURNING on . 2 Reset the speed control. To change the incline of the treadmill, press the top or bottom of calories and fat calo- TIME/DISTANCE display...
... incline level is started. To stop the walking belt and remove the key. Note: Any time that you are finished exercising, stop the walking belt, step onto the foot rails and slide the speed control to move at any time, press the ON/RESET button. 6 When you have burned. (See FAT BURNING on . 2 Reset the speed control. To change the incline of the treadmill, press the top or bottom of calories and fat calo- TIME/DISTANCE display...
English Manual
Page 10
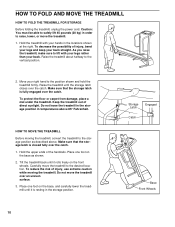
... handrails. Make sure that the storage latch is closed fully over an uneven surface. 3. To reduce the risk of injury, bend your legs and keep your hands in the storage position. Place one foot on the front wheels. HOW TO FOLD AND MOVE THE TREADMILL HOW TO FOLD THE TREADMILL FOR STORAGE Before folding the treadmill, unplug the power cord. Caution: You must be...
... handrails. Make sure that the storage latch is closed fully over an uneven surface. 3. To reduce the risk of injury, bend your legs and keep your hands in the storage position. Place one foot on the front wheels. HOW TO FOLD AND MOVE THE TREADMILL HOW TO FOLD THE TREADMILL FOR STORAGE Before folding the treadmill, unplug the power cord. Caution: You must be...

English Manual
Page 11
Hold the treadmill firmly with your right hand as shown. HOW TO LOWER THE TREADMILL FOR USE 1. Pivot the treadmill until the frame and foot rail are past the storage latch. 2. Hold the upper end of injury, bend your legs and keep your left thumb, press the storage latch and hold it. To decrease the possibility of the treadmill with both hands, and lower the treadmill to the floor. Using your back straight. Storage Latch Unlatched 11
Hold the treadmill firmly with your right hand as shown. HOW TO LOWER THE TREADMILL FOR USE 1. Pivot the treadmill until the frame and foot rail are past the storage latch. 2. Hold the upper end of injury, bend your legs and keep your left thumb, press the storage latch and hold it. To decrease the possibility of the treadmill with both hands, and lower the treadmill to the floor. Using your back straight. Storage Latch Unlatched 11

English Manual
Page 12
... then press the switch back in . Make sure that the power cord is aligned with the Reed Switch. d. b. Turn the Pulley until 6 p.m. If necessary, loosen the Screw (33) and move the Reed Switch slightly. If further assistance is about 1/8". Mountain Time (excluding holidays). 1. SYMPTOM: THE POWER TURNS OFF DURING USE Tripped Reset a. Check the batteries in , make sure that applies, and follow the steps listed. Remove the key from the console. Locate the Reed Switch...
... then press the switch back in . Make sure that the power cord is aligned with the Reed Switch. d. b. Turn the Pulley until 6 p.m. If necessary, loosen the Screw (33) and move the Reed Switch slightly. If further assistance is about 1/8". Mountain Time (excluding holidays). 1. SYMPTOM: THE POWER TURNS OFF DURING USE Tripped Reset a. Check the batteries in , make sure that applies, and follow the steps listed. Remove the key from the console. Locate the Reed Switch...

English Manual
Page 13
... Service Department, toll-free. 5. Be careful to 3 inches off the walking platform. Plug in the power cord, insert the key and run the treadmill for a few minutes. Use only a UL-listed surge protector, rated at 15 amps, with a 14-gauge cord of the walking belt 2 to keep the walking belt centered. If the walking belt is properly tightened. Remove the key and UNPLUG THE POWER CORD. b 2"-3" Rear Roller Adjustment Bolts c. SYMPTOM: THE WALKING BELT IS OFF-CENTER a. If the walking belt...
... Service Department, toll-free. 5. Be careful to 3 inches off the walking platform. Plug in the power cord, insert the key and run the treadmill for a few minutes. Use only a UL-listed surge protector, rated at 15 amps, with a 14-gauge cord of the walking belt 2 to keep the walking belt centered. If the walking belt is properly tightened. Remove the key and UNPLUG THE POWER CORD. b 2"-3" Rear Roller Adjustment Bolts c. SYMPTOM: THE WALKING BELT IS OFF-CENTER a. If the walking belt...

English Manual
Page 14
... exercise program, keep your heart rate near the lower two numbers in your training zone. During the first few weeks of your training zone. Aerobic Exercise If your goal is to burn fat, adjust the speed and incline of the treadmill until your heart rate is near the highest number in your heart rate is too high or too low, adjust the speed or incline of the chart (ages are recommended heart rates for exercise...
... exercise program, keep your heart rate near the lower two numbers in your training zone. During the first few weeks of your training zone. Aerobic Exercise If your goal is to burn fat, adjust the speed and incline of the treadmill until your heart rate is near the highest number in your heart rate is too high or too low, adjust the speed or incline of the chart (ages are recommended heart rates for exercise...

English Manual
Page 15
...post-exercise problems. Exercise Frequency To maintain or improve your but- Hold for each leg. ...exercise until your heart rate is in your back leg as you exercise-never hold your toes as far as possible. Repeat 3 times. To cause further stretching of your exercise program, do not keep your heart rate in your training...workouts. SUGGESTED STRETCHES The correct form for longer than 20 minutes.) Breathe regularly and deeply as you and rest it against a wall. Reach toward the wall. Move slowly as well. Training Zone Exercise After warming up to five workouts...
...post-exercise problems. Exercise Frequency To maintain or improve your but- Hold for each leg. ...exercise until your heart rate is in your back leg as you exercise-never hold your toes as far as possible. Repeat 3 times. To cause further stretching of your exercise program, do not keep your heart rate in your training...workouts. SUGGESTED STRETCHES The correct form for longer than 20 minutes.) Breathe regularly and deeply as you and rest it against a wall. Reach toward the wall. Move slowly as well. Training Zone Exercise After warming up to five workouts...

English Manual
Page 16
... or repairs not provided by ICON at one of its authorized service centers. This warranty extends only to you. When ordering parts, please be prepared to give the following information: • The MODEL NUMBER OF THE PRODUCT (PFTL39193) • The NAME OF THE PRODUCT (PROFORM® 385C treadmill) • The SERIAL NUMBER OF THE PRODUCT (see the front cover of this manual) • The KEY NUMBER AND...
... or repairs not provided by ICON at one of its authorized service centers. This warranty extends only to you. When ordering parts, please be prepared to give the following information: • The MODEL NUMBER OF THE PRODUCT (PFTL39193) • The NAME OF THE PRODUCT (PROFORM® 385C treadmill) • The SERIAL NUMBER OF THE PRODUCT (see the front cover of this manual) • The KEY NUMBER AND...

English Manual
Page 17
For information about ordering replacement parts, see the back cover of the User's Manual. 34 REMOVE THIS EXPLODED DRAWING AND PART LIST FROM THE MANUAL Save this EXPLODED DRAWING and PART LIST for future reference. Note: Specifications are subject to change without notice.
For information about ordering replacement parts, see the back cover of the User's Manual. 34 REMOVE THIS EXPLODED DRAWING AND PART LIST FROM THE MANUAL Save this EXPLODED DRAWING and PART LIST for future reference. Note: Specifications are subject to change without notice.

English Manual
Page 18
.... Bolt Rear Endcap Latch Decal Rear Roller Upright Plug Handrail Bolt Latch Screw/Handrail Screw Handrail Washer Rubber Ring 8" White Wire, Pigtail 8" Blue Wire, Pigtail 8" White Wire, Male/Female User's Manual * Includes all parts shown in the box # These parts are not illustrated Qty. PFTL39193 R0201A Key No. Bolt Incline Wheel Extension Leg Screw Power Cord Power Cord Grommet Circuit Breaker Frame Pivot Washer Frame Pivot Bolt Roller Guard Motor Belly Pan 1" Grommet Rear Platform Screw Releasable Tie Choke Belt Guide Belly Pan Fastener Walking Belt Walking...
.... Bolt Rear Endcap Latch Decal Rear Roller Upright Plug Handrail Bolt Latch Screw/Handrail Screw Handrail Washer Rubber Ring 8" White Wire, Pigtail 8" Blue Wire, Pigtail 8" White Wire, Male/Female User's Manual * Includes all parts shown in the box # These parts are not illustrated Qty. PFTL39193 R0201A Key No. Bolt Incline Wheel Extension Leg Screw Power Cord Power Cord Grommet Circuit Breaker Frame Pivot Washer Frame Pivot Bolt Roller Guard Motor Belly Pan 1" Grommet Rear Platform Screw Releasable Tie Choke Belt Guide Belly Pan Fastener Walking Belt Walking...

English Manual
Page 19
EXPLODED DRAWING-Model No. PFTL39193 R1201A 9 8 4 46 2 91 13 13 31 32 31 38 6 84 39 83 83 5 48 49 25 62 73 42 49 71 75 59 ... 25 87 70 54 55 56 25 26 58 53 40 89 1 33 33 40 25 33 90 88 22 22 R0201A PFTL39193 EXPLODED DRAWING-Model No.
EXPLODED DRAWING-Model No. PFTL39193 R1201A 9 8 4 46 2 91 13 13 31 32 31 38 6 84 39 83 83 5 48 49 25 62 73 42 49 71 75 59 ... 25 87 70 54 55 56 25 26 58 53 40 89 1 33 33 40 25 33 90 88 22 22 R0201A PFTL39193 EXPLODED DRAWING-Model No.

