

Owner's Manual
Page 1
...MULTI-CHANNEL RECEIVER VSX-816 Register your product at www.pioneerelectronics.com (US) www.pioneerelectronics.ca (Canada) • Protect your new investment The details of your purchase will be on file for reference in the event of an insurance claim such as loss or theft. • Receive free tips..., updates and service bulletins on your new product • Improve product development Your input helps us continue to design products that meet your needs. • Receive a free Pioneer newsletter Registered customers can opt in to...
...MULTI-CHANNEL RECEIVER VSX-816 Register your product at www.pioneerelectronics.com (US) www.pioneerelectronics.ca (Canada) • Protect your new investment The details of your purchase will be on file for reference in the event of an insurance claim such as loss or theft. • Receive free tips..., updates and service bulletins on your new product • Improve product development Your input helps us continue to design products that meet your needs. • Receive a free Pioneer newsletter Registered customers can opt in to...

Owner's Manual
Page 2
...(POLARIZED) PLUG WITH AN EXTENSION CORD. D2-4-4-1_EF WARNING: Handling the cord on proposition 65 known to radio or television reception, which the receiver is no guarantee that to which can be disconnected by turning the equipment off plug can radiate radio frequency energy and, if not installed and... in accordance with Canadian ICES-003. If connected to an AC outlet, the cut-off and on the power supply cord of this Pioneer product. Make sure it is encouraged to try to other governmental entities to use shielded cables and connectors for buying this unit should be...
...(POLARIZED) PLUG WITH AN EXTENSION CORD. D2-4-4-1_EF WARNING: Handling the cord on proposition 65 known to radio or television reception, which the receiver is no guarantee that to which can be disconnected by turning the equipment off plug can radiate radio frequency energy and, if not installed and... in accordance with Canadian ICES-003. If connected to an AC outlet, the cut-off and on the power supply cord of this Pioneer product. Make sure it is encouraged to try to other governmental entities to use shielded cables and connectors for buying this unit should be...
Owner's Manual
Page 4
...12 Digital audio cables 12 Video cables 12 Connecting a DVD player and TV 13 Connecting the multichannel analog outputs 14 Connecting a satellite receiver or other digital set-top box 14 Connecting other audio components 15 About the WMA9 Pro decoder 15 Connecting other video components 16 ... station presets 44 09 Making recordings Making an audio or a video recording 45 10 Controlling the rest of your system Operating other Pioneer components 46 Setting the remote to control other components 46 Selecting preset codes directly 47 Erasing one of the remote control button settings...
...12 Digital audio cables 12 Video cables 12 Connecting a DVD player and TV 13 Connecting the multichannel analog outputs 14 Connecting a satellite receiver or other digital set-top box 14 Connecting other audio components 15 About the WMA9 Pro decoder 15 Connecting other video components 16 ... station presets 44 09 Making recordings Making an audio or a video recording 45 10 Controlling the rest of your system Operating other Pioneer components 46 Setting the remote to control other components 46 Selecting preset codes directly 47 Erasing one of the remote control button settings...

Owner's Manual
Page 5
...system 54 Bi-amping your front speakers 55 Bi-wiring your speakers 55 Connecting additional amplifiers 56 Using this receiver with a Pioneer plasma display 56 Using the SR+ mode with a Pioneer plasma display 57 12 Other Settings The Input Assign menu 58 The Other Setup menu 59 Dynamic Range ...Control Setup 59 Dual Mono Setup 60 LFE Attenuator Setup 60 SR+ Setup for Pioneer plasma displays . . . 60 13 Additional information Troubleshooting 61 XM radio messages 63 Resetting the main unit 63 Switching the speaker impedance 63...
...system 54 Bi-amping your front speakers 55 Bi-wiring your speakers 55 Connecting additional amplifiers 56 Using this receiver with a Pioneer plasma display 56 Using the SR+ mode with a Pioneer plasma display 57 12 Other Settings The Input Assign menu 58 The Other Setup menu 59 Dynamic Range ...Control Setup 59 Dual Mono Setup 60 LFE Attenuator Setup 60 SR+ Setup for Pioneer plasma displays . . . 60 13 Additional information Troubleshooting 61 XM radio messages 63 Resetting the main unit 63 Switching the speaker impedance 63...

Owner's Manual
Page 6
... may distort) - in direct sunlight - 01 Before you start Chapter 1: Before you start Checking what's in the box Please check that you've received the following supplied accessories: • Setup microphone • Remote control unit • Dry cell batteries (AA size IEC R6) x2 • AM... loop antenna • FM wire antenna • These operating instructions Loading the batteries Installing the receiver When installing this unit, make sure to leave space around the unit for ventilation and to protect the equipment from overheating. If not enough...
... may distort) - in direct sunlight - 01 Before you start Chapter 1: Before you start Checking what's in the box Please check that you've received the following supplied accessories: • Setup microphone • Remote control unit • Dry cell batteries (AA size IEC R6) x2 • AM... loop antenna • FM wire antenna • These operating instructions Loading the batteries Installing the receiver When installing this unit, make sure to leave space around the unit for ventilation and to protect the equipment from overheating. If not enough...

Owner's Manual
Page 7
... on your speaker setup, but other possibilities (like you want to hook up for surround sound in and switch on page 19. This receiver will have to the receiver. 2 Connect your speakers and place them for more on this .2 Note 1 You may need to do this. 4 Press QUICK SETUP on this ....'t have a big effect on your TV to Surround Sound With the following quick setup guide, you 've set to STANDARD (see Listening in the receiver's display. Place your speakers as shown below for realistic surround sound, but also on this . In this case, the listening mode must be set...
... on your speaker setup, but other possibilities (like you want to hook up for surround sound in and switch on page 19. This receiver will have to the receiver. 2 Connect your speakers and place them for more on this .2 Note 1 You may need to do this. 4 Press QUICK SETUP on this ....'t have a big effect on your TV to Surround Sound With the following quick setup guide, you 've set to STANDARD (see Listening in the receiver's display. Place your speakers as shown below for realistic surround sound, but also on this . In this case, the listening mode must be set...

Owner's Manual
Page 8
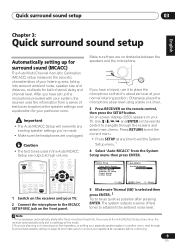
...subwoofer was detected in step 2, the following choices: • FWD - If you choose to do so, you have selected. The receiver automatically makes the necessary settings after you can skip the Quick Setup.1 DIGITAL PRECISION PROCESSING ADVANCED ST/DIRECT/ STANDARD SURR AUTO SURR LISTENING MODE...ANALOG MIDNIGHT/ ATT LOUDNESS SPEAKERS TUNING / STATION TUNER EDIT TONE QUICK SETUP SETUP MULTI JOG AUDIO/VIDEO MULTI-CHANNEL RECEIVER VSX-816 ENTER MULTI JOG DIGITAL PRECISION PROCESSING AUX SIGNAL SB ch ACOUSTIC SELECT PROCESSING EQ MCACC SETUP MIC MASTER VOLUME DOWN UP 1 If...
...subwoofer was detected in step 2, the following choices: • FWD - If you choose to do so, you have selected. The receiver automatically makes the necessary settings after you can skip the Quick Setup.1 DIGITAL PRECISION PROCESSING ADVANCED ST/DIRECT/ STANDARD SURR AUTO SURR LISTENING MODE...ANALOG MIDNIGHT/ ATT LOUDNESS SPEAKERS TUNING / STATION TUNER EDIT TONE QUICK SETUP SETUP MULTI JOG AUDIO/VIDEO MULTI-CHANNEL RECEIVER VSX-816 ENTER MULTI JOG DIGITAL PRECISION PROCESSING AUX SIGNAL SB ch ACOUSTIC SELECT PROCESSING EQ MCACC SETUP MIC MASTER VOLUME DOWN UP 1 If...
Owner's Manual
Page 9
...8226; The Auto MCACC Setup will be as quiet as necessary before continuing. 9 En Otherwise, place the microphone at any time, the receiver automatically exits and no obstacles between the speakers and the microphone. The system outputs a series of test tones to optimize the speaker settings and...tones used in another room, read through the screens and select menu items. Press RETURN to navigate through Surround back speaker setting on the receiver and your particular room. System Setup 1.Surr Back System 2.Auto MCACC 3.Manual MCACC 4.Manual SP Setup 5.Input Assign 6.Other Setup 2. ...
...8226; The Auto MCACC Setup will be as quiet as necessary before continuing. 9 En Otherwise, place the microphone at any time, the receiver automatically exits and no obstacles between the speakers and the microphone. The system outputs a series of test tones to optimize the speaker settings and...tones used in another room, read through the screens and select menu items. Press RETURN to navigate through Surround back speaker setting on the receiver and your particular room. System Setup 1.Surr Back System 2.Auto MCACC 3.Manual MCACC 4.Manual SP Setup 5.Input Assign 6.Other Setup 2. ...
Owner's Manual
Page 10
...system, but it is also possible to adjust these settings manually using the System Setup menu (starting on -screen while the receiver outputs test tones to determine the speakers present in the Auto MCACC Setup should be accurate (taking delay and room characteristics into ... [ ] Channel Level [ ] Acoustic Cal EQ [ ] :Cancel Again, try to be a problem with the speaker connection. The MCACC indicator on -screen while the receiver outputs more on this . 2.Auto MCACC Now Analyzing Environment Check Ambient Noise Microphone Speaker YES/NO [ OK ] [ OK ] [ OK ] :Cancel • For ...
...system, but it is also possible to adjust these settings manually using the System Setup menu (starting on -screen while the receiver outputs test tones to determine the speakers present in the Auto MCACC Setup should be accurate (taking delay and room characteristics into ... [ ] Channel Level [ ] Acoustic Cal EQ [ ] :Cancel Again, try to be a problem with the speaker connection. The MCACC indicator on -screen while the receiver outputs more on this . 2.Auto MCACC Now Analyzing Environment Check Ambient Noise Microphone Speaker YES/NO [ OK ] [ OK ] [ OK ] :Cancel • For ...
Owner's Manual
Page 12
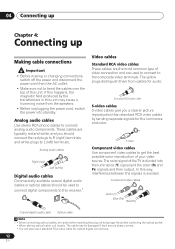
... and are used to connect digital components to the composite video terminals. S Video Component video cables Use component video cables to L (left) terminals. If this receiver.1 Video cables Standard RCA video cables These cables are typically red and white, and you a clearer picture reproduction than standard RCA video cables by the...
... and are used to connect digital components to the composite video terminals. S Video Component video cables Use component video cables to L (left) terminals. If this receiver.1 Video cables Standard RCA video cables These cables are typically red and white, and you a clearer picture reproduction than standard RCA video cables by the...

Owner's Manual
Page 13
... input on your TV. Use an optical cable for the connection.1 2 Connect the composite video output and the stereo analog audio outputs2 on this receiver. When you set up 04 English Deutsch Français Italiano Nederlands Español Connecting a DVD player and TV This page shows you can... TAPE / MD REC L VIDEO OUT CONTROL IN OUT OUT MONITOR OUT DVR / VCR IN TV / SAT IN SUB WOOFER DVD / LD PREOUT IN S-VIDEO This receiver 2 1 COAXIAL DIGITAL OUT R AUDIO L ANALOG OUT VIDEO OUT DVD player Note 1 If your DVD player only has an optical digital output, you want to use...
... input on your TV. Use an optical cable for the connection.1 2 Connect the composite video output and the stereo analog audio outputs2 on this receiver. When you set up 04 English Deutsch Français Italiano Nederlands Español Connecting a DVD player and TV This page shows you can... TAPE / MD REC L VIDEO OUT CONTROL IN OUT OUT MONITOR OUT DVR / VCR IN TV / SAT IN SUB WOOFER DVD / LD PREOUT IN S-VIDEO This receiver 2 1 COAXIAL DIGITAL OUT R AUDIO L ANALOG OUT VIDEO OUT DVD player Note 1 If your DVD player only has an optical digital output, you want to use...

Owner's Manual
Page 14
... OUT VIDEO STB Note 1 The multichannel input can only be used when DVD 5.1 ch is selected (see The Input Assign menu on this receiver as shown below.1 This receiver IN IN OPT 2 (TV/ SAT) IN OPT 1 (CD) OUT ASSIGNABLE DIGITAL IN IN ASSIGNABLE DIGITAL IN XM IN IN COAX 2 (DVR/VCR)... to the multichannel inputs of so-called `set -top box also has a component video output, you can connect this step. 04 Connecting up the receiver you'll need to press the input select button for the video connection.3 2 Connect an optical digital audio output from your set-top box component...
... OUT VIDEO STB Note 1 The multichannel input can only be used when DVD 5.1 ch is selected (see The Input Assign menu on this receiver as shown below.1 This receiver IN IN OPT 2 (TV/ SAT) IN OPT 1 (CD) OUT ASSIGNABLE DIGITAL IN IN ASSIGNABLE DIGITAL IN XM IN IN COAX 2 (DVR/VCR)... to the multichannel inputs of so-called `set -top box also has a component video output, you can connect this step. 04 Connecting up the receiver you'll need to press the input select button for the video connection.3 2 Connect an optical digital audio output from your set-top box component...
Owner's Manual
Page 15
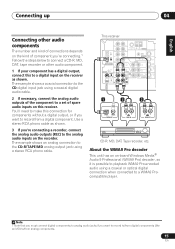
...Italiano Nederlands Español Connecting up 04 Connecting other audio component. 1 If your component has a digital output, connect this to a digital input on the receiver as shown. 3 If you want to record to/from digital components (like an MD) to a WMA9 Procompatible player. About the WMA9 Pro decoder This unit... has an on-board Windows Media® Audio 9 Professional (WMA9 Pro) decoder, so it is possible to make this receiver. You'll need to playback WMA9 Pro-encoded audio using a stereo RCA phono cable. Use a stereo RCA phono cable as shown. This...
...Italiano Nederlands Español Connecting up 04 Connecting other audio component. 1 If your component has a digital output, connect this to a digital input on the receiver as shown. 3 If you want to record to/from digital components (like an MD) to a WMA9 Procompatible player. About the WMA9 Pro decoder This unit... has an on-board Windows Media® Audio 9 Professional (WMA9 Pro) decoder, so it is possible to make this receiver. You'll need to playback WMA9 Pro-encoded audio using a stereo RCA phono cable. Use a stereo RCA phono cable as shown. This...
Owner's Manual
Page 16
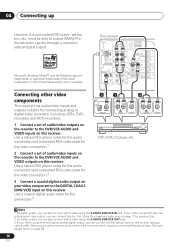
... cable for the video connection.1 2 Connect a set of audio/video inputs on the recorder to the DVR/VCR AUDIO and VIDEO outputs on this receiver. Note 1 For better quality, you can connect this too. Microsoft, Windows Media®, and the Windows logo are trademarks, or registered trademarks of... audio/video outputs on the recorder to the DVR/VCR AUDIO and VIDEO inputs on this receiver. This receiver IN IN OPT 2 (TV/ SAT) IN OPT 1 (CD) OUT ASSIGNABLE DIGITAL IN IN ASSIGNABLE DIGITAL IN XM IN IN COAX 2 (DVR/VCR...
... cable for the video connection.1 2 Connect a set of audio/video inputs on the recorder to the DVR/VCR AUDIO and VIDEO outputs on this receiver. Note 1 For better quality, you can connect this too. Microsoft, Windows Media®, and the Windows logo are trademarks, or registered trademarks of... audio/video outputs on the recorder to the DVR/VCR AUDIO and VIDEO inputs on this receiver. This receiver IN IN OPT 2 (TV/ SAT) IN OPT 1 (CD) OUT ASSIGNABLE DIGITAL IN IN ASSIGNABLE DIGITAL IN XM IN IN COAX 2 (DVR/VCR...

Owner's Manual
Page 17
...• COMP 2 - Hook them up 04 Using the component video jacks Component video should deliver superior picture quality when compared to this receiver. A further advantage (if your TV or monitor. This only needs to be done if you must also have your TV connected to ...jack and an optical input. Connecting to check whether they are both compatible) is progressive-scan video, which delivers a very stable, flicker-free picture. This receiver DIGITAL PRECISION PROCESSING CD CD-R / TAPE / MD FM AM XM AUX S -VIDEO VIDEO INPUT VIDEO L AUDIO R DIGITAL IN MCACC SETUP MIC V...
...• COMP 2 - Hook them up 04 Using the component video jacks Component video should deliver superior picture quality when compared to this receiver. A further advantage (if your TV or monitor. This only needs to be done if you must also have your TV connected to ...jack and an optical input. Connecting to check whether they are both compatible) is progressive-scan video, which delivers a very stable, flicker-free picture. This receiver DIGITAL PRECISION PROCESSING CD CD-R / TAPE / MD FM AM XM AUX S -VIDEO VIDEO INPUT VIDEO L AUDIO R DIGITAL IN MCACC SETUP MIC V...

Owner's Manual
Page 19
... 2 (DVR / VCR) IN COAX 1 (DVD/LD) OUT R AUDIO CEN- Also make sure the positive and negative (+/-) terminals on the receiver match those on the speakers.2 You can use speakers with a nominal impedance between 6-16Ω (please see Speaker Setting on the left to the...(DVD/LD) IN 1 PB PR FRONT L SURROUND SURROUND BACK L L PREOUT MONITOR OUT LR SURROUND (TV/SAT)IN 2 R R L CENTER R SURROUND BACK L R CENTER B This receiver Powered subwoofer SW INPUT AC OUTLET Caution • Make sure that all the bare speaker wire is shown here but using only one surround back...
... 2 (DVR / VCR) IN COAX 1 (DVD/LD) OUT R AUDIO CEN- Also make sure the positive and negative (+/-) terminals on the receiver match those on the speakers.2 You can use speakers with a nominal impedance between 6-16Ω (please see Speaker Setting on the left to the...(DVD/LD) IN 1 PB PR FRONT L SURROUND SURROUND BACK L L PREOUT MONITOR OUT LR SURROUND (TV/SAT)IN 2 R R L CENTER R SURROUND BACK L R CENTER B This receiver Powered subwoofer SW INPUT AC OUTLET Caution • Make sure that all the bare speaker wire is shown here but using only one surround back...

Owner's Manual
Page 20
... 3/8 in the event of external shocks such as earthquakes. • Make sure no exposed speaker wire is touching the rear panel, this may cause the receiver to turn off automatically. If you do not have provided a few turns until the wire is best to install the center speaker on placement that...
... 3/8 in the event of external shocks such as earthquakes. • Make sure no exposed speaker wire is touching the rear panel, this may cause the receiver to turn off automatically. If you do not have provided a few turns until the wire is best to install the center speaker on placement that...

Owner's Manual
Page 21
...Power supplied through this type of connected equipment should not exceed 100 W (0.8 A). • This unit should not be disconnected by the receiver's power switch. A RS SBL SBL SBR SBR fig. English Deutsch Français Italiano Nederlands Español Connecting up 04 Overhead ... Total electrical power consumption of equipment should be connected to malfunction. • Since a subwoofer or power amplifier can also cause the receiver to the AC outlet. 21 En when on vacation). The diagrams below show suggested surround and surround back speaker orientation. This can exceed...
...Power supplied through this type of connected equipment should not exceed 100 W (0.8 A). • This unit should not be disconnected by the receiver's power switch. A RS SBL SBL SBR SBR fig. English Deutsch Français Italiano Nederlands Español Connecting up 04 Overhead ... Total electrical power consumption of equipment should be connected to malfunction. • Since a subwoofer or power amplifier can also cause the receiver to the AC outlet. 21 En when on vacation). The diagrams below show suggested surround and surround back speaker orientation. This can exceed...

Owner's Manual
Page 22
... displays Chapter 5: Controls and displays Front panel ADVANCED ST/DIRECT/ STANDARD SURR AUTO SURR LISTENING MODE STANDBY/ON PHONES 1 2 34 56 AUDIO/VIDEO MULTI-CHANNEL RECEIVER VSX-816 ENTER MULTI JOG DIGITAL PRECISION PROCESSING DVD / LD TV/ SAT DVR/ VCR VIDEO CD CD-R / TAPE / MD FM AM XM AUX SIGNAL SB ch ACOUSTIC...
... displays Chapter 5: Controls and displays Front panel ADVANCED ST/DIRECT/ STANDARD SURR AUTO SURR LISTENING MODE STANDBY/ON PHONES 1 2 34 56 AUDIO/VIDEO MULTI-CHANNEL RECEIVER VSX-816 ENTER MULTI JOG DIGITAL PRECISION PROCESSING DVD / LD TV/ SAT DVR/ VCR VIDEO CD CD-R / TAPE / MD FM AM XM AUX SIGNAL SB ch ACOUSTIC...
Owner's Manual
Page 23
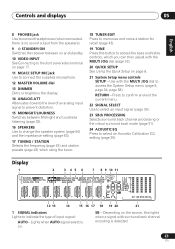
... to select an Acoustic Calibration EQ setting (page 30). Lights when AUTO signal select is no sound output from the speakers). 9 STANDBY/ON Switches the receiver between Midnight and Loudness listening (page 32). 16 SPEAKERS Use to change the speaker system (page 54) and the impedance setting (page 63). 17 TUNING...
... to select an Acoustic Calibration EQ setting (page 30). Lights when AUTO signal select is no sound output from the speakers). 9 STANDBY/ON Switches the receiver between Midnight and Loudness listening (page 32). 16 SPEAKERS Use to change the speaker system (page 54) and the impedance setting (page 63). 17 TUNING...


