

Owner's Manual
Page 1
...MULTI-CHANNEL RECEIVER VSX-816 Register your product at www.pioneerelectronics.com (US) www.pioneerelectronics.ca (Canada) • Protect your new investment The details of your purchase will be on file for reference in the event of an insurance claim such as loss or theft. • Receive free tips..., updates and service bulletins on your new product • Improve product development Your input helps us continue to design products that meet your needs. • Receive a free Pioneer newsletter Registered customers can opt in to...
...MULTI-CHANNEL RECEIVER VSX-816 Register your product at www.pioneerelectronics.com (US) www.pioneerelectronics.ca (Canada) • Protect your new investment The details of your purchase will be on file for reference in the event of an insurance claim such as loss or theft. • Receive free tips..., updates and service bulletins on your new product • Improve product development Your input helps us continue to design products that meet your needs. • Receive a free Pioneer newsletter Registered customers can opt in to...

Owner's Manual
Page 2
... against harmful interference in a particular installation. Make sure it is no guarantee that to radio communications. Increase the separation between the equipment and receiver. - Cet appareil numérique de la Classe B est conforme à la norme NMB-003 du Canada. For U.S. D8-10-1-... with electric appliances such as radios and televisions, use , the plug must be determined by turning the equipment off and on this Pioneer product. To prevent electromagnetic interference with Canadian ICES-003. THE SERIAL NUMBER FOR THIS EQUIPMENT IS LOCATED IN THE REAR. D8-10-2_En...
... against harmful interference in a particular installation. Make sure it is no guarantee that to radio communications. Increase the separation between the equipment and receiver. - Cet appareil numérique de la Classe B est conforme à la norme NMB-003 du Canada. For U.S. D8-10-1-... with electric appliances such as radios and televisions, use , the plug must be determined by turning the equipment off and on this Pioneer product. To prevent electromagnetic interference with Canadian ICES-003. THE SERIAL NUMBER FOR THIS EQUIPMENT IS LOCATED IN THE REAR. D8-10-2_En...
Owner's Manual
Page 4
...12 Digital audio cables 12 Video cables 12 Connecting a DVD player and TV 13 Connecting the multichannel analog outputs 14 Connecting a satellite receiver or other digital set-top box 14 Connecting other audio components 15 About the WMA9 Pro decoder 15 Connecting other video components 16 ... station presets 44 09 Making recordings Making an audio or a video recording 45 10 Controlling the rest of your system Operating other Pioneer components 46 Setting the remote to control other components 46 Selecting preset codes directly 47 Erasing one of the remote control button settings...
...12 Digital audio cables 12 Video cables 12 Connecting a DVD player and TV 13 Connecting the multichannel analog outputs 14 Connecting a satellite receiver or other digital set-top box 14 Connecting other audio components 15 About the WMA9 Pro decoder 15 Connecting other video components 16 ... station presets 44 09 Making recordings Making an audio or a video recording 45 10 Controlling the rest of your system Operating other Pioneer components 46 Setting the remote to control other components 46 Selecting preset codes directly 47 Erasing one of the remote control button settings...

Owner's Manual
Page 5
...system 54 Bi-amping your front speakers 55 Bi-wiring your speakers 55 Connecting additional amplifiers 56 Using this receiver with a Pioneer plasma display 56 Using the SR+ mode with a Pioneer plasma display 57 12 Other Settings The Input Assign menu 58 The Other Setup menu 59 Dynamic Range ...Control Setup 59 Dual Mono Setup 60 LFE Attenuator Setup 60 SR+ Setup for Pioneer plasma displays . . . 60 13 Additional information Troubleshooting 61 XM radio messages 63 Resetting the main unit 63 Switching the speaker impedance 63...
...system 54 Bi-amping your front speakers 55 Bi-wiring your speakers 55 Connecting additional amplifiers 56 Using this receiver with a Pioneer plasma display 56 Using the SR+ mode with a Pioneer plasma display 57 12 Other Settings The Input Assign menu 58 The Other Setup menu 59 Dynamic Range ...Control Setup 59 Dual Mono Setup 60 LFE Attenuator Setup 60 SR+ Setup for Pioneer plasma displays . . . 60 13 Additional information Troubleshooting 61 XM radio messages 63 Resetting the main unit 63 Switching the speaker impedance 63...

Owner's Manual
Page 6
...use new and old batteries together. • Insert the plus and minus sides of used batteries, please comply with performance and/or causing malfunctions. Receiver 8 inches (20 cm) Slot and openings in the cabinet are very dusty - 01 Before you start Chapter 1: Before you start Checking what's... (AA size IEC R6) x2 • AM loop antenna • FM wire antenna • These operating instructions Loading the batteries Installing the receiver When installing this unit, make sure to leave space around the unit for ventilation to improve heat dispersal (at least 8 in places that are ...
...use new and old batteries together. • Insert the plus and minus sides of used batteries, please comply with performance and/or causing malfunctions. Receiver 8 inches (20 cm) Slot and openings in the cabinet are very dusty - 01 Before you start Chapter 1: Before you start Checking what's... (AA size IEC R6) x2 • AM loop antenna • FM wire antenna • These operating instructions Loading the batteries Installing the receiver When installing this unit, make sure to leave space around the unit for ventilation to improve heat dispersal (at least 8 in places that are ...

Owner's Manual
Page 7
...hooked up using a digital connection from a home theater system depends not only on your DVD player or source disc, you may need to do this receiver. See Connecting a DVD player and TV on this . For surround sound, you'll want multichannel surround sound. 7 En Also see Hints on ...Surround Sound With the following quick setup guide, you should have a big effect on page 19. Check the manual that DVD is showing in the receiver's display. 5 minute guide 02 English Deutsch Français Italiano Nederlands Español Chapter 2: 5 minute guide Introduction to home theater Home ...
...hooked up using a digital connection from a home theater system depends not only on your DVD player or source disc, you may need to do this receiver. See Connecting a DVD player and TV on this . For surround sound, you'll want multichannel surround sound. 7 En Also see Hints on ...Surround Sound With the following quick setup guide, you should have a big effect on page 19. Check the manual that DVD is showing in the receiver's display. 5 minute guide 02 English Deutsch Français Italiano Nederlands Español Chapter 2: 5 minute guide Introduction to home theater Home ...

Owner's Manual
Page 8
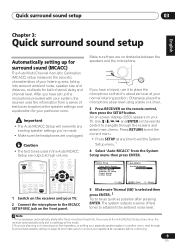
... medium, or large (S, M or L), M being an average-sized room. 6 Press ENTER. 7 Use the MULTI JOG dial to choose your speaker setup. The receiver automatically makes the necessary settings after you are available: 2.1ch - 3.1ch - 4.1ch - 5.1ch - 6.1ch - 7.1ch If a subwoofer wasn't detected in step...ANALOG MIDNIGHT/ ATT LOUDNESS SPEAKERS TUNING / STATION TUNER EDIT TONE QUICK SETUP SETUP MULTI JOG AUDIO/VIDEO MULTI-CHANNEL RECEIVER VSX-816 ENTER MULTI JOG DIGITAL PRECISION PROCESSING AUX SIGNAL SB ch ACOUSTIC SELECT PROCESSING EQ MCACC SETUP MIC MASTER VOLUME DOWN UP 1 If...
... medium, or large (S, M or L), M being an average-sized room. 6 Press ENTER. 7 Use the MULTI JOG dial to choose your speaker setup. The receiver automatically makes the necessary settings after you are available: 2.1ch - 3.1ch - 4.1ch - 5.1ch - 6.1ch - 7.1ch If a subwoofer wasn't detected in step...ANALOG MIDNIGHT/ ATT LOUDNESS SPEAKERS TUNING / STATION TUNER EDIT TONE QUICK SETUP SETUP MULTI JOG AUDIO/VIDEO MULTI-CHANNEL RECEIVER VSX-816 ENTER MULTI JOG DIGITAL PRECISION PROCESSING AUX SIGNAL SB ch ACOUSTIC SELECT PROCESSING EQ MCACC SETUP MIC MASTER VOLUME DOWN UP 1 If...
Owner's Manual
Page 9
... be as quiet as necessary before continuing. 9 En Otherwise, place the microphone at ear level using a table or a chair. 3 Press RECEIVER on the remote control to navigate through Surround back speaker setting on bi-amping your front speakers, or setting up for surround sound (MCACC)...SETUP MIC jack on the front panel. Note 1 The screensaver automatically starts after pressing ENTER. An on-screen display (OSD) appears on the receiver and your TV. 2 Connect the microphone to optimize the speaker settings and equalization for both channel delay and channel level. After you 've ...
... be as quiet as necessary before continuing. 9 En Otherwise, place the microphone at ear level using a table or a chair. 3 Press RECEIVER on the remote control to navigate through Surround back speaker setting on bi-amping your front speakers, or setting up for surround sound (MCACC)...SETUP MIC jack on the front panel. Note 1 The screensaver automatically starts after pressing ENTER. An on-screen display (OSD) appears on the receiver and your TV. 2 Connect the microphone to optimize the speaker settings and equalization for both channel delay and channel level. After you 've ...
Owner's Manual
Page 10
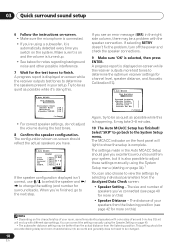
..., sometimes identical speakers with cone sizes of around 5 inches (12cm) will light to finish. The MCACC indicator on -screen while the receiver outputs test tones to determine the speakers present in the right side column, there may take 3-8 minutes. 10 The Auto MCACC Setup has... (and number for the test tones to show the setup is complete. If you see page 40 for more test tones to determine the optimum receiver settings for channel level, speaker distance, and Acoustic Calibration EQ. 2.Auto MCACC Now Analyzing Surround Analyzing Speaker System [ ] Speaker Distance [ ] Channel...
..., sometimes identical speakers with cone sizes of around 5 inches (12cm) will light to finish. The MCACC indicator on -screen while the receiver outputs test tones to determine the speakers present in the right side column, there may take 3-8 minutes. 10 The Auto MCACC Setup has... (and number for the test tones to show the setup is complete. If you see page 40 for more test tones to determine the optimum receiver settings for channel level, speaker distance, and Acoustic Calibration EQ. 2.Auto MCACC Now Analyzing Surround Analyzing Speaker System [ ] Speaker Distance [ ] Channel...
Owner's Manual
Page 12
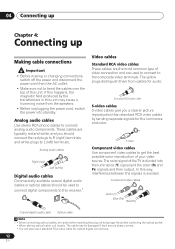
... off the power and disconnect the power cord from the AC outlet. • Make sure not to bend the cables over the top of this receiver.1 Video cables Standard RCA video cables These cables are the most common type of video connection and are typically red and white, and you a clearer...
... off the power and disconnect the power cord from the AC outlet. • Make sure not to bend the cables over the top of this receiver.1 Video cables Standard RCA video cables These cables are the most common type of video connection and are typically red and white, and you a clearer...

Owner's Manual
Page 13
...cable3 and a stereo RCA phono cable for the connection. • If your DVD player has multichannel analog outputs, see The Input Assign menu on this receiver. This will allow you to play the sound from your DVD player. 3 For better quality, you can also connect with S-video using the S-VIDEO ... connect with S-video using the S-VIDEO DVD/LD jack. Use a coaxial digital audio cable for how to connect it to the optical input on this receiver. Use a standard RCA video cable to connect to the composite video jack.4 DIGITAL AUDIO OUT OPTICAL 3 TV ANALOG AUDIO OUT R L VIDEO IN 4 IN ...
...cable3 and a stereo RCA phono cable for the connection. • If your DVD player has multichannel analog outputs, see The Input Assign menu on this receiver. This will allow you to play the sound from your DVD player. 3 For better quality, you can also connect with S-video using the S-VIDEO ... connect with S-video using the S-VIDEO DVD/LD jack. Use a coaxial digital audio cable for how to connect it to the optical input on this receiver. Use a standard RCA video cable to connect to the composite video jack.4 DIGITAL AUDIO OUT OPTICAL 3 TV ANALOG AUDIO OUT R L VIDEO IN 4 IN ...

Owner's Manual
Page 14
... OUTPUT VIDEO OUTPUT 1 Connect a set of audio/video outputs on the set-top box component to the TV/SAT AUDIO and VIDEO inputs on this receiver.2 Use a stereo RCA phono cable for the audio connection and a standard RCA video cable for the video connection.3 2 Connect an optical digital audio...(see page 33). 2 If you've already connected your TV to the multichannel inputs of the coaxial inputs on this. 4 If your satellite/cable receiver doesn't have 5.1 channel analog outputs.In this case, you can connect the multichannel analog outputs to the TV/SAT inputs, simply choose another input. ...
... OUTPUT VIDEO OUTPUT 1 Connect a set of audio/video outputs on the set-top box component to the TV/SAT AUDIO and VIDEO inputs on this receiver.2 Use a stereo RCA phono cable for the audio connection and a standard RCA video cable for the video connection.3 2 Connect an optical digital audio...(see page 33). 2 If you've already connected your TV to the multichannel inputs of the coaxial inputs on this. 4 If your satellite/cable receiver doesn't have 5.1 channel analog outputs.In this case, you can connect the multichannel analog outputs to the TV/SAT inputs, simply choose another input. ...
Owner's Manual
Page 15
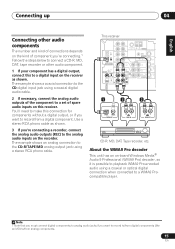
...from analog components. 15 En Note 1 Note that you must connect digital components to analog audio jacks if you want to a digital input on the receiver as shown. 3 If you're connecting a recorder, connect the analog audio outputs (REC) to a WMA9 Procompatible player. You'll need to make ...-board Windows Media® Audio 9 Professional (WMA9 Pro) decoder, so it is possible to playback WMA9 Pro-encoded audio using a stereo RCA phono cable. This receiver IN IN OPT 2 (TV/ SAT) IN OPT 1 (CD) OUT ASSIGNABLE DIGITAL IN IN ASSIGNABLE DIGITAL IN XM IN IN COAX 2 (DVR/VCR) IN...
...from analog components. 15 En Note 1 Note that you must connect digital components to analog audio jacks if you want to a digital input on the receiver as shown. 3 If you're connecting a recorder, connect the analog audio outputs (REC) to a WMA9 Procompatible player. You'll need to make ...-board Windows Media® Audio 9 Professional (WMA9 Pro) decoder, so it is possible to playback WMA9 Pro-encoded audio using a stereo RCA phono cable. This receiver IN IN OPT 2 (TV/ SAT) IN OPT 1 (CD) OUT ASSIGNABLE DIGITAL IN IN ASSIGNABLE DIGITAL IN XM IN IN COAX 2 (DVR/VCR) IN...
Owner's Manual
Page 16
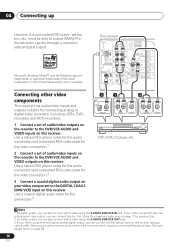
... Windows logo are trademarks, or registered trademarks of audio/video outputs on the recorder to the DVR/VCR AUDIO and VIDEO inputs on this receiver. Use a stereo RCA phono cable for the audio connection and a standard RCA video cable for the video connection.2 3 Connect a coaxial... recorders, including VCRs, DVDrecorders and HDD recorders. 1 Connect a set of Microsoft Corporation in the United States and/or other video components This receiver has audio/video inputs and outputs suitable for the video connection.1 2 Connect a set -top box, etc. If your video component only has...
... Windows logo are trademarks, or registered trademarks of audio/video outputs on the recorder to the DVR/VCR AUDIO and VIDEO inputs on this receiver. Use a stereo RCA phono cable for the audio connection and a standard RCA video cable for the video connection.2 3 Connect a coaxial... recorders, including VCRs, DVDrecorders and HDD recorders. 1 Connect a set of Microsoft Corporation in the United States and/or other video components This receiver has audio/video inputs and outputs suitable for the video connection.1 2 Connect a set -top box, etc. If your video component only has...

Owner's Manual
Page 17
...set of your source and TV are accessed via the front panel using a component video input, you connect any source component to the receiver using the VIDEO button. Use a three-way component video cable. English Deutsch Français Italiano Nederlands Español Connecting up ... way you made the rear panel connections. See the manuals that came with progressive-scan video. DVD • COMP 2 - TV • COMP 3 - This receiver DIGITAL PRECISION PROCESSING CD CD-R / TAPE / MD FM AM XM AUX S -VIDEO VIDEO INPUT VIDEO L AUDIO R DIGITAL IN MCACC SETUP MIC V L R ...
...set of your source and TV are accessed via the front panel using a component video input, you connect any source component to the receiver using the VIDEO button. Use a three-way component video cable. English Deutsch Français Italiano Nederlands Español Connecting up ... way you made the rear panel connections. See the manuals that came with progressive-scan video. DVD • COMP 2 - TV • COMP 3 - This receiver DIGITAL PRECISION PROCESSING CD CD-R / TAPE / MD FM AM XM AUX S -VIDEO VIDEO INPUT VIDEO L AUDIO R DIGITAL IN MCACC SETUP MIC V L R ...

Owner's Manual
Page 19
...(DVD/LD) IN 1 PB PR FRONT L SURROUND SURROUND BACK L L PREOUT MONITOR OUT LR SURROUND (TV/SAT)IN 2 R R L CENTER R SURROUND BACK L R CENTER B This receiver Powered subwoofer SW INPUT AC OUTLET Caution • Make sure that all the bare speaker wire is best. Also make sure the positive and negative... (+/-) terminals on the receiver match those on the speakers.2 You can use speakers with an impedance of eight speakers (including the subwoofer) is shown here but ...
...(DVD/LD) IN 1 PB PR FRONT L SURROUND SURROUND BACK L L PREOUT MONITOR OUT LR SURROUND (TV/SAT)IN 2 R R L CENTER R SURROUND BACK L R CENTER B This receiver Powered subwoofer SW INPUT AC OUTLET Caution • Make sure that all the bare speaker wire is best. Also make sure the positive and negative... (+/-) terminals on the receiver match those on the speakers.2 You can use speakers with an impedance of eight speakers (including the subwoofer) is shown here but ...

Owner's Manual
Page 20
... in the event of external shocks such as earthquakes. • Make sure no exposed speaker wire is touching the rear panel, this may cause the receiver to speaker manual for bigger rooms. • Surround and surround back speakers should be placed near the TV, we recommend using a center speaker, place the...
... in the event of external shocks such as earthquakes. • Make sure no exposed speaker wire is touching the rear panel, this may cause the receiver to speaker manual for bigger rooms. • Surround and surround back speakers should be placed near the TV, we recommend using a center speaker, place the...

Owner's Manual
Page 21
...A) shows orientation with two surround back speakers connected. 90~120 LS RS LS RS 0~60 LS SB fig. This can also cause the receiver to malfunction. • Since a subwoofer or power amplifier can also refer to the AC outlet in regular use (ex. The first diagram... (fig. Total electrical power consumption of connected equipment should not exceed 100 W (0.8 A). • This unit should not be disconnected by the receiver's power switch. B 3-D view of 7.1 channel speaker setup Caution • Do not connect a TV set, monitor, heater, or similar appliance to the...
...A) shows orientation with two surround back speakers connected. 90~120 LS RS LS RS 0~60 LS SB fig. This can also cause the receiver to malfunction. • Since a subwoofer or power amplifier can also refer to the AC outlet in regular use (ex. The first diagram... (fig. Total electrical power consumption of connected equipment should not exceed 100 W (0.8 A). • This unit should not be disconnected by the receiver's power switch. B 3-D view of 7.1 channel speaker setup Caution • Do not connect a TV set, monitor, heater, or similar appliance to the...

Owner's Manual
Page 22
... displays Chapter 5: Controls and displays Front panel ADVANCED ST/DIRECT/ STANDARD SURR AUTO SURR LISTENING MODE STANDBY/ON PHONES 1 2 34 56 AUDIO/VIDEO MULTI-CHANNEL RECEIVER VSX-816 ENTER MULTI JOG DIGITAL PRECISION PROCESSING DVD / LD TV/ SAT DVR/ VCR VIDEO CD CD-R / TAPE / MD FM AM XM AUX SIGNAL SB ch ACOUSTIC...
... displays Chapter 5: Controls and displays Front panel ADVANCED ST/DIRECT/ STANDARD SURR AUTO SURR LISTENING MODE STANDBY/ON PHONES 1 2 34 56 AUDIO/VIDEO MULTI-CHANNEL RECEIVER VSX-816 ENTER MULTI JOG DIGITAL PRECISION PROCESSING DVD / LD TV/ SAT DVR/ VCR VIDEO CD CD-R / TAPE / MD FM AM XM AUX SIGNAL SB ch ACOUSTIC...
Owner's Manual
Page 23
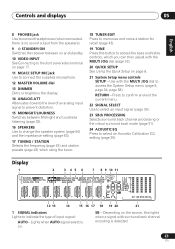
... Italiano Nederlands Español 8 PHONES jack Use to connect headphones (when connected, there is no sound output from the speakers). 9 STANDBY/ON Switches the receiver between on and standby. 10 VIDEO INPUT See Connecting to the front panel video terminal on page 17. 11 MCACC SETUP MIC jack Use to...
... Italiano Nederlands Español 8 PHONES jack Use to connect headphones (when connected, there is no sound output from the speakers). 9 STANDBY/ON Switches the receiver between on and standby. 10 VIDEO INPUT See Connecting to the front panel video terminal on page 17. 11 MCACC SETUP MIC jack Use to...


