
Owner's Manual
Page 3
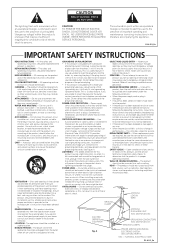
... short-out parts that are required, be fatal. OBJECT AND LIQUID ENTRY - Adjust only those controls that could result in a wet basement; When replacement parts are covered by following the operating instructions. A ANTENNA DISCHARGE UNIT (NEC SECTION 810-20) GROUNDING CONDUCTORS (NEC SECTION 810-21) GROUND CLAMPS POWER SERVICE GROUNDING ELECTRODE SYSTEM (NEC ART 250, PART H) NEC - NATIONAL ELECTRICAL CODE D1-4-2-2_En...
... short-out parts that are required, be fatal. OBJECT AND LIQUID ENTRY - Adjust only those controls that could result in a wet basement; When replacement parts are covered by following the operating instructions. A ANTENNA DISCHARGE UNIT (NEC SECTION 810-20) GROUNDING CONDUCTORS (NEC SECTION 810-21) GROUND CLAMPS POWER SERVICE GROUNDING ELECTRODE SYSTEM (NEC ART 250, PART H) NEC - NATIONAL ELECTRICAL CODE D1-4-2-2_En...
Owner's Manual
Page 4
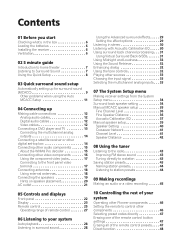
... Manual speaker setup 39 Speaker Setting 40 Crossover Network 41 Channel Level 41 Speaker Distance 42 08 Using the tuner Listening to the radio 43 Improving FM stereo sound 43 Tuning directly to a station 43 Saving station presets 43 Naming station presets 44 Listening to station presets 44 09 Making recordings Making an audio or a video recording 45 10 Controlling the rest of your system Operating other Pioneer components 46 Setting the remote to control other components 46 Selecting preset codes directly 47 Erasing one of the remote control button settings...
... Manual speaker setup 39 Speaker Setting 40 Crossover Network 41 Channel Level 41 Speaker Distance 42 08 Using the tuner Listening to the radio 43 Improving FM stereo sound 43 Tuning directly to a station 43 Saving station presets 43 Naming station presets 44 Listening to station presets 44 09 Making recordings Making an audio or a video recording 45 10 Controlling the rest of your system Operating other Pioneer components 46 Setting the remote to control other components 46 Selecting preset codes directly 47 Erasing one of the remote control button settings...

Owner's Manual
Page 5
... XM Radio 53 Using XM Surround 53 Saving channel presets 53 Second Zone speaker B setup 54 Switching the speaker system 54 Bi-amping your front speakers 55 Bi-wiring your speakers 55 Connecting additional amplifiers 56 Using this receiver with a Pioneer plasma display 56 Using the SR+ mode with a Pioneer plasma display 57 12 Other Settings The Input Assign menu 58 The Other Setup menu 59 Dynamic Range Control Setup 59 Dual Mono Setup 60 LFE Attenuator Setup 60 SR+ Setup for Pioneer plasma displays . . . 60 13 Additional information Troubleshooting...
... XM Radio 53 Using XM Surround 53 Saving channel presets 53 Second Zone speaker B setup 54 Switching the speaker system 54 Bi-amping your front speakers 55 Bi-wiring your speakers 55 Connecting additional amplifiers 56 Using this receiver with a Pioneer plasma display 56 Using the SR+ mode with a Pioneer plasma display 57 12 Other Settings The Input Assign menu 58 The Other Setup menu 59 Dynamic Range Control Setup 59 Dual Mono Setup 60 LFE Attenuator Setup 60 SR+ Setup for Pioneer plasma displays . . . 60 13 Additional information Troubleshooting...

Owner's Manual
Page 7
... the receiver's display. In this case, the listening mode must be set your DVD player to output Dolby Digital, DTS and 88.2/96kHz PCM (2 channel) audio (see your DVD player's manual for more on this). 2 Depending on your DVD player or source disc, you want to hook up for more on this.2 Note 1 You may only get from the DVD player to do this . 5 Play a DVD, and adjust the volume. See Connecting a DVD player and TV on the source and the sound settings...
... the receiver's display. In this case, the listening mode must be set your DVD player to output Dolby Digital, DTS and 88.2/96kHz PCM (2 channel) audio (see your DVD player's manual for more on this). 2 Depending on your DVD player or source disc, you want to hook up for more on this.2 Note 1 You may only get from the DVD player to do this . 5 Play a DVD, and adjust the volume. See Connecting a DVD player and TV on the source and the sound settings...
Owner's Manual
Page 10
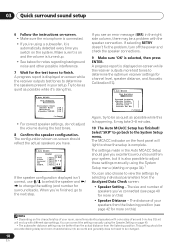
.... 2.Auto MCACC Now Analyzing Environment Check Ambient Noise Microphone Speaker YES/NO [ OK ] [ OK ] [ OK ] :Cancel • For correct speaker settings, do not adjust the volume during the test tones. 8 Confirm the speaker configuration. 03 Quick surround sound setup 6 Follow the instructions on-screen. • Make sure the microphone is connected. • If you're using a subwoofer, it is automatically detected every time you switch on page 40. • The subwoofer distance setting...
.... 2.Auto MCACC Now Analyzing Environment Check Ambient Noise Microphone Speaker YES/NO [ OK ] [ OK ] [ OK ] :Cancel • For correct speaker settings, do not adjust the volume during the test tones. 8 Confirm the speaker configuration. 03 Quick surround sound setup 6 Follow the instructions on-screen. • Make sure the microphone is connected. • If you're using a subwoofer, it is automatically detected every time you switch on page 40. • The subwoofer distance setting...

Owner's Manual
Page 14
... L DVD/multi-channel decoder with S-video using a coaxial digital audio cable. SUB TER WOOFER AUX FM UNBAL 75 Ω CD DVR / VCR AM LOOP ANTENNA MONITOR OUT OUT CONTROL IN OUT R L SURROUND DVD 5.1CH INPUT IN TV / SAT IN DVD / LD FRONT PLAY CD-R D V D 5.1CH INPUT IN / TAPE / MD REC L VIDEO OUT MONITOR OUT DVR / VCR IN TV / SAT IN SR P E SUB WOOFER A DVD / LD A PREOUT IN S-VIDEO K E R S FRONT COMPONEN (DVR / VC Y PB MONITO LR RL FRONT OUTPUT CENTER OUTPUT RL SURROUND OUTPUT SUB WOOFER OUTPUT VIDEO OUTPUT 1 Connect a set...
... L DVD/multi-channel decoder with S-video using a coaxial digital audio cable. SUB TER WOOFER AUX FM UNBAL 75 Ω CD DVR / VCR AM LOOP ANTENNA MONITOR OUT OUT CONTROL IN OUT R L SURROUND DVD 5.1CH INPUT IN TV / SAT IN DVD / LD FRONT PLAY CD-R D V D 5.1CH INPUT IN / TAPE / MD REC L VIDEO OUT MONITOR OUT DVR / VCR IN TV / SAT IN SR P E SUB WOOFER A DVD / LD A PREOUT IN S-VIDEO K E R S FRONT COMPONEN (DVR / VC Y PB MONITO LR RL FRONT OUTPUT CENTER OUTPUT RL SURROUND OUTPUT SUB WOOFER OUTPUT VIDEO OUTPUT 1 Connect a set...

Owner's Manual
Page 17
... AUX S -VIDEO VIDEO INPUT VIDEO L AUDIO R DIGITAL IN MCACC SETUP MIC V L R VIDEO OUTPUT DIGITAL OUT Video camera (etc.) 17 En This only needs to be done if you 've connected. DVD • COMP 2 - Use a three-way component video cable. See the manuals that came with your source and TV are standard audio/video jacks as well as an Svideo jack and an optical input. Use a three-way component video cable for more on this. 3 Connect the COMPONENT VIDEO MONITOR OUT jacks on this receiver to the receiver using the VIDEO button. Hook...
... AUX S -VIDEO VIDEO INPUT VIDEO L AUDIO R DIGITAL IN MCACC SETUP MIC V L R VIDEO OUTPUT DIGITAL OUT Video camera (etc.) 17 En This only needs to be done if you 've connected. DVD • COMP 2 - Use a three-way component video cable. See the manuals that came with your source and TV are standard audio/video jacks as well as an Svideo jack and an optical input. Use a three-way component video cable for more on this. 3 Connect the COMPONENT VIDEO MONITOR OUT jacks on this receiver to the receiver using the VIDEO button. Hook...

Owner's Manual
Page 19
... LOOP ANTENNA MONITOR OUT OUT CONTROL IN OUT R L SURROUND DVD 5.1CH INPUT IN TV / SAT IN DVD / LD FRONT D V D 5.1CH PLAY INPUT IN CD-R / TAPE / MD REC L VIDEO OUT MONITOR OUT DVR / VCR IN TV / SAT IN SR P E SUB WOOFER A DVD / LD A PREOUT IN S-VIDEO K E R S FRONT COMPONENT VIDEO (DVR/VCR)IN 3 ASSIGNABLE Y PB PR Y (DVD/LD) IN 1 PB PR FRONT L SURROUND SURROUND BACK L L PREOUT MONITOR OUT LR SURROUND (TV/SAT)IN 2 R R L CENTER R SURROUND BACK L R CENTER B This receiver Powered subwoofer SW INPUT...
... LOOP ANTENNA MONITOR OUT OUT CONTROL IN OUT R L SURROUND DVD 5.1CH INPUT IN TV / SAT IN DVD / LD FRONT D V D 5.1CH PLAY INPUT IN CD-R / TAPE / MD REC L VIDEO OUT MONITOR OUT DVR / VCR IN TV / SAT IN SR P E SUB WOOFER A DVD / LD A PREOUT IN S-VIDEO K E R S FRONT COMPONENT VIDEO (DVR/VCR)IN 3 ASSIGNABLE Y PB PR Y (DVD/LD) IN 1 PB PR FRONT L SURROUND SURROUND BACK L L PREOUT MONITOR OUT LR SURROUND (TV/SAT)IN 2 R R L CENTER R SURROUND BACK L R CENTER B This receiver Powered subwoofer SW INPUT...
Owner's Manual
Page 26
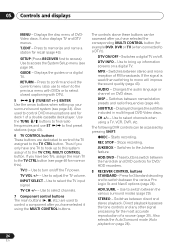
.... Use to hook up information screens on page 28). 26 En 05 Controls and displays MENU - Switches between the various surround modes (page 29). GUIDE - DTV INFO - Use to switch between named station presets and radio frequencies (page 44). Displays/changes the subtitles included in multilingual DVD-Video discs. Press for example DVD, DVR or TV (when connected to the TV CTRL button. Use to select channels. 7 Component control buttons The main buttons ( , , etc.) are dedicated to control the TV assigned to a DTV)). Switches...
.... Use to hook up information screens on page 28). 26 En 05 Controls and displays MENU - Switches between the various surround modes (page 29). GUIDE - DTV INFO - Use to switch between named station presets and radio frequencies (page 44). Displays/changes the subtitles included in multilingual DVD-Video discs. Press for example DVD, DVR or TV (when connected to the TV CTRL button. Use to select channels. 7 Component control buttons The main buttons ( , , etc.) are dedicated to control the TV assigned to a DTV)). Switches...

Owner's Manual
Page 27
... choose the options below. DIRECT F - ERASE - Press to make these adjustments. S. Indicates the setup mode, from which you 're setting the remote to control other components connected to make dialog stand out when watching TV or a movie (page 32). PRESET - Selects Auto Surround (Auto playback on page 47. READ ID - RETRIEVER - Use to turn on/off other components (see Controlling the rest of the remote control button settings on page 42). See...
... choose the options below. DIRECT F - ERASE - Press to make these adjustments. S. Indicates the setup mode, from which you 're setting the remote to control other components connected to make dialog stand out when watching TV or a movie (page 32). PRESET - Selects Auto Surround (Auto playback on page 47. READ ID - RETRIEVER - Use to turn on/off other components (see Controlling the rest of the remote control button settings on page 42). See...
Owner's Manual
Page 29
... of overall surround with Dolby Pro Logic for a variety of settings you can adjust. 1 Press EFFECT/CH SEL repeatedly to select the setting you can be used with film soundtracks, but some modes are connected, the PHONES SURROUND mode will automatically be adjusted using the EFFECT parameter in your setup. buttons to set it sound wider (higher settings) or narrower (lower settings). 0 to 7 Default: 3 Dimensiona Adjusts the surround sound balance from the surround back speakers in Setting the...
... of overall surround with Dolby Pro Logic for a variety of settings you can adjust. 1 Press EFFECT/CH SEL repeatedly to select the setting you can be used with film soundtracks, but some modes are connected, the PHONES SURROUND mode will automatically be adjusted using the EFFECT parameter in your setup. buttons to set it sound wider (higher settings) or narrower (lower settings). 0 to 7 Default: 3 Dimensiona Adjusts the surround sound balance from the surround back speakers in Setting the...

Owner's Manual
Page 34
... surround setup (see Manual MCACC speaker setup below ). • Auto MCACC - Note 1 If headphones are using the receiver (see The Input Assign menu on your TV. Surround back speaker setting • Default setting: Normal (SB) There are using your speaker settings and customize the Acoustic Calibration EQ (see Automatically setting up two speaker systems in another room. RECEIVER INPUT SELECT SOURCE AUDIO/VIDEO PRE-PROGRAMMED REMOTE CONTROL UNIT DVD CD TV DVR TVCTRL CD-R/TAPE FM XM RADIO AM RECEIVER D.ACCESS +10 CLASS DISC ENTER TOP MENU TUNE...
... surround setup (see Manual MCACC speaker setup below ). • Auto MCACC - Note 1 If headphones are using the receiver (see The Input Assign menu on your TV. Surround back speaker setting • Default setting: Normal (SB) There are using your speaker settings and customize the Acoustic Calibration EQ (see Automatically setting up two speaker systems in another room. RECEIVER INPUT SELECT SOURCE AUDIO/VIDEO PRE-PROGRAMMED REMOTE CONTROL UNIT DVD CD TV DVR TVCTRL CD-R/TAPE FM XM RADIO AM RECEIVER D.ACCESS +10 CLASS DISC ENTER TOP MENU TUNE...
Owner's Manual
Page 35
... connect the setup microphone to the front panel and place it on page 54). • Front Bi-Amp - Measure the acoustic characteristics of your room and automatically adjust the frequency balance of your main (speaker system A) setup. • Second Zone - See Making receiver settings from the System Setup menu above if you 'll have already completed Automatically setting up the volume as necessary. 1 Select 'Manual MCACC' from the System Setup menu...
... connect the setup microphone to the front panel and place it on page 54). • Front Bi-Amp - Measure the acoustic characteristics of your room and automatically adjust the frequency balance of your main (speaker system A) setup. • Second Zone - See Making receiver settings from the System Setup menu above if you 'll have already completed Automatically setting up the volume as necessary. 1 Select 'Manual MCACC' from the System Setup menu...
Owner's Manual
Page 57
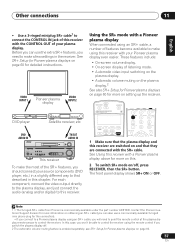
...VIDEO MULTI-CHANNEL RECEIVER VSX-816 ENTER MULTI JOG DIGITAL PRECISION PROCESSING DVD / LD TV/ SAT DVR /VCR VIDEO CD CD-R / TAPE / MD FM AM XM AUX SIGNAL SB ch ACOUSTIC SELECT PROCESSING EQ DIMMER ANALOG MIDNIGHT/ ATT LOUDNESS SPEAKERS TUNING / STATION TUNER EDIT TONE QUICK SETUP SETUP RETURN MULTI JOG S -VIDEO VIDEO INPUT VIDEO L AUDIO R DIGITAL IN MCACC SETUP MIC DOWN MASTER VOLUME UP This receiver To make using an SR+ cable, you will need to make a few settings in this receiver with a Pioneer plasma display When connected using an SR+ cable, a number...
...VIDEO MULTI-CHANNEL RECEIVER VSX-816 ENTER MULTI JOG DIGITAL PRECISION PROCESSING DVD / LD TV/ SAT DVR /VCR VIDEO CD CD-R / TAPE / MD FM AM XM AUX SIGNAL SB ch ACOUSTIC SELECT PROCESSING EQ DIMMER ANALOG MIDNIGHT/ ATT LOUDNESS SPEAKERS TUNING / STATION TUNER EDIT TONE QUICK SETUP SETUP RETURN MULTI JOG S -VIDEO VIDEO INPUT VIDEO L AUDIO R DIGITAL IN MCACC SETUP MIC DOWN MASTER VOLUME UP This receiver To make using an SR+ cable, you will need to make a few settings in this receiver with a Pioneer plasma display When connected using an SR+ cable, a number...

Owner's Manual
Page 58
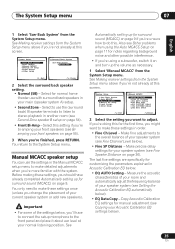
...Input' from the Input Assign menu. 5.Input Assign a.Digital Input b.Component Input 5a.Digital Input Setup Coaxial - 1 Coaxial - 2 Optical - 1 Optical - 2 DVD [ DVR ] [ CD ] [ TV ] :Return :Finish 2 Select the number of the digital input to which device it is, or else you may see Using the component video jacks on page 17. 1 Select 'Component Input' from the System Setup menu. DVD Coaxial - 2 - This setting tells the receiver what digital equipment is hooked up to which terminal so the buttons on the remote correspond to what you have connected equipment using component video cables...
...Input' from the Input Assign menu. 5.Input Assign a.Digital Input b.Component Input 5a.Digital Input Setup Coaxial - 1 Coaxial - 2 Optical - 1 Optical - 2 DVD [ DVR ] [ CD ] [ TV ] :Return :Finish 2 Select the number of the digital input to which device it is, or else you may see Using the component video jacks on page 17. 1 Select 'Component Input' from the System Setup menu. DVD Coaxial - 2 - This setting tells the receiver what digital equipment is hooked up to which terminal so the buttons on the remote correspond to what you have connected equipment using component video cables...
Owner's Manual
Page 62
... wires. • Fully extend the FM wire antenna, position for best reception, and secure to the CONTROL IN jack and use remote normally (see Operating other components, but • Reinsert the SR cable, making sure it away from the receiver (or move antennas farther away from equipment causing noise). Broadcast stations cannot be operated with Pioneer products. subwoofer output). The System Setup screen doesn't appear. • When the receiver is in standby, switch...
... wires. • Fully extend the FM wire antenna, position for best reception, and secure to the CONTROL IN jack and use remote normally (see Operating other components, but • Reinsert the SR cable, making sure it away from the receiver (or move antennas farther away from equipment causing noise). Broadcast stations cannot be operated with Pioneer products. subwoofer output). The System Setup screen doesn't appear. • When the receiver is in standby, switch...
Service Manual
Page 138
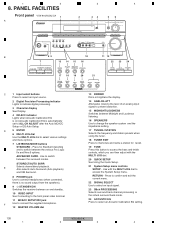
PANEL FACILITIES Front panel VSX-816/KUXJ/CA 1 A 2 34 5 6 AUDIO/VIDEO MULTI-CHANNEL RECEIVER VSX-816 ENTER MULTI JOG ADVANCED ST/DIRECT/ STANDARD SURR AUTO SURR LISTENING MODE STANDBY/ON PHONES DIGITAL PRECISION PROCESSING DVD/LD TV/SAT DVR/VCR VIDEO CD CD-R/TAPE/MD FM AM XM AUX SIGNAL SB ch ACOUSTIC SELECT PROCESSING EQ DIMMER ANALOG MIDNIGHT/ ATT LOUDNESS SPEAKERS TUNING/ STATION TUNER EDIT TONE QUICK SETUP SETUP RETURN MULTI JOG S-VIDEO VIDEO INPUT VIDEO L AUDIO R DIGITAL IN MCACC SETUP MIC DOWN MASTER VOLUME UP B 89 10 11 12 7 13 14...
PANEL FACILITIES Front panel VSX-816/KUXJ/CA 1 A 2 34 5 6 AUDIO/VIDEO MULTI-CHANNEL RECEIVER VSX-816 ENTER MULTI JOG ADVANCED ST/DIRECT/ STANDARD SURR AUTO SURR LISTENING MODE STANDBY/ON PHONES DIGITAL PRECISION PROCESSING DVD/LD TV/SAT DVR/VCR VIDEO CD CD-R/TAPE/MD FM AM XM AUX SIGNAL SB ch ACOUSTIC SELECT PROCESSING EQ DIMMER ANALOG MIDNIGHT/ ATT LOUDNESS SPEAKERS TUNING/ STATION TUNER EDIT TONE QUICK SETUP SETUP RETURN MULTI JOG S-VIDEO VIDEO INPUT VIDEO L AUDIO R DIGITAL IN MCACC SETUP MIC DOWN MASTER VOLUME UP B 89 10 11 12 7 13 14...
Service Manual
Page 140
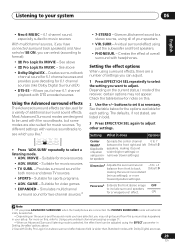
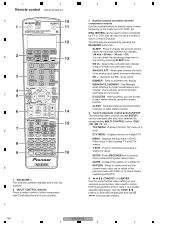
... an analog input signal to boost the bass and treble at low volume. SR + - MIDNIGHT/LOUDNESS - Use Loudness to prevent distortion. Switches between standby and on a digital TV. T.EDIT - SB ch - Dims or brightens the display. After pressing, you have selected the corresponding MULTI CONTROL button (DVD, FM, AM, TV, etc.) TOP MENU - Displays the disc menu of a DVD. Press to memorize and name a station for this receiver. 2 MULTI CONTROL buttons Press to find preset stations. 140 VSX-816-K 1 2 3 4 SETUP (Press RECEIVER first...
... an analog input signal to boost the bass and treble at low volume. SR + - MIDNIGHT/LOUDNESS - Use Loudness to prevent distortion. Switches between standby and on a digital TV. T.EDIT - SB ch - Dims or brightens the display. After pressing, you have selected the corresponding MULTI CONTROL button (DVD, FM, AM, TV, etc.) TOP MENU - Displays the disc menu of a DVD. Press to memorize and name a station for this receiver. 2 MULTI CONTROL buttons Press to find preset stations. 140 VSX-816-K 1 2 3 4 SETUP (Press RECEIVER first...
Service Manual
Page 141
... station presets and radio frequencies. STEREO - AUTO SURR - RETRIEVER - DIRECT F - See Confirming preset codes. 13 RECEIVER C Switches the remote to control the receiver (used to control a component after you choose the options below. Also adjusts the level of the remote control presets. 5 6 6 TV CONTROL buttons These buttons are used to compressed audio sources. Use to switch between the various Pro Logic IIx and Neo:6 options. SUBTITLE - Press for example DVD, DVR or TV (when connected to a DTV)). DIALOG E - PRESET - See Direct function. RESET - Operating...
... station presets and radio frequencies. STEREO - AUTO SURR - RETRIEVER - DIRECT F - See Confirming preset codes. 13 RECEIVER C Switches the remote to control the receiver (used to control a component after you choose the options below. Also adjusts the level of the remote control presets. 5 6 6 TV CONTROL buttons These buttons are used to compressed audio sources. Use to switch between the various Pro Logic IIx and Neo:6 options. SUBTITLE - Press for example DVD, DVR or TV (when connected to a DTV)). DIALOG E - PRESET - See Direct function. RESET - Operating...
Service Manual
Page 142
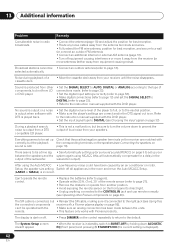
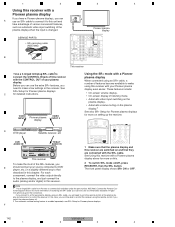
...; VIDEO INPUT 1 Pioneer plasma display VIDEO INPUT 2 D DVD player Satellite receiver, etc DVD AUDIO IN TV/SAT AUDIO IN ADVANCED ST /DIRECT / STANDARD SURR AUTO SURR LISTENING MODE STANDBY/ON PHONES AUDIO/VIDEO MULTI-CHANNEL RECEIVER VSX-816 ENTER MULTI JOG DIGITAL PRECISION PROCESSING DVD / LD TV / SAT DVR/ VCR VIDEO CD CD-R/T APE /M D FM AM XM AUX SIGNAL SB ch ACOUSTIC SELECT PROCESSING EQ DIMMER ANALOG MIDNIGHT/ ATT LOUDNESS SPEAKERS TUNING / STATION TUNER EDIT TONE QUICK SETUP SETUP RETURN MULTI JOG S- see SR+ Setup for detailed instructions...
...; VIDEO INPUT 1 Pioneer plasma display VIDEO INPUT 2 D DVD player Satellite receiver, etc DVD AUDIO IN TV/SAT AUDIO IN ADVANCED ST /DIRECT / STANDARD SURR AUTO SURR LISTENING MODE STANDBY/ON PHONES AUDIO/VIDEO MULTI-CHANNEL RECEIVER VSX-816 ENTER MULTI JOG DIGITAL PRECISION PROCESSING DVD / LD TV / SAT DVR/ VCR VIDEO CD CD-R/T APE /M D FM AM XM AUX SIGNAL SB ch ACOUSTIC SELECT PROCESSING EQ DIMMER ANALOG MIDNIGHT/ ATT LOUDNESS SPEAKERS TUNING / STATION TUNER EDIT TONE QUICK SETUP SETUP RETURN MULTI JOG S- see SR+ Setup for detailed instructions...


