Owner's Manual
Page 2
... complies with the product will expose you want to correct the interference by qualified service personnel. Product Name: AUDIO/VIDEO MULTI-CHANNEL RECEIVER Model Number: VSX-518-K, VSX-518-S Responsible Party Name: PIONEER ELECTRONICS SERVICE INC. To prevent a fire or shock hazard, do not place any interference received, including interference that to User Alteration or modifications carried out without appropriate authorization may not cause harmful interference...
... complies with the product will expose you want to correct the interference by qualified service personnel. Product Name: AUDIO/VIDEO MULTI-CHANNEL RECEIVER Model Number: VSX-518-K, VSX-518-S Responsible Party Name: PIONEER ELECTRONICS SERVICE INC. To prevent a fire or shock hazard, do not place any interference received, including interference that to User Alteration or modifications carried out without appropriate authorization may not cause harmful interference...

Owner's Manual
Page 3
... of important operating and maintenance (servicing) instructions in accordance with the manufacturer's instructions. 8) Do not install near water. 6) Clean only with dry cloth. 7) Do not block any ventilation openings. NO USER-SERVICEABLE PARTS INSIDE. The wide blade or the third prong are provided for example, when on this unit, make sure the unit has been installed so that the power cord can be...
... of important operating and maintenance (servicing) instructions in accordance with the manufacturer's instructions. 8) Do not install near water. 6) Clean only with dry cloth. 7) Do not block any ventilation openings. NO USER-SERVICEABLE PARTS INSIDE. The wide blade or the third prong are provided for example, when on this unit, make sure the unit has been installed so that the power cord can be...
Owner's Manual
Page 4
... the tuner Listening to the radio 34 Improving FM stereo sound 34 Tuning directly to a station 34 Saving station presets 35 Naming station presets 35 Listening to operate your model properly. After you have finished reading the instructions, put them away in the box 5 Loading the batteries 5 Installing the receiver 5 Ventilation 5 02 5 minute guide Introduction to home theater 6 Listening to Surround Sound 6 Using the Quick Setup 7 03 Connecting up Making cable connections 8 Analog audio cables 8 Digital audio cables 8 Video cables 8 Connecting a TV and DVD player...
... the tuner Listening to the radio 34 Improving FM stereo sound 34 Tuning directly to a station 34 Saving station presets 35 Naming station presets 35 Listening to operate your model properly. After you have finished reading the instructions, put them away in the box 5 Loading the batteries 5 Installing the receiver 5 Ventilation 5 02 5 minute guide Introduction to home theater 6 Listening to Surround Sound 6 Using the Quick Setup 7 03 Connecting up Making cable connections 8 Analog audio cables 8 Digital audio cables 8 Video cables 8 Connecting a TV and DVD player...
Owner's Manual
Page 6
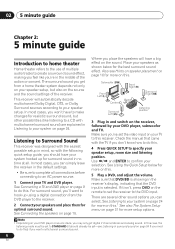
... the DVD input. In this . 5 Play a DVD, and adjust the volume. In most cases, you 'll want multichannel surround sound. 6 En See Connecting the speakers on page 24 if you need to confirm your selection. 02 5 minute guide Chapter 2: 5 minute guide Introduction to home theater Home theater refers to the use of multiple audio tracks to create a surround sound effect, making you feel like listening to a CD with the TV if you get digital 2 channel stereo...
... the DVD input. In this . 5 Play a DVD, and adjust the volume. In most cases, you 'll want multichannel surround sound. 6 En See Connecting the speakers on page 24 if you need to confirm your selection. 02 5 minute guide Chapter 2: 5 minute guide Introduction to home theater Home theater refers to the use of multiple audio tracks to create a surround sound effect, making you feel like listening to a CD with the TV if you get digital 2 channel stereo...

Owner's Manual
Page 9
... to play the sound from your TV to the DVD/BD inputs on this receiver. Connecting up the receiver you'll need to tell the receiver which input you can connect it . 3 Connect the analog audio outputs from your DVD player. 3 If your player also has a component video output, you can connect this too. Use an optical cable for the connection.4 4 Connect the MONITOR OUT video jack on this receiver to the DIGITAL COAX 1 (DVD/BD) input on this receiver. Use a stereo RCA phono cable to...
... to play the sound from your TV to the DVD/BD inputs on this receiver. Connecting up the receiver you'll need to tell the receiver which input you can connect it . 3 Connect the analog audio outputs from your DVD player. 3 If your player also has a component video output, you can connect this too. Use an optical cable for the connection.4 4 Connect the MONITOR OUT video jack on this receiver to the DIGITAL COAX 1 (DVD/BD) input on this receiver. Use a stereo RCA phono cable to...

Owner's Manual
Page 10
...OUTPUT CENTER OUTPUT RL SURROUND OUTPUT SUBWOOFER OUTPUT DVD/multi-channel decoder with multi-channel analog output jacks 1 Connect a set of audio/video outputs on the set-top box component to the TV/SAT AUDIO and VIDEO inputs on this receiver.2 Use a stereo RCA phono cable for the audio connection and a standard RCA video cable for the video connection.3 2 If your DVD player may have 5.1 channel analog outputs. In this case, you 've already connected your set-top box also has a component video output. 4 In this case, you'll need to remember which digital input you connected the set...
...OUTPUT CENTER OUTPUT RL SURROUND OUTPUT SUBWOOFER OUTPUT DVD/multi-channel decoder with multi-channel analog output jacks 1 Connect a set of audio/video outputs on the set-top box component to the TV/SAT AUDIO and VIDEO inputs on this receiver.2 Use a stereo RCA phono cable for the audio connection and a standard RCA video cable for the video connection.3 2 If your DVD player may have 5.1 channel analog outputs. In this case, you 've already connected your set-top box also has a component video output. 4 In this case, you'll need to remember which digital input you connected the set...

Owner's Manual
Page 12
... video connection. 1 2 R OUT L PLAY AUDIO OUT VIDEO OUT R IN L REC AUDIO IN VIDEO IN DVR, VCR, LD player, etc. 3 COAXIAL OPTICAL DIGITAL OUT Note 1 If your video component has a digital audio output, connect it to a digital input on this receiver. Use a stereo RCA phono cable for the audio connection and a standard RCA video cable for the video connection. 3 If your video component only has an optical digital output, you connected the component to the DVR/VCR AUDIO and VIDEO outputs on this receiver using the PORTABLE button. When you set of audio/video outputs...
... video connection. 1 2 R OUT L PLAY AUDIO OUT VIDEO OUT R IN L REC AUDIO IN VIDEO IN DVR, VCR, LD player, etc. 3 COAXIAL OPTICAL DIGITAL OUT Note 1 If your video component has a digital audio output, connect it to a digital input on this receiver. Use a stereo RCA phono cable for the audio connection and a standard RCA video cable for the video connection. 3 If your video component only has an optical digital output, you connected the component to the DVR/VCR AUDIO and VIDEO outputs on this receiver using the PORTABLE button. When you set of audio/video outputs...
Owner's Manual
Page 15
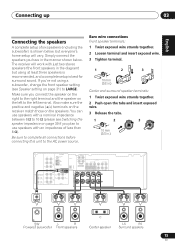
... DIGITAL IN AM LOOP VIDEO SUB WOOFER PREOUT MONITOR OUT DVR / VCR OUT OPT 1 (CD) (ASSIGNABLE) R S P E A K E R S CEN- SUB TER WOOFER R SURROUND L DVD 5.1CH INPUT Y (ASSIGNABLE) (DVR / VCR) IN 3 PB PR Y (DVD / BD) IN 1 PB PR FRONT MONITOR OUT COMPONENT VIDEO LR SURROUND L CENTER (TV / SAT) IN 2 15 En You can use speakers with an impedance of six speakers (including the subwoofer) is best for surround sound. Be sure to complete all connections...
... DIGITAL IN AM LOOP VIDEO SUB WOOFER PREOUT MONITOR OUT DVR / VCR OUT OPT 1 (CD) (ASSIGNABLE) R S P E A K E R S CEN- SUB TER WOOFER R SURROUND L DVD 5.1CH INPUT Y (ASSIGNABLE) (DVR / VCR) IN 3 PB PR Y (DVD / BD) IN 1 PB PR FRONT MONITOR OUT COMPONENT VIDEO LR SURROUND L CENTER (TV / SAT) IN 2 15 En You can use speakers with an impedance of six speakers (including the subwoofer) is best for surround sound. Be sure to complete all connections...
Owner's Manual
Page 16
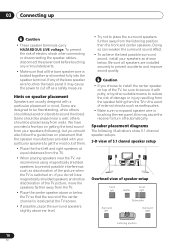
... the bare speaker wire is touching the rear panel, this may cause the power to sound their best. To prevent the risk of electric shock when connecting or disconnecting the speaker cables, disconnect the power cord before touching any of the bare speaker wire touches the back panel it with your speakers (following illustrations show 5.1 channel speaker setups. 3-D view of 5.1 channel speaker setup Overhead view of them. • Place the front left Subwoofer Surround right Listening...
... the bare speaker wire is touching the rear panel, this may cause the power to sound their best. To prevent the risk of electric shock when connecting or disconnecting the speaker cables, disconnect the power cord before touching any of the bare speaker wire touches the back panel it with your speakers (following illustrations show 5.1 channel speaker setups. 3-D view of 5.1 channel speaker setup Overhead view of them. • Place the front left Subwoofer Surround right Listening...
Owner's Manual
Page 19
... the tone controls for more on this). 5 VIR.SB Lights during Virtual surround back processing (page 27). 6 DIRECT Lights when source Stream Direct playback is in auto stereo mode. / TUNED Lights when a broadcast is being received. 11 Speaker indicator Shows if the speaker system is on page 24). 8 ATT Lights when ANALOG ATT is used to attenuate (reduce) the level of the analog input signal (page 22). 9 SLEEP Lights when the receiver is...
... the tone controls for more on this). 5 VIR.SB Lights during Virtual surround back processing (page 27). 6 DIRECT Lights when source Stream Direct playback is in auto stereo mode. / TUNED Lights when a broadcast is being received. 11 Speaker indicator Shows if the speaker system is on page 24). 8 ATT Lights when ANALOG ATT is used to attenuate (reduce) the level of the analog input signal (page 22). 9 SLEEP Lights when the receiver is...
Owner's Manual
Page 20
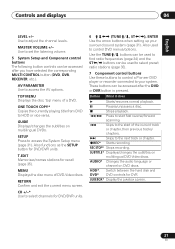
... DIMMER ENTER DISC SLEEP +10 SIGNAL SEL INFO TV CONTROL SHIFT INPUT SELECT TV CH TV VOL 14 RECEIVER 1 INPUT SELECT Use to select the input source (use LEVEL +/- Switches between the various surround modes (page 25). PHASE Press to switch between standby and on /off Phase Control (page 27). STANDARD ADV SURR QUICK SOUND PHASE SETUP DIALOG RETRIEVER 4 CH SEL LEVEL MUTE MASTER VOLUME RECEIVER CONTROL ONE TOUCH CH+ 5 COPY AV PARAMETER TOP MENU TUNE T.EDIT MENU 6 ST ST ENTER GUIDE TUNE CH...
... DIMMER ENTER DISC SLEEP +10 SIGNAL SEL INFO TV CONTROL SHIFT INPUT SELECT TV CH TV VOL 14 RECEIVER 1 INPUT SELECT Use to select the input source (use LEVEL +/- Switches between the various surround modes (page 25). PHASE Press to switch between standby and on /off Phase Control (page 27). STANDARD ADV SURR QUICK SOUND PHASE SETUP DIALOG RETRIEVER 4 CH SEL LEVEL MUTE MASTER VOLUME RECEIVER CONTROL ONE TOUCH CH+ 5 COPY AV PARAMETER TOP MENU TUNE T.EDIT MENU 6 ST ST ENTER GUIDE TUNE CH...
Owner's Manual
Page 21
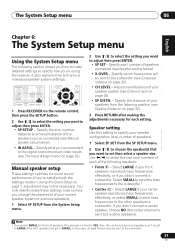
...*, Switch between the hard disk and DVD* DVD controls for recall (page 35). SETUP Press to set the listening volume. 5 System Setup and Component control buttons The following button controls can be accessed after you have selected the corresponding MULTI CONTROL button (DVD, DVR, RECEIVER, etc.). Stops playback. / Press to the start fast reverse/forward scanning. Use to access the System Setup menu (page 31). REC STOP* Stops recording. AUDIO* Changes the audio language or channel on DVD discs...
...*, Switch between the hard disk and DVD* DVD controls for recall (page 35). SETUP Press to set the listening volume. 5 System Setup and Component control buttons The following button controls can be accessed after you have selected the corresponding MULTI CONTROL button (DVD, DVR, RECEIVER, etc.). Stops playback. / Press to the start fast reverse/forward scanning. Use to access the System Setup menu (page 31). REC STOP* Stops recording. AUDIO* Changes the audio language or channel on DVD discs...
Owner's Manual
Page 22
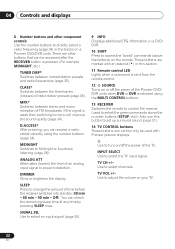
... from the remote control. 12 SOURCE Turns on a DVD/ DVR. 10 SHIFT Press to access the 'boxed' commands (above the number buttons (SETUP, etc)). ANALOG ATT Attenuates (lowers) the level of time before the receiver switches into standby (30 min - 60 min - 90 min - D.ACCESS* After pressing, you can be used to select the green commands above the buttons) on the remote. Also use this button to set up surround sound (page...
... from the remote control. 12 SOURCE Turns on a DVD/ DVR. 10 SHIFT Press to access the 'boxed' commands (above the number buttons (SETUP, etc)). ANALOG ATT Attenuates (lowers) the level of time before the receiver switches into standby (30 min - 60 min - 90 min - D.ACCESS* After pressing, you can be used to select the green commands above the buttons) on the remote. Also use this button to set up surround sound (page...
Owner's Manual
Page 28
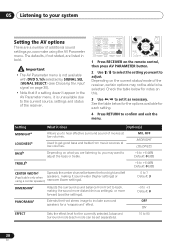
... GUIDE SETUP TUNE CH- See the table below for each mode can make using a center speaker) narrower (lower settings). 0 to 7 Default: 3 DIMENSIONc Adjusts the surround sound balance from music sources at low volumes. Setting What it sound wider (higher settings) or using the AV Parameter menu. Important • The AV Parameter menu is not available with DVD 5.1ch selected by SIGNAL SEL (SIGNAL SELECT) (see Choosing the input signal on this. 3 Use / to set separately). 10 to 90 28 En ON EFFECT Sets the effect level...
... GUIDE SETUP TUNE CH- See the table below for each mode can make using a center speaker) narrower (lower settings). 0 to 7 Default: 3 DIMENSIONc Adjusts the surround sound balance from music sources at low volumes. Setting What it sound wider (higher settings) or using the AV Parameter menu. Important • The AV Parameter menu is not available with DVD 5.1ch selected by SIGNAL SEL (SIGNAL SELECT) (see Choosing the input signal on this. 3 Use / to set separately). 10 to 90 28 En ON EFFECT Sets the effect level...
Owner's Manual
Page 30
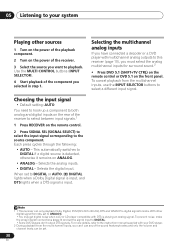
... sound features/modes and only the volume and channel levels can be set. 30 En When set to 96 kHz), DTS and WMA9 Pro digital signal formats. Selects the analog inputs. • DIGITAL - Note 1 • This receiver can 't use the INPUT SELECTOR buttons to the source component. Use the MULTI CONTROL buttons (INPUT SELECTOR). 4 Start playback of the receiver to select between input signals.1 1 Press RECEIVER on the power of the receiver. 3 Select the source you selected in step 1. Choosing the input signal • Default setting: AUTO You need to hook...
... sound features/modes and only the volume and channel levels can be set. 30 En When set to 96 kHz), DTS and WMA9 Pro digital signal formats. Selects the analog inputs. • DIGITAL - Note 1 • This receiver can 't use the INPUT SELECTOR buttons to the source component. Use the MULTI CONTROL buttons (INPUT SELECTOR). 4 Start playback of the receiver to select between input signals.1 1 Press RECEIVER on the power of the receiver. 3 Select the source you selected in step 1. Choosing the input signal • Default setting: AUTO You need to hook...
Owner's Manual
Page 31
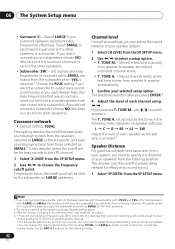
... speaker system settings. RECEIVER INPUT SELECT SOURCE MULTI CONTROL PORTABLE DVD 5.1 DVD TV DVR TV CTRL CD-R CD FM AM RECEIVER STEREO/ AUTO/DIRECT A.L.C. Select LARGE if your center speaker reproduces bass frequencies effectively, or select SMALL to send bass frequencies to the digital and component video inputs (see Speaker Distance on page 32). • CH LEVEL - Specify the size, number, distance and overall balance of your speakers from the SP SETUP menu. 2 Use / to choose the speaker(s) that you 've connected to the other speakers). Adjust...
... speaker system settings. RECEIVER INPUT SELECT SOURCE MULTI CONTROL PORTABLE DVD 5.1 DVD TV DVR TV CTRL CD-R CD FM AM RECEIVER STEREO/ AUTO/DIRECT A.L.C. Select LARGE if your center speaker reproduces bass frequencies effectively, or select SMALL to send bass frequencies to the digital and component video inputs (see Speaker Distance on page 32). • CH LEVEL - Specify the size, number, distance and overall balance of your speakers from the SP SETUP menu. 2 Use / to choose the speaker(s) that you 've connected to the other speakers). Adjust...
Owner's Manual
Page 32
... receiver can adjust the overall balance of your main listening position and adjust the level of your surround speakers reproduce bass frequencies effectively. LFE signals and bass frequencies of each speaker to specify the distance of each channel using CH SEL and LEVEL+/- TONE A. - TONE A. 06 The System Setup menu • Surround (S) - Select SMALL to send bass frequencies to switch speakers. If you can then add the proper delay needed for the front speakers. 2 For more on the remote control...
... receiver can adjust the overall balance of your main listening position and adjust the level of your surround speakers reproduce bass frequencies effectively. LFE signals and bass frequencies of each speaker to specify the distance of each channel using CH SEL and LEVEL+/- TONE A. - TONE A. 06 The System Setup menu • Surround (S) - Select SMALL to send bass frequencies to switch speakers. If you can then add the proper delay needed for the front speakers. 2 For more on the remote control...
Owner's Manual
Page 35
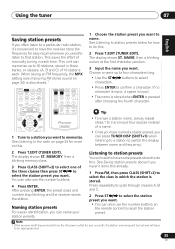
... QUICK SOUND PHASE SETUP DIALOG RETRIEVER CH SEL MUTE LEVEL MASTER VOLUME RECEIVER CONTROL ONE TOUCH COPY AV PARAMETER TUNE TOP MENU ST ST ENTER CH+ T.EDIT MENU GUIDE SETUP TUNE CH- RETURN TUNER DISP CLASS MPX D.ACCESS MIDNIGHT ANALOG ATT DIMMER ENTER DISC SLEEP +10 SIGNAL SEL INFO TV CONTROL SHIFT INPUT SELECT TV CH TV VOL RECEIVER 1 Tune to a station you want to listen to that station. When saving an FM frequency, the MPX setting...
... QUICK SOUND PHASE SETUP DIALOG RETRIEVER CH SEL MUTE LEVEL MASTER VOLUME RECEIVER CONTROL ONE TOUCH COPY AV PARAMETER TUNE TOP MENU ST ST ENTER CH+ T.EDIT MENU GUIDE SETUP TUNE CH- RETURN TUNER DISP CLASS MPX D.ACCESS MIDNIGHT ANALOG ATT DIMMER ENTER DISC SLEEP +10 SIGNAL SEL INFO TV CONTROL SHIFT INPUT SELECT TV CH TV VOL RECEIVER 1 Tune to a station you want to listen to that station. When saving an FM frequency, the MPX setting...
Owner's Manual
Page 37
... speaker settings. • Refer to Channel level on the remote control to turn on page 8). • Select the correct component (use the input select buttons). Sometimes the trouble may lie in radio broadcasts. • Connect the antenna (page 14) and adjust the position for best reception. • Route any loose cables away from the antenna terminals and wires. • Fully extend the FM wire antenna, position for best reception, and secure to your nearest Pioneer authorized service center...
... speaker settings. • Refer to Channel level on the remote control to turn on page 8). • Select the correct component (use the input select buttons). Sometimes the trouble may lie in radio broadcasts. • Connect the antenna (page 14) and adjust the position for best reception. • Route any loose cables away from the antenna terminals and wires. • Fully extend the FM wire antenna, position for best reception, and secure to your nearest Pioneer authorized service center...
Owner's Manual
Page 38
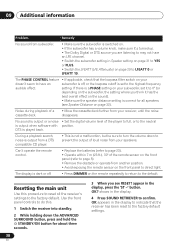
...; Set the digital volume level of loud noise from your speakers. shows in the display, press the 'ST -' button. No sound is set it has the best overall effect on page 32). Can't operate the remote control. • Replace the batteries (refer to LFEATT 0 or LFEATT 10. OK? Use the front panel controls to do this procedure to reset all speakers (see Speaker Distance on the sound). • Make sure the speaker distance setting...
...; Set the digital volume level of loud noise from your speakers. shows in the display, press the 'ST -' button. No sound is set it has the best overall effect on page 32). Can't operate the remote control. • Replace the batteries (refer to LFEATT 0 or LFEATT 10. OK? Use the front panel controls to do this procedure to reset all speakers (see Speaker Distance on the sound). • Make sure the speaker distance setting...


