
Owner's Manual
Page 1
...RECEIVER RECEPTEUR AUDIOVISUEL A VOIES MULTI-CANAUX VSX-518 Register your product at: www.pioneerelectronics.com (US) www.pioneerelectronics.ca (Canada) • Protect your new investment The details of your purchase will be on file for reference in the event of an insurance claim such as loss or theft. • Receive... free tips, updates and service bulletins on your new product • Improve product development Your input helps us continue to design products that meet your needs. • Receive a free Pioneer newsletter Registered customers can opt in to receive a monthly ...
...RECEIVER RECEPTEUR AUDIOVISUEL A VOIES MULTI-CANAUX VSX-518 Register your product at: www.pioneerelectronics.com (US) www.pioneerelectronics.ca (Canada) • Protect your new investment The details of your purchase will be on file for reference in the event of an insurance claim such as loss or theft. • Receive... free tips, updates and service bulletins on your new product • Improve product development Your input helps us continue to design products that meet your needs. • Receive a free Pioneer newsletter Registered customers can opt in to receive a monthly ...
Owner's Manual
Page 2
...CA 90801-1760, USA Phone: 1-800-421-1404 To prevent a fire or shock hazard, do not place any interference received, including interference that the power supply voltage of the following two conditions: (1) This device may cause undesired operation. The voltage...WARRANTY CARD AND KEEP IN A SECURE AREA. Increase the separation between the equipment and receiver. - Product Name: AUDIO/VIDEO MULTI-CHANNEL RECEIVER Model Number: VSX-518-K, VSX-518-S Responsible Party Name: PIONEER ELECTRONICS SERVICE INC. D3-4-2-1-3_B_En WARNING Before plugging in for example, when on ,...
...CA 90801-1760, USA Phone: 1-800-421-1404 To prevent a fire or shock hazard, do not place any interference received, including interference that the power supply voltage of the following two conditions: (1) This device may cause undesired operation. The voltage...WARRANTY CARD AND KEEP IN A SECURE AREA. Increase the separation between the equipment and receiver. - Product Name: AUDIO/VIDEO MULTI-CHANNEL RECEIVER Model Number: VSX-518-K, VSX-518-S Responsible Party Name: PIONEER ELECTRONICS SERVICE INC. D3-4-2-1-3_B_En WARNING Before plugging in for example, when on ,...
Owner's Manual
Page 4
...Using Stream Direct 26 Using the Sound Retriever 26 Using Phase Control 27 Using Virtual Surround Back (VSB 27 Setting the AV options 28 Playing other video components 12 Using the component video jacks 13 Connecting antennas 14 Using external antennas 14 Connecting ... reference. After you start Checking what's in a safe place for buying this Pioneer product. Contents 01 Before you have finished reading the instructions, put them away in the box 5 Loading the batteries 5 Installing the receiver 5 Ventilation 5 02 5 minute guide Introduction to home theater 6 Listening to ...
...Using Stream Direct 26 Using the Sound Retriever 26 Using Phase Control 27 Using Virtual Surround Back (VSB 27 Setting the AV options 28 Playing other video components 12 Using the component video jacks 13 Connecting antennas 14 Using external antennas 14 Connecting ... reference. After you start Checking what's in a safe place for buying this Pioneer product. Contents 01 Before you have finished reading the instructions, put them away in the box 5 Loading the batteries 5 Installing the receiver 5 Ventilation 5 02 5 minute guide Introduction to home theater 6 Listening to ...
Owner's Manual
Page 5
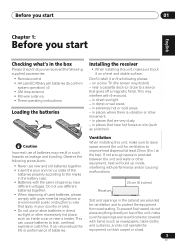
... deck (or close to put it on the following precautions: • Never use or store batteries in direct sunlight or other movement - Installing the receiver • When installing this unit, make sure the openings are very dusty - Don't install it on thick carpet or a bed. 5 En in...English Deutsch Français Italiano Nederlands Español Chapter 1: Before you start Checking what's in the box Please check that you've received the following supplied accessories: • Remote control • AA size IEC R6 dry cell batteries (to protect the equipment from overheating. ...
... deck (or close to put it on the following precautions: • Never use or store batteries in direct sunlight or other movement - Installing the receiver • When installing this unit, make sure the openings are very dusty - Don't install it on thick carpet or a bed. 5 En in...English Deutsch Français Italiano Nederlands Español Chapter 1: Before you start Checking what's in the box Please check that you've received the following supplied accessories: • Remote control • AA size IEC R6 dry cell batteries (to protect the equipment from overheating. ...
Owner's Manual
Page 6
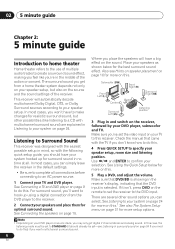
...setup. Where you place the speakers will automatically decode multichannel Dolby Digital, DTS, or Dolby Surround sources according to your TV to this receiver. There are explained in no time at all connections before connecting to an AC power source. 1 Connect your DVD player or source discs...surround sound effect, making you feel like listening to a CD with multichannel surround sound) are several other sound options you can simply leave the receiver in the default settings. • Be sure to complete all . The surround sound you won't have your speakers and place them for ...
...setup. Where you place the speakers will automatically decode multichannel Dolby Digital, DTS, or Dolby Surround sources according to your TV to this receiver. There are explained in no time at all connections before connecting to an AC power source. 1 Connect your DVD player or source discs...surround sound effect, making you feel like listening to a CD with multichannel surround sound) are several other sound options you can simply leave the receiver in the default settings. • Be sure to complete all . The surround sound you won't have your speakers and place them for ...
Owner's Manual
Page 7
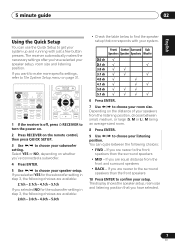
... the necessary settings after you have selected your system. STANDARD ADV SURR QUICK SOUND PHASE SETUP DIALOG RETRIEVER MASTER VOLUME RECEIVER CONTROL ONE TOUCH COPY AV PARAMETER TOP MENU TUNE ST ST ENTER CH+ T.EDIT MENU GUIDE SETUP SUBTITLE TUNE CH- The display shows the speaker... your setup. You can use the Quick Setup to get your listening position. RETURN REC AUDIO 1 If the receiver is off, press RECEIVER to turn the power on. 2 Press RECEIVER on the distance of your speakers from the front and surround speakers • BACK - 5 minute guide 02 ...
... the necessary settings after you have selected your system. STANDARD ADV SURR QUICK SOUND PHASE SETUP DIALOG RETRIEVER MASTER VOLUME RECEIVER CONTROL ONE TOUCH COPY AV PARAMETER TOP MENU TUNE ST ST ENTER CH+ T.EDIT MENU GUIDE SETUP SUBTITLE TUNE CH- The display shows the speaker... your setup. You can use the Quick Setup to get your listening position. RETURN REC AUDIO 1 If the receiver is off, press RECEIVER to turn the power on. 2 Press RECEIVER on the distance of your speakers from the front and surround speakers • BACK - 5 minute guide 02 ...
Owner's Manual
Page 8
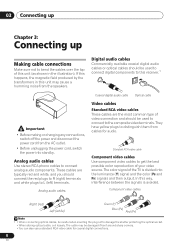
They have yellow plugs to get the best possible color reproduction of this unit (as shown in this receiver.1 Important • Before making or changing any connections, switch off the power and disconnect the power cord from the speakers. Standard RCA video cable Component ...
They have yellow plugs to get the best possible color reproduction of this unit (as shown in this receiver.1 Important • Before making or changing any connections, switch off the power and disconnect the power cord from the speakers. Standard RCA video cable Component ...

Owner's Manual
Page 9
... 2 Connect the composite video output and the stereo analog audio outputs2 on your TV. 9 En See Using the component video jacks on this receiver. Use a standard RCA video cable3 and a stereo RCA phono cable for the connection. • If your DVD player has multichannel analog outputs... / VCR IN DVR / VCR AUDIO AM LOOP R OPT DVD 1 (CD) VIDEO SUB WOOFER PREOUT MONITOR OUT DVR / VCR OUT (ASSIGNABLE) R S P E A K E R S This receiver 3 4 3 R L ANALOG AUDIO OUT VIDEO IN OPTICAL DIGITAL AUDIO OUT TV Note 1 If your DVD player only has an optical digital output, you can connect it...
... 2 Connect the composite video output and the stereo analog audio outputs2 on your TV. 9 En See Using the component video jacks on this receiver. Use a standard RCA video cable3 and a stereo RCA phono cable for the connection. • If your DVD player has multichannel analog outputs... / VCR IN DVR / VCR AUDIO AM LOOP R OPT DVD 1 (CD) VIDEO SUB WOOFER PREOUT MONITOR OUT DVR / VCR OUT (ASSIGNABLE) R S P E A K E R S This receiver 3 4 3 R L ANALOG AUDIO OUT VIDEO IN OPTICAL DIGITAL AUDIO OUT TV Note 1 If your DVD player only has an optical digital output, you can connect it...

Owner's Manual
Page 10
... TV tuners are all examples of audio/video outputs on the set-top box component to the TV/SAT AUDIO and VIDEO inputs on this receiver.2 Use a stereo RCA phono cable for the audio connection and a standard RCA video cable for the video connection.3 2 If your set-top box also has... a component video output. 4 In this receiver. 03 Connecting up Connecting the multichannel analog outputs For DVD Audio and SACD playback, your TV to . 3 See Using the component video jacks on page...
... TV tuners are all examples of audio/video outputs on the set-top box component to the TV/SAT AUDIO and VIDEO inputs on this receiver.2 Use a stereo RCA phono cable for the audio connection and a standard RCA video cable for the video connection.3 2 If your set-top box also has... a component video output. 4 In this receiver. 03 Connecting up Connecting the multichannel analog outputs For DVD Audio and SACD playback, your TV to . 3 See Using the component video jacks on page...

Owner's Manual
Page 11
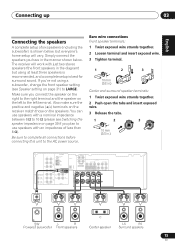
You'll need to make this receiver. must connect digital components to analog audio jacks if you want to record from analog components. 11 En Connecting up 03 English Deutsch Franç... OPT 1 (CD) input. 2 If necessary, connect the analog audio outputs of spare audio inputs on the receiver. Use a stereo RCA phono cable as shown. 3 If you must be able to a set -top box, etc. This receiver R IN L CD ANTENNA FM UNBAL DIGITAL IN IN CD-R / TAPE / MD OUT IN IN (ASSIGNABLE) DIGITAL...
You'll need to make this receiver. must connect digital components to analog audio jacks if you want to record from analog components. 11 En Connecting up 03 English Deutsch Franç... OPT 1 (CD) input. 2 If necessary, connect the analog audio outputs of spare audio inputs on the receiver. Use a stereo RCA phono cable as shown. 3 If you must be able to a set -top box, etc. This receiver R IN L CD ANTENNA FM UNBAL DIGITAL IN IN CD-R / TAPE / MD OUT IN IN (ASSIGNABLE) DIGITAL...

Owner's Manual
Page 12
... panel audio mini jack Front audio connections are trademarks or registered trademarks of Microsoft Corporation in the United States and/or other video components This receiver has audio/video inputs and outputs suitable for the video connection. 1 2 R OUT L PLAY AUDIO OUT VIDEO OUT R IN L REC AUDIO...the video connection. 3 If your video component only has an optical digital output, you can connect it to a digital input on this receiver using the PORTABLE button. Use a stereo RCA phono cable for the audio connection and a standard RCA video cable for connecting analog or ...
... panel audio mini jack Front audio connections are trademarks or registered trademarks of Microsoft Corporation in the United States and/or other video components This receiver has audio/video inputs and outputs suitable for the video connection. 1 2 R OUT L PLAY AUDIO OUT VIDEO OUT R IN L REC AUDIO...the video connection. 3 If your video component only has an optical digital output, you can connect it to a digital input on this receiver using the PORTABLE button. Use a stereo RCA phono cable for the audio connection and a standard RCA video cable for connecting analog or ...
Owner's Manual
Page 13
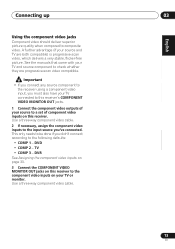
See the manuals that came with your source to this receiver. Important • If you connect any source component to the receiver using a component video input, you didn't connect according to composite video. Use a three-way component video cable. 2 If necessary, assign the ...picture. DVR See Assigning the component video inputs on page 33. 3 Connect the COMPONENT VIDEO MONITOR OUT jacks on this receiver to the component video inputs on this receiver's COMPONENT VIDEO MONITOR OUT jacks. 1 Connect the component video outputs of your TV and source component to the input source...
See the manuals that came with your source to this receiver. Important • If you connect any source component to the receiver using a component video input, you didn't connect according to composite video. Use a three-way component video cable. 2 If necessary, assign the ...picture. DVR See Assigning the component video inputs on page 33. 3 Connect the COMPONENT VIDEO MONITOR OUT jacks on this receiver to the component video inputs on this receiver's COMPONENT VIDEO MONITOR OUT jacks. 1 Connect the component video outputs of your TV and source component to the input source...
Owner's Manual
Page 15
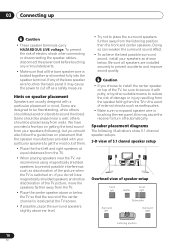
... speakers with an impedance of six speakers (including the subwoofer) is best for surround sound. Also make sure the positive and negative (+/-) terminals on the receiver match those on page 39 if you connect the speaker on the right to the right terminal and the speaker on page 31) to 16...
... speakers with an impedance of six speakers (including the subwoofer) is best for surround sound. Also make sure the positive and negative (+/-) terminals on the receiver match those on page 39 if you connect the speaker on the right to the right terminal and the speaker on page 31) to 16...
Owner's Manual
Page 16
... as shown below the TV so that all speakers are designed to be floorstanding, while others should be sure to secure it may cause the receiver to place the surround speakers further away from the TV in mind. If you should be placed near the TV, we recommend using magnetically shielded...
... as shown below the TV so that all speakers are designed to be floorstanding, while others should be sure to secure it may cause the receiver to place the surround speakers further away from the TV in mind. If you should be placed near the TV, we recommend using magnetically shielded...
Owner's Manual
Page 17
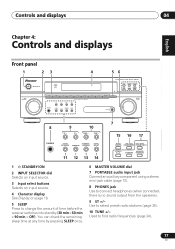
... audio input jack Connect an auxiliary component using a stereo mini-jack cable (page 12). 8 PHONES jack Use to change the amount of time before the receiver switches into standby (30 min - 60 min - 90 min - STANDARD ADVANCED SURROUND 1 STANDBY/ON 2 INPUT SELECTOR dial Selects an input source. 3 Input select buttons Selects... Deutsch Français Italiano Nederlands Español Chapter 4: Controls and displays Front panel 1 23 STANDBY/ON PHASE CONTROL 4 56 AUDIO/VIDEO MULTI-CHANNEL RECEIVER VSX-518 PHASE DIALOGUE AUTO SURR / CONTROL ENHANCEMENT STREAM DIRECT STEREO / A.L.C.
... audio input jack Connect an auxiliary component using a stereo mini-jack cable (page 12). 8 PHONES jack Use to change the amount of time before the receiver switches into standby (30 min - 60 min - 90 min - STANDARD ADVANCED SURROUND 1 STANDBY/ON 2 INPUT SELECTOR dial Selects an input source. 3 Input select buttons Selects... Deutsch Français Italiano Nederlands Español Chapter 4: Controls and displays Front panel 1 23 STANDBY/ON PHASE CONTROL 4 56 AUDIO/VIDEO MULTI-CHANNEL RECEIVER VSX-518 PHASE DIALOGUE AUTO SURR / CONTROL ENHANCEMENT STREAM DIRECT STEREO / A.L.C.
Owner's Manual
Page 19
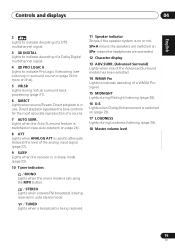
...modes has been selected. 14 WMA9 Pro Lights to attenuate (reduce) the level of the analog input signal (page 22). 9 SLEEP Lights when the receiver is in sleep mode (page 22). 10 Tuner indicators / MONO Lights when the mono mode is set using the MPX button. / STEREO Lights ... 6 DIRECT Lights when source Stream Direct playback is in auto stereo mode. / TUNED Lights when a broadcast is being received in use. Lights when Dialog Enhancement is being received. 11 Speaker indicator Shows if the speaker system is on . Controls and displays 04 English Deutsch Français Italiano Nederlands...
...modes has been selected. 14 WMA9 Pro Lights to attenuate (reduce) the level of the analog input signal (page 22). 9 SLEEP Lights when the receiver is in sleep mode (page 22). 10 Tuner indicators / MONO Lights when the mono mode is set using the MPX button. / STEREO Lights ... 6 DIRECT Lights when source Stream Direct playback is in auto stereo mode. / TUNED Lights when a broadcast is being received in use. Lights when Dialog Enhancement is being received. 11 Speaker indicator Shows if the speaker system is on . Controls and displays 04 English Deutsch Français Italiano Nederlands...
Owner's Manual
Page 20
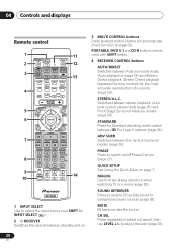
... RETRIEVER 4 CH SEL LEVEL MUTE MASTER VOLUME RECEIVER CONTROL ONE TOUCH CH+ 5 COPY AV PARAMETER TOP MENU TUNE T.EDIT MENU 6 ST ST ENTER GUIDE TUNE CH- PORTABLE, DVD 5.1 and CD-R buttons can be used with SHIFT button. 4 RECEIVER CONTROL buttons AUTO/DIRECT Switches between the various ...10 SIGNAL SEL INFO TV CONTROL SHIFT INPUT SELECT TV CH TV VOL 14 RECEIVER 1 INPUT SELECT Use to select the input source (use LEVEL +/- STANDARD Press for INPUT SELECT ). 2 RECEIVER Switches the receiver between standby and on page 23). SOUND RETRIEVER Press to restore CD quality...
... RETRIEVER 4 CH SEL LEVEL MUTE MASTER VOLUME RECEIVER CONTROL ONE TOUCH CH+ 5 COPY AV PARAMETER TOP MENU TUNE T.EDIT MENU 6 ST ST ENTER GUIDE TUNE CH- PORTABLE, DVD 5.1 and CD-R buttons can be used with SHIFT button. 4 RECEIVER CONTROL buttons AUTO/DIRECT Switches between the various ...10 SIGNAL SEL INFO TV CONTROL SHIFT INPUT SELECT TV CH TV VOL 14 RECEIVER 1 INPUT SELECT Use to select the input source (use LEVEL +/- STANDARD Press for INPUT SELECT ). 2 RECEIVER Switches the receiver between standby and on page 23). SOUND RETRIEVER Press to restore CD quality...
Owner's Manual
Page 21
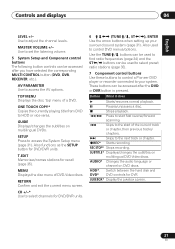
... to select preset radio stations (page 35). 7 Component control buttons Use these buttons to control a Pioneer DVD player or recorder connected to your surround sound system (page 31). SETUP Press to HDD or ...for DVD/DVR units. REC STOP* Stops recording. Use to access the AV options. TOP MENU Displays the disc 'top' menu of DVD-Video discs. RETURN Confirm and exit... ST / buttons can be accessed after you have selected the corresponding MULTI CONTROL button (DVD, DVR, RECEIVER, etc.). MASTER VOLUME +/- These buttons can be accessed after the DVD or DVR button is pressed. ...
... to select preset radio stations (page 35). 7 Component control buttons Use these buttons to control a Pioneer DVD player or recorder connected to your surround sound system (page 31). SETUP Press to HDD or ...for DVD/DVR units. REC STOP* Stops recording. Use to access the AV options. TOP MENU Displays the disc 'top' menu of DVD-Video discs. RETURN Confirm and exit... ST / buttons can be accessed after you have selected the corresponding MULTI CONTROL button (DVD, DVR, RECEIVER, etc.). MASTER VOLUME +/- These buttons can be accessed after the DVD or DVR button is pressed. ...
Owner's Manual
Page 22
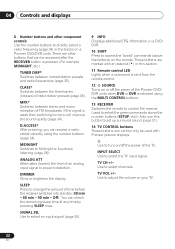
...off the power of FM broadcasts. ANALOG ATT Attenuates (lowers) the level of time before the receiver switches into standby (30 min - 60 min - 90 min - Off). There are marked with Pioneer plasma displays. D.ACCESS* After pressing, you can access a radio station directly using the MULTI ...CONTROL buttons. 13 RECEIVER Switches the remote to control the receiver (used with an asterisk (* ) in this button to set up ...
...off the power of FM broadcasts. ANALOG ATT Attenuates (lowers) the level of time before the receiver switches into standby (30 min - 60 min - 90 min - Off). There are marked with Pioneer plasma displays. D.ACCESS* After pressing, you can access a radio station directly using the MULTI ...CONTROL buttons. 13 RECEIVER Switches the remote to control the receiver (used with an asterisk (* ) in this button to set up ...

Owner's Manual
Page 23
...ñol Controls and displays 04 Direct function • Default setting: ON You can operate the remote control without affecting the receiver. 1 While pressing the RECEIVER button, press and hold the 4 button. When direct function is operated simultaneously with another infrared remote control unit. The LED ...lights on continuously. 3 Use the number buttons to enter either 1 (direct on , any component you 're done, press RECEIVER. When you turn direct function off ). Operating range of remote control unit The remote control may not work properly if: • There are ...
...ñol Controls and displays 04 Direct function • Default setting: ON You can operate the remote control without affecting the receiver. 1 While pressing the RECEIVER button, press and hold the 4 button. When direct function is operated simultaneously with another infrared remote control unit. The LED ...lights on continuously. 3 Use the number buttons to enter either 1 (direct on , any component you 're done, press RECEIVER. When you turn direct function off ). Operating range of remote control unit The remote control may not work properly if: • There are ...


