Owner's Manual
Page 3
... tub; When replacement parts are covered by the operating instructions as an improper adjustment of the polarized plug. • If this product is equipped with a three-wire grounding type plug, a plug having one blade wider than the other controls may result in any kind into a grounding type power outlet. ANTENNA LEAD IN WIRE GROUND CLAMP ELECTRIC SERVICE EQUIPMENT Fig. NATIONAL ELECTRICAL CODE D1-4-2-2_En CLEANING...
... tub; When replacement parts are covered by the operating instructions as an improper adjustment of the polarized plug. • If this product is equipped with a three-wire grounding type plug, a plug having one blade wider than the other controls may result in any kind into a grounding type power outlet. ANTENNA LEAD IN WIRE GROUND CLAMP ELECTRIC SERVICE EQUIPMENT Fig. NATIONAL ELECTRICAL CODE D1-4-2-2_En CLEANING...
Owner's Manual
Page 4
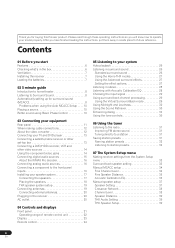
... 8 Problems when using the Auto MCACC Setup . . . . 10 Playing a source 10 Better sound using Basic Phase Control 10 03 Connecting your equipment Rear panel 11 When making cable connections 12 About the video converter 12 Connecting your TV and DVD player 13 Connecting a satellite/cable receiver or other set-top box 13 Connecting a DVD/HDD recorder, VCR and other video sources 14 Using the component video jacks 14 Connecting digital audio sources 15 About the WMA9 Pro decoder 16 Connecting analog audio sources 16 Connecting a component to the front panel inputs 16 Installing your...
... 8 Problems when using the Auto MCACC Setup . . . . 10 Playing a source 10 Better sound using Basic Phase Control 10 03 Connecting your equipment Rear panel 11 When making cable connections 12 About the video converter 12 Connecting your TV and DVD player 13 Connecting a satellite/cable receiver or other set-top box 13 Connecting a DVD/HDD recorder, VCR and other video sources 14 Using the component video jacks 14 Connecting digital audio sources 15 About the WMA9 Pro decoder 16 Connecting analog audio sources 16 Connecting a component to the front panel inputs 16 Installing your...
Owner's Manual
Page 5
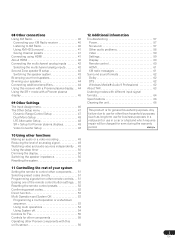
... Surround 41 Saving channel presets 41 Connecting using HDMI 41 About HDMI 42 Connecting the multichannel analog inputs 42 Selecting the multichannel analog inputs 42 Second Zone speaker B setup 42 Switching the speaker system 43 Bi-amping your front speakers 43 Bi-wiring your speakers 44 Connecting additional amplifiers 44 Using this unit's sensor 56 12 Additional information Troubleshooting 57 Power 57 No sound 57 Other audio problems 58 Video 59 Settings 59 Display 60 Remote control 60 HDMI 61 XM radio messages 61 Surround sound formats 62 Dolby 62 DTS...
... Surround 41 Saving channel presets 41 Connecting using HDMI 41 About HDMI 42 Connecting the multichannel analog inputs 42 Selecting the multichannel analog inputs 42 Second Zone speaker B setup 42 Switching the speaker system 43 Bi-amping your front speakers 43 Bi-wiring your speakers 44 Connecting additional amplifiers 44 Using this unit's sensor 56 12 Additional information Troubleshooting 57 Power 57 No sound 57 Other audio problems 58 Video 59 Settings 59 Display 60 Remote control 60 HDMI 61 XM radio messages 61 Surround sound formats 62 Dolby 62 DTS...
Owner's Manual
Page 9
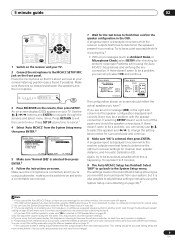
... connected using the HDMI output to adjust these settings manually using a subwoofer, make sure YES is happening. If selecting RETRY doesn't work, turn off the power and check the speaker connections. Use component, S-video, or composite connections for over three minutes, the screen saver will appear. • The OSD will end up a separate speaker system in the OSD. A progress report is selected then press ENTER.3 6 Follow the instructions on-screen. 5 minute guide 02 RECEIVER INPUT SELECT SYSTEM OFF SOURCE DVD...
... connected using the HDMI output to adjust these settings manually using a subwoofer, make sure YES is happening. If selecting RETRY doesn't work, turn off the power and check the speaker connections. Use component, S-video, or composite connections for over three minutes, the screen saver will appear. • The OSD will end up a separate speaker system in the OSD. A progress report is selected then press ENTER.3 6 Follow the instructions on-screen. 5 minute guide 02 RECEIVER INPUT SELECT SYSTEM OFF SOURCE DVD...

Owner's Manual
Page 10
... may interfere with your DVD player or digital satellite receiver. Turn down the volume of phase matching4 for playing a source (such as shown in the upper section of the diagram above) then the sound will be set to output Dolby Digital, DTS and 88.2 kHz / 96 kHz PCM (2 channel) audio, and if there is on and we recommend leaving Phase Control switched on the front panel lights. 4 Use the volume control to select 'AUTO SURROUND' and start playback...
... may interfere with your DVD player or digital satellite receiver. Turn down the volume of phase matching4 for playing a source (such as shown in the upper section of the diagram above) then the sound will be set to output Dolby Digital, DTS and 88.2 kHz / 96 kHz PCM (2 channel) audio, and if there is on and we recommend leaving Phase Control switched on the front panel lights. 4 Use the volume control to select 'AUTO SURROUND' and start playback...
Owner's Manual
Page 16
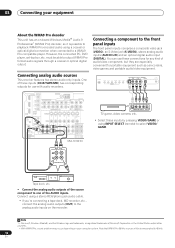
... the source component to select VIDEO/ GAME. You can use with audio recorders. FRONT WOOFER ROUND OUT IN MONITOR OUT OUT IN L CENTER DVR/VCR2 R FRONT SUB WOOFER MULTI CH IN VSX-1016TXV VIDEO/AUDIO OUTPUT DIGITAL OUT TV game, video camera, etc. • Select these connections for portable equipment such as camcorders, video games and portable audio/video equipment. PHONES SYSTEM SETUP RETURN TONE TUNING/ STATION TUNER EDIT SPEAKERS MULTI JOG S - OUT PLAY IN REC R L AUDIO IN/OUT Tape deck, etc. • Connect the analog audio outputs of...
... the source component to select VIDEO/ GAME. You can use with audio recorders. FRONT WOOFER ROUND OUT IN MONITOR OUT OUT IN L CENTER DVR/VCR2 R FRONT SUB WOOFER MULTI CH IN VSX-1016TXV VIDEO/AUDIO OUTPUT DIGITAL OUT TV game, video camera, etc. • Select these connections for portable equipment such as camcorders, video games and portable audio/video equipment. PHONES SYSTEM SETUP RETURN TONE TUNING/ STATION TUNER EDIT SPEAKERS MULTI JOG S - OUT PLAY IN REC R L AUDIO IN/OUT Tape deck, etc. • Connect the analog audio outputs of...
Owner's Manual
Page 25
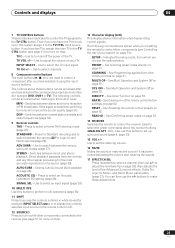
... Off on page 53. See Direct function on page 53. Thus if you have one of the Advanced Surround effects, Dolby Pro Logic IIx Music, and Neo:6 Music parameters (page 27). Use to select an input signal (page 29). 10 MULTI OPE Use this button to the built-in the remote control LCD. 12 SOURCE Press to switch between named station presets and radio frequencies (page 32). 9 Receiver controls THX - SYS OFF - READ ID...
... Off on page 53. See Direct function on page 53. Thus if you have one of the Advanced Surround effects, Dolby Pro Logic IIx Music, and Neo:6 Music parameters (page 27). Use to select an input signal (page 29). 10 MULTI OPE Use this button to the built-in the remote control LCD. 12 SOURCE Press to switch between named station presets and radio frequencies (page 32). 9 Receiver controls THX - SYS OFF - READ ID...

Owner's Manual
Page 27
... Home THX modes THX and Home THX are also suited for music sources. Allows you to hear 7.1 channel playback from the output of a video game console Using the Advanced surround effects The Advanced surround effects can be selected. 4 Use with Dolby Pro Logic for a stereo surround effect (stereo field is designed to hear 6.1 channel playback with 5.1 channel sources • THX Surround EX - Try different settings with 5.1 channel sources • THX GAMES MODE - Simulates multichannel surround sound for cinema and home theater sound...
... Home THX modes THX and Home THX are also suited for music sources. Allows you to hear 7.1 channel playback from the output of a video game console Using the Advanced surround effects The Advanced surround effects can be selected. 4 Use with Dolby Pro Logic for a stereo surround effect (stereo field is designed to hear 6.1 channel playback with 5.1 channel sources • THX Surround EX - Try different settings with 5.1 channel sources • THX GAMES MODE - Simulates multichannel surround sound for cinema and home theater sound...
Owner's Manual
Page 33
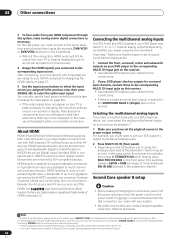
.... Select for system setup. 2 You can use with this screen. Make customized settings to reflect how you have connected using the System Setup menu. • The OSD will not appear if you are connected to stereo playback in your TV. Note 1 • Make sure not to switch off the power when using the HDMI output to the System Setup menu. Use component, S-video, or composite connections for normal home theater use the surround back speaker channels with surround back speakers...
.... Select for system setup. 2 You can use with this screen. Make customized settings to reflect how you have connected using the System Setup menu. • The OSD will not appear if you are connected to stereo playback in your TV. Note 1 • Make sure not to switch off the power when using the HDMI output to the System Setup menu. Use component, S-video, or composite connections for normal home theater use the surround back speaker channels with surround back speakers...

Owner's Manual
Page 34
See Automatically setting up for surround sound (MCACC) on page 8 if you 're not already at high volume. 1 Select 'Manual MCACC' from the Manual MCACC setup menu. See Making receiver settings from the System Setup menu above if you 're unsure how to the reference level, test tones will be output. :Cancel 2 Select each channel in turn up for manual adjustment (see Copying your speaker system (see Setting the Acoustic Calibration EQ automatically below ). •...
See Automatically setting up for surround sound (MCACC) on page 8 if you 're not already at high volume. 1 Select 'Manual MCACC' from the Manual MCACC setup menu. See Making receiver settings from the System Setup menu above if you 're unsure how to the reference level, test tones will be output. :Cancel 2 Select each channel in turn up for manual adjustment (see Copying your speaker system (see Setting the Acoustic Calibration EQ automatically below ). •...
Owner's Manual
Page 38
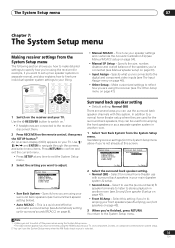
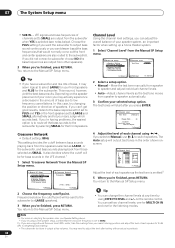
...are using a Sound Pressure Level (SPL) meter, take the readings from your main listening position and adjust the level of your speaker system, an important factor when setting up a home theater system. 1 Select 'Channel Level' from those selected as LARGE, or the subwoofer, and bass sounds playing back from the Manual SP Setup menu. 4.Manual SP Setup a.Speaker Setting b.Crossover Network c.Channel Level d.Speaker Distance e.THX Audio Setting f.THX Speaker Setup 4c.Channel Level Test Tone Manual :Return ENTER:Next :Cancel 2 Select a setup option. • Manual - Frequencies below...
...are using a Sound Pressure Level (SPL) meter, take the readings from your main listening position and adjust the level of your speaker system, an important factor when setting up a home theater system. 1 Select 'Channel Level' from those selected as LARGE, or the subwoofer, and bass sounds playing back from the Manual SP Setup menu. 4.Manual SP Setup a.Speaker Setting b.Crossover Network c.Channel Level d.Speaker Distance e.THX Audio Setting f.THX Speaker Setup 4c.Channel Level Test Tone Manual :Return ENTER:Next :Cancel 2 Select a setup option. • Manual - Frequencies below...
Owner's Manual
Page 40
... COAXIAL ASSIGNABLE 12 OUT IN IN IN OUT IN CD-R/TAPE/MD DVD/LD TV/SAT DVR/VCR1 VSX-1016TXV AM LOOP L OUT PRE OUT CENTER L L (Single) IN 3 R R SUB R SUR- For best reception, you will be able to use this receiver to select channels and navigate categories using the onscreen display.2 The information displayed is switched off before making or changing the connections. Tip • You can select channels directly by genre. Channel blocking...
... COAXIAL ASSIGNABLE 12 OUT IN IN IN OUT IN CD-R/TAPE/MD DVD/LD TV/SAT DVR/VCR1 VSX-1016TXV AM LOOP L OUT PRE OUT CENTER L L (Single) IN 3 R R SUB R SUR- For best reception, you will be able to use this receiver to select channels and navigate categories using the onscreen display.2 The information displayed is switched off before making or changing the connections. Tip • You can select channels directly by genre. Channel blocking...
Owner's Manual
Page 41
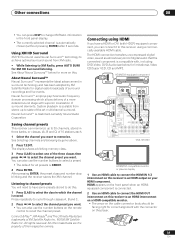
... VIDEO OUT IN IN IN OUT IN CD-R/TAPE/MD DVD/LD TV/SAT DVR/VCR1 AM L L OUT IN 3 R OUT OUT DVR/ VSX-1016TXV HDMI IN HDMI/DVI-compatible monitor or plasma display 1 Use an HDMI cable to connect the HDMI IN 1/2 interconnect on the remote control to recall the channel preset. The display shows a blinking memory class. 3 Press CLASS to select one of the three classes then press / to select the channel preset...
... VIDEO OUT IN IN IN OUT IN CD-R/TAPE/MD DVD/LD TV/SAT DVR/VCR1 AM L L OUT IN 3 R OUT OUT DVR/ VSX-1016TXV HDMI IN HDMI/DVI-compatible monitor or plasma display 1 Use an HDMI cable to connect the HDMI IN 1/2 interconnect on the remote control to recall the channel preset. The display shows a blinking memory class. 3 Press CLASS to select one of the three classes then press / to select the channel preset...
Owner's Manual
Page 42
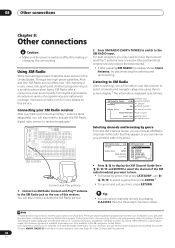
... the volume and channel levels can be set. • You can't listen to multi-channel surround-sound audio. This switches between SW IN +10dB (increase of the subwoofer channel may have 5.1, 6.1 or 7.1 channel analog outputs (depending on whether your player supports surround back channels).1 Make sure that the player is set to output multichannel analog audio. 1 Connect the front, surround, center and subwoofer outputs on your DVD player to the corresponding MULTI CH input jack on this receiver. • Use standard RCA/phono jack cables for the connections. 2 If your HDMI component...
... the volume and channel levels can be set. • You can't listen to multi-channel surround-sound audio. This switches between SW IN +10dB (increase of the subwoofer channel may have 5.1, 6.1 or 7.1 channel analog outputs (depending on whether your player supports surround back channels).1 Make sure that the player is set to output multichannel analog audio. 1 Connect the front, surround, center and subwoofer outputs on your DVD player to the corresponding MULTI CH input jack on this receiver. • Use standard RCA/phono jack cables for the connections. 2 If your HDMI component...

Owner's Manual
Page 44
...'t connect different speakers from the pre-outs, switch the speaker system to OFF, or simply disconnect any home use, but additionally, interference effects within the wire could be bi-wireable (that are basically the same as well. SURROUND FRONT WOOFER ROUND BACK OUT IN MONITOR OUT ANALOG INPUT L R ANALOG INPUT ANALOG INPUT L R Front channel amplifier Center channel amplifier (mono) Surround channel amplifier OUT VSX-1016TXV Pioneer plasma display OPTICAL IN 1 DIGITAL OUT ANTENNA IN 1 IN 2 (DVR/ VCR1) IN 2 (TV/SAT) OUT HDMI IN...
...'t connect different speakers from the pre-outs, switch the speaker system to OFF, or simply disconnect any home use, but additionally, interference effects within the wire could be bi-wireable (that are basically the same as well. SURROUND FRONT WOOFER ROUND BACK OUT IN MONITOR OUT ANALOG INPUT L R ANALOG INPUT ANALOG INPUT L R Front channel amplifier Center channel amplifier (mono) Surround channel amplifier OUT VSX-1016TXV Pioneer plasma display OPTICAL IN 1 DIGITAL OUT ANTENNA IN 1 IN 2 (DVR/ VCR1) IN 2 (TV/SAT) OUT HDMI IN...
Owner's Manual
Page 45
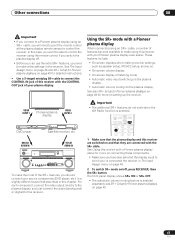
... receiver. The front panel display shows SR+ ON or SR+ OFF. • The automatic volume muting feature is selected. Using the SR+ mode with a Pioneer plasma display When connected using an SR+ cable, a number of your plasma display. DVD CD TV CD-R DVR 2 DVR1 TV CTRL XM RADIO TUNER RECEIVER SLEEP SR+ DIALOG E SB ch DIMMER PHASE ANALOG ATT MIDNIGHT/ LOUDNESS S.RETRIEVER DVD/LD AUDIO IN TV/SAT AUDIO IN AUDIO/VIDEO MULTI-CHANNEL RECEIVER VSX-1016TXV STANDBY/ON PHASE CONTROL...
... receiver. The front panel display shows SR+ ON or SR+ OFF. • The automatic volume muting feature is selected. Using the SR+ mode with a Pioneer plasma display When connected using an SR+ cable, a number of your plasma display. DVD CD TV CD-R DVR 2 DVR1 TV CTRL XM RADIO TUNER RECEIVER SLEEP SR+ DIALOG E SB ch DIMMER PHASE ANALOG ATT MIDNIGHT/ LOUDNESS S.RETRIEVER DVD/LD AUDIO IN TV/SAT AUDIO IN AUDIO/VIDEO MULTI-CHANNEL RECEIVER VSX-1016TXV STANDBY/ON PHASE CONTROL...
Owner's Manual
Page 49
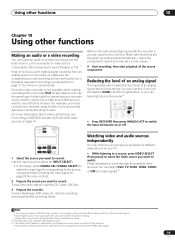
... feature will not work with digital sources. 3 • The video select feature is canceled if you change the source input or switch off . Most video recorders set the recording levels. You can use the same type of video cable for connecting your recorder as a CD player or TV). 1 Keep in the sound.2 DVD CD TV CD-R DVR 2 DVR1 TV CTRL XM RADIO TUNER RECEIVER SLEEP SR+ SB ch DIMMER ANALOG ATT MIDNIGHT/ LOUDNESS...
... feature will not work with digital sources. 3 • The video select feature is canceled if you change the source input or switch off . Most video recorders set the recording levels. You can use the same type of video cable for connecting your recorder as a CD player or TV). 1 Keep in the sound.2 DVD CD TV CD-R DVR 2 DVR1 TV CTRL XM RADIO TUNER RECEIVER SLEEP SR+ SB ch DIMMER ANALOG ATT MIDNIGHT/ LOUDNESS...

Owner's Manual
Page 58
... recorders input jacks (see Connecting analog audio sources on page 16). 58 En output when Dolby Digital/DTS • Check the digital output settings of the advanced effect listening mode, you 're recording isn't copy protected. • Check that the OUT jacks are selected (see Selecting the multichannel analog inputs on page 42). For AM broadcasts • Adjust the position and direction of your DVD player. A multichannel DVD source appears to be set too low; Lower the volume when...
... recorders input jacks (see Connecting analog audio sources on page 16). 58 En output when Dolby Digital/DTS • Check the digital output settings of the advanced effect listening mode, you 're recording isn't copy protected. • Check that the OUT jacks are selected (see Selecting the multichannel analog inputs on page 42). For AM broadcasts • Adjust the position and direction of your DVD player. A multichannel DVD source appears to be set too low; Lower the volume when...

Owner's Manual
Page 59
... components connected using component cables (see The Input Assign menu on page 46). • A separate video source has been selected using VIDEO SELECT (see Watching video and audio sources independently on page 49). • Check the video output settings of phase. Switch off all other digital components connected to the same power source are all in the room as low as possible (see also Problems when using the Auto MCACC • There may occur in the room and use Auto MCACC Setup again. Settings...
... components connected using component cables (see The Input Assign menu on page 46). • A separate video source has been selected using VIDEO SELECT (see Watching video and audio sources independently on page 49). • Check the video output settings of phase. Switch off all other digital components connected to the same power source are all in the room as low as possible (see also Problems when using the Auto MCACC • There may occur in the room and use Auto MCACC Setup again. Settings...
Owner's Manual
Page 61
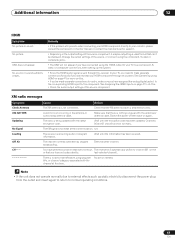
...; Check the audio output settings of the source component. See Assigning the HDMI inputs on again. The XM signal is attached securely. Remedy • If the problem still persists when connecting your HDMI component through this time. Check that the XM antenna cable is too weak at this system. The radio is acquiring audio or program information. n/a The receiver is being updated with the latest encryption code. You have selected a channel that you have...
...; Check the audio output settings of the source component. See Assigning the HDMI inputs on again. The XM signal is attached securely. Remedy • If the problem still persists when connecting your HDMI component through this time. Check that the XM antenna cable is too weak at this system. The radio is acquiring audio or program information. n/a The receiver is being updated with the latest encryption code. You have selected a channel that you have...


