Owner's Manual
Page 4
...theater 8 Listening to Surround Sound 8 Automatically setting up for future reference. Please read through these operating instructions so you for buying this Pioneer product. Contents 01 Before you have finished reading the instructions, put them away in a safe place for surround sound (MCACC 8 ...Making receiver settings from the System Setup menu 33 Surround back speaker setting 33 Manual MCACC setup 34 Fine Channel Level 34 Fine Speaker Distance 35 Acoustic Calibration EQ 35 Manual speaker setup 37 Speaker Setting 37 Crossover Network 38 Channel Level 38 Speaker ...
...theater 8 Listening to Surround Sound 8 Automatically setting up for future reference. Please read through these operating instructions so you for buying this Pioneer product. Contents 01 Before you have finished reading the instructions, put them away in a safe place for surround sound (MCACC 8 ...Making receiver settings from the System Setup menu 33 Surround back speaker setting 33 Manual MCACC setup 34 Fine Channel Level 34 Fine Speaker Distance 35 Acoustic Calibration EQ 35 Manual speaker setup 37 Speaker Setting 37 Crossover Network 38 Channel Level 38 Speaker ...
Owner's Manual
Page 8
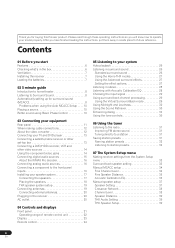
... on to Playing a source on page 13 to the receiver. 2 Connect your speakers and place them for both channel delay and channel level. Check the manual that the DVD input is selected. See also Making receiver settings from a home theater system depends not only on your speaker setup, but other sound...
... on to Playing a source on page 13 to the receiver. 2 Connect your speakers and place them for both channel delay and channel level. Check the manual that the DVD input is selected. See also Making receiver settings from a home theater system depends not only on your speaker setup, but other sound...
Owner's Manual
Page 9
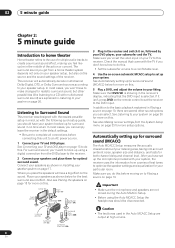
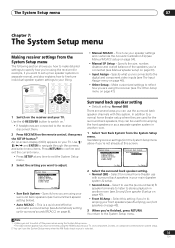
... doesn't seem to finish then confirm the speaker configuration in the Auto MCACC Setup should give you see Problems when using the Manual speaker setup on -screen while the receiver outputs more test tones to exit the current menu. This setting should reflect the actual... step 6. • If you have .5 If you excellent surround sound from the System Setup menu then press ENTER.2 System Setup 1.Surr Back System 2.Auto MCACC 3.Manual MCACC 4.Manual SP Setup 5.Input Assign 6.Other Setup 2. Front Center Surround SB SUB W. [ YES ] [ YES ] [ YES ] [ Yx2 ] [ YES ] OK :Cancel...
... doesn't seem to finish then confirm the speaker configuration in the Auto MCACC Setup should give you see Problems when using the Manual speaker setup on -screen while the receiver outputs more test tones to exit the current menu. This setting should reflect the actual... step 6. • If you have .5 If you excellent surround sound from the System Setup menu then press ENTER.2 System Setup 1.Surr Back System 2.Auto MCACC 3.Manual MCACC 4.Manual SP Setup 5.Input Assign 6.Other Setup 2. Front Center Surround SB SUB W. [ YES ] [ YES ] [ YES ] [ Yx2 ] [ YES ] OK :Cancel...

Owner's Manual
Page 10
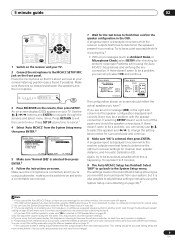
... Control This receiver's Basic Phase Control feature uses phase correction measures to make sure that the VIDEO 1 input is now selected.) 2 If you need to manually switch the input signal type press SIGNAL SEL (page 29). 3 • You may only get digital 2 channel stereo and analog sound. P Front speaker H A S E C O N T O F Sound F source...
... Control This receiver's Basic Phase Control feature uses phase correction measures to make sure that the VIDEO 1 input is now selected.) 2 If you need to manually switch the input signal type press SIGNAL SEL (page 29). 3 • You may only get digital 2 channel stereo and analog sound. P Front speaker H A S E C O N T O F Sound F source...
Owner's Manual
Page 14
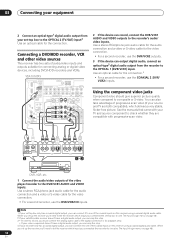
.... Using the component video jacks Component video should give superior picture quality when compared to the recorder's audio/ video inputs. See the manuals that came with progressive-scan video. VSX-1016TXV OPTICAL IN 1 DIGITAL OUT ANTENNA IN 1 IN 2 (DVR/ VCR1) IN 2 (TV/SAT) OUT HDMI IN 3 (CD) ASSIGNABLE 13 CONTROL OUT XM IN...
.... Using the component video jacks Component video should give superior picture quality when compared to the recorder's audio/ video inputs. See the manuals that came with progressive-scan video. VSX-1016TXV OPTICAL IN 1 DIGITAL OUT ANTENNA IN 1 IN 2 (DVR/ VCR1) IN 2 (TV/SAT) OUT HDMI IN 3 (CD) ASSIGNABLE 13 CONTROL OUT XM IN...
Owner's Manual
Page 17
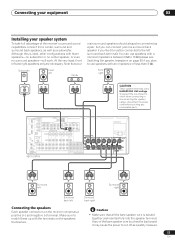
...PR Y PB PR ASSIGNABLE 1 3 S-VIDEO IN IN OUT IN VIDEO OUT IN IN IN OUT IN CD-R/TAPE/MD DVD/LD TV/SAT DVR/VCR1 VSX-1016TXV AM LOOP L OUT PRE OUT CENTER L L (Single) IN 3 R R SUB R SUR- SURROUND WOOFER ROUND BACK MULTI CH IN CENTER AC ...OUTLET SWITCHED 100 W(0.8 A) MAX R SURROUND L SURROUND BACK / B R L (Single) SEE INSTRUCTION MANUAL SELECTABLE Surround left Surround right Surround back left Surround back right Connecting the speakers Each speaker connection on page 50 if you like (it may...
...PR Y PB PR ASSIGNABLE 1 3 S-VIDEO IN IN OUT IN VIDEO OUT IN IN IN OUT IN CD-R/TAPE/MD DVD/LD TV/SAT DVR/VCR1 VSX-1016TXV AM LOOP L OUT PRE OUT CENTER L L (Single) IN 3 R R SUB R SUR- SURROUND WOOFER ROUND BACK MULTI CH IN CENTER AC ...OUTLET SWITCHED 100 W(0.8 A) MAX R SURROUND L SURROUND BACK / B R L (Single) SEE INSTRUCTION MANUAL SELECTABLE Surround left Surround right Surround back left Surround back right Connecting the speakers Each speaker connection on page 50 if you like (it may...

Owner's Manual
Page 18
... edge of the speaker terminal. Use less of an angle for details on how to connect the other end of the speaker cables to the manual that came with about ear-level when you 're using magnetically shielded speakers to three feet higher than the front and center speakers. B). C). Front left...
... edge of the speaker terminal. Use less of an angle for details on how to connect the other end of the speaker cables to the manual that came with about ear-level when you 're using magnetically shielded speakers to three feet higher than the front and center speakers. B). C). Front left...
Owner's Manual
Page 29
... is set to ANALOG (the MULTI CH IN and TUNER functions are on 5.1 encoded material) • VirtualSB AUTO - For more details, refer to the instruction manual supplied with your DVD player. 2 • You can't use the Virtual Surround Back mode with headphones, or with the THX, XM HD Surround, STEREO or...
... is set to ANALOG (the MULTI CH IN and TUNER functions are on 5.1 encoded material) • VirtualSB AUTO - For more details, refer to the instruction manual supplied with your DVD player. 2 • You can't use the Virtual Surround Back mode with headphones, or with the THX, XM HD Surround, STEREO or...
Owner's Manual
Page 31
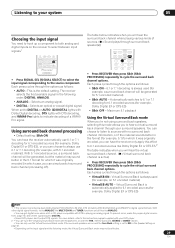
... can also use the number buttons to search for more on this case, you can simply enter the frequency directly using the automatic (search) and manual (step) tuning functions. There are tuned to a station you can memorize up to 30 stations, stored in the currently selected band, press and ...about a second. Each press switches the band between FM and AM. 3 Press D.ACCESS (Direct Access). 4 Use the number buttons to enter the frequency of manually tuning in to FM and AM radio broadcasts using the number buttons on how to do this . This saves the effort of the radio station...
... can also use the number buttons to search for more on this case, you can simply enter the frequency directly using the automatic (search) and manual (step) tuning functions. There are tuned to a station you can memorize up to 30 stations, stored in the currently selected band, press and ...about a second. Each press switches the band between FM and AM. 3 Press D.ACCESS (Direct Access). 4 Use the number buttons to enter the frequency of manually tuning in to FM and AM radio broadcasts using the number buttons on how to do this . This saves the effort of the radio station...
Owner's Manual
Page 33
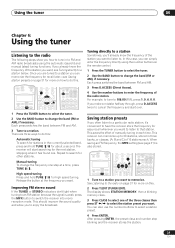
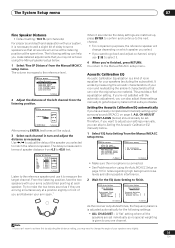
... speaker system in another room. 1 Select 'Surr Back System' from the System Setup menu. System Setup 1.Surr Back System 2.Auto MCACC 3.Manual MCACC 4.Manual SP Setup 5.Input Assign 6.Other Setup 1.Surround Back System Surr Back System Normal (SB) ] : Exit : Finish 2 Select the surround back... speaker setting. • Normal (SB) - System Setup 1.Surr Back System 2.Auto MCACC 3.Manual MCACC 4.Manual SP Setup 5.Input Assign 6.Other Setup : Exit • Surr Back System - You return to stereo playback in another room (see The Input ...
... speaker system in another room. 1 Select 'Surr Back System' from the System Setup menu. System Setup 1.Surr Back System 2.Auto MCACC 3.Manual MCACC 4.Manual SP Setup 5.Input Assign 6.Other Setup 1.Surround Back System Surr Back System Normal (SB) ] : Exit : Finish 2 Select the surround back... speaker setting. • Normal (SB) - System Setup 1.Surr Back System 2.Auto MCACC 3.Manual MCACC 4.Manual SP Setup 5.Input Assign 6.Other Setup : Exit • Surr Back System - You return to stereo playback in another room (see The Input ...

Owner's Manual
Page 34
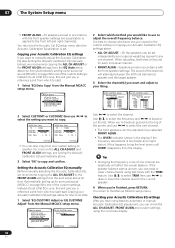
... placement of the settings below ). • Fine SP Distance - You only need to make detailed adjustments that you 're using the Manual speaker setup on page 36). • EQ CUSTOM1/2 Adjust - Make fine adjustments to the overall balance of your normal listening position. ... making these settings, you should have plenty of the left channel (the primary reference speaker) is fixed at high volume. 1 Select 'Manual MCACC' from the Manual MCACC setup menu. Also see Setting the Acoustic Calibration EQ automatically below : • EQ Auto Setting - Fine Channel Level • ...
... placement of the settings below ). • Fine SP Distance - You only need to make detailed adjustments that you 're using the Manual speaker setup on page 36). • EQ CUSTOM1/2 Adjust - Make fine adjustments to the overall balance of your normal listening position. ... making these settings, you should have plenty of the left channel (the primary reference speaker) is fixed at high volume. 1 Select 'Manual MCACC' from the Manual MCACC setup menu. Also see Setting the Acoustic Calibration EQ automatically below : • EQ Auto Setting - Fine Channel Level • ...
Owner's Manual
Page 35
... weighting is given to any one channel. Turn on Subwoofar. :Return :Cancel • Make sure the microphone is connected. • See Problems when using the Manual speaker setup below. 1 Select 'Fine SP Distance' from 0.5 to 45.0 feet. 3b.Fine SP Distance L R C SL SR SBL SBR SW 10.0ft...by measuring the acoustic characteristics of your room and neutralizing the ambient characteristics that suits your tastes. The volume increases to the reference level. 3.Manual MCACC a.Fine Ch Level b.Fine SP Distance c.EQ Auto Setting d.EQ Data Copy e.EQ CUSTOM1 Adjust f .EQ CUSTOM2 Adjust g.EQ Data...
... weighting is given to any one channel. Turn on Subwoofar. :Return :Cancel • Make sure the microphone is connected. • See Problems when using the Manual speaker setup below. 1 Select 'Fine SP Distance' from 0.5 to 45.0 feet. 3b.Fine SP Distance L R C SL SR SBL SBR SW 10.0ft...by measuring the acoustic characteristics of your room and neutralizing the ambient characteristics that suits your tastes. The volume increases to the reference level. 3.Manual MCACC a.Fine Ch Level b.Fine SP Distance c.EQ Auto Setting d.EQ Data Copy e.EQ CUSTOM1 Adjust f .EQ CUSTOM2 Adjust g.EQ Data...
Owner's Manual
Page 36
...one channel too drastically will sound for each individual channel. • FRONT ALIGN - Use / to select the frequency and / to the Manual MCACC setup menu. disappears from Automatically setting up for the current speaker. 4 When you selected FRONT ALIGN. • The OVER! Setting the... Acoustic Calibration EQ manually Before manually adjusting the Acoustic Calibration EQ, we recommend copying the ALL CH ADJUST or the FRONT ALIGN settings from the EQ Auto setup above...
...one channel too drastically will sound for each individual channel. • FRONT ALIGN - Use / to select the frequency and / to the Manual MCACC setup menu. disappears from Automatically setting up for the current speaker. 4 When you selected FRONT ALIGN. • The OVER! Setting the... Acoustic Calibration EQ manually Before manually adjusting the Acoustic Calibration EQ, we recommend copying the ALL CH ADJUST or the FRONT ALIGN settings from the EQ Auto setup above...
Owner's Manual
Page 37
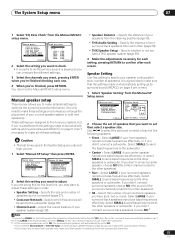
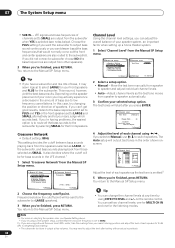
... Select the number of the following speakers: • Front - System Setup 1.Surr Back System 2.Auto MCACC 3.Manual MCACC 4.Manual SP Setup 5.Input Assign 6.Other Setup 4.Manual SP Setup a.Speaker Setting b.Crossover Network c.Channel Level d.Speaker Distance e.THX Audio Setting f.THX Speaker Setup : ...39). 3 Make the adjustments necessary for the first time, you are correct. 1 Select 'Speaker Setting' from the Manual SP Setup menu. 4.Manual SP Setup a.Speaker Setting b.Crossover Network c.Channel Level d.Speaker Distance e.THX Audio Setting f.THX Speaker Setup 4a.Speaker Setting...
... Select the number of the following speakers: • Front - System Setup 1.Surr Back System 2.Auto MCACC 3.Manual MCACC 4.Manual SP Setup 5.Input Assign 6.Other Setup 4.Manual SP Setup a.Speaker Setting b.Crossover Network c.Channel Level d.Speaker Distance e.THX Audio Setting f.THX Speaker Setup : ...39). 3 Make the adjustments necessary for the first time, you are correct. 1 Select 'Speaker Setting' from the Manual SP Setup menu. 4.Manual SP Setup a.Speaker Setting b.Crossover Network c.Channel Level d.Speaker Distance e.THX Audio Setting f.THX Speaker Setup 4a.Speaker Setting...
Owner's Manual
Page 38
...below the cutoff point will output test tones in the LFE channel.1 1 Select 'Crossover Network' from your room you selected Manual, use / to low frequency cancellations. Choose the PLUS setting if you want deeper bass (the bass frequencies that would normally ...Channel Level L 0.0dB C [ 0.0dB ] R [ 0.0dB ] SR [ 0.0dB ] SBR [ 0.0dB ] SBL [ 0.0dB ] SL [ 0.0dB ] SW [ 0.0dB ] :Finish 4.Manual SP Setup a.Speaker Setting b.Crossover Network c.Channel Level d.Speaker Distance e.THX Audio Setting f.THX Speaker Setup :Return 4b.Crossover Network Frequency 80Hz ( THX : 80Hz ) :Finish...
...below the cutoff point will output test tones in the LFE channel.1 1 Select 'Crossover Network' from your room you selected Manual, use / to low frequency cancellations. Choose the PLUS setting if you want deeper bass (the bass frequencies that would normally ...Channel Level L 0.0dB C [ 0.0dB ] R [ 0.0dB ] SR [ 0.0dB ] SBR [ 0.0dB ] SBL [ 0.0dB ] SL [ 0.0dB ] SW [ 0.0dB ] :Finish 4.Manual SP Setup a.Speaker Setting b.Crossover Network c.Channel Level d.Speaker Distance e.THX Audio Setting f.THX Speaker Setup :Return 4b.Crossover Network Frequency 80Hz ( THX : 80Hz ) :Finish...
Owner's Manual
Page 39
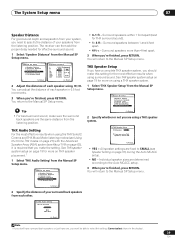
...able to select this setting for the most effective results when using a THX speaker system. 1 Select 'THX Speaker Setup' from the Manual SP Setup menu. 4.Manual SP Setup a.Speaker Setting b.Crossover Network c.Channel Level d.Speaker Distance e.THX Audio Setting f.THX Speaker Setup • 0-1 ft - Tip... you are using a THX speaker system. 4f.THX Speaker Setup THX Speaker NO If you are the same distance from the Manual SP Setup menu. 4.Manual SP Setup a.Speaker Setting b.Crossover Network c.Channel Level d.Speaker Distance e.THX Audio Setting f.THX Speaker Setup :Return 4d.Speaker...
...able to select this setting for the most effective results when using a THX speaker system. 1 Select 'THX Speaker Setup' from the Manual SP Setup menu. 4.Manual SP Setup a.Speaker Setting b.Crossover Network c.Channel Level d.Speaker Distance e.THX Audio Setting f.THX Speaker Setup • 0-1 ft - Tip... you are using a THX speaker system. 4f.THX Speaker Setup THX Speaker NO If you are the same distance from the Manual SP Setup menu. 4.Manual SP Setup a.Speaker Setting b.Crossover Network c.Channel Level d.Speaker Distance e.THX Audio Setting f.THX Speaker Setup :Return 4d.Speaker...

Owner's Manual
Page 43
...Other connections 08 • You can use speakers with both front and surround back terminals) for biamping your front left speaker SEE INSTRUCTION MANUAL SELECTABLE Switching the speaker system If you selected 2nd Zone in speaker system B, and the subwoofer. This illustration below . Press repeatedly to... a speaker system setting. No sound is output from the surround back channel pre-out terminals. • SP AB - See your speaker manual for more information. • If your speaker system on page 33, three speaker system settings are for the listening options with this ....
...Other connections 08 • You can use speakers with both front and surround back terminals) for biamping your front left speaker SEE INSTRUCTION MANUAL SELECTABLE Switching the speaker system If you selected 2nd Zone in speaker system B, and the subwoofer. This illustration below . Press repeatedly to... a speaker system setting. No sound is output from the surround back channel pre-out terminals. • SP AB - See your speaker manual for more information. • If your speaker system on page 33, three speaker system settings are for the listening options with this ....
Owner's Manual
Page 46
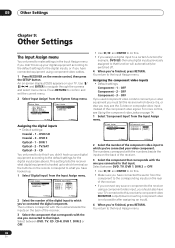
... / / / and ENTER to navigate through the screens and select menu items. Press RETURN to the Input Assign menu. System Setup 1.Surr Back System 2.Auto MCACC 3.Manual MCACC 4.Manual SP Setup 5.Input Assign 6.Other Setup 5.Input Assign a.Digital Input b.Component Input c.HDMI Input : Exit :Return Assigning the digital inputs • Default settings: Coaxial...
... / / / and ENTER to navigate through the screens and select menu items. Press RETURN to the Input Assign menu. System Setup 1.Surr Back System 2.Auto MCACC 3.Manual MCACC 4.Manual SP Setup 5.Input Assign 6.Other Setup 5.Input Assign a.Digital Input b.Component Input c.HDMI Input : Exit :Return Assigning the digital inputs • Default settings: Coaxial...
Owner's Manual
Page 47
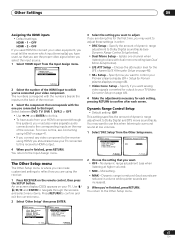
... - If you are doing this receiver's HDMI output. 4 When you may want . • OFF - Choose the attenuator level for Pioneer plasma displays on the rear of dynamic range adjustment to connect your video component. Specify if you want to control your TV connected to this...ENTER to the receiver using the receiver. 1 Press RECEIVER on page 48). • SR+ Setup - System Setup 1.Surr Back System 2.Auto MCACC 3.Manual MCACC 4.Manual SP Setup 5.Input Assign 6.Other Setup 6.Other Setup a.DRC Setup b.Dual Mono Setup c.LFE ATT Setup d.SR+ Setup e.Video Conv. Isolate one you ...
... - If you are doing this receiver's HDMI output. 4 When you may want . • OFF - Choose the attenuator level for Pioneer plasma displays on the rear of dynamic range adjustment to connect your video component. Specify if you want to control your TV connected to this...ENTER to the receiver using the receiver. 1 Press RECEIVER on page 48). • SR+ Setup - System Setup 1.Surr Back System 2.Auto MCACC 3.Manual MCACC 4.Manual SP Setup 5.Input Assign 6.Other Setup 6.Other Setup a.DRC Setup b.Dual Mono Setup c.LFE ATT Setup d.SR+ Setup e.Video Conv. Isolate one you ...
Owner's Manual
Page 49
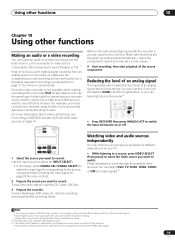
into the recording device and set the audio recording level automatically-check the component's instruction manual if you're unsure. 4 Start recording, then start playback of an analog signal when it's too strong. Refer to the instructions that came with the ...
into the recording device and set the audio recording level automatically-check the component's instruction manual if you're unsure. 4 Start recording, then start playback of an analog signal when it's too strong. Refer to the instructions that came with the ...


