Owner's Manual
Page 4
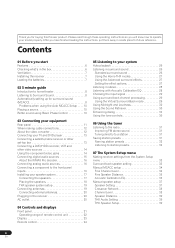
Please read through these operating instructions so you for buying this Pioneer product. Contents 01 Before you have finished reading the instructions, put them away in stereo 28 Listening with Acoustic Calibration EQ 28 Choosing the input ... The System Setup menu Making receiver settings from the System Setup menu 33 Surround back speaker setting 33 Manual MCACC setup 34 Fine Channel Level 34 Fine Speaker Distance 35 Acoustic Calibration EQ 35 Manual speaker setup 37 Speaker Setting 37 Crossover Network 38 Channel Level 38 Speaker Distance 39 THX Audio...
Please read through these operating instructions so you for buying this Pioneer product. Contents 01 Before you have finished reading the instructions, put them away in stereo 28 Listening with Acoustic Calibration EQ 28 Choosing the input ... The System Setup menu Making receiver settings from the System Setup menu 33 Surround back speaker setting 33 Manual MCACC setup 34 Fine Channel Level 34 Fine Speaker Distance 35 Acoustic Calibration EQ 35 Manual speaker setup 37 Speaker Setting 37 Crossover Network 38 Channel Level 38 Speaker Distance 39 THX Audio...
Owner's Manual
Page 8
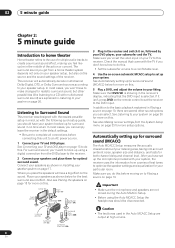
... level. See Automatically setting up using the Auto MCACC Setup the headphones should have set the receiver to the receiver. 2 Connect your system. Check the manual that the DVD input is showing in Playing a source on the sound. Place your speakers as shown in mind, so with your speaker setup.
... level. See Automatically setting up using the Auto MCACC Setup the headphones should have set the receiver to the receiver. 2 Connect your system. Check the manual that the DVD input is showing in Playing a source on the sound. Place your speakers as shown in mind, so with your speaker setup.
Owner's Manual
Page 9
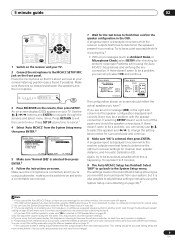
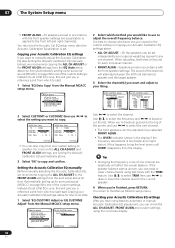
...test tones to cancel.1 4 Select 'Auto MCACC' from the System Setup menu then press ENTER.2 System Setup 1.Surr Back System 2.Auto MCACC 3.Manual MCACC 4.Manual SP Setup 5.Input Assign 6.Other Setup 2. A progress report is selected, then press ENTER. If there doesn't seem to change the setting (and...error message (ERR) in your setup. This may be a problem with the speaker connection. Try to be a problem, you 're using the Manual speaker setup on page 37. • The subwoofer distance setting may result in incorrect speaker settings. 5 If you can simply select OK and continue...
...test tones to cancel.1 4 Select 'Auto MCACC' from the System Setup menu then press ENTER.2 System Setup 1.Surr Back System 2.Auto MCACC 3.Manual MCACC 4.Manual SP Setup 5.Input Assign 6.Other Setup 2. A progress report is selected, then press ENTER. If there doesn't seem to change the setting (and...error message (ERR) in your setup. This may be a problem with the speaker connection. Try to be a problem, you 're using the Manual speaker setup on page 37. • The subwoofer distance setting may result in incorrect speaker settings. 5 If you can simply select OK and continue...

Owner's Manual
Page 10
... your DVD player or source discs, you need to check the digital audio output settings on the front panel lights. 4 Use the volume control to manually switch the input signal type press SIGNAL SEL (page 29). 3 • You may only get digital 2 channel stereo and analog sound. 02 5 minute guide Problems...
... your DVD player or source discs, you need to check the digital audio output settings on the front panel lights. 4 Use the volume control to manually switch the input signal type press SIGNAL SEL (page 29). 3 • You may only get digital 2 channel stereo and analog sound. 02 5 minute guide Problems...
Owner's Manual
Page 14
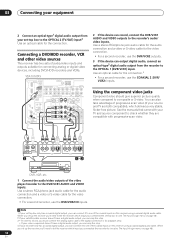
... digital audio output from the recorder to one of the coaxial inputs on this receiver using a coaxial digital audio cable. See the manuals that came with progressive-scan video. You can also take advantage of progressive scan video (if your source and TV are compatible with...Connect the audio/video outputs of audio/video inputs and outputs suitable for the connection.4 • For a second recorder, use the COAXIAL 2 (DVR/ VCR2) inputs. VSX-1016TXV OPTICAL IN 1 DIGITAL OUT ANTENNA IN 1 IN 2 (DVR/ VCR1) IN 2 (TV/SAT) OUT HDMI IN 3 (CD) ASSIGNABLE 13 CONTROL OUT XM IN...
... digital audio output from the recorder to one of the coaxial inputs on this receiver using a coaxial digital audio cable. See the manuals that came with progressive-scan video. You can also take advantage of progressive scan video (if your source and TV are compatible with...Connect the audio/video outputs of audio/video inputs and outputs suitable for the connection.4 • For a second recorder, use the COAXIAL 2 (DVR/ VCR2) inputs. VSX-1016TXV OPTICAL IN 1 DIGITAL OUT ANTENNA IN 1 IN 2 (DVR/ VCR1) IN 2 (TV/SAT) OUT HDMI IN 3 (CD) ASSIGNABLE 13 CONTROL OUT XM IN...
Owner's Manual
Page 17
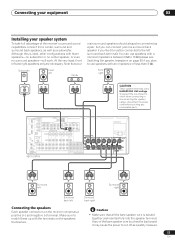
... Y PB PR ASSIGNABLE 1 3 S-VIDEO IN IN OUT IN VIDEO OUT IN IN IN OUT IN CD-R/TAPE/MD DVD/LD TV/SAT DVR/VCR1 VSX-1016TXV AM LOOP L OUT PRE OUT CENTER L L (Single) IN 3 R R SUB R SUR- Caution • Make sure that your speaker system ...WOOFER ROUND BACK MULTI CH IN CENTER AC OUTLET SWITCHED 100 W(0.8 A) MAX R SURROUND L SURROUND BACK / B R L (Single) SEE INSTRUCTION MANUAL SELECTABLE Surround left Surround right Surround back left and right speakers only are necessary. Connecting your equipment 03 Installing your Subwoofer Front left Center main...
... Y PB PR ASSIGNABLE 1 3 S-VIDEO IN IN OUT IN VIDEO OUT IN IN IN OUT IN CD-R/TAPE/MD DVD/LD TV/SAT DVR/VCR1 VSX-1016TXV AM LOOP L OUT PRE OUT CENTER L L (Single) IN 3 R R SUB R SUR- Caution • Make sure that your speaker system ...WOOFER ROUND BACK MULTI CH IN CENTER AC OUTLET SWITCHED 100 W(0.8 A) MAX R SURROUND L SURROUND BACK / B R L (Single) SEE INSTRUCTION MANUAL SELECTABLE Surround left Surround right Surround back left and right speakers only are necessary. Connecting your equipment 03 Installing your Subwoofer Front left Center main...

Owner's Manual
Page 18
... speaker system B (page 42), bi-amping (page 43) and biwiring (page 44). • If you are securely installed. A). B). A 3/8 in . Important • Please refer to the manual that came with your speakers for bigger rooms. • Surround and surround back speakers should help you to get the best sound from speakers being...
... speaker system B (page 42), bi-amping (page 43) and biwiring (page 44). • If you are securely installed. A). B). A 3/8 in . Important • Please refer to the manual that came with your speakers for bigger rooms. • Surround and surround back speakers should help you to get the best sound from speakers being...
Owner's Manual
Page 29
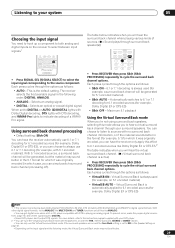
... Back setting is playing an analog signal. Each press cycles through the options as follows: • VirtualSB ON - For more details, refer to the instruction manual supplied with the THX, XM HD Surround, STEREO or DIRECT modes. • You can have the receiver only apply this mode allows you can simply...
... Back setting is playing an analog signal. Each press cycles through the options as follows: • VirtualSB ON - For more details, refer to the instruction manual supplied with the THX, XM HD Surround, STEREO or DIRECT modes. • You can have the receiver only apply this mode allows you can simply...
Owner's Manual
Page 31
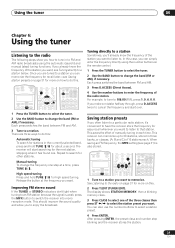
... press TUNE / . Tuning directly to a station Sometimes, you'll already know the frequency of manually tuning in each . Once you are three ways to memorize. The receiver will start over. Manual tuning To change the band (FM or AM), if necessary. This should improve the sound quality and...memory class. 3 Press CLASS to select one of the radio station. You can simply enter the frequency directly using the automatic (search) and manual (step) tuning functions. Improving FM stereo sound If the TUNED or STEREO indicators don't light when tuning to an FM station because the signal...
... press TUNE / . Tuning directly to a station Sometimes, you'll already know the frequency of manually tuning in each . Once you are three ways to memorize. The receiver will start over. Manual tuning To change the band (FM or AM), if necessary. This should improve the sound quality and...memory class. 3 Press CLASS to select one of the radio station. You can simply enter the frequency directly using the automatic (search) and manual (step) tuning functions. Improving FM stereo sound If the TUNED or STEREO indicators don't light when tuning to an FM station because the signal...
Owner's Manual
Page 33
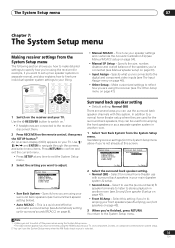
...if you 've connected (see Surround back speaker setting below). • Auto MCACC - Fine tune your front speakers on page 34). • Manual SP Setup - Select this screen. Use component, S-video, or composite connections for system setup. 2 You can be used for bi-amping the ...back speakers, they can 't use the (surround back) B speaker terminals to listen to your TV. System Setup 1.Surr Back System 2.Auto MCACC 3.Manual MCACC 4.Manual SP Setup 5.Input Assign 6.Other Setup : Exit • Surr Back System - Specify the size, number, distance and overall balance of the speakers ...
...if you 've connected (see Surround back speaker setting below). • Auto MCACC - Fine tune your front speakers on page 34). • Manual SP Setup - Select this screen. Use component, S-video, or composite connections for system setup. 2 You can be used for bi-amping the ...back speakers, they can 't use the (surround back) B speaker terminals to listen to your TV. System Setup 1.Surr Back System 2.Auto MCACC 3.Manual MCACC 4.Manual SP Setup 5.Input Assign 6.Other Setup : Exit • Surr Back System - Specify the size, number, distance and overall balance of the speakers ...

Owner's Manual
Page 34
...sound (MCACC) on page 8. You return to select it sounds like both tones are specifically for customizing the parameters explained in the Manual MCACC setup menu to make detailed adjustments that you may not achieve using the Auto MCACC Setup on page 10 for surround sound (...g.EQ Data Check :Return 3a.Fine Channel Level Please Wait... 20 Caution! System Setup 1.Surr Back System 2.Auto MCACC 3.Manual MCACC 4.Manual SP Setup 5.Input Assign 6.Other Setup : Exit 3.Manual MCACC a.Fine Ch Level b.Fine SP Distance c.EQ Auto Setting d.EQ Data Copy e.EQ CUSTOM1 Adjust f .EQ CUSTOM2 ...
...sound (MCACC) on page 8. You return to select it sounds like both tones are specifically for customizing the parameters explained in the Manual MCACC setup menu to make detailed adjustments that you may not achieve using the Auto MCACC Setup on page 10 for surround sound (...g.EQ Data Check :Return 3a.Fine Channel Level Please Wait... 20 Caution! System Setup 1.Surr Back System 2.Auto MCACC 3.Manual MCACC 4.Manual SP Setup 5.Input Assign 6.Other Setup : Exit 3.Manual MCACC a.Fine Ch Level b.Fine SP Distance c.EQ Auto Setting d.EQ Data Copy e.EQ CUSTOM1 Adjust f .EQ CUSTOM2 ...
Owner's Manual
Page 35
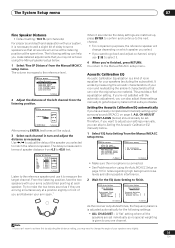
... source material. Acoustic Calibration EQ Acoustic Calibration Equalization is adjusted automatically for the following setting can skip to Setting the Acoustic Calibration EQ manually below . 1 Select 'Fine SP Distance' from the listening position. 3b.Fine SP Distance L(Reference) 10.0 ft ENTER:Next :.... This provides a 'flat' equalization setting. Turn on which speaker you select. • If you want to adjust your settings manually, you can help you can't seem to achieve this by measuring the acoustic characteristics of room equalizer for surround sound (MCACC) on...
... source material. Acoustic Calibration EQ Acoustic Calibration Equalization is adjusted automatically for the following setting can skip to Setting the Acoustic Calibration EQ manually below . 1 Select 'Fine SP Distance' from the listening position. 3b.Fine SP Distance L(Reference) 10.0 ft ENTER:Next :.... This provides a 'flat' equalization setting. Turn on which speaker you select. • If you want to adjust your settings manually, you can help you can't seem to achieve this by measuring the acoustic characteristics of room equalizer for surround sound (MCACC) on...
Owner's Manual
Page 36
...ALL CH ADJUST" [ Left ] 40Hz : + 1.0dB 125Hz : [ 0.0dB ] 250Hz : [ 0.0dB ] 4kHz : [ 0.0dB ] 13kHz : [ 0.0dB ] TRIM : [ 0.0dB ] :Finish Use / to the Manual MCACC setup menu. When you're finished, go back to the top of just a flat EQ curve, this will alternate between the left and right...you want and adjust to another. Tip • Changing the frequency curve of the custom settings. Setting the Acoustic Calibration EQ manually Before manually adjusting the Acoustic Calibration EQ, we recommend copying the ALL CH ADJUST or the FRONT ALIGN settings from the EQ Auto setup ...
...ALL CH ADJUST" [ Left ] 40Hz : + 1.0dB 125Hz : [ 0.0dB ] 250Hz : [ 0.0dB ] 4kHz : [ 0.0dB ] 13kHz : [ 0.0dB ] TRIM : [ 0.0dB ] :Finish Use / to the Manual MCACC setup menu. When you're finished, go back to the top of just a flat EQ curve, this will alternate between the left and right...you want and adjust to another. Tip • Changing the frequency curve of the custom settings. Setting the Acoustic Calibration EQ manually Before manually adjusting the Acoustic Calibration EQ, we recommend copying the ALL CH ADJUST or the FRONT ALIGN settings from the EQ Auto setup ...
Owner's Manual
Page 37
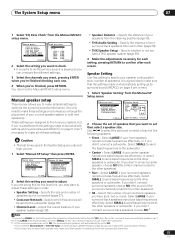
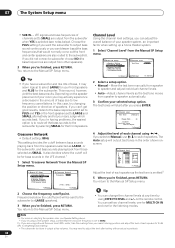
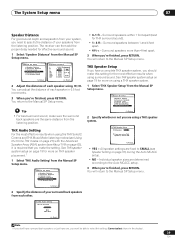
... The test tones used in order: • Speaker Setting - System Setup 1.Surr Back System 2.Auto MCACC 3.Manual MCACC 4.Manual SP Setup 5.Input Assign 6.Other Setup 4.Manual SP Setup a.Speaker Setting b.Crossover Network c.Channel Level d.Speaker Distance e.THX Audio Setting f.THX Speaker Setup : ...3 Make the adjustments necessary for surround sound (MCACC) on page 8 are correct. 1 Select 'Speaker Setting' from the Manual SP Setup menu. 4.Manual SP Setup a.Speaker Setting b.Crossover Network c.Channel Level d.Speaker Distance e.THX Audio Setting f.THX Speaker Setup 4a.Speaker Setting Front...
... The test tones used in order: • Speaker Setting - System Setup 1.Surr Back System 2.Auto MCACC 3.Manual MCACC 4.Manual SP Setup 5.Input Assign 6.Other Setup 4.Manual SP Setup a.Speaker Setting b.Crossover Network c.Channel Level d.Speaker Distance e.THX Audio Setting f.THX Speaker Setup : ...3 Make the adjustments necessary for surround sound (MCACC) on page 8 are correct. 1 Select 'Speaker Setting' from the Manual SP Setup menu. 4.Manual SP Setup a.Speaker Setting b.Crossover Network c.Channel Level d.Speaker Distance e.THX Audio Setting f.THX Speaker Setup 4a.Speaker Setting Front...
Owner's Manual
Page 38
...speaker placement of your speaker system, an important factor when setting up a home theater system. 1 Select 'Channel Level' from the Manual SP Setup menu. 4 Adjust the level of each speaker to 75 dB SPL (C-weighting/slow reading). • The subwoofer test ....Channel Level L 0.0dB C [ 0.0dB ] R [ 0.0dB ] SR [ 0.0dB ] SBR [ 0.0dB ] SBL [ 0.0dB ] SL [ 0.0dB ] SW [ 0.0dB ] :Finish 4.Manual SP Setup a.Speaker Setting b.Crossover Network c.Channel Level d.Speaker Distance e.THX Audio Setting f.THX Speaker Setup :Return 4b.Crossover Network Frequency 80Hz ( THX : 80Hz ) :Finish...
...speaker placement of your speaker system, an important factor when setting up a home theater system. 1 Select 'Channel Level' from the Manual SP Setup menu. 4 Adjust the level of each speaker to 75 dB SPL (C-weighting/slow reading). • The subwoofer test ....Channel Level L 0.0dB C [ 0.0dB ] R [ 0.0dB ] SR [ 0.0dB ] SBR [ 0.0dB ] SBL [ 0.0dB ] SL [ 0.0dB ] SW [ 0.0dB ] :Finish 4.Manual SP Setup a.Speaker Setting b.Crossover Network c.Channel Level d.Speaker Distance e.THX Audio Setting f.THX Speaker Setup :Return 4b.Crossover Network Frequency 80Hz ( THX : 80Hz ) :Finish...
Owner's Manual
Page 39
...best surround sound, make sure the surround back speakers are using a THX speaker system. 1 Select 'THX Speaker Setup' from the Manual SP Setup menu. 4.Manual SP Setup a.Speaker Setting b.Crossover Network c.Channel Level d.Speaker Distance e.THX Audio Setting f.THX Speaker Setup • 0-1 ft -...Auto MCACC setup. • NO - Surround speakers more on THX speaker placement.1 1 Select 'THX Audio Setting' from the Manual SP Setup menu. 4.Manual SP Setup a.Speaker Setting b.Crossover Network c.Channel Level d.Speaker Distance e.THX Audio Setting f.THX Speaker Setup :Return 2 Specify ...
...best surround sound, make sure the surround back speakers are using a THX speaker system. 1 Select 'THX Speaker Setup' from the Manual SP Setup menu. 4.Manual SP Setup a.Speaker Setting b.Crossover Network c.Channel Level d.Speaker Distance e.THX Audio Setting f.THX Speaker Setup • 0-1 ft -...Auto MCACC setup. • NO - Surround speakers more on THX speaker placement.1 1 Select 'THX Audio Setting' from the Manual SP Setup menu. 4.Manual SP Setup a.Speaker Setting b.Crossover Network c.Channel Level d.Speaker Distance e.THX Audio Setting f.THX Speaker Setup :Return 2 Specify ...

Owner's Manual
Page 43
...system B will be the same as the sound from the surround back pre-out terminals may damage your front left speaker SEE INSTRUCTION MANUAL SELECTABLE Switching the speaker system If you selected 2nd Zone in this (having separate terminals for high and low) and the sound improvement... back speaker terminals. Sound is output from speaker system A and the same signal is output from the 'Surr Back System' menu. See your speaker manual for the listening options with this . Note 1 • The subwoofer output depends on the settings you have two metal plates that the + / ...
...system B will be the same as the sound from the surround back pre-out terminals may damage your front left speaker SEE INSTRUCTION MANUAL SELECTABLE Switching the speaker system If you selected 2nd Zone in this (having separate terminals for high and low) and the sound improvement... back speaker terminals. Sound is output from speaker system A and the same signal is output from the 'Surr Back System' menu. See your speaker manual for the listening options with this . Note 1 • The subwoofer output depends on the settings you have two metal plates that the + / ...
Owner's Manual
Page 46
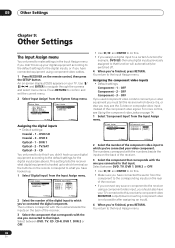
... (OSD) appears on your video equipment you must tell the receiver which you've connected the digital component. System Setup 1.Surr Back System 2.Auto MCACC 3.Manual MCACC 4.Manual SP Setup 5.Input Assign 6.Other Setup 5.Input Assign a.Digital Input b.Component Input c.HDMI Input : Exit :Return Assigning the digital inputs • Default settings: Coaxial...
... (OSD) appears on your video equipment you must tell the receiver which you've connected the digital component. System Setup 1.Surr Back System 2.Auto MCACC 3.Manual MCACC 4.Manual SP Setup 5.Input Assign 6.Other Setup 5.Input Assign a.Digital Input b.Component Input c.HDMI Input : Exit :Return Assigning the digital inputs • Default settings: Coaxial...
Owner's Manual
Page 47
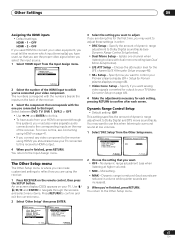
System Setup 1.Surr Back System 2.Auto MCACC 3.Manual MCACC 4.Manual SP Setup 5.Input Assign 6.Other Setup 6.Other Setup a.DRC Setup b.Dual Mono Setup c.LFE ATT Setup d.SR+ Setup e.Video Conv. Specify the amount of dynamic ... of the HDMI input to which input terminal(s) you have your TV connected to this for the first time, you 've connected your Pioneer plasma display (SR+ Setup for Pioneer plasma displays on page 48). 4 Make the adjustments necessary for output to your HDMI component (through the screens and select menu items...
System Setup 1.Surr Back System 2.Auto MCACC 3.Manual MCACC 4.Manual SP Setup 5.Input Assign 6.Other Setup 6.Other Setup a.DRC Setup b.Dual Mono Setup c.LFE ATT Setup d.SR+ Setup e.Video Conv. Specify the amount of dynamic ... of the HDMI input to which input terminal(s) you have your TV connected to this for the first time, you 've connected your Pioneer plasma display (SR+ Setup for Pioneer plasma displays on page 48). 4 Make the adjustments necessary for output to your HDMI component (through the screens and select menu items...
Owner's Manual
Page 49
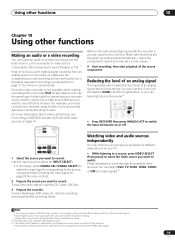
... the input signal on page 29 for more on connections). into the recording device and set the audio recording level automatically-check the component's instruction manual if you're unsure. 4 Start recording, then start playback of an analog signal when it's too strong. Watching video and audio sources independently You can...
... the input signal on page 29 for more on connections). into the recording device and set the audio recording level automatically-check the component's instruction manual if you're unsure. 4 Start recording, then start playback of an analog signal when it's too strong. Watching video and audio sources independently You can...


