
Owner's Manual
Page 1
...-CHANNEL RECEIVER VSX-1016TXV-K Register your product at www.pioneerelectronics.com (US) www.pioneerelectronics.ca (Canada) • Protect your new investment The details of your purchase will be on file for reference in the event of an insurance claim such as loss or theft. • Receive free ...tips, updates and service bulletins on your new product • Improve product development Your input helps us continue to design products that meet your needs. • Receive a free Pioneer newsletter Registered customers can opt in to...
...-CHANNEL RECEIVER VSX-1016TXV-K Register your product at www.pioneerelectronics.com (US) www.pioneerelectronics.ca (Canada) • Protect your new investment The details of your purchase will be on file for reference in the event of an insurance claim such as loss or theft. • Receive free ...tips, updates and service bulletins on your new product • Improve product development Your input helps us continue to design products that meet your needs. • Receive a free Pioneer newsletter Registered customers can opt in to...
Owner's Manual
Page 2
... DE COURANT, SAUF SI LES LAMES PEUVENT ETRE INSEREES A FOND SANS EN LAISSER AUCUNE PARTIE A DECOUVERT. Product Name: AUDIO/VIDEO MULTI-CHANNEL RECEIVER Model Number: VSX-1016TXV-K Responsible Party Name: PIONEER ELECTRONICS SERVICE INC. D1-4-2-6-1_En NOTE: This equipment has been tested and found to operate the equipment. Increase the separation between the equipment...
... DE COURANT, SAUF SI LES LAMES PEUVENT ETRE INSEREES A FOND SANS EN LAISSER AUCUNE PARTIE A DECOUVERT. Product Name: AUDIO/VIDEO MULTI-CHANNEL RECEIVER Model Number: VSX-1016TXV-K Responsible Party Name: PIONEER ELECTRONICS SERVICE INC. D1-4-2-6-1_En NOTE: This equipment has been tested and found to operate the equipment. Increase the separation between the equipment...
Owner's Manual
Page 4
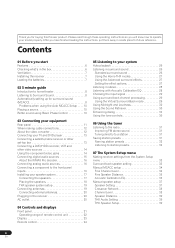
...Speaker Setup 39 4 En Contents 01 Before you start Features 6 Checking what's in the box 6 Ventilation 7 Installing the receiver 7 Loading the batteries 7 02 5 minute guide Introduction to home theater 8 Listening to Surround Sound 8 Automatically setting up ...speakers 18 THX speaker system setup 19 Connecting antennas 19 Connecting external antennas 20 Plugging in the receiver 20 AC outlet 20 04 Controls and displays Front panel 21 Operating range of remote control ...options 27 Listening in a safe place for buying this Pioneer product. Thank you for future reference.
...Speaker Setup 39 4 En Contents 01 Before you start Features 6 Checking what's in the box 6 Ventilation 7 Installing the receiver 7 Loading the batteries 7 02 5 minute guide Introduction to home theater 8 Listening to Surround Sound 8 Automatically setting up ...speakers 18 THX speaker system setup 19 Connecting antennas 19 Connecting external antennas 20 Plugging in the receiver 20 AC outlet 20 04 Controls and displays Front panel 21 Operating range of remote control ...options 27 Listening in a safe place for buying this Pioneer product. Thank you for future reference.
Owner's Manual
Page 5
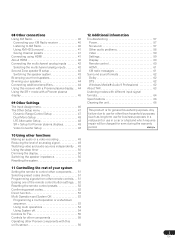
...66 This product is for even during the warranty period. K041_En 5 En 08 Other connections Using XM Radio 40 Connecting your XM Radio receiver 40 Listening to XM Radio 40 Using XM HD Surround 41 Saving channel presets 41 Connecting using HDMI 41 About HDMI 42 Connecting the...system 43 Bi-amping your front speakers 43 Bi-wiring your speakers 44 Connecting additional amplifiers 44 Using this receiver with a Pioneer plasma display. . . 44 Using the SR+ mode with a Pioneer plasma display 45 09 Other Settings The Input Assign menu 46 The Other Setup menu 47 Dynamic Range Control...
...66 This product is for even during the warranty period. K041_En 5 En 08 Other connections Using XM Radio 40 Connecting your XM Radio receiver 40 Listening to XM Radio 40 Using XM HD Surround 41 Saving channel presets 41 Connecting using HDMI 41 About HDMI 42 Connecting the...system 43 Bi-amping your front speakers 43 Bi-wiring your speakers 44 Connecting additional amplifiers 44 Using this receiver with a Pioneer plasma display. . . 44 Using the SR+ mode with a Pioneer plasma display 45 09 Other Settings The Input Assign menu 46 The Other Setup menu 47 Dynamic Range Control...
Owner's Manual
Page 6
... feature incorporated into your speakers, a DVD player or other equipment. 01 Before you start Features • Advanced Direct Energy design This receiver offers a new advancement in discrete design unique to Pioneer for high-power drivability, low distortion and stable imaging. Checking what the director intended. • Dolby Digital and DTS decoding, including...
... feature incorporated into your speakers, a DVD player or other equipment. 01 Before you start Features • Advanced Direct Energy design This receiver offers a new advancement in discrete design unique to Pioneer for high-power drivability, low distortion and stable imaging. Checking what the director intended. • Dolby Digital and DTS decoding, including...

Owner's Manual
Page 7
... and stable surface. It can cause batteries to a device that are provided for ventilation to the marks in direct sunlight - Installing the receiver • When installing this unit, make sure the openings are never blocked or covered with items (such as newspapers, table-cloths and curtains...), and do not place anything directly on top of batteries. in the cabinet are very dusty - Loading the batteries 8 inches Receiver (20 cm) Slot and openings in places where there is provided between the unit and walls or other equipment, heat will build up ...
... and stable surface. It can cause batteries to a device that are provided for ventilation to the marks in direct sunlight - Installing the receiver • When installing this unit, make sure the openings are never blocked or covered with items (such as newspapers, table-cloths and curtains...), and do not place anything directly on top of batteries. in the cabinet are very dusty - Loading the batteries 8 inches Receiver (20 cm) Slot and openings in places where there is provided between the unit and walls or other equipment, heat will build up ...
Owner's Manual
Page 8
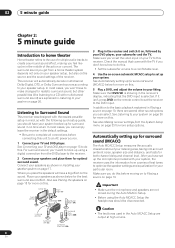
...options you place the speakers will automatically decode multichannel Dolby Digital, DTS, or Dolby Surround sources according to your TV and DVD player. This receiver will have to make changes for more setup options. See Listening to your liking. 02 5 minute guide Chapter 2: 5 minute guide Introduction to... settings and equalization for your speaker system on page 13 to hook up for more on -screen automatic MCACC setup to set the receiver to the receiver. 2 Connect your TV and DVD player on page 17. After you 're in Playing a source on the remote control to ...
...options you place the speakers will automatically decode multichannel Dolby Digital, DTS, or Dolby Surround sources according to your TV and DVD player. This receiver will have to make changes for more setup options. See Listening to your liking. 02 5 minute guide Chapter 2: 5 minute guide Introduction to... settings and equalization for your speaker system on page 13 to hook up for more on -screen automatic MCACC setup to set the receiver to the receiver. 2 Connect your TV and DVD player on page 17. After you 're in Playing a source on the remote control to ...
Owner's Manual
Page 9
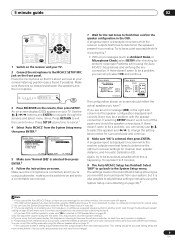
...necessary before continuing to step 6. • If you have .5 If you have connected using the Manual speaker setup on -screen while the receiver outputs test tones to determine the speakers present in your setup. It may be farther than the actual distance from the System Setup menu ...SETUP RETURN TONE TUNING/ STATION TUNER EDIT SPEAKERS MULTI JOG S -VIDEO VIDEO/GAME INPUT VIDEO L AUDIO R DIGITAL IN MCACC SETUP MIC 3 Press RECEIVER on your TV. Make sure the microphone is selected, then press ENTER. If there doesn't seem to be as quiet as Ambient Noise or Microphone...
...necessary before continuing to step 6. • If you have .5 If you have connected using the Manual speaker setup on -screen while the receiver outputs test tones to determine the speakers present in your setup. It may be farther than the actual distance from the System Setup menu ...SETUP RETURN TONE TUNING/ STATION TUNER EDIT SPEAKERS MULTI JOG S -VIDEO VIDEO/GAME INPUT VIDEO L AUDIO R DIGITAL IN MCACC SETUP MIC 3 Press RECEIVER on your TV. Make sure the microphone is selected, then press ENTER. If there doesn't seem to be as quiet as Ambient Noise or Microphone...

Owner's Manual
Page 10
...by switching on the playback component (for example a DVD player), your TV1 and subwoofer (if you have one), then the receiver (press RECEIVER). • Make sure the setup mic is on and we recommend leaving Phase Control switched on for all sound is now... background noise, echo off the walls, obstacles blocking the speakers from the front left/right speakers in achieving proper sound reproduction. In this case, the receiver must be set to a multichannel listening mode (see illustration below). P Front speaker H A S E C O N T O F Sound F source Subwoofer Listening position...
...by switching on the playback component (for example a DVD player), your TV1 and subwoofer (if you have one), then the receiver (press RECEIVER). • Make sure the setup mic is on and we recommend leaving Phase Control switched on for all sound is now... background noise, echo off the walls, obstacles blocking the speakers from the front left/right speakers in achieving proper sound reproduction. In this case, the receiver must be set to a multichannel listening mode (see illustration below). P Front speaker H A S E C O N T O F Sound F source Subwoofer Listening position...
Owner's Manual
Page 11
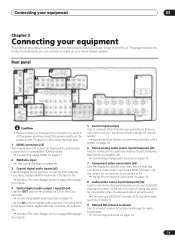
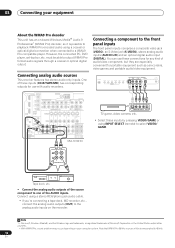
...) (x6) Use for connection to a CD or MiniDisc recorder. Use the output for digital audio sources, including DVD players/ recorders, digital satellite receivers, CD players, etc. Connecting digital audio sources on page 56. 6 Stereo analog audio source inputs/(outputs) (x3) Use for connection to a ...; Before making or changing the connections, switch off the power and disconnect the power cord from a single IR remote sensor. Operating other Pioneer components with many connection possibilities, but it doesn't have to be the final step. 1 HDMI connectors (x3) Two inputs and one ...
...) (x6) Use for connection to a CD or MiniDisc recorder. Use the output for digital audio sources, including DVD players/ recorders, digital satellite receivers, CD players, etc. Connecting digital audio sources on page 56. 6 Stereo analog audio source inputs/(outputs) (x3) Use for connection to a ...; Before making or changing the connections, switch off the power and disconnect the power cord from a single IR remote sensor. Operating other Pioneer components with many connection possibilities, but it doesn't have to be the final step. 1 HDMI connectors (x3) Two inputs and one ...
Owner's Manual
Page 12
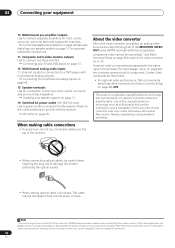
... (HDMI and high-definition progressive component video cannot be converted).1 See Video Converter Setup on page 48 to a DVD player with the receiver. Note 1 You must be damaged if bent around sharp corners. If the video signal does not appear on your TV or plasma display... to power another component in Video Converter Setup on or off with multichannel analog outputs. If several video components are output through all of the receiver. • When connecting optical cables, be converted. Connecting your speaker system on page 17. 14 Switched AC power outlet (100 W/0.8 A max.)...
... (HDMI and high-definition progressive component video cannot be converted).1 See Video Converter Setup on page 48 to a DVD player with the receiver. Note 1 You must be damaged if bent around sharp corners. If the video signal does not appear on your TV or plasma display... to power another component in Video Converter Setup on or off with multichannel analog outputs. If several video components are output through all of the receiver. • When connecting optical cables, be converted. Connecting your speaker system on page 17. 14 Switched AC power outlet (100 W/0.8 A max.)...
Owner's Manual
Page 13
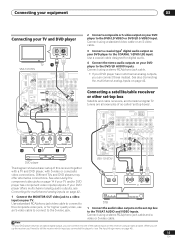
...outputs on the set up the receiver you'll need to tell the receiver which input you connected the player to a video input on your TV. See also Using the component video jacks on page 42. When you set -top box to the S-video jack. TV 1 VSX-1016TXV OPTICAL IN 1 DIGITAL OUT ANTENNA...IN IN OUT IN CD-R/TAPE/MD DVD/LD TV/SAT DVR/VCR1 VSX-1016TXV AM LOOP L OUT P CENTER L IN 3 R SUB R FRONT WOOFER OUT IN MONITOR OUT OUT IN L DVR/VCR2 R FRONT MULTI C The diagram shows a basic setup of this receiver using a stereo RCA/phono jack cable. • If your DVD player...
...outputs on the set up the receiver you'll need to tell the receiver which input you connected the player to a video input on your TV. See also Using the component video jacks on page 42. When you set -top box to the S-video jack. TV 1 VSX-1016TXV OPTICAL IN 1 DIGITAL OUT ANTENNA...IN IN OUT IN CD-R/TAPE/MD DVD/LD TV/SAT DVR/VCR1 VSX-1016TXV AM LOOP L OUT P CENTER L IN 3 R SUB R FRONT WOOFER OUT IN MONITOR OUT OUT IN L DVR/VCR2 R FRONT MULTI C The diagram shows a basic setup of this receiver using a stereo RCA/phono jack cable. • If your DVD player...
Owner's Manual
Page 14
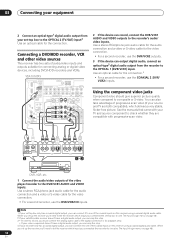
...• If your video component doesn't have a digital audio output, you can connect it to one of the coaxial inputs on this receiver using a coaxial digital audio cable. VSX-1016TXV OPTICAL IN 1 DIGITAL OUT ANTENNA IN 1 IN 2 (DVR/ VCR1) IN 2 (TV/SAT) OUT HDMI IN 3 (CD) ... IN S-VIDEO R AUDIO L AV OUT VIDEO S-VIDEO 12 DVR, VCR, etc. 1 Connect the audio/video outputs of the coaxial inputs on this receiver using a coaxial digital audio cable. 03 Connecting your equipment 2 Connect an optical-type1 digital audio output from the recorder to the OPTICAL 1 (DVR/VCR1...
...• If your video component doesn't have a digital audio output, you can connect it to one of the coaxial inputs on this receiver using a coaxial digital audio cable. VSX-1016TXV OPTICAL IN 1 DIGITAL OUT ANTENNA IN 1 IN 2 (DVR/ VCR1) IN 2 (TV/SAT) OUT HDMI IN 3 (CD) ... IN S-VIDEO R AUDIO L AV OUT VIDEO S-VIDEO 12 DVR, VCR, etc. 1 Connect the audio/video outputs of the coaxial inputs on this receiver using a coaxial digital audio cable. 03 Connecting your equipment 2 Connect an optical-type1 digital audio output from the recorder to the OPTICAL 1 (DVR/VCR1...
Owner's Manual
Page 15
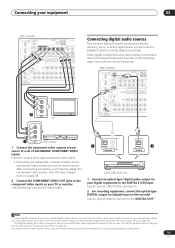
...analog audio sources on the recorder. After connecting everything, you'll need to tell the receiver which component video inputs you use for making digital recordings. Connecting your equipment 03 VSX-1016TXV OPTICAL IN 1 DIGITAL OUT ANTENNA IN 1 IN 2 (DVR/ VCR1) IN 2 ... 2 COMPONENT VIDEO TV Connecting digital audio sources This receiver has both digital inputs and outputs, allowing you to connect digital audio components for playback and for which source. Most digital components also have analog connections. VSX-1016TXV OPTICAL IN 1 DIGITAL OUT ANTENNA IN 1 IN ...
...analog audio sources on the recorder. After connecting everything, you'll need to tell the receiver which component video inputs you use for making digital recordings. Connecting your equipment 03 VSX-1016TXV OPTICAL IN 1 DIGITAL OUT ANTENNA IN 1 IN 2 (DVR/ VCR1) IN 2 ... 2 COMPONENT VIDEO TV Connecting digital audio sources This receiver has both digital inputs and outputs, allowing you to connect digital audio components for playback and for which source. Most digital components also have analog connections. VSX-1016TXV OPTICAL IN 1 DIGITAL OUT ANTENNA IN 1 IN ...
Owner's Manual
Page 16
... L IN 3 R SUB R SUR- FRONT WOOFER ROUND OUT IN MONITOR OUT OUT IN L CENTER DVR/VCR2 R FRONT SUB WOOFER MULTI CH IN VSX-1016TXV VIDEO/AUDIO OUTPUT DIGITAL OUT TV game, video camera, etc. • Select these inputs (CD-R/TAPE/MD) has corresponding outputs for use these connections ...able to 48 kHz. 16 En PHONES SYSTEM SETUP RETURN TONE TUNING/ STATION TUNER EDIT SPEAKERS MULTI JOG S - Connecting analog audio sources This receiver features two stereo audio-only inputs. OUT PLAY IN REC R L AUDIO IN/OUT Tape deck, etc. • Connect the analog audio outputs...
... L IN 3 R SUB R SUR- FRONT WOOFER ROUND OUT IN MONITOR OUT OUT IN L CENTER DVR/VCR2 R FRONT SUB WOOFER MULTI CH IN VSX-1016TXV VIDEO/AUDIO OUTPUT DIGITAL OUT TV game, video camera, etc. • Select these inputs (CD-R/TAPE/MD) has corresponding outputs for use these connections ...able to 48 kHz. 16 En PHONES SYSTEM SETUP RETURN TONE TUNING/ STATION TUNER EDIT SPEAKERS MULTI JOG S - Connecting analog audio sources This receiver features two stereo audio-only inputs. OUT PLAY IN REC R L AUDIO IN/OUT Tape deck, etc. • Connect the analog audio outputs...
Owner's Manual
Page 17
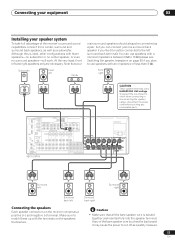
...PR Y PB PR ASSIGNABLE 1 3 S-VIDEO IN IN OUT IN VIDEO OUT IN IN IN OUT IN CD-R/TAPE/MD DVD/LD TV/SAT DVR/VCR1 VSX-1016TXV AM LOOP L OUT PRE OUT CENTER L L (Single) IN 3 R R SUB R SUR- If any uninsulated parts. SURROUND FRONT WOOFER ROUND BACK ... At the very least, front left Surround back right Connecting the speakers Each speaker connection on the receiver comprises a positive (+) and negative (-) terminal. To prevent the risk of the receiver's surround sound capabilities connect front, center, surround and surround back speakers, as well as a pair...
...PR Y PB PR ASSIGNABLE 1 3 S-VIDEO IN IN OUT IN VIDEO OUT IN IN IN OUT IN CD-R/TAPE/MD DVD/LD TV/SAT DVR/VCR1 VSX-1016TXV AM LOOP L OUT PRE OUT CENTER L L (Single) IN 3 R R SUB R SUR- If any uninsulated parts. SURROUND FRONT WOOFER ROUND BACK ... At the very least, front left Surround back right Connecting the speakers Each speaker connection on the receiver comprises a positive (+) and negative (-) terminal. To prevent the risk of the receiver's surround sound capabilities connect front, center, surround and surround back speakers, as well as a pair...

Owner's Manual
Page 20
... the best possible reception, suspend horizontally outdoors. Outdoor antenna Indoor antenna (vinyl-coated wire) Caution • Handle the power cord by the receiver's power switch. ANTENNA FM UNBAL 75 Ω AM LOOP 15 ft. 03 Connecting your hands are not likely to be stepped on the.... • Since a subwoofer or power amplifier can cause a fire or give you have connected all your nearest Pioneer authorized independent service company for a replacement. • The receiver should not be connected to the AC outlet. 20 En Do not place the unit, a piece of equipment should...
... the best possible reception, suspend horizontally outdoors. Outdoor antenna Indoor antenna (vinyl-coated wire) Caution • Handle the power cord by the receiver's power switch. ANTENNA FM UNBAL 75 Ω AM LOOP 15 ft. 03 Connecting your hands are not likely to be stepped on the.... • Since a subwoofer or power amplifier can cause a fire or give you have connected all your nearest Pioneer authorized independent service company for a replacement. • The receiver should not be connected to the AC outlet. 20 En Do not place the unit, a piece of equipment should...
Owner's Manual
Page 21
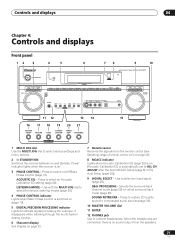
...for example, it disappears when listening through the multichannel analog inputs). 6 Character display See Display on page 23. 7 Remote sensor Receives the signals from the speakers. 21 En ACOUSTIC EQ - When the headphones are connected, there is no sound output from the ...PHASE CONTROL - Controls and displays 04 Chapter 4: Controls and displays Front panel 12 3 4 5 6 78 9 10 AUDIO/VIDEO MULTI-CHANNEL RECEIVER VSX-1016TXV STANDBY/ON PHASE CONTROL PHASE ACOUSTIC LISTENING CONTROL EQ MODE MULTI JOG DIGITAL PRECISION PROCESSING DVD / LD TV /SAT DVR /VCR1 DVR / ...
...for example, it disappears when listening through the multichannel analog inputs). 6 Character display See Display on page 23. 7 Remote sensor Receives the signals from the speakers. 21 En ACOUSTIC EQ - When the headphones are connected, there is no sound output from the ...PHASE CONTROL - Controls and displays 04 Chapter 4: Controls and displays Front panel 12 3 4 5 6 78 9 10 AUDIO/VIDEO MULTI-CHANNEL RECEIVER VSX-1016TXV STANDBY/ON PHASE CONTROL PHASE ACOUSTIC LISTENING CONTROL EQ MODE MULTI JOG DIGITAL PRECISION PROCESSING DVD / LD TV /SAT DVR /VCR1 DVR / ...

Owner's Manual
Page 22
... sensor. • Direct sunlight or fluorescent light is shining onto the remote sensor. • The receiver is located near a device that is emitting infrared rays. • The receiver is operated simultaneously with the MULTI JOG dial to memorize and name stations for recall (page 31). 21 SPEAKERS Use to change the speaker...
... sensor. • Direct sunlight or fluorescent light is shining onto the remote sensor. • The receiver is located near a device that is emitting infrared rays. • The receiver is operated simultaneously with the MULTI JOG dial to memorize and name stations for recall (page 31). 21 SPEAKERS Use to change the speaker...

Owner's Manual
Page 23
... Left surround channel S - Lights when a broadcast is in stereo on (see Listening in surround sound on page 26). 12 SLEEP Lights when the receiver is being received in digital sources. Center channel R - Right surround back channel LFE - Lights when the mono mode is selected. Lights when a Home THX mode... DTS SL S SR WMA9 Pro 96/24 SBL SB SBR LFE VIDEO CONV. When one of the Neo:6 modes of an analog source is being received. This lights to the active sound processing feature. 8 TUNER indicators TUNED - Neo:6 - Surround channel (mono) SR - MONO - Left front channel C - ...
... Left surround channel S - Lights when a broadcast is in stereo on (see Listening in surround sound on page 26). 12 SLEEP Lights when the receiver is being received in digital sources. Center channel R - Right surround back channel LFE - Lights when the mono mode is selected. Lights when a Home THX mode... DTS SL S SR WMA9 Pro 96/24 SBL SB SBR LFE VIDEO CONV. When one of the Neo:6 modes of an analog source is being received. This lights to the active sound processing feature. 8 TUNER indicators TUNED - Neo:6 - Surround channel (mono) SR - MONO - Left front channel C - ...


