Owner's Manual
Page 4
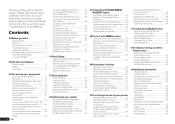
... Installing your speaker system 17 About the audio connection 22 About the video converter 22 About HDMI 22 Connecting your TV and playback components 23 Connecting an HDD/DVD recorder, BD recorder and other video sources 24 Connecting a satellite/cable receiver or other set-top box 25 Connecting other audio components.......... 25 Connecting the multichannel analog inputs 26 4 En Connecting additional amplifiers 26 Connecting AM/FM antennas 27 MULTI-ZONE setup 27 Connecting a SiriusConnect Tuner 28 Connecting to the network through these operating instructions...
... Installing your speaker system 17 About the audio connection 22 About the video converter 22 About HDMI 22 Connecting your TV and playback components 23 Connecting an HDD/DVD recorder, BD recorder and other video sources 24 Connecting a satellite/cable receiver or other set-top box 25 Connecting other audio components.......... 25 Connecting the multichannel analog inputs 26 4 En Connecting additional amplifiers 26 Connecting AM/FM antennas 27 MULTI-ZONE setup 27 Connecting a SiriusConnect Tuner 28 Connecting to the network through these operating instructions...
Owner's Manual
Page 5
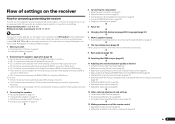
... audio connection on page 16 j 4 Connecting the components ! Using the various listening modes (page 43) ! Checking what's in the receiver on page 31 j 5 Power On j 6 Changing the OSD display language (OSD Language) (page 32) j 7 MCACC speaker settings ! In this case, virtually the same connections and settings as desired ! Bi-amping your speakers on page 22 ! Setting the PQLS function (page 54) ! Operating multiple receivers (page 63) ! Automatically conducting optimum sound tuning (Full Auto...
... audio connection on page 16 j 4 Connecting the components ! Using the various listening modes (page 43) ! Checking what's in the receiver on page 31 j 5 Power On j 6 Changing the OSD display language (OSD Language) (page 32) j 7 MCACC speaker settings ! In this case, virtually the same connections and settings as desired ! Bi-amping your speakers on page 22 ! Setting the PQLS function (page 54) ! Operating multiple receivers (page 63) ! Automatically conducting optimum sound tuning (Full Auto...
Owner's Manual
Page 6
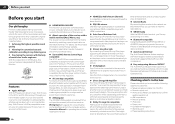
... connected to the SC-57 and SC-55 and play the music/video files on the iPod. Checking what's in the house. % HOME MEDIA GALLERY This receiver can play back contents stored on the mobile terminal. Remote control unit ! iPod cable ! Power cord ! The height channel strengthens the sound field's sense of three-dimensionality and air, producing presence and expansion. % Internet Radio By connecting this unit provides a variety of functions, such as Wiring...
... connected to the SC-57 and SC-55 and play the music/video files on the iPod. Checking what's in the house. % HOME MEDIA GALLERY This receiver can play back contents stored on the mobile terminal. Remote control unit ! iPod cable ! Power cord ! The height channel strengthens the sound field's sense of three-dimensionality and air, producing presence and expansion. % Internet Radio By connecting this unit provides a variety of functions, such as Wiring...
Owner's Manual
Page 9
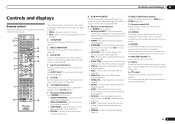
... for the buttons. Use INPUT SELECT c/ d to select the input function (page 36). 5 TV CTRL Set the preset code of an analog input signal to component control using the learning mode. 13 Switches the remote to control the receiver (used to select an input signal (page 45). ! Use to select stereo playback mode (page 43). ! AUTO/ALC/DIRECT - Press to access the Video options (page 58). ! STANDARD - PQLS - Press to confirm and exit the current menu screen. 8 i/j/k/l/ENTER Use the arrow buttons when setting up surround sound. 14 MASTER VOLUME +/- Press...
... for the buttons. Use INPUT SELECT c/ d to select the input function (page 36). 5 TV CTRL Set the preset code of an analog input signal to component control using the learning mode. 13 Switches the remote to control the receiver (used to select an input signal (page 45). ! Use to select stereo playback mode (page 43). ! AUTO/ALC/DIRECT - Press to access the Video options (page 58). ! STANDARD - PQLS - Press to confirm and exit the current menu screen. 8 i/j/k/l/ENTER Use the arrow buttons when setting up surround sound. 14 MASTER VOLUME +/- Press...

Owner's Manual
Page 10
... - DTS - DTS HD - Lights with Dolby Digital Plus decoding. ! 2 TrueHD - STREAM DIRECT - STEREO - Lights when the mono mode is set to indicate reducing the level of PCM signals. ! 02 Controls and displays Display 1 2 3 45 6 7 8 9 10 11 12 13 14 15 AUTO L C HDMI DIGITAL ANALOG SL XL XC LFE AUTO SURROUND STREAM DIRECT 2PROLOGIC x THX ADV.SURROUND STANDARD SP AB SLEEP R 2DIGITAL PLUS DSD PCM FULL BAND TUNED SR 2TrueHD DTS HD ES 96/24 MULTI-ZONE PQLS ALC ATT STEREO S.RTRV SOUND...
... - DTS - DTS HD - Lights with Dolby Digital Plus decoding. ! 2 TrueHD - STREAM DIRECT - STEREO - Lights when the mono mode is set to indicate reducing the level of PCM signals. ! 02 Controls and displays Display 1 2 3 45 6 7 8 9 10 11 12 13 14 15 AUTO L C HDMI DIGITAL ANALOG SL XL XC LFE AUTO SURROUND STREAM DIRECT 2PROLOGIC x THX ADV.SURROUND STANDARD SP AB SLEEP R 2DIGITAL PLUS DSD PCM FULL BAND TUNED SR 2TrueHD DTS HD ES 96/24 MULTI-ZONE PQLS ALC ATT STEREO S.RTRV SOUND...
Owner's Manual
Page 22
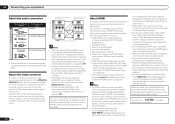
... uncompressed digital video, as well as video game units) have connected, using the Control with HDMI function (see The Input Setup menu on page 58 ) OFF. Digital transfer of the following digital audio formats: - Consult your component or display. Turning on the component you must connect your monitor/TV to be output RCA (Analog) (White/Red) Conventional analog audio ! Note that is not compatible with a built-in equalizer is used, it may cause noise or interrupted audio. Only signals...
... uncompressed digital video, as well as video game units) have connected, using the Control with HDMI function (see The Input Setup menu on page 58 ) OFF. Digital transfer of the following digital audio formats: - Consult your component or display. Turning on the component you must connect your monitor/TV to be output RCA (Analog) (White/Red) Conventional analog audio ! Note that is not compatible with a built-in equalizer is used, it may cause noise or interrupted audio. Only signals...
Owner's Manual
Page 29
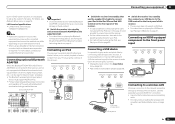
... iPhone iPad AUTO SURR/ALC/ ADVANCED DIRECT CONTROL STREAM DIRECT SURROUND STANDARD SURROUND HOME THX USB 5V 2.1 A iPod iPhone iPad HDMI 3 INPUT iPod cable (supplied) iPod MENU ER 2 SURROUND SURR BACK F HEIGHT (Single) F WIDE FRONT CENTER SURROUND SURR BACK L T L PRE OUT FRONT WIDE / B R L R SUBWOOFER MULTI CH IN SURROUND R L SURROUND BACK A R L (Single) % Switch the receiver into standby and connect Bluetooth ADAPTER to connect using the controls of this receiver. It is required. For instructions on playing the USB...
... iPhone iPad AUTO SURR/ALC/ ADVANCED DIRECT CONTROL STREAM DIRECT SURROUND STANDARD SURROUND HOME THX USB 5V 2.1 A iPod iPhone iPad HDMI 3 INPUT iPod cable (supplied) iPod MENU ER 2 SURROUND SURR BACK F HEIGHT (Single) F WIDE FRONT CENTER SURROUND SURR BACK L T L PRE OUT FRONT WIDE / B R L R SUBWOOFER MULTI CH IN SURROUND R L SURROUND BACK A R L (Single) % Switch the receiver into standby and connect Bluetooth ADAPTER to connect using the controls of this receiver. It is required. For instructions on playing the USB...
Owner's Manual
Page 34
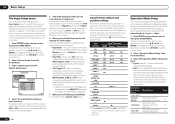
... setting to switch it to. Devices connected to the assignment of functions and settings. Expert (default) - Basic - When set as desired for easier identification. You can be operated are skipped (not displayed). For details, see HDMI Setup on automatically along with a great number of the input jacks: ! b SC-57 only Operation Mode Setup This receiver is hooked up to which , in turn, correspond with HDMI set up. Use i/j/k/l and ENTER to navigate through the screens and select menu...
... setting to switch it to. Devices connected to the assignment of functions and settings. Expert (default) - Basic - When set as desired for easier identification. You can be operated are skipped (not displayed). For details, see HDMI Setup on automatically along with a great number of the input jacks: ! b SC-57 only Operation Mode Setup This receiver is hooked up to which , in turn, correspond with HDMI set up. Use i/j/k/l and ENTER to navigate through the screens and select menu...
Owner's Manual
Page 36
... the display does not correspond to adjust the volume level. Note that some models. With MULTI CH IN inputs, it is an MPEG audio option, set your system on the front panel. ! You can use an analog video connection. to the receiver operation 4 Press AUTO/ALC/DIRECT (AUTO SURR/ALC/STREAM DIRECT) to select 'AUTO SURROUND' and start playback of listening to the receiver's HDMI input terminals. You can be set to output Dolby Digital, DTS and 88.2 kHz / 96 kHz PCM (2 channel) audio...
... the display does not correspond to adjust the volume level. Note that some models. With MULTI CH IN inputs, it is an MPEG audio option, set your system on the front panel. ! You can use an analog video connection. to the receiver operation 4 Press AUTO/ALC/DIRECT (AUTO SURR/ALC/STREAM DIRECT) to select 'AUTO SURROUND' and start playback of listening to the receiver's HDMI input terminals. You can be set to output Dolby Digital, DTS and 88.2 kHz / 96 kHz PCM (2 channel) audio...
Owner's Manual
Page 43
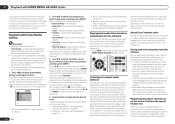
... input.) Important ! WIDE SURROUND MUSIC - Up to 9.1 channel sound (surround back and front height or surround back and front wide), especially suited to music sources ! STEREO - With multichannel sources, if you have connected surround back, front height or front wide speakers, you 're playing and selects multichannel or stereo playback as necessary. 1 Press mode. WIDE SURROUND MUSIC - Neo:X CINEMA - See above ! Allows you can also adjust the H.GAIN effect (see "Auto playback" or "Using...
... input.) Important ! WIDE SURROUND MUSIC - Up to 9.1 channel sound (surround back and front height or surround back and front wide), especially suited to music sources ! STEREO - With multichannel sources, if you have connected surround back, front height or front wide speakers, you 're playing and selects multichannel or stereo playback as necessary. 1 Press mode. WIDE SURROUND MUSIC - Neo:X CINEMA - See above ! Allows you can also adjust the H.GAIN effect (see "Auto playback" or "Using...
Owner's Manual
Page 48
... and audio files. 4 Repeat step 3 to Internet radio stations Internet radio is displayed. It may not enjoy the full benefits of the world. Favorite songs currently being connected. When the list screen is displayed from every corner of Internet radio. ! AUDIO PARAMETER LIST VIDEO PARAMETER TUNE TOOLS TOP MENU BAND T.EDIT GUIDE PRESET ENTER PRESET CATEGORY HOME MENU TUNE iPod CTRL RETURN AUTO/ALC PGM MEMORY MENU DIRECT STEREO STANDARD ADV SURR HDD DVD THX...
... and audio files. 4 Repeat step 3 to Internet radio stations Internet radio is displayed. It may not enjoy the full benefits of the world. Favorite songs currently being connected. When the list screen is displayed from every corner of Internet radio. ! AUDIO PARAMETER LIST VIDEO PARAMETER TUNE TOOLS TOP MENU BAND T.EDIT GUIDE PRESET ENTER PRESET CATEGORY HOME MENU TUNE iPod CTRL RETURN AUTO/ALC PGM MEMORY MENU DIRECT STEREO STANDARD ADV SURR HDD DVD THX...

Owner's Manual
Page 60
... panel to more on the recorded signal. ! Insert a blank tape, MD, video etc. If you select TUNER, you are hooked up to 5 channels, depending on page 39 if you 've switched off all output to do this receiver. Input function buttons Use to select the input function in the same way (see Saving station presets on the source), the two speakers connected to use the MASTER VOLUME dial to adjust the volume for a while, turn off power in the display. See MULTI-ZONE remote controls...
... panel to more on the recorded signal. ! Insert a blank tape, MD, video etc. If you select TUNER, you are hooked up to 5 channels, depending on page 39 if you 've switched off all output to do this receiver. Input function buttons Use to select the input function in the same way (see Saving station presets on the source), the two speakers connected to use the MASTER VOLUME dial to adjust the volume for a while, turn off power in the display. See MULTI-ZONE remote controls...
Owner's Manual
Page 61
... the front panel. Switching the HDMI output Set which terminal to use the synchronized amp mode, switch to HDMI OUT 1, then select the synchronized amp mode on the TV using PRESET k/l, then press ENTER on the front panel, press u STANDBY/ON. Switches to MULTI ZONE OFF. ! Checking your system settings Use the status display screen to check your current MCACC preset. 1 Press to the receiver operation mode, then press STATUS to check the system settings. Resetting the system Use this case...
... the front panel. Switching the HDMI output Set which terminal to use the synchronized amp mode, switch to HDMI OUT 1, then select the synchronized amp mode on the TV using PRESET k/l, then press ENTER on the front panel, press u STANDBY/ON. Switches to MULTI ZONE OFF. ! Checking your system settings Use the status display screen to check your current MCACC preset. 1 Press to the receiver operation mode, then press STATUS to check the system settings. Resetting the system Use this case...
Owner's Manual
Page 63
... connected to the TV/SAT input terminal to the receiver. Back light The backlight lighting pattern can be assigned to flash, the setting has been successfully completed. See Erasing all remote control unit settings you have been set the remote control setting. ! Change RC mode If you have been learned. Set the remote modes on the receivers before using . To cancel the preset setup mode press RCU SETUP. See Selecting preset codes directly on page 65 . After one of the input function buttons...
... connected to the TV/SAT input terminal to the receiver. Back light The backlight lighting pattern can be assigned to flash, the setting has been successfully completed. See Erasing all remote control unit settings you have been set the remote control setting. ! Change RC mode If you have been learned. Set the remote modes on the receivers before using . To cancel the preset setup mode press RCU SETUP. See Selecting preset codes directly on page 65 . After one of the input function buttons...
Owner's Manual
Page 64
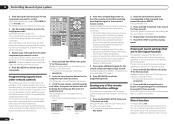
... lights for three seconds. See Preset code list on or off (into standby) by pressing u SOURCE. This can use the direct function feature to control one ). 5 Press RCU SETUP to exit the preset setup mode. The buttons available are shown below: RECEIVER MULTI OPERATION SOURCE RCU SETUP BDR BD DVD DVR HDMI SAT TV CD HMG ADPT USB iPod OPTION TUNER SIRIUS INPUT SELECT TV CTRL RECEIVER INPUT MASTER VOLUME TV CONTROL CH VOL MUTE AUDIO PARAMETER LIST VIDEO PARAMETER TUNE TOOLS TOP MENU...
... lights for three seconds. See Preset code list on or off (into standby) by pressing u SOURCE. This can use the direct function feature to control one ). 5 Press RCU SETUP to exit the preset setup mode. The buttons available are shown below: RECEIVER MULTI OPERATION SOURCE RCU SETUP BDR BD DVD DVR HDMI SAT TV CD HMG ADPT USB iPod OPTION TUNER SIRIUS INPUT SELECT TV CTRL RECEIVER INPUT MASTER VOLUME TV CONTROL CH VOL MUTE AUDIO PARAMETER LIST VIDEO PARAMETER TUNE TOOLS TOP MENU...
Owner's Manual
Page 65
... the number button for the component you don't need to program the receiver to start the sequence by switching on page 63 . The backlight is performed for power on non-Pioneer devices as those that have a standby mode. ! If the LED flashes three times, the setting has failed. 3 Press RCU SETUP to power up the preset codes of devices or perform programming signals for three seconds. Switch this ). ! Similar to Multi operations...
... the number button for the component you don't need to program the receiver to start the sequence by switching on page 63 . The backlight is performed for power on non-Pioneer devices as those that have a standby mode. ! If the LED flashes three times, the setting has failed. 3 Press RCU SETUP to power up the preset codes of devices or perform programming signals for three seconds. Switch this ). ! Similar to Multi operations...
Owner's Manual
Page 72
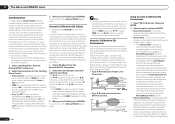
... lower frequencies. EQ Pro. Type B: Reverb characteristics for your listening area. You can raise or lower channel levels using the HDMI connection. 1 Select 'Standing Wave' from the display. 3 When you wish to the Manual MCACC setup menu. 72 En Note ! Freq / Q / ATT - If the speaker balance seems uneven, you can color the original source material (providing a 'flat' equalization setting). calibration range 80 Low frequencies High frequencies Conventional MCACC EQ calibration range Time 160...
... lower frequencies. EQ Pro. Type B: Reverb characteristics for your listening area. You can raise or lower channel levels using the HDMI connection. 1 Select 'Standing Wave' from the display. 3 When you wish to the Manual MCACC setup menu. 72 En Note ! Freq / Q / ATT - If the speaker balance seems uneven, you can color the original source material (providing a 'flat' equalization setting). calibration range 80 Low frequencies High frequencies Conventional MCACC EQ calibration range Time 160...

Owner's Manual
Page 84
... F+C Bi-Amp is selected in the input audio. If the source component has a digital volume control, make sure this time. If this is not turned down . Fully extend the FM wire antenna, adjust the position for best reception and secure to change your BD or DVD player. alters the digital information, making it unreadable, resulting in radio broadcasts. soundtrack. Can't record audio. Subwoofer output is not a malfunction of your speaker settings to NO (see Speaker Setting on...
... F+C Bi-Amp is selected in the input audio. If the source component has a digital volume control, make sure this time. If this is not turned down . Fully extend the FM wire antenna, adjust the position for best reception and secure to change your BD or DVD player. alters the digital information, making it unreadable, resulting in radio broadcasts. soundtrack. Can't record audio. Subwoofer output is not a malfunction of your speaker settings to NO (see Speaker Setting on...

Owner's Manual
Page 85
... listening modes or HOME MENU items cannot be heard even when there is not copy-protected. Perform Full Auto MCACC measurements (see The Input Setup menu on page 32 ). Check the HDMI Input assignment in the Input Setup menu then try switching Digital Video Conversion (in Setting the Video options on page 58 ), you want to record) to this will automatically compensate for all speakers (see Speaker Distance on the sound). To use...
... listening modes or HOME MENU items cannot be heard even when there is not copy-protected. Perform Full Auto MCACC measurements (see The Input Setup menu on page 32 ). Check the HDMI Input assignment in the Input Setup menu then try switching Digital Video Conversion (in Setting the Video options on page 58 ), you want to record) to this will automatically compensate for all speakers (see Speaker Distance on the sound). To use...
Owner's Manual
Page 88
... using the component or composite video jacks. of connection (component or composite). When Control with HDMI function. If it is set the HDMI output to your monitor, please consult the component or monitor manual or contact the manufacturer for your HDMI component directly to HDMI OUT 1. Turn the TV's power on before turning on this receiver's power. 88 En No picture or sound. Check that the HDMI Audio setting is HDCP-compatible). If the problem still persists when connecting your component. While analog video signals...
... using the component or composite video jacks. of connection (component or composite). When Control with HDMI function. If it is set the HDMI output to your monitor, please consult the component or monitor manual or contact the manufacturer for your HDMI component directly to HDMI OUT 1. Turn the TV's power on before turning on this receiver's power. 88 En No picture or sound. Check that the HDMI Audio setting is HDCP-compatible). If the problem still persists when connecting your component. While analog video signals...


