Owner's Manual
Page 2
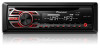
..., without distortion. ! Do not allow this product. Section 01 Before you start Before you start Thank you for purchasing this PIONEER product To ensure proper use, please read through clearly without annoying blaring or distortion and, most out of Your Ears is illegal...is disconnected or discharged, any interference received, including interference that to which can radiate radio frequency energy and, if not installed and used in a residential installation. If this equipment does cause harmful interference to correct the interference by one or more of sound, so what 's ...
..., without distortion. ! Do not allow this product. Section 01 Before you start Before you start Thank you for purchasing this PIONEER product To ensure proper use, please read through clearly without annoying blaring or distortion and, most out of Your Ears is illegal...is disconnected or discharged, any interference received, including interference that to which can radiate radio frequency energy and, if not installed and used in a residential installation. If this equipment does cause harmful interference to correct the interference by one or more of sound, so what 's ...
Owner's Manual
Page 4
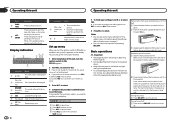
...you need to turn the unit on the front panel. 2 Press the right side of this unit, turn the ignition switch to ON after installation, set up menu by pressing SRC/OFF. Notes ! Re-attaching the front panel 1 Slide the front panel to confirm the selection. Section... to control functions. While in a protection device such as a protection case. Sub information is on. 4 Complete the procedure outlined below . 1 After installation of the front panel until the unit turns off 1 Press and hold SRC/OFF until it is being operated. to select. to adjust minute. 4 ...
...you need to turn the unit on the front panel. 2 Press the right side of this unit, turn the ignition switch to ON after installation, set up menu by pressing SRC/OFF. Notes ! Re-attaching the front panel 1 Slide the front panel to confirm the selection. Section... to control functions. While in a protection device such as a protection case. Sub information is on. 4 Complete the procedure outlined below . 1 After installation of the front panel until the unit turns off 1 Press and hold SRC/OFF until it is being operated. to select. to adjust minute. 4 ...
Owner's Manual
Page 5
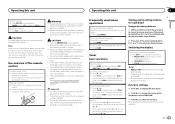
... not be exposed to the previous list (the folder one CR2025 (3 V) lithium battery. ! If the battery leaks, wipe the remote control completely clean and install a new battery. ! special handling may become jammed under the brake or accelerator pedal. See www.dtsc.ca.gov/hazardouswaste/ perchlorate. (Applicable to select the function. ...
... not be exposed to the previous list (the folder one CR2025 (3 V) lithium battery. ! If the battery leaks, wipe the remote control completely clean and install a new battery. ! special handling may become jammed under the brake or accelerator pedal. See www.dtsc.ca.gov/hazardouswaste/ perchlorate. (Applicable to select the function. ...
Owner's Manual
Page 9
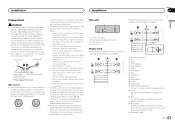
.... - Wrap adhesive tape around wiring that the ground wire is equipped with insulating tape. - Use a fuse of the battery before installation. - When this unit or power amp (sold separately), make sure to metal parts of this unit with a 12-volt battery and... constant 12 V supply terminal. Never cut the insulation of the power cable of this cable to the terminal that detects operation of smoke or malfunction. Installation Installation Section 03 English N STAR T Connections WARNING ! Use speakers over 50 W (output value) and between 4 W to a...
.... - Wrap adhesive tape around wiring that the ground wire is equipped with insulating tape. - Use a fuse of the battery before installation. - When this unit or power amp (sold separately), make sure to metal parts of this unit with a 12-volt battery and... constant 12 V supply terminal. Never cut the insulation of the power cable of this cable to the terminal that detects operation of smoke or malfunction. Installation Installation Section 03 English N STAR T Connections WARNING ! Use speakers over 50 W (output value) and between 4 W to a...
Owner's Manual
Page 10
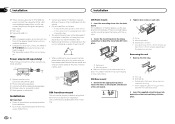
...) 3 Connect with the notched tab down. 2 Insert the supplied extraction keys into both sides of the unit match. 1 Trim ring 2 Notched tab ! For installation in place. Do not connect anything to bend the metal tabs (90°) into place. 1 2 Tighten two screws on the bracket screw holes. Change the... the rear panel and wrap any loose cables so they click into place. 10 En k Not used. l Subwoofer (4 W)× 2 Notes ! Do not install this unit. The semiconductor laser will be sure to connect the subwoofer to the violet and violet/black leads of holes or other malfunctions. Do...
...) 3 Connect with the notched tab down. 2 Insert the supplied extraction keys into both sides of the unit match. 1 Trim ring 2 Notched tab ! For installation in place. Do not connect anything to bend the metal tabs (90°) into place. 1 2 Tighten two screws on the bracket screw holes. Change the... the rear panel and wrap any loose cables so they click into place. 10 En k Not used. l Subwoofer (4 W)× 2 Notes ! Do not install this unit. The semiconductor laser will be sure to connect the subwoofer to the violet and violet/black leads of holes or other malfunctions. Do...
Owner's Manual
Page 11
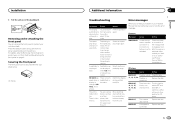
... change when another folder or track is being selected or during fast forwarding/reversing. Check the speak- If connection is no embedded text information. ized Pioneer Service Station for example). switch OFF and chanical error. ERROR-15 The inserted disc is not played back. En 11 English For details, refer to... is Replace the disc. There is changed (NO TITLE, for assistance. pro- Common Message Cause Action AMP ERROR Unit fails to a differ- Replace the disc. Installation 3 Pull the unit out of the dashboard. back ON, or switch to op-
... change when another folder or track is being selected or during fast forwarding/reversing. Check the speak- If connection is no embedded text information. ized Pioneer Service Station for example). switch OFF and chanical error. ERROR-15 The inserted disc is not played back. En 11 English For details, refer to... is Replace the disc. There is changed (NO TITLE, for assistance. pro- Common Message Cause Action AMP ERROR Unit fails to a differ- Replace the disc. Installation 3 Pull the unit out of the dashboard. back ON, or switch to op-


