Owner's Manual
Page 7
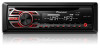
...to the previous display. ! POWERFUL-NATURAL-VOCAL-CUSTOM1-CUSTOM2-FLAT-SUPER BASS The equalizer band and equalizer level can be adjusted with a subwoofer output which remains unchanged. ! to return to display the setting mode. 2 Turn M.C. CUSTOM2 is selected in volume when switching between ...bal- When selecting FM as the level is equipped with this unit Section 02 ! ance. to -6 ! Settings are outputted from the subwoofer output frequency range to SLA. 1 Press M.C. Equalizer band: 80HZ-250HZ-800HZ- 2.5KHZ-8KHZ Equalizer level: +6 to display the setting...
...to the previous display. ! POWERFUL-NATURAL-VOCAL-CUSTOM1-CUSTOM2-FLAT-SUPER BASS The equalizer band and equalizer level can be adjusted with a subwoofer output which remains unchanged. ! to return to display the setting mode. 2 Turn M.C. CUSTOM2 is selected in volume when switching between ...bal- When selecting FM as the level is equipped with this unit Section 02 ! ance. to -6 ! Settings are outputted from the subwoofer output frequency range to SLA. 1 Press M.C. Equalizer band: 80HZ-250HZ-800HZ- 2.5KHZ-8KHZ Equalizer level: +6 to display the setting...

Owner's Manual
Page 8
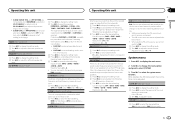
... ILLUMI and press to display the main menu. 2 Turn M.C. to display the main menu. 2 Turn M.C. Select when there is a subwoofer connected directly to change the dimmer setting by pressing and holding /DIMMER. to select the desired setting. to the rear speaker leads output without... refer to select INITIAL. 4 Turn M.C. Switching the display Selecting the desired text information 1 Press DISP to connect a full-range speaker or subwoofer. SUB.W/SUB.W - to select the desired setting. to select the initial menu function. to select. 4 Turn M.C. Initial menu 1 Press ...
... ILLUMI and press to display the main menu. 2 Turn M.C. to display the main menu. 2 Turn M.C. Select when there is a subwoofer connected directly to change the dimmer setting by pressing and holding /DIMMER. to select the desired setting. to the rear speaker leads output without... refer to select INITIAL. 4 Turn M.C. Switching the display Selecting the desired text information 1 Press DISP to connect a full-range speaker or subwoofer. SUB.W/SUB.W - to select the desired setting. to select the initial menu function. to select. 4 Turn M.C. Initial menu 1 Press ...
Owner's Manual
Page 9
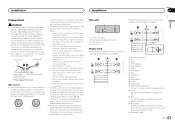
...! This unit 1 2 34 1 Power cord input 2 Rear output or subwoofer output 3 Antenna input 4 Fuse (10 A) Power cord Perform these connections when using a subwoofer without an ACC (accessory) position on , control signals are sent through the hole to a subwoofer. Use speakers over 50 W (output value) and between 4 W to ground...- Never cut the insulation of the power cable of this unit with other device must be sure to connect the ground wire first. i Subwoofer (4 W) En 9 Place all cables away from hot places, such as the shift lever and seat rails. - Use this unit or any...
...! This unit 1 2 34 1 Power cord input 2 Rear output or subwoofer output 3 Antenna input 4 Fuse (10 A) Power cord Perform these connections when using a subwoofer without an ACC (accessory) position on , control signals are sent through the hole to a subwoofer. Use speakers over 50 W (output value) and between 4 W to ground...- Never cut the insulation of the power cable of this unit with other device must be sure to connect the ground wire first. i Subwoofer (4 W) En 9 Place all cables away from hot places, such as the shift lever and seat rails. - Use this unit or any...
Owner's Manual
Page 10
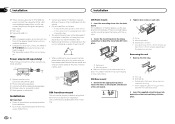
... to Blue/white cable. 2 Power amp (sold separately) 3 Connect with RCA cables (sold separately) 4 To Rear output or subwoofer output 5 Rear speaker or subwoofer Installation Important ! it may cause injury to the trim ring. ! The semiconductor laser will be damaged if it may cause malfunctions.... installation may cause skipping or other modifications to the violet and violet/black leads of 70 W (2 W), be properly installed using a subwoofer of this may interfere with the notched tab down. 2 Insert the supplied extraction keys into place. 10 En Releasing the front panel ...
... to Blue/white cable. 2 Power amp (sold separately) 3 Connect with RCA cables (sold separately) 4 To Rear output or subwoofer output 5 Rear speaker or subwoofer Installation Important ! it may cause injury to the trim ring. ! The semiconductor laser will be damaged if it may cause malfunctions.... installation may cause skipping or other modifications to the violet and violet/black leads of 70 W (2 W), be properly installed using a subwoofer of this may interfere with the notched tab down. 2 Insert the supplied extraction keys into place. 10 En Releasing the front panel ...
Owner's Manual
Page 13
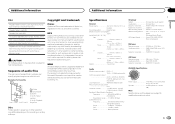
...: up to 99 Playable files: up to modifications without a license from the original recording, compressed audio discs play with this product only conveys a license for subwoofer) Continuous power output 22 W × 4 (50 Hz to 15 000 Hz, 5 % THD, 4 W load, both channels driven) Load impedance 4 W (4 W to 8 W allowable) Preout ...-30 dB) Equalizer (5-Band Graphic Equalizer): Frequency 80 Hz/250 Hz/800 Hz/ 2.5 kHz/8 kHz Equalization range .... ±12 dB (2 dB step) Subwoofer (mono): Frequency 50 Hz/63 Hz/80 Hz/100 Hz/ 125 Hz/160 Hz/200 Hz Slope 6 dB/oct, -12 dB/oct Gain 6 dB to...
...: up to 99 Playable files: up to modifications without a license from the original recording, compressed audio discs play with this product only conveys a license for subwoofer) Continuous power output 22 W × 4 (50 Hz to 15 000 Hz, 5 % THD, 4 W load, both channels driven) Load impedance 4 W (4 W to 8 W allowable) Preout ...-30 dB) Equalizer (5-Band Graphic Equalizer): Frequency 80 Hz/250 Hz/800 Hz/ 2.5 kHz/8 kHz Equalization range .... ±12 dB (2 dB step) Subwoofer (mono): Frequency 50 Hz/63 Hz/80 Hz/100 Hz/ 125 Hz/160 Hz/200 Hz Slope 6 dB/oct, -12 dB/oct Gain 6 dB to...


