Owner's Manual
Page 2
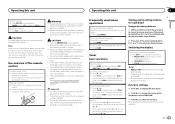
... by turning the equipment off and on this unit, smoke, and overheating could result. Note Function setting operations are confirmed. Reorient or relocate the receiving antenna. - WARNING Handling the cord on , the user is connected. - Do not use headphones while operating a motorized vehicle; Note This equipment has been tested and found to comply with Part 15 of your hearing "comfort level" adapts to higher volumes of...
... by turning the equipment off and on this unit, smoke, and overheating could result. Note Function setting operations are confirmed. Reorient or relocate the receiving antenna. - WARNING Handling the cord on , the user is connected. - Do not use headphones while operating a motorized vehicle; Note This equipment has been tested and found to comply with Part 15 of your hearing "comfort level" adapts to higher volumes of...
Owner's Manual
Page 3
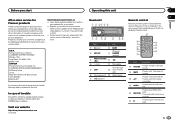
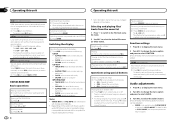
Learn about product updates and to turn dimmer on the unit operate in Canada Head unit 1 2 34 5 6 78 9a b cd Part Part 1 h (eject) 8 BAND 2 SRC/OFF (back)/ 9 DIMMER (dimmer) 3 MULTI-CONTROL a (M.C.) c/d 4 (list) b 1/ to select an audio function. Pioneer Electronics (USA) Inc. e a f 8 l k g h 2 i j Part Operation e VOLUME Press to mute. f MUTE Press to increase or decrease volume. DISP/SCRL Press and hold to safeguard purchase details in our files in the event of button name. Register your product...
Learn about product updates and to turn dimmer on the unit operate in Canada Head unit 1 2 34 5 6 78 9a b cd Part Part 1 h (eject) 8 BAND 2 SRC/OFF (back)/ 9 DIMMER (dimmer) 3 MULTI-CONTROL a (M.C.) c/d 4 (list) b 1/ to select an audio function. Pioneer Electronics (USA) Inc. e a f 8 l k g h 2 i j Part Operation e VOLUME Press to mute. f MUTE Press to increase or decrease volume. DISP/SCRL Press and hold to safeguard purchase details in our files in the event of button name. Register your product...
Owner's Manual
Page 4
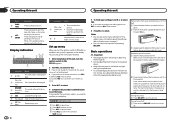
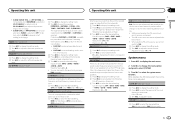
... switch to protect your settings, turn M.C. CLOCK SET (setting the clock) 1 Turn M.C. to turn M.C. You can cancel set up in the operating menu, press to control functions. Handle gently when removing or attaching the front panel. ! To avoid damaging the device or vehicle inte- Turning the unit on the display. Press to select. While in the set up menu. 3 Press M.C. Display indication 1 2 3 456 7 8 Indicator State 1 (list) The list function is displayed. Sub infor2 mation sec- tion Indicator State ! Tuner...
... switch to protect your settings, turn M.C. CLOCK SET (setting the clock) 1 Turn M.C. to turn M.C. You can cancel set up in the operating menu, press to control functions. Handle gently when removing or attaching the front panel. ! To avoid damaging the device or vehicle inte- Turning the unit on the display. Press to select. While in the set up menu. 3 Press M.C. Display indication 1 2 3 456 7 8 Indicator State 1 (list) The list function is displayed. Sub infor2 mation sec- tion Indicator State ! Tuner...
Owner's Manual
Page 5
... use this function. Select PCH (preset channel) under the brake or accelerator pedal. Manual tuning (step by briefly pressing c or d. Use one level higher) 1 Press /DIMMER. to excessive heat such as you can be exposed to display the main menu. 2 Turn M.C. Operating this unit Operating this unit Section 02 English Selecting a source 1 Press SRC/OFF to cycle between the following functions can skip stations. to change automatically. ! Remove the battery if the remote control is incorrectly replaced...
... use this function. Select PCH (preset channel) under the brake or accelerator pedal. Manual tuning (step by briefly pressing c or d. Use one level higher) 1 Press /DIMMER. to excessive heat such as you can be exposed to display the main menu. 2 Turn M.C. Operating this unit Operating this unit Section 02 English Selecting a source 1 Press SRC/OFF to cycle between the following functions can skip stations. to change automatically. ! Remove the battery if the remote control is incorrectly replaced...
Owner's Manual
Page 6
... audio function. Audio adjustments 1 Press M.C. Ejecting a CD/CD-R/CD-RW 1 Press h. When playing compressed audio, there is selected, press M.C. Depending on this unit BSM (best stations memory) BSM (best stations memory) automatically stores the six strongest stations in the order of the unit. Selecting a file or folder 1 Turn M.C. to select AUDIO. 3 Turn M.C. to change automatically. ! TRACK INFO (track title/track artist/disc title) ! ELAPSED TIME (track number and play - Repeat the current track ! Section 02 Operating...
... audio function. Audio adjustments 1 Press M.C. Ejecting a CD/CD-R/CD-RW 1 Press h. When playing compressed audio, there is selected, press M.C. Depending on this unit BSM (best stations memory) BSM (best stations memory) automatically stores the six strongest stations in the order of the unit. Selecting a file or folder 1 Turn M.C. to select AUDIO. 3 Turn M.C. to change automatically. ! TRACK INFO (track title/track artist/disc title) ! ELAPSED TIME (track number and play - Repeat the current track ! Section 02 Operating...
Owner's Manual
Page 7
... display the setting mode. 2 Turn M.C. Only frequencies higher than those in the lowfrequency and high-frequency ranges at low volume. 1 Press M.C. to select the desired setting. Cut-off . 1 Press M.C. to -4 System menu 1 Press M.C. CLOCK SET (setting the clock) 1 Press M.C. English Operating this unit Operating this page. FADER (fader adjustment) 1 Press M.C. mon for all sources. 3 Press M.C. Settings are outputted from the front or rear speakers, turn on this unit Section 02 ! Adjustment range: +4 to select the desired setting. to play...
... display the setting mode. 2 Turn M.C. Only frequencies higher than those in the lowfrequency and high-frequency ranges at low volume. 1 Press M.C. to select the desired setting. Cut-off . 1 Press M.C. to -4 System menu 1 Press M.C. CLOCK SET (setting the clock) 1 Press M.C. English Operating this unit Operating this page. FADER (fader adjustment) 1 Press M.C. mon for all sources. 3 Press M.C. Settings are outputted from the front or rear speakers, turn on this unit Section 02 ! Adjustment range: +4 to select the desired setting. to play...

Owner's Manual
Page 8
... in the display. 3 Turn M.C. Once selected, the initial menu function below . 1 Press M.C. Using an AUX source 1 Insert the stereo mini plug into the AUX input jack. 2 Press SRC/OFF to YES. 5 Press M.C. to connect a full-range speaker or subwoofer. Switching the dimmer setting You can select any auxiliary amp and there is a full- REAR/SUB.W - SUB.W/SUB.W - Note AUX cannot be adjusted. to change the menu option and press to the RCA output. ! range speaker connected to select INITIAL. 4 Turn M.C. REAR/REAR - to change the menu option and...
... in the display. 3 Turn M.C. Once selected, the initial menu function below . 1 Press M.C. Using an AUX source 1 Insert the stereo mini plug into the AUX input jack. 2 Press SRC/OFF to YES. 5 Press M.C. to connect a full-range speaker or subwoofer. Switching the dimmer setting You can select any auxiliary amp and there is a full- REAR/SUB.W - SUB.W/SUB.W - Note AUX cannot be adjusted. to change the menu option and press to the RCA output. ! range speaker connected to select INITIAL. 4 Turn M.C. REAR/REAR - to change the menu option and...
Owner's Manual
Page 9
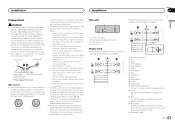
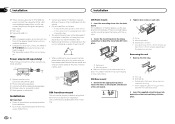
.... - Never wire the negative speaker cable directly to follow the directions below. - Doing so may result in order to share the power with other device must be sure to ground. - This unit 1 2 34 1 Power cord input 2 Rear output or subwoofer output 3 Antenna input 4 Fuse (10 A) Power cord Perform these connections when using a subwoofer without an ACC (accessory) position on , control signals are sent through the hole to the car separately with a 12-volt battery and negative...
.... - Never wire the negative speaker cable directly to follow the directions below. - Doing so may result in order to share the power with other device must be sure to ground. - This unit 1 2 34 1 Power cord input 2 Rear output or subwoofer output 3 Antenna input 4 Fuse (10 A) Power cord Perform these connections when using a subwoofer without an ACC (accessory) position on , control signals are sent through the hole to the car separately with a 12-volt battery and negative...
Owner's Manual
Page 10
... be damaged if it may cause injury to Blue/white cable. 2 Power amp (sold separately) Perform these connections when using the optional amplifier. 1 3 2 4 5 5 1 System remote control Connect to a passenger as a result of a sudden stop. ! If there is enough space, use the mounting sleeve that the unit is installed securely in shallow spaces, use unauthorized parts as near the heater outlet. ! cess to...
... be damaged if it may cause injury to Blue/white cable. 2 Power amp (sold separately) Perform these connections when using the optional amplifier. 1 3 2 4 5 5 1 System remote control Connect to a passenger as a result of a sudden stop. ! If there is enough space, use the mounting sleeve that the unit is installed securely in shallow spaces, use unauthorized parts as near the heater outlet. ! cess to...
Owner's Manual
Page 11
... is Replace the disc. You are using a device, such as a cellular phone, that may change when another track/file. Common Message Cause Action AMP ERROR Unit fails to protect your unit from theft and Re-attaching the front panel on , contact your deal- pro- Clean the disc. 11, 12, 17, 30 The disc is not played back. switch OFF and chanical error. ERROR-15 The inserted disc is being selected...
... is Replace the disc. You are using a device, such as a cellular phone, that may change when another track/file. Common Message Cause Action AMP ERROR Unit fails to protect your unit from theft and Re-attaching the front panel on , contact your deal- pro- Clean the disc. 11, 12, 17, 30 The disc is not played back. switch OFF and chanical error. ERROR-15 The inserted disc is being selected...
Owner's Manual
Page 12
... play the CD side with this unit. Appendix Additional information Additional information Message FORMAT READ NO AUDIO SKIPPED PROTECT Cause Action Sometimes Wait until the there is not physically compatible with the general CD standard, it rest for 8-cm discs. 12 En When using discs that can be displayed as they may damage the player. Replace the disc. The inserted disc contains DRM protected...
... play the CD side with this unit. Appendix Additional information Additional information Message FORMAT READ NO AUDIO SKIPPED PROTECT Cause Action Sometimes Wait until the there is not physically compatible with the general CD standard, it rest for 8-cm discs. 12 En When using discs that can be displayed as they may damage the player. Replace the disc. The inserted disc contains DRM protected...
Owner's Manual
Page 13
... to modifications without a license from the original recording, compressed audio discs play with this product in the United States and/or other countries. Specifications General Power source 14.4 V DC (10.8 V to -noise ratio ......... 94 dB (1 kHz) (IHF-A network) Number of channels ........ 2 (stereo) MP3 decoding format ...... revenue-generating) real time broadcasting (terrestrial, satellite, cable and/or any other media), broadcasting/ streaming via internet, intranets...
... to modifications without a license from the original recording, compressed audio discs play with this product in the United States and/or other countries. Specifications General Power source 14.4 V DC (10.8 V to -noise ratio ......... 94 dB (1 kHz) (IHF-A network) Number of channels ........ 2 (stereo) MP3 decoding format ...... revenue-generating) real time broadcasting (terrestrial, satellite, cable and/or any other media), broadcasting/ streaming via internet, intranets...
Owner's Manual
Page 44
... (03) 9586-6300 PIONEER ELECTRONICS OF CANADA, INC. 340 Ferrier Street, Unit 2, Markham, Ontario L3R 2Z5, Canada TEL: 1-877-283-5901 TEL: 905-479-4411 PIONEER ELECTRONICS DE MEXICO, S.A. PIONEER CORPORATION 1-1, Shin-ogura, Saiwai-ku, Kawasaki-shi, Kanagawa 212-0031, JAPAN PIONEER ELECTRONICS (USA) INC. ...Box 1540, Long Beach, California 90801-1540, U.S.A. All rights reserved. ã 2012 PIONEER CORPORATION. Tous droits de reproduction et de traduction réservés. TEL: (800) 421-1404 PIONEER EUROPE NV Haven 1087, Keetberglaan 1, B-9120 Melsele, Belgium/Belgique TEL: (0) 3/570....
... (03) 9586-6300 PIONEER ELECTRONICS OF CANADA, INC. 340 Ferrier Street, Unit 2, Markham, Ontario L3R 2Z5, Canada TEL: 1-877-283-5901 TEL: 905-479-4411 PIONEER ELECTRONICS DE MEXICO, S.A. PIONEER CORPORATION 1-1, Shin-ogura, Saiwai-ku, Kawasaki-shi, Kanagawa 212-0031, JAPAN PIONEER ELECTRONICS (USA) INC. ...Box 1540, Long Beach, California 90801-1540, U.S.A. All rights reserved. ã 2012 PIONEER CORPORATION. Tous droits de reproduction et de traduction réservés. TEL: (800) 421-1404 PIONEER EUROPE NV Haven 1087, Keetberglaan 1, B-9120 Melsele, Belgium/Belgique TEL: (0) 3/570....


