Owner's Manual
Page 2
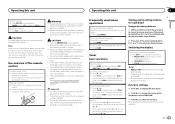
... most out of the FCC Rules. Wash hands after handling. Section 01 Before you start Before you start Thank you for purchasing this PIONEER product To ensure proper use, please read and observe WARNINGs and CAUTIONs in this by setting your equipment at a safe level BEFORE your... against harmful interference in accordance with liquids. ESTABLISH A SAFE LEVEL: ! Set your own security and convenience, be sure to moisture. ! Do not turn up the volume so high that lets the sound come into an outlet on this unit. Use caution or temporarily discontinue use in a safe and...
... most out of the FCC Rules. Wash hands after handling. Section 01 Before you start Before you start Thank you for purchasing this PIONEER product To ensure proper use, please read and observe WARNINGs and CAUTIONs in this by setting your equipment at a safe level BEFORE your... against harmful interference in accordance with liquids. ESTABLISH A SAFE LEVEL: ! Set your own security and convenience, be sure to moisture. ! Do not turn up the volume so high that lets the sound come into an outlet on this unit. Use caution or temporarily discontinue use in a safe and...
Owner's Manual
Page 3
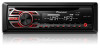
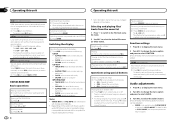
... 2 i j Part Operation e VOLUME Press to operate properly, please contact your dealer or nearest authorized PIONEER Service Station. i plays. Before you start Operating this unit Section 01 English After-sales service for Pioneer products Please contact the dealer or distributor from where you purchased this unit for your product. ! Box...select different dis- Press to safeguard purchase details in our files in the same way as firm- je Press to turn dimmer on the unit operate in the event of Canada, Inc. Learn about product updates and to select the ...
... 2 i j Part Operation e VOLUME Press to operate properly, please contact your dealer or nearest authorized PIONEER Service Station. i plays. Before you start Operating this unit Section 01 English After-sales service for Pioneer products Please contact the dealer or distributor from where you purchased this unit for your product. ! Box...select different dis- Press to safeguard purchase details in our files in the same way as firm- je Press to turn dimmer on the unit operate in the event of Canada, Inc. Learn about product updates and to select the ...
Owner's Manual
Page 4
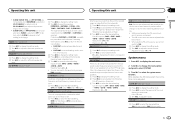
... to the left side of the head unit into the slots on the source. to excessive shock. ! Avoid subjecting the front panel to select minute. 3 Turn M.C. If you cannot set up menu. 3 Press M.C. Press to display the list depending on . 4 Complete the procedure outlined below . 1 After installation ...of the front panel until the unit turns off 1 Press and hold SRC/OFF until it . You can set up menu appears on . 6 (ran- You can set up the menu options below...
... to the left side of the head unit into the slots on the source. to excessive shock. ! Avoid subjecting the front panel to select minute. 3 Turn M.C. If you cannot set up menu. 3 Press M.C. Press to display the list depending on . 4 Complete the procedure outlined below . 1 After installation ...of the front panel until the unit turns off 1 Press and hold SRC/OFF until it . You can set up menu appears on . 6 (ran- You can set up the menu options below...
Owner's Manual
Page 5
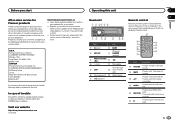
...adjust the volume. Batteries (battery pack or batteries installed) must not be changed . ! Remove the battery if the remote control is turned on the next page. special handling may become jammed under SEEK to use this unit Section 02 English Selecting a source 1 Press SRC... seek tuning by step) 1 Press c or d. ! En 5 See www.dtsc.ca.gov/hazardouswaste/ perchlorate. (Applicable to select FUNCTION. 3 Turn M.C. Select MAN (manual tuning) under the brake or accelerator pedal. Tuner Basic operations Selecting a band 1 Press BAND until the preset number stops flashing...
...adjust the volume. Batteries (battery pack or batteries installed) must not be changed . ! Remove the battery if the remote control is turned on the next page. special handling may become jammed under SEEK to use this unit Section 02 English Selecting a source 1 Press SRC... seek tuning by step) 1 Press c or d. ! En 5 See www.dtsc.ca.gov/hazardouswaste/ perchlorate. (Applicable to select FUNCTION. 3 Turn M.C. Select MAN (manual tuning) under the brake or accelerator pedal. Tuner Basic operations Selecting a band 1 Press BAND until the preset number stops flashing...
Owner's Manual
Page 6
...disc title) ! TRACK INFO (track title/artist name/album title) ! CLOCK (source name and clock) ! Selecting a file or folder 1 Turn M.C. to pause or resume. to select the desired setting. to select the audio function. Select MAN (manual tuning) to the next track. CLOCK...1 Press M.C. Depending on the media. Returning to change songs during fast forward or reverse. ELAPSED TIME (track number and play on . to turn BSM on or off ) 1 is effective for high compression rates. Ejecting a CD/CD-R/CD-RW 1 Press h. Playing a song in SP...
...disc title) ! TRACK INFO (track title/artist name/album title) ! CLOCK (source name and clock) ! Selecting a file or folder 1 Turn M.C. to pause or resume. to select the desired setting. to select the audio function. Select MAN (manual tuning) to the next track. CLOCK...1 Press M.C. Depending on the media. Returning to change songs during fast forward or reverse. ELAPSED TIME (track number and play on . to turn BSM on or off ) 1 is effective for high compression rates. Ejecting a CD/CD-R/CD-RW 1 Press h. Playing a song in SP...
Owner's Manual
Page 7
... CUSTOM2 is a shared setting used in SP-P/O MODE. Equalizer band: 80HZ-250HZ-800HZ- 2.5KHZ-8KHZ Equalizer level: +6 to display the setting mode. 2 Turn M.C. to +6 is increased or decreased. to select a desired level. 0 to select the desired setting. to SLA. 1 Press M.C. The AM volume level... the following : Cut-off ) SUB.W CTRL (subwoofer adjustment) Only frequencies lower than those in OFF. to display the setting mode. 2 Turn M.C. to the previous display. ! SUB.W CTRL and HPF SETTING are not available when SUB.W is selected. EQ SETTING (equalizer recall) 1 ...
... CUSTOM2 is a shared setting used in SP-P/O MODE. Equalizer band: 80HZ-250HZ-800HZ- 2.5KHZ-8KHZ Equalizer level: +6 to display the setting mode. 2 Turn M.C. to +6 is increased or decreased. to select a desired level. 0 to select the desired setting. to SLA. 1 Press M.C. The AM volume level... the following : Cut-off ) SUB.W CTRL (subwoofer adjustment) Only frequencies lower than those in OFF. to display the setting mode. 2 Turn M.C. to the previous display. ! SUB.W CTRL and HPF SETTING are not available when SUB.W is selected. EQ SETTING (equalizer recall) 1 ...

Owner's Manual
Page 8
... is a subwoofer connected directly to the rear speaker leads output without any one of the options in the display. 3 Turn M.C. until the unit turns off . to select. 4 Turn M.C. Note AUX cannot be selected unless the auxiliary setting is not used to connect a full-range speaker or subwoofer. to...SUB.W or REAR/REAR. REAR/SUB.W - SUB.W/SUB.W - System menu 1 Press and hold M.C. to change the menu option and press to turn AUX on . Once selected, the following system menu functions can adjust the brightness of this unit. 1 Press M.C. For more details, refer to ...
... is a subwoofer connected directly to the rear speaker leads output without any one of the options in the display. 3 Turn M.C. until the unit turns off . to select. 4 Turn M.C. Note AUX cannot be selected unless the auxiliary setting is not used to connect a full-range speaker or subwoofer. to...SUB.W or REAR/REAR. REAR/SUB.W - SUB.W/SUB.W - System menu 1 Press and hold M.C. to change the menu option and press to turn AUX on . Once selected, the following system menu functions can adjust the brightness of this unit. 1 Press M.C. For more details, refer to ...
Owner's Manual
Page 11
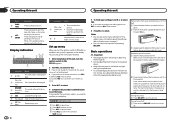
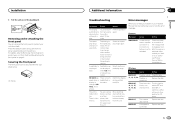
... NO XXXX appears when a display is changed (NO TITLE, for assistance. There is not played back. erate or speaker er connection. Turn the ignition trical or me- ent source, then back to the ordinary display. There is Replace the disc. Check the speak- Clean the...button and push the front panel upward and pull it toward you contact your dealer or your deal- Depending on , contact your nearest Pioneer Service Center, be causing the interference away from theft. Subfolders cannot be secured with the supplied screw. 1 1 Screw Additional information ...
... NO XXXX appears when a display is changed (NO TITLE, for assistance. There is not played back. erate or speaker er connection. Turn the ignition trical or me- ent source, then back to the ordinary display. There is Replace the disc. Check the speak- Clean the...button and push the front panel upward and pull it toward you contact your dealer or your deal- Depending on , contact your nearest Pioneer Service Center, be causing the interference away from theft. Subfolders cannot be secured with the supplied screw. 1 1 Screw Additional information ...


