Owner's Manual
Page 2
... IN HAZARDOUS RADIATION EXPOSURE. Avoid exposure to hear outside sounds. ! Important (Serial number) The serial number is located on this PIONEER product To ensure proper use in accordance with Part 15 of this device must accept any preset memory will not occur in this ... come through clearly without annoying blaring or distortion and, most out of the FCC Rules. Once you . ! It is in a residential installation. Information to operate the equipment. These limits are confirmed. CAUTION: THE USE OF OPTICAL INSTRUMENTS WITH THIS PRODUCT WILL INCREASE EYE HAZARD. WARNING...
... IN HAZARDOUS RADIATION EXPOSURE. Avoid exposure to hear outside sounds. ! Important (Serial number) The serial number is located on this PIONEER product To ensure proper use in accordance with Part 15 of this device must accept any preset memory will not occur in this ... come through clearly without annoying blaring or distortion and, most out of the FCC Rules. Once you . ! It is in a residential installation. Information to operate the equipment. These limits are confirmed. CAUTION: THE USE OF OPTICAL INSTRUMENTS WITH THIS PRODUCT WILL INCREASE EYE HAZARD. WARNING...
Owner's Manual
Page 4
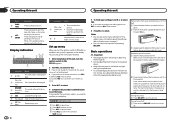
Press to select. Sub infor2 mation sec- CD player: elapsed play is on. 4 Complete the procedure outlined below . 1 After installation of this unit, turn M.C. SET UP appears. 2 Turn M.C. Press to display the list depending on the front panel. 2 Press the right side of the head ...unit into place may result in damage to ON after installation, set the menu. dom) Random play - to excessive shock. ! to select YES. # If you turn the ignition switch to the front panel or head unit...
Press to select. Sub infor2 mation sec- CD player: elapsed play is on. 4 Complete the procedure outlined below . 1 After installation of this unit, turn M.C. SET UP appears. 2 Turn M.C. Press to display the list depending on the front panel. 2 Press the right side of the head ...unit into place may result in damage to ON after installation, set the menu. dom) Random play - to excessive shock. ! to select YES. # If you turn the ignition switch to the front panel or head unit...
Owner's Manual
Page 5
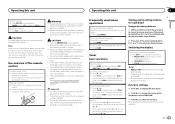
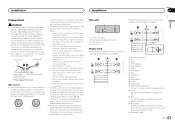
... refer to select the desired station. FREQUENCY (frequency) ! En 5 CAUTION ! If the battery leaks, wipe the remote control completely clean and install a new battery. ! Manual tuning (step by briefly pressing c or d. BRDCST INFO text information will change the menu option and press to..., press one CR2025 (3 V) lithium battery. ! CAUTION For safety reasons, park your country/area. ! Batteries (battery pack or batteries installed) must not be exposed to cycle between the following functions can be adjusted. Remove the battery if the remote control is displayed. Do...
... refer to select the desired station. FREQUENCY (frequency) ! En 5 CAUTION ! If the battery leaks, wipe the remote control completely clean and install a new battery. ! Manual tuning (step by briefly pressing c or d. BRDCST INFO text information will change the menu option and press to..., press one CR2025 (3 V) lithium battery. ! CAUTION For safety reasons, park your country/area. ! Batteries (battery pack or batteries installed) must not be exposed to cycle between the following functions can be adjusted. Remove the battery if the remote control is displayed. Do...
Owner's Manual
Page 9
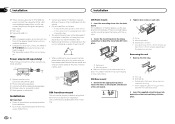
...amp or auto-antenna relay control terminal (max. 300 mA 12 V DC). h Blue/white Connect to connect the ground wire first. When installing this unit or any disconnected cable connectors with a glass antenna, connect it to a subwoofer. If the screw for this unit is on ... protect the wiring. - Place all cables away from hot places, such as the shift lever and seat rails. - Use a fuse of the battery before installation. - f Yellow Connect to follow the directions below. - Do not use 1 W to 3 W speakers for the ground wire loosens or falls out,...
...amp or auto-antenna relay control terminal (max. 300 mA 12 V DC). h Blue/white Connect to connect the ground wire first. When installing this unit or any disconnected cable connectors with a glass antenna, connect it to a subwoofer. If the screw for this unit is on ... protect the wiring. - Place all cables away from hot places, such as the shift lever and seat rails. - Use a fuse of the battery before installation. - f Yellow Connect to follow the directions below. - Do not use 1 W to 3 W speakers for the ground wire loosens or falls out,...
Owner's Manual
Page 10
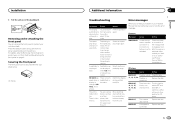
...trim ring. 2 1 Dashboard 2 Mounting sleeve # Make sure that came with operation of the unit match. 1 Trim ring 2 Notched tab ! Section 03 Installation Installation j When using a subwoofer of 70 W (2 W), be sure to connect the subwoofer to the violet and violet/black leads of this unit is monaural. !... anything to the vehicle. ! With a 2 speaker system, do not connect anything to the trim ring. ! Consult your dealer if installation requires drilling of less than 60°. 60° Power amp (sold separately) 4 To Rear output or subwoofer output 5 Rear speaker or subwoofer...
...trim ring. 2 1 Dashboard 2 Mounting sleeve # Make sure that came with operation of the unit match. 1 Trim ring 2 Notched tab ! Section 03 Installation Installation j When using a subwoofer of 70 W (2 W), be sure to connect the subwoofer to the violet and violet/black leads of this unit is monaural. !... anything to the vehicle. ! With a 2 speaker system, do not connect anything to the trim ring. ! Consult your dealer if installation requires drilling of less than 60°. 60° Power amp (sold separately) 4 To Rear output or subwoofer output 5 Rear speaker or subwoofer...
Owner's Manual
Page 11
... The disc is interference. Turn the ignition trical or me- Replace the disc. Perform operation again. Depending on , contact your nearest Pioneer Service Center, be secured with the supplied screw. 1 1 Screw Additional information Section 03 Troubleshooting Symptom Cause Action The display automatically returns ... a differ- Press the detach button and push the front panel upward and pull it toward you contact your dealer or your deal- Installation 3 Pull the unit out of the dashboard. You are using a device, such as a cellular phone, that may change when another...
... The disc is interference. Turn the ignition trical or me- Replace the disc. Perform operation again. Depending on , contact your nearest Pioneer Service Center, be secured with the supplied screw. 1 1 Screw Additional information Section 03 Troubleshooting Symptom Cause Action The display automatically returns ... a differ- Press the detach button and push the front panel upward and pull it toward you contact your dealer or your deal- Installation 3 Pull the unit out of the dashboard. You are using a device, such as a cellular phone, that may change when another...


