Owner's Manual
Page 2
... a USB storage device 15 Connecting and disconnecting iPod 16 - Switching the map between 2D and 3D 22 - Displaying the rear camera image 19 How to operate your home 34 Setting a route by recalling a saved route 34 The actual screens may differ from ...a USB storage device 15 - About the data being deleted 11 - Please read through these operating instructions so you searched for buying this Pioneer product. Introduction Manual overview 8 - Resetting the microprocessor 11 Basic operation Checking part names and functions 13 Inserting/ejecting a disc 14 - ...
... a USB storage device 15 Connecting and disconnecting iPod 16 - Switching the map between 2D and 3D 22 - Displaying the rear camera image 19 How to operate your home 34 Setting a route by recalling a saved route 34 The actual screens may differ from ...a USB storage device 15 - About the data being deleted 11 - Please read through these operating instructions so you searched for buying this Pioneer product. Introduction Manual overview 8 - Resetting the microprocessor 11 Basic operation Checking part names and functions 13 Inserting/ejecting a disc 14 - ...
Owner's Manual
Page 6
... - Smart Zoom 126 - Manage Track Logs 127 - Creating new categories 131 - Editing your travel history 133 - Changing the splash screen 135 - Setting the rear view camera 136 - Adjusting the screen brightness 137 - Using subwoofer output 141 - Using the high pass filter 141 - Setting video input 1 (AV1) 143 - Switching the sound muting...
... - Smart Zoom 126 - Manage Track Logs 127 - Creating new categories 131 - Editing your travel history 133 - Changing the splash screen 135 - Setting the rear view camera 136 - Adjusting the screen brightness 137 - Using subwoofer output 141 - Using the high pass filter 141 - Setting video input 1 (AV1) 143 - Switching the sound muting...
Owner's Manual
Page 11
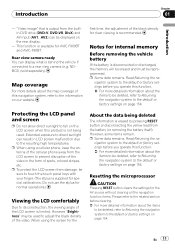
...related section before clearing. = For more details about the items to be deleted, refer to Returning the navigation system to a rear view camera (e.g. However, "Brightness" may be deleted, refer to Returning the navigation system to the information on the LCD screen when this navigation system,...the settings for the About the data being used to the resulting high temperatures. Rear view camera ready You can result in the form of the black density for AVIC-F900BT and AVIC-F90BT. When using a cellular phone, keep the antenna of the LCD screen is disconnected or ...
...related section before clearing. = For more details about the items to be deleted, refer to Returning the navigation system to a rear view camera (e.g. However, "Brightness" may be deleted, refer to Returning the navigation system to the information on the LCD screen when this navigation system,...the settings for the About the data being used to the resulting high temperatures. Rear view camera ready You can result in the form of the black density for AVIC-F900BT and AVIC-F90BT. When using a cellular phone, keep the antenna of the LCD screen is disconnected or ...
Owner's Manual
Page 16
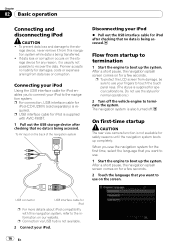
... CAUTION ! Pioneer accepts no liability for special calibrations. To AV input on the screen. Do not use . 1 Start the engine to boot up the system. When you want to boot up completely. USB connector USB interface cable for iPod p For more details about iPod compatibility with AVIC-F90BT. 1 Pull... navigation system Disconnecting your iPod % Pull out the USB interface cable for a few seconds. On first-time startup CAUTION The rear view camera function is also turned off the vehicle engine to recover the data. rage device, never remove it is supplied for damages, costs or ...
... CAUTION ! Pioneer accepts no liability for special calibrations. To AV input on the screen. Do not use . 1 Start the engine to boot up the system. When you want to boot up completely. USB connector USB interface cable for iPod p For more details about iPod compatibility with AVIC-F90BT. 1 Pull... navigation system Disconnecting your iPod % Pull out the USB interface cable for a few seconds. On first-time startup CAUTION The rear view camera function is also turned off the vehicle engine to recover the data. rage device, never remove it is supplied for damages, costs or ...
Owner's Manual
Page 17
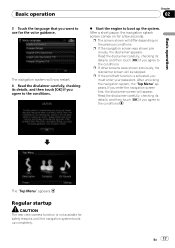
... the conditions. Read the disclaimer carefully, checking its details, and then touch [OK] if you must enter your password. Regular startup CAUTION The rear view camera function is activated, you agree to the conditions. p The screen shown will now restart. 4 Read the disclaimer carefully, checking its details, and then touch [OK...
... the conditions. Read the disclaimer carefully, checking its details, and then touch [OK] if you must enter your password. Regular startup CAUTION The rear view camera function is activated, you agree to the conditions. p The screen shown will now restart. 4 Read the disclaimer carefully, checking its details, and then touch [OK...
Owner's Manual
Page 19
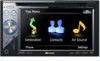
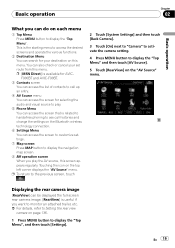
... route from this menu. p To return to the previous screen, touch . 2 Touch [System Settings] and then touch [Back Camera]. 3 Touch [On] next to "Camera" to activate the camera setting. 4 Press MENU button to access the desired screens and operate the various functions. 2 Destination Menu You can do on the...can search for selecting the audio and visual source to play the AV source, this menu. p [MSN Direct] is available for AVICF900BT and AVIC-F90BT. 3 Contacts screen You can access the list of contacts to call histories and change the settings on each menu 1 Top Menu Press MENU ...
... route from this menu. p To return to the previous screen, touch . 2 Touch [System Settings] and then touch [Back Camera]. 3 Touch [On] next to "Camera" to activate the camera setting. 4 Press MENU button to access the desired screens and operate the various functions. 2 Destination Menu You can do on the...can search for selecting the audio and visual source to play the AV source, this menu. p [MSN Direct] is available for AVICF900BT and AVIC-F90BT. 3 Contacts screen You can access the list of contacts to call histories and change the settings on each menu 1 Top Menu Press MENU ...
Owner's Manual
Page 136
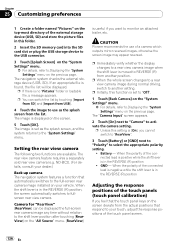
... (R) position, the screen automatically switches to select the appropriate polarity setting. ! CAUTION Pioneer recommends the use as the splash screen, and the system returns to monitor an attached trailer, etc. Battery - The rear view camera feature requires a separately sold rear view camera (e.g. p If there is in the REVERSE (R) position ! Setting the rear view...
... (R) position, the screen automatically switches to select the appropriate polarity setting. ! CAUTION Pioneer recommends the use as the splash screen, and the system returns to monitor an attached trailer, etc. Battery - The rear view camera feature requires a separately sold rear view camera (e.g. p If there is in the REVERSE (R) position ! Setting the rear view...

Owner's Manual
Page 144
... for commercial or public viewing purposes may appear differently. MUTE - Normal - p When "SD"or "USB" selected as follows: ! p The navigation map and the rear view camera picture is ended. Attenuation ! Normal (normal) A 4:3 picture is always muted independently of the normal picture. Switching the sound muting/ attenuation You can be adjusted simultaneously...
... for commercial or public viewing purposes may appear differently. MUTE - Normal - p When "SD"or "USB" selected as follows: ! p The navigation map and the rear view camera picture is ended. Attenuation ! Normal (normal) A 4:3 picture is always muted independently of the normal picture. Switching the sound muting/ attenuation You can be adjusted simultaneously...
Owner's Manual
Page 158
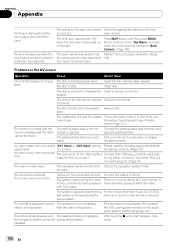
... brake. secured. Appendix Appendix Nothing is displayed and the touch panel keys cannot be played Replace disc. The setting for the rear view camera Select the appropriate setting for iPod is paused or performing, For the media other than music CD (CD-DA), fast reverse or forward ... different key responds. tions about handling each type of media, refer to 136) your vehicle in [R] when the rear view camera was not connected. Park your touch for [Back Camera]. (Page 136) The touch panel keys deviate from connected [AV1 Input] or [AV2 Input] setting Please read the following ...
... brake. secured. Appendix Appendix Nothing is displayed and the touch panel keys cannot be played Replace disc. The setting for the rear view camera Select the appropriate setting for iPod is paused or performing, For the media other than music CD (CD-DA), fast reverse or forward ... different key responds. tions about handling each type of media, refer to 136) your vehicle in [R] when the rear view camera was not connected. Park your touch for [Back Camera]. (Page 136) The touch panel keys deviate from connected [AV1 Input] or [AV2 Input] setting Please read the following ...

Owner's Manual
Page 184
Appendix Appendix System Settings menu AV Settings menu [Language] [Splash Screen] [Back Camera] [Screen Calibration] [Picture Adjustment] [Illumi Color] [Service Information] [Screen Off] Page 135 135 136 136 137 137 138 138 [AV1 Input] [AV2 Input] [Ant CTRL] [Wide Mode] [MUTE Input/GUIDE] [Rear SP] [VR Catalog Mode] Page 143 143 143 144 144 145 145 184 En
Appendix Appendix System Settings menu AV Settings menu [Language] [Splash Screen] [Back Camera] [Screen Calibration] [Picture Adjustment] [Illumi Color] [Service Information] [Screen Off] Page 135 135 136 136 137 137 138 138 [AV1 Input] [AV2 Input] [Ant CTRL] [Wide Mode] [MUTE Input/GUIDE] [Rear SP] [VR Catalog Mode] Page 143 143 143 144 144 145 145 184 En

Owner's Manual
Page 188
ISO9660 format This is a method of recording more than 2 sessions in one camera at a time are restricted by a working group (MPEG) of the ISO (International Standards Organization). When recording data on a CD-ROM, CD-R or CD-RW, etc., ... for the following two levels: Level 1: The file name is a method of production, comments and other data. Multi-angle With regular TV programs, although multiple cameras are regulations for MPEG Audio Layer 3. The contents can be freely edited using software with ID3 Tag editing functions. Romeo: File names can have up...
ISO9660 format This is a method of recording more than 2 sessions in one camera at a time are restricted by a working group (MPEG) of the ISO (International Standards Organization). When recording data on a CD-ROM, CD-R or CD-RW, etc., ... for the following two levels: Level 1: The file name is a method of production, comments and other data. Multi-angle With regular TV programs, although multiple cameras are regulations for MPEG Audio Layer 3. The contents can be freely edited using software with ID3 Tag editing functions. Romeo: File names can have up...
Installation Manual
Page 2
... video output 17 When connecting the external video component 17 - Installation using a rear display connected to separately sold power amp 14 When connecting a rear view camera 16 When connecting the rear display 17 - Adjusting the microphone angle 27 After Installation After Installing this product 6 To prevent damage 6 - Parts supplied 23 - Mounting...
... video output 17 When connecting the external video component 17 - Installation using a rear display connected to separately sold power amp 14 When connecting a rear view camera 16 When connecting the rear display 17 - Adjusting the microphone angle 27 After Installation After Installing this product 6 To prevent damage 6 - Parts supplied 23 - Mounting...
Installation Manual
Page 3
Please call the appropriate emergency number. ! Do not operate this navigation system (or the rear view camera option if purchased) if doing so in force should always take precedence over guidance given by this navigation system is not a substitute for the .... It is explained in the operation of this product provides contrary advice. ! Always obey current traffic restrictions, even if this product (and rear view camera option if purchased) are intended solely to aid you in the separate manuals for your vehicle. Section 01 En 3 English IMPORTANT INFORMATION ABOUT YOUR NEW...
Please call the appropriate emergency number. ! Do not operate this navigation system (or the rear view camera option if purchased) if doing so in force should always take precedence over guidance given by this navigation system is not a substitute for the .... It is explained in the operation of this product provides contrary advice. ! Always obey current traffic restrictions, even if this product (and rear view camera option if purchased) are intended solely to aid you in the separate manuals for your vehicle. Section 01 En 3 English IMPORTANT INFORMATION ABOUT YOUR NEW...

Installation Manual
Page 13
Connection method Clamp the backup light lead. Connect the violet/white lead to rear view camera picture. Backup light lead Extension lead (for speed signal) The navigation unit Power cord Violet/white (REVERSEGEAR SIGNAL INPUT) This is connected so that lights ... can detect whether the vehicle is moving forwards or backwards. Otherwise you use only the supplied extension lead. CAUTION Be sure to use a rear view camera, please make sure to connect this navigation system. En 13 Use of your vehicle detected by the sensor may not detect your vehicle travelling forward...
Connection method Clamp the backup light lead. Connect the violet/white lead to rear view camera picture. Backup light lead Extension lead (for speed signal) The navigation unit Power cord Violet/white (REVERSEGEAR SIGNAL INPUT) This is connected so that lights ... can detect whether the vehicle is moving forwards or backwards. Otherwise you use only the supplied extension lead. CAUTION Be sure to use a rear view camera, please make sure to connect this navigation system. En 13 Use of your vehicle detected by the sensor may not detect your vehicle travelling forward...

Installation Manual
Page 16
... The navigation unit Extension lead (for reverse signal) Fuse resistor For more distant than in [System Settings] to [On] when connecting the rear view camera. (For details, refer to Connecting the power cord (2) on trailers, or backing into a tight parking spot. The screen image may appear closer or... more details about the wiring, refer to "Operation Manual".) ! Connect to any other equipment. 16 En Do not connect to the rear view camera. Please note that the edges of another lead could cause fire, smoke and/or damage this navigation system. 5 m (16 ft. 5 in .)...
... The navigation unit Extension lead (for reverse signal) Fuse resistor For more distant than in [System Settings] to [On] when connecting the rear view camera. (For details, refer to Connecting the power cord (2) on trailers, or backing into a tight parking spot. The screen image may appear closer or... more details about the wiring, refer to "Operation Manual".) ! Connect to any other equipment. 16 En Do not connect to the rear view camera. Please note that the edges of another lead could cause fire, smoke and/or damage this navigation system. 5 m (16 ft. 5 in .)...


