Owner's Manual
Page 147
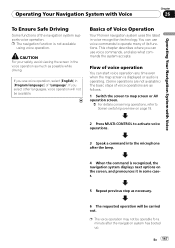
... Navigation System with Voice Operating Your Navigation System with Voice Chapter 26 To Ensure Safe Driving Some functions of Voice Operation Your Pioneer navigation system uses the latest in some cases. 5 Repeat previous step as possible while driving. En 147 CAUTION For your ... MULTI-CONTROL to operate many of voice operation You can use voice commands to activate voice operations. 3 Speak a command into the microphone after the navigation system has booted up. Flow of its functions. p The navigation function is recognized, the navigation system displays next options...
... Navigation System with Voice Operating Your Navigation System with Voice Chapter 26 To Ensure Safe Driving Some functions of Voice Operation Your Pioneer navigation system uses the latest in some cases. 5 Repeat previous step as possible while driving. En 147 CAUTION For your ... MULTI-CONTROL to operate many of voice operation You can use voice commands to activate voice operations. 3 Speak a command into the microphone after the navigation system has booted up. Flow of its functions. p The navigation function is recognized, the navigation system displays next options...

Owner's Manual
Page 152
... for Voice Operation For your commands carefully Speak slowly, deliberately, and clearly. 152 En Pronounce your voice commands to fail. Position the microphone carefully For optimum pick-up, the microphone should be correctly recognized and interpreted, ensure that wind through the vehicle window or miscellaneous noise from outside the vehicle can interfere...
... for Voice Operation For your commands carefully Speak slowly, deliberately, and clearly. 152 En Pronounce your voice commands to fail. Position the microphone carefully For optimum pick-up, the microphone should be correctly recognized and interpreted, ensure that wind through the vehicle window or miscellaneous noise from outside the vehicle can interfere...
Owner's Manual
Page 157
... due to Select the appropriate AV source. Adjusting the volume of the phone call is not MULTI-CONTROL. Turn the volume up by the microphone again, creat- -Have both speakers pause slightly before ing an echo. Connect the parking brake cord, and apply nected. There is a ...with the "Rear Check the "Rear display" and its connection. Connect the parking brake cord, and apply the parking brake. display", for AVIC-F900BT and AVIC-F90BT.) The voice from the speakers and then picked -Lower the volume on Check the settings. Check [Night mode] setting and make sure [...
... due to Select the appropriate AV source. Adjusting the volume of the phone call is not MULTI-CONTROL. Turn the volume up by the microphone again, creat- -Have both speakers pause slightly before ing an echo. Connect the parking brake cord, and apply nected. There is a ...with the "Rear Check the "Rear display" and its connection. Connect the parking brake cord, and apply the parking brake. display", for AVIC-F900BT and AVIC-F90BT.) The voice from the speakers and then picked -Lower the volume on Check the settings. Check [Night mode] setting and make sure [...
Installation Manual
Page 2
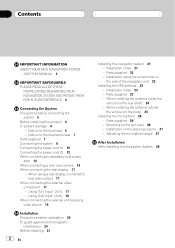
... 6 To prevent damage 6 - Parts supplied 22 - Parts supplied 23 - When installing the antenna inside the vehicle (on the body) 25 Installing the microphone 26 - Notice for the blue/white lead 7 Parts supplied 7 Connecting the system 8 Connecting the power cord (1) 10 Connecting the power cord (2) 12 ... 21 - When installing the antenna outside the vehicle (on the rear shelf) 24 - Mounting on the steering column 27 - Adjusting the microphone angle 27 After Installation After Installing this navigation system 21 - When using the screw holes on the side of the navigation unit 22 Installing ...
... 6 To prevent damage 6 - Parts supplied 22 - Parts supplied 23 - When installing the antenna inside the vehicle (on the body) 25 Installing the microphone 26 - Notice for the blue/white lead 7 Parts supplied 7 Connecting the system 8 Connecting the power cord (1) 10 Connecting the power cord (2) 12 ... 21 - When installing the antenna outside the vehicle (on the rear shelf) 24 - Mounting on the steering column 27 - Adjusting the microphone angle 27 After Installation After Installing this navigation system 21 - When using the screw holes on the side of the navigation unit 22 Installing ...

Installation Manual
Page 7
... current drain and malfunction. Such connection could cause excessive current drain and malfunction. Connector Extension lead (for speed signal) Notice for reverse signal) GPS antenna Microphone Parts supplied The navigation unit Power cord En 7 Change the source from radio (AM or FM) to an external power amp's system remote control terminal...
... current drain and malfunction. Such connection could cause excessive current drain and malfunction. Connector Extension lead (for speed signal) Notice for reverse signal) GPS antenna Microphone Parts supplied The navigation unit Power cord En 7 Change the source from radio (AM or FM) to an external power amp's system remote control terminal...

Installation Manual
Page 9
Connecting the System Section 03 English Microphone GPS antenna DIGITAL OUT This terminal is intended to support future equipment and should not be used if you are using this product´s video ...
Connecting the System Section 03 English Microphone GPS antenna DIGITAL OUT This terminal is intended to support future equipment and should not be used if you are using this product´s video ...

Installation Manual
Page 26
... the sun visor is turned off. (ACC OFF) 2 Attach the microphone clip to the navigation system after the system is in the microphone clip. Install the microphone on the sun visor 1 Install the microphone in the down position. 26 En Microphone clip Parts supplied Microphone Microphone clip Double-sided tape Clamp (5 pcs.) Mounting on the sun visor...
... the sun visor is turned off. (ACC OFF) 2 Attach the microphone clip to the navigation system after the system is in the microphone clip. Install the microphone on the sun visor 1 Install the microphone in the down position. 26 En Microphone clip Parts supplied Microphone Microphone clip Double-sided tape Clamp (5 pcs.) Mounting on the sun visor...

Installation Manual
Page 27
Installation Installation on the steering column, keeping it away from the steering wheel. Double-sided tape Clamps Use clamps to secure the lead where necessary inside the vehicle. En 27 Install the microphone clip on the steering column 1 Install the microphone in the groove. 2 Mount the microphone clip on the steering column. Adjusting the microphone angle The microphone angle can be adjusted by moving forward or backward the microphone clip angle. Microphone Microphone clip English Section 04 Fit the microphone cord in the microphone clip.
Installation Installation on the steering column, keeping it away from the steering wheel. Double-sided tape Clamps Use clamps to secure the lead where necessary inside the vehicle. En 27 Install the microphone clip on the steering column 1 Install the microphone in the groove. 2 Mount the microphone clip on the steering column. Adjusting the microphone angle The microphone angle can be adjusted by moving forward or backward the microphone clip angle. Microphone Microphone clip English Section 04 Fit the microphone cord in the microphone clip.

