Owner's Manual
Page 1
English Operation Manual FLASH MEMORY MULTIMEDIA AV NAVIGATION RECEIVER AVIC-F90BT Notice to all users: Be sure to read "Important Information for the user" includes the important information that the navigation system is properly connected to your vehicle's parking brake and depending on your Authorized Pioneer Electronics retailer or call us at (800) 421-1404. This software requires that you must understand before using this navigation system. "Important Information for the user" first! For more information, please contact your vehicle, additional installation may be required.
English Operation Manual FLASH MEMORY MULTIMEDIA AV NAVIGATION RECEIVER AVIC-F90BT Notice to all users: Be sure to read "Important Information for the user" includes the important information that the navigation system is properly connected to your vehicle's parking brake and depending on your Authorized Pioneer Electronics retailer or call us at (800) 421-1404. This software requires that you must understand before using this navigation system. "Important Information for the user" first! For more information, please contact your vehicle, additional installation may be required.
Owner's Manual
Page 2
...for POIs around the destination 28 - Please read through these operating instructions so you will know how to read this manual 8 - Terminology 8 - Before removing the vehicle battery 11 - Inserting an SD memory card 15 - How to operate your iPod 16 Flow from the actual screens. Switching the ... Scrolling the map to the position you want to read the map screen 20 - After you have finished reading the instructions, keep this Pioneer product. What you can do on -screen keyboard 24 Searching for and selecting a location Searching for a location by recalling a saved route...
...for POIs around the destination 28 - Please read through these operating instructions so you will know how to read this manual 8 - Terminology 8 - Before removing the vehicle battery 11 - Inserting an SD memory card 15 - How to operate your iPod 16 Flow from the actual screens. Switching the ... Scrolling the map to the position you want to read the map screen 20 - After you have finished reading the instructions, keep this Pioneer product. What you can do on -screen keyboard 24 Searching for and selecting a location Searching for a location by recalling a saved route...
Owner's Manual
Page 8
...page you need from a menu name If you need to make full use your home position on the screen are described in this manual Finding the operation procedure from what you want to do When you have decided what you want to as you should note. Items in different menus,... format: e.g.) p If the home location has not been stored yet, set the location first. ! This manual provides important information you want to check the meaning of a term. Chapter 8 describes the operations related to hands-free phoning by using this product, be sure to Setting your new equipment. ! How to...
...page you need from a menu name If you need to make full use your home position on the screen are described in this manual Finding the operation procedure from what you want to do When you have decided what you want to as you should note. Items in different menus,... format: e.g.) p If the home location has not been stored yet, set the location first. ! This manual provides important information you want to check the meaning of a term. Chapter 8 describes the operations related to hands-free phoning by using this product, be sure to Setting your new equipment. ! How to...

Owner's Manual
Page 9
Introduction Chapter 01 Introduction "Video image" "Video image" in this manual indicates the moving images of playable file formats ! Assign your original image as a splash screen You can be guaranteed completely. p Imported original images will re-.... Features Touch panel key operation It is deleted, set up as the "external storage device (USB, SD)". If it indicates the USB memory and USB portable audio player only, they are collectively referred to the destination. You can be stored in the built-in DVD drive (AVIC-F900BTand AVIC-F90BT) DVD-Video (commercial-release...
Introduction Chapter 01 Introduction "Video image" "Video image" in this manual indicates the moving images of playable file formats ! Assign your original image as a splash screen You can be guaranteed completely. p Imported original images will re-.... Features Touch panel key operation It is deleted, set up as the "external storage device (USB, SD)". If it indicates the USB memory and USB portable audio player only, they are collectively referred to the destination. You can be stored in the built-in DVD drive (AVIC-F900BTand AVIC-F90BT) DVD-Video (commercial-release...

Owner's Manual
Page 103
... the radio by touching either [c] or [d] briefly. The frequencies move up or down one second and release. p For details concerning operation, refer to the HD Radio tuner's operation manual. % Touch [Digital Radio] on the "AV Source" menu to display the "Digital Radio" screen. = For details concerning... operations, refer to Switching the display on page 105. 8 Signal type indicator Shows the type of multicast channels in the current ...
... the radio by touching either [c] or [d] briefly. The frequencies move up or down one second and release. p For details concerning operation, refer to the HD Radio tuner's operation manual. % Touch [Digital Radio] on the "AV Source" menu to display the "Digital Radio" screen. = For details concerning... operations, refer to Switching the display on page 105. 8 Signal type indicator Shows the type of multicast channels in the current ...
Owner's Manual
Page 109
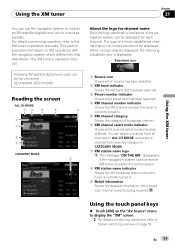
...the XM tuner You can use the navigation system to control an XM satellite digital tuner, which differs from selected category in the XM tuner's operation manual. Using the touch panel keys % Touch [XM] on page 18. You can select a channel from all channels in ALL CH MODE, and... for some reason. 8 XM station name indicator Shows the XM broadcast station name the tuner is displayed. For details concerning operation, refer to Screen switching overview on the "AV Source" menu to display the "XM" screen. = For details concerning operations, refer to the XM tuner's operation manuals.
...the XM tuner You can use the navigation system to control an XM satellite digital tuner, which differs from selected category in the XM tuner's operation manual. Using the touch panel keys % Touch [XM] on page 18. You can select a channel from all channels in ALL CH MODE, and... for some reason. 8 XM station name indicator Shows the XM broadcast station name the tuner is displayed. For details concerning operation, refer to Screen switching overview on the "AV Source" menu to display the "XM" screen. = For details concerning operations, refer to the XM tuner's operation manuals.

Owner's Manual
Page 114
... SIRIUS band that described in the SIRIUS tuner's operation manual. This section provides information on SIRIUS operations with navigation system which is sold separately) with this navigation system, Pioneer SIRIUS BUS INTERFACE is tuned to control a Pioneer Sirius satellite digital tuner, which differs from the ...to Screen switching overview on the "AV Source" menu to display the "SIRIUS" screen. = For details concerning operations, refer to the owner's manual of Pioneer SIRIUS BUS INTERFACE and SiriusConnect universal tuner. Using the touch panel keys % Touch [SIRIUS] on page 18. ...
... SIRIUS band that described in the SIRIUS tuner's operation manual. This section provides information on SIRIUS operations with navigation system which is sold separately) with this navigation system, Pioneer SIRIUS BUS INTERFACE is tuned to control a Pioneer Sirius satellite digital tuner, which differs from the ...to Screen switching overview on the "AV Source" menu to display the "SIRIUS" screen. = For details concerning operations, refer to the owner's manual of Pioneer SIRIUS BUS INTERFACE and SiriusConnect universal tuner. Using the touch panel keys % Touch [SIRIUS] on page 18. ...
Owner's Manual
Page 121
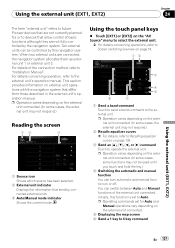
...navigation system allocates them as external unit 1 or external unit 2. For details of the connection method, refer to the external unit's operation manual. Using the touch panel keys % Touch [EXT1] or [EXT2] on the "AV Source" menu to select the external unit. = For details ..., EXT2) En 121 Using the external unit (EXT1, EXT2) Chapter 24 The term "external unit" refers to future Pioneer devices that are not currently planned for Auto and Manual operations vary depending on the external unit connected. (In some cases, the external unit may not respond.) Reading the screen 12...
...navigation system allocates them as external unit 1 or external unit 2. For details of the connection method, refer to the external unit's operation manual. Using the touch panel keys % Touch [EXT1] or [EXT2] on the "AV Source" menu to select the external unit. = For details ..., EXT2) En 121 Using the external unit (EXT1, EXT2) Chapter 24 The term "external unit" refers to future Pioneer devices that are not currently planned for Auto and Manual operations vary depending on the external unit connected. (In some cases, the external unit may not respond.) Reading the screen 12...
Owner's Manual
Page 164
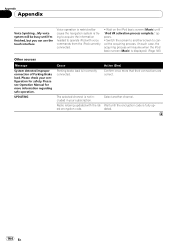
... process. (In such case, the acquiring process will be busy until I'm finished, but you can use the touch interface Voice operation is restricted because the navigation system is trying to acquire the information needed to another channel. est encryption code. appears. •... (Music) until the encryption code is incorrectly connected. UPDATING Cause Parking brake lead is fully up- Please see Operation Manual for safety. Wait until "iPod VR activation process complete." Please check your subscription. Action (See) Confirm once more information regarding safe...
... process. (In such case, the acquiring process will be busy until I'm finished, but you can use the touch interface Voice operation is restricted because the navigation system is trying to acquire the information needed to another channel. est encryption code. appears. •... (Music) until the encryption code is incorrectly connected. UPDATING Cause Parking brake lead is fully up- Please see Operation Manual for safety. Wait until "iPod VR activation process complete." Please check your subscription. Action (See) Confirm once more information regarding safe...

Installation Manual
Page 6
...the * side of the speaker lead or connect the * sides of the connector. ! Since a unique BPTL circuit is especially important to "Operation Manual".) ! The timing varies depending on the setting. (For more detailed information on this product will not be stowed or turned off by following the.... ! Connecting speakers with a 12-volt battery and negative grounding. It is employed, do not remove the caps attached to the owner's manual for details on the fuse holder. ! Attach the connectors of the same color to the corresponding colored port, i.e., blue connector to the blue...
...the * side of the speaker lead or connect the * sides of the connector. ! Since a unique BPTL circuit is especially important to "Operation Manual".) ! The timing varies depending on the setting. (For more detailed information on this product will not be stowed or turned off by following the.... ! Connecting speakers with a 12-volt battery and negative grounding. It is employed, do not remove the caps attached to the owner's manual for details on the fuse holder. ! Attach the connectors of the same color to the corresponding colored port, i.e., blue connector to the blue...

Installation Manual
Page 8
...INPUT) Black Blue XM tuner (e.g. It is necessary to set [AV1 Input] in .) Antenna jack Vehicle antenna WIRED REMOTE INPUT Please see the Instruction Manual for iPod or an appropriate USB storage device. *1 8 En GEX-P920XM) *1 (sold separately). Section 03 Connecting the System Connecting the system The ...ft. 5 in.) RCA connector 2 m (6 ft. 7 in.) Blue 20 cm (7-7/8 in [AV Settings] to [iPod] when connecting the iPod. (For details, refer to "Operation Manual".) USB connector Connect either the interface cable for the Wired Remote Control Adapters (sold separately) *1 -
...INPUT) Black Blue XM tuner (e.g. It is necessary to set [AV1 Input] in .) Antenna jack Vehicle antenna WIRED REMOTE INPUT Please see the Instruction Manual for iPod or an appropriate USB storage device. *1 8 En GEX-P920XM) *1 (sold separately). Section 03 Connecting the System Connecting the system The ...ft. 5 in.) RCA connector 2 m (6 ft. 7 in.) Blue 20 cm (7-7/8 in [AV Settings] to [iPod] when connecting the iPod. (For details, refer to "Operation Manual".) USB connector Connect either the interface cable for the Wired Remote Control Adapters (sold separately) *1 -

Installation Manual
Page 9
... this product´s video source should not be used while the vehicle is being driven except for iPod® Note For details concerning operations and compatiblity, refer to "Operation Manual". Also Rear Displays should not be in a location where it is a visible distraction to the driver. · In some countries or states, the...
... this product´s video source should not be used while the vehicle is being driven except for iPod® Note For details concerning operations and compatiblity, refer to "Operation Manual". Also Rear Displays should not be in a location where it is a visible distraction to the driver. · In some countries or states, the...

Installation Manual
Page 10
... of this navigation system is connected to this navigation system instead of a rear speaker, change the rear output setting in the Initial Setting. (Refer to "Operation Manual".) The subwoofer output of ignition switch position.
... of this navigation system is connected to this navigation system instead of a rear speaker, change the rear output setting in the Initial Setting. (Refer to "Operation Manual".) The subwoofer output of ignition switch position.

Installation Manual
Page 11
... the Audio Mute lead free of the navigation - En 11 voice guidance of any connections. Blue To auto-antenna relay control terminal. For details, see "Operation Manual". - If the vehicle has a glass antenna, connect to mute or attenuate, while the following sounds will automatically retract or turn off, yet the timing varies...
... the Audio Mute lead free of the navigation - En 11 voice guidance of any connections. Blue To auto-antenna relay control terminal. For details, see "Operation Manual". - If the vehicle has a glass antenna, connect to mute or attenuate, while the following sounds will automatically retract or turn off, yet the timing varies...

Installation Manual
Page 14
Section 03 Connecting the System When connecting to separately sold power amp Subwoofer output (SUBWOOFER OUTPUT) 28cm (11 in.) RCA connector Rear output (REAR OUTPUT) 30cm (11-7/8 in.) The navigation unit Front output (FRONT OUTPUT) 30cm (11-7/8 in.) 30cm (11-7/8 in.) Blue/white To system control terminal of the power amp (max. 300 mA 12 V DC). 14 En Note You can change the RCA output of the subwoofer depending on your subwoofer system. (Refer to "Operation Manual".)
Section 03 Connecting the System When connecting to separately sold power amp Subwoofer output (SUBWOOFER OUTPUT) 28cm (11 in.) RCA connector Rear output (REAR OUTPUT) 30cm (11-7/8 in.) The navigation unit Front output (FRONT OUTPUT) 30cm (11-7/8 in.) 30cm (11-7/8 in.) Blue/white To system control terminal of the power amp (max. 300 mA 12 V DC). 14 En Note You can change the RCA output of the subwoofer depending on your subwoofer system. (Refer to "Operation Manual".)

Installation Manual
Page 16
... when the gear shift is necessary to set [Back Camera] in [System Settings] to [On] when connecting the rear view camera. (For details, refer to "Operation Manual".) ! Use of the rear view camera images may appear reversed. ! RearView mode also allows you while driving. ND-BC2) (sold separately) To video output RCA...
... when the gear shift is necessary to set [Back Camera] in [System Settings] to [On] when connecting the rear view camera. (For details, refer to "Operation Manual".) ! Use of the rear view camera images may appear reversed. ! RearView mode also allows you while driving. ND-BC2) (sold separately) To video output RCA...

Installation Manual
Page 17
... watch the video source while driving. This navigation system's rear video output is necessary to set [AV1 Input] in a location that enables the driver to "Operation Manual".) En 17 RCA connector Yellow (VIDEO INPUT) 20 cm (7-7/8 in.) Red, white (AUDIO INPUT) RCA cables (sold separately) To video output To audio outputs External...
... watch the video source while driving. This navigation system's rear video output is necessary to set [AV1 Input] in a location that enables the driver to "Operation Manual".) En 17 RCA connector Yellow (VIDEO INPUT) 20 cm (7-7/8 in.) Red, white (AUDIO INPUT) RCA cables (sold separately) To video output To audio outputs External...

Installation Manual
Page 18
... System Using "AV2 Input" (AV2) The navigation unit Mini jack CD-RM10 (sold separately) Yellow RCA cables (sold separately) Red, white CAUTION Be sure to "Operation Manual".) 18 En It is necessary to set [AV2 Input] in [AV Settings] to [Video] when connecting the external video component. (For details, refer to use...
... System Using "AV2 Input" (AV2) The navigation unit Mini jack CD-RM10 (sold separately) Yellow RCA cables (sold separately) Red, white CAUTION Be sure to "Operation Manual".) 18 En It is necessary to set [AV2 Input] in [AV Settings] to [Video] when connecting the external video component. (For details, refer to use...
Installation Manual
Page 19
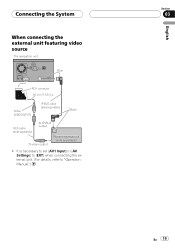
It is necessary to "Operation Manual".) English Section 03 En 19 Connecting the System When connecting the external unit featuring video source The navigation unit Blue RCA connector 20 cm (7-7/8 in [AV Settings] to [EXT] when connecting the external unit. (For details, refer to set [AV1 Input] in .) Yellow (VIDEO INPUT) IP-BUS cable (sold separately) Black RCA cable (sold separately) To IP-BUS output To video output Pioneer external unit (sold separately) !
It is necessary to "Operation Manual".) English Section 03 En 19 Connecting the System When connecting the external unit featuring video source The navigation unit Blue RCA connector 20 cm (7-7/8 in [AV Settings] to [EXT] when connecting the external unit. (For details, refer to set [AV1 Input] in .) Yellow (VIDEO INPUT) IP-BUS cable (sold separately) Black RCA cable (sold separately) To IP-BUS output To video output Pioneer external unit (sold separately) !
Installation Manual
Page 28
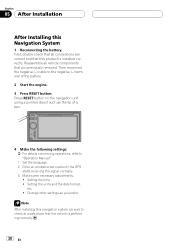
Then reconnect the negative (-) cable to "Operation Manual". 1 Set the language. 2 Drive an unobstructed road until the GPS starts receiving the signal normally. 3 Make some necessary adjustments. ! Press RESET button on the navigation ... this product is performing normally. 28 En Setting the time ! Change other settings as the tip of a pen. 4 Make the following settings: = For details concerning operations, refer to the negative (-) terminal of the battery. 2 Start the engine. 3 Press RESET button. First, double-check that all vehicle components that the vehicle is...
Then reconnect the negative (-) cable to "Operation Manual". 1 Set the language. 2 Drive an unobstructed road until the GPS starts receiving the signal normally. 3 Make some necessary adjustments. ! Press RESET button on the navigation ... this product is performing normally. 28 En Setting the time ! Change other settings as the tip of a pen. 4 Make the following settings: = For details concerning operations, refer to the negative (-) terminal of the battery. 2 Start the engine. 3 Press RESET button. First, double-check that all vehicle components that the vehicle is...


