Owner's Manual
Page 2
Resetting the microprocessor 11 Basic operation Checking part names and functions 13 Inserting/ejecting a disc 14 - Inserting an SD memory card 15 - Disconnecting your iPod 16 - What you want to the position you ... iPod 16 - Please read through these operating instructions so you searched for a location by coordinates 32 Selecting a location you will know how to read this Pioneer product. Plugging in "Favorites" 33 - Searching for performance and function improvements. Ejecting an SD memory card 15 Plugging and unplugging a USB storage device 15 - Changing...
Resetting the microprocessor 11 Basic operation Checking part names and functions 13 Inserting/ejecting a disc 14 - Inserting an SD memory card 15 - Disconnecting your iPod 16 - What you want to the position you ... iPod 16 - Please read through these operating instructions so you searched for a location by coordinates 32 Selecting a location you will know how to read this Pioneer product. Plugging in "Favorites" 33 - Searching for performance and function improvements. Ejecting an SD memory card 15 Plugging and unplugging a USB storage device 15 - Changing...

Owner's Manual
Page 13
...Adjusting the screen brightness on page 137. 7 MULTI-CONTROL Rotating; Basic operation 43 2 1 Chapter 02 Basic operation 5 6 7 8 9 a Checking part names and functions This chapter gives information about the names of the touch panels (touch panel calibration) on page 136. 6 MAP button Press to display...". Press and hold to display the "Screen Calibration" screen. = For details concerning operations, refer to Adjusting the response positions of the parts and the main features using the buttons. 1 Disc loading slot Insert a disc to play. = For details concerning operations, refer to ...
...Adjusting the screen brightness on page 137. 7 MULTI-CONTROL Rotating; Basic operation 43 2 1 Chapter 02 Basic operation 5 6 7 8 9 a Checking part names and functions This chapter gives information about the names of the touch panels (touch panel calibration) on page 136. 6 MAP button Press to display...". Press and hold to display the "Screen Calibration" screen. = For details concerning operations, refer to Adjusting the response positions of the parts and the main features using the buttons. 1 Disc loading slot Insert a disc to play. = For details concerning operations, refer to ...

Owner's Manual
Page 65
...Displaying the "Function" menu = For details, refer to Using the "Function" menu on the next page. 3 Switching the playing part = For details, refer to Switching the playing part on page 67. 4 Skipping the track forward or backward Touching [p] skips to the start of the current track. p Fast rewind ...is not available for AVICF700BT and AVIC-F7010BT. p To cancel the random play into disc-loading slot. Playback starts ...
...Displaying the "Function" menu = For details, refer to Using the "Function" menu on the next page. 3 Switching the playing part = For details, refer to Switching the playing part on page 67. 4 Skipping the track forward or backward Touching [p] skips to the start of the current track. p Fast rewind ...is not available for AVICF700BT and AVIC-F7010BT. p To cancel the random play into disc-loading slot. Playback starts ...
Owner's Manual
Page 67
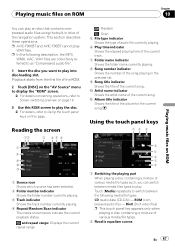
.../Scan indicator The marks shown below indicate the current playback status. Using the touch panel keys 12 3 4 5 6 7 8 1 Switching the playing part When playing a disc containing a mixture of the current song. Touch [Media] repeatedly to switch between media files types to play an disc that contains ... play WAV files. ROM (compressed audio file) - Playing music files on ROM Chapter 10 Playing music files on this page. p AVIC-F900BT and AVIC-F90BT cannot play into disc-loading slot. a Artist name indicator Shows the artist name of the album for the current song. and repeat...
.../Scan indicator The marks shown below indicate the current playback status. Using the touch panel keys 12 3 4 5 6 7 8 1 Switching the playing part When playing a disc containing a mixture of the current song. Touch [Media] repeatedly to switch between media files types to play an disc that contains ... play WAV files. ROM (compressed audio file) - Playing music files on ROM Chapter 10 Playing music files on this page. p AVIC-F900BT and AVIC-F90BT cannot play into disc-loading slot. a Artist name indicator Shows the artist name of the album for the current song. and repeat...

Owner's Manual
Page 68
... a mixture of the upper folder (parent folder). If you touch a folder on a disc. If the uppermost folder is not available for AVICF700BT and AVIC-F7010BT. Artist Name : (artist name) If specific information has not been recorded on compressed audio files on the repeat range. You cannot select a folder.... 68 En p Fast rewind is no sound on the folder. Touching displays the content of various media file types, all tracks within the current part ("CD" or "ROM") are played randomly. The next piece of the songs in the list. p Moving MULTI-CONTROL left or right enables you...
... a mixture of the upper folder (parent folder). If you touch a folder on a disc. If the uppermost folder is not available for AVICF700BT and AVIC-F7010BT. Artist Name : (artist name) If specific information has not been recorded on compressed audio files on the repeat range. You cannot select a folder.... 68 En p Fast rewind is no sound on the folder. Touching displays the content of various media file types, all tracks within the current part ("CD" or "ROM") are played randomly. The next piece of the songs in the list. p Moving MULTI-CONTROL left or right enables you...

Owner's Manual
Page 80
... search and time search are not possible when disc playback has been stopped. 80 En File name display 7 Displaying the map screen 8 Switching the playing part When playing a disc containing a mixture of various media file types such, you can search for five seconds, fast reverse/fast forward continues even if you...
... search and time search are not possible when disc playback has been stopped. 80 En File name display 7 Displaying the map screen 8 Switching the playing part When playing a disc containing a mixture of various media file types such, you can search for five seconds, fast reverse/fast forward continues even if you...

Owner's Manual
Page 126
... field: is activated. "Textured Polygons" You can setup the behavior while "Smart Zoom" is described here along with an operational example. 1 Touch [Visual] on each part of "Top field:" to activate or deactivate "Smart Zoom".
... field: is activated. "Textured Polygons" You can setup the behavior while "Smart Zoom" is described here along with an operational example. 1 Touch [Visual] on each part of "Top field:" to activate or deactivate "Smart Zoom".

Owner's Manual
Page 173
... system, refer to the DivX VOD provider. You cannot connect a USB storage device to Specifications on page 190. Partitioned USB memory is different from DivX part- Firmly secure the USB storage device when driving. Do not connect anything other than the USB portable audio player/USB memory device. SD memory card...
... system, refer to the DivX VOD provider. You cannot connect a USB storage device to Specifications on page 190. Partitioned USB memory is different from DivX part- Firmly secure the USB storage device when driving. Do not connect anything other than the USB portable audio player/USB memory device. SD memory card...
Installation Manual
Page 2
...power cord (1) 10 Connecting the power cord (2) 12 When connecting to rear video output 17 When connecting the external video component 17 - Parts supplied 22 - Parts supplied 26 - Using "AV1 Input" (AV1) 17 - When using the screw holes on the side of the navigation unit 22 ...Installation After Installing this navigation system 21 - Installation notes 23 - Mounting on the rear shelf) 24 - Notice for the blue lead 6 - Parts supplied 23 - Installation on the body) 25 Installing the microphone 26 - Contents IMPORTANT INFORMATION ABOUT YOUR NEW NAVIGATION SYSTEM AND THIS MANUAL 3 ...
...power cord (1) 10 Connecting the power cord (2) 12 When connecting to rear video output 17 When connecting the external video component 17 - Parts supplied 22 - Parts supplied 26 - Using "AV1 Input" (AV1) 17 - When using the screw holes on the side of the navigation unit 22 ...Installation After Installing this navigation system 21 - Installation notes 23 - Mounting on the rear shelf) 24 - Notice for the blue lead 6 - Parts supplied 23 - Installation on the body) 25 Installing the microphone 26 - Contents IMPORTANT INFORMATION ABOUT YOUR NEW NAVIGATION SYSTEM AND THIS MANUAL 3 ...
Installation Manual
Page 5
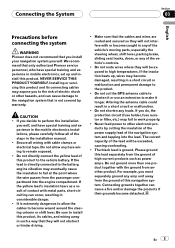
...the wire passes from another product. We recommend that only authorized Pioneer service personnel, who have special training and experience in the mobile electronics installations, please carefully follow all wiring with metal parts, short-circuiting can cause a fire and/or damage the ...short circuit or malfunction and permanent damage to the product. ! Connecting the System Section 03 English Precautions before connecting the system WARNING Pioneer does not recommend that you do, the protection circuit (fuse holder, fuse resistor or filter, etc.) may fail to work properly...
...the wire passes from another product. We recommend that only authorized Pioneer service personnel, who have special training and experience in the mobile electronics installations, please carefully follow all wiring with metal parts, short-circuiting can cause a fire and/or damage the ...short circuit or malfunction and permanent damage to the product. ! Connecting the System Section 03 English Precautions before connecting the system WARNING Pioneer does not recommend that you do, the protection circuit (fuse holder, fuse resistor or filter, etc.) may fail to work properly...

Installation Manual
Page 7
... Section 03 English - RCA connector Extension lead (for the blue/white lead ! Connector Extension lead (for speed signal) Notice for reverse signal) GPS antenna Microphone Parts supplied The navigation unit Power cord En 7 Be sure not to an external power amp's system remote control terminal (max. 300 mA 12 V DC). Connect...
... Section 03 English - RCA connector Extension lead (for the blue/white lead ! Connector Extension lead (for speed signal) Notice for reverse signal) GPS antenna Microphone Parts supplied The navigation unit Power cord En 7 Be sure not to an external power amp's system remote control terminal (max. 300 mA 12 V DC). Connect...
Installation Manual
Page 20
...the vehicle stops quickly. ! Install the navigation system between the driver's seat and front passenger seat so that they may damage internal parts of the vehicle's operating systems, including airbags and headrests. Never install the navigation system in front of the driver's seat, or close... lead ! Refer all applicable laws and regulations regarding the use the supplied parts in the dash, door, or pillar from this product in places where, or in front of or next to authorized Pioneer service personnel. To ensure proper installation, use , installation and operation of your...
...the vehicle stops quickly. ! Install the navigation system between the driver's seat and front passenger seat so that they may damage internal parts of the vehicle's operating systems, including airbags and headrests. Never install the navigation system in front of the driver's seat, or close... lead ! Refer all applicable laws and regulations regarding the use the supplied parts in the dash, door, or pillar from this product in places where, or in front of or next to authorized Pioneer service personnel. To ensure proper installation, use , installation and operation of your...

Installation Manual
Page 22
Section 04 Installation Parts supplied The navigation unit Binding screw (5 mm × 6 mm) (8 pcs.) Flush surface screw (5 mm × 6 mm) (8 pcs.) Installation using the screw holes on the side ...
Section 04 Installation Parts supplied The navigation unit Binding screw (5 mm × 6 mm) (8 pcs.) Flush surface screw (5 mm × 6 mm) (8 pcs.) Installation using the screw holes on the side ...

Installation Manual
Page 23
... antenna cable could result in the vehicle when going through an automatic vehicle wash. The antenna should be knocked off and scratch the vehicle body. ! Parts supplied GPS antenna Metal sheet Clamp (5 pcs.) Waterproof pad Trunk lid Roof Rear shelf ! En 23 If it may be installed on the outside it...
... antenna cable could result in the vehicle when going through an automatic vehicle wash. The antenna should be knocked off and scratch the vehicle body. ! Parts supplied GPS antenna Metal sheet Clamp (5 pcs.) Waterproof pad Trunk lid Roof Rear shelf ! En 23 If it may be installed on the outside it...

Installation Manual
Page 26
Microphone clip Parts supplied Microphone Microphone clip Double-sided tape Clamp (5 pcs.) Mounting on the sun visor when it easiest to pick up position. Microphone Microphone clip Clamps ...
Microphone clip Parts supplied Microphone Microphone clip Double-sided tape Clamp (5 pcs.) Mounting on the sun visor when it easiest to pick up position. Microphone Microphone clip Clamps ...


