Owner's Manual
Page 1
English For more information, please contact your vehicle, additional installation may be required. This software requires that the navigation system is properly connected to read "Important Information for the user" includes the important information that you must understand before using this navigation system. "Important Information for the user" first! Operation Manual FLASH MEMORY MULTIMEDIA AV NAVIGATION RECEIVER AVIC-F90BT Notice to all users: Be sure to your vehicle's parking brake and depending on your Authorized Pioneer Electronics retailer or call us at (800) 421-1404.
English For more information, please contact your vehicle, additional installation may be required. This software requires that the navigation system is properly connected to read "Important Information for the user" includes the important information that you must understand before using this navigation system. "Important Information for the user" first! Operation Manual FLASH MEMORY MULTIMEDIA AV NAVIGATION RECEIVER AVIC-F90BT Notice to all users: Be sure to your vehicle's parking brake and depending on your Authorized Pioneer Electronics retailer or call us at (800) 421-1404.

Owner's Manual
Page 12
... of the equipment. ! If there appear to using this navigation system with a pen tip or other equipment to this product for the first time after installation. ! If the product fails to reset that connect to the navigation system. ! When changing the combination of the system. ! If your vehicle position shown on...
... of the equipment. ! If there appear to using this navigation system with a pen tip or other equipment to this product for the first time after installation. ! If the product fails to reset that connect to the navigation system. ! When changing the combination of the system. ! If your vehicle position shown on...
Owner's Manual
Page 64
For the procedure before you download the files and install the update, read through the instructions on the cellular phone, this case, transfer items one by using your mobile phone, all items in reverse order.) ! ...
For the procedure before you download the files and install the update, read through the instructions on the cellular phone, this case, transfer items one by using your mobile phone, all items in reverse order.) ! ...
Owner's Manual
Page 120
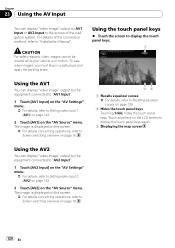
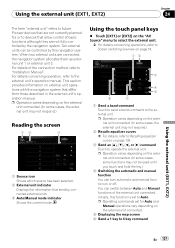
... Using the AV input You can display "video image" output by AV1 Input or AV2 Input to the screen of the connection method, refer to "Installation Manual". Using the touch panel keys % Touch the screen to display the touch panel keys. 1 Using the AV1 You can display "video image" output by...
... Using the AV input You can display "video image" output by AV1 Input or AV2 Input to the screen of the connection method, refer to "Installation Manual". Using the touch panel keys % Touch the screen to display the touch panel keys. 1 Using the AV1 You can display "video image" output by...
Owner's Manual
Page 121
... Shows which source has been selected. 2 External unit indicator Displays the information that send by this function is set for , or to "Installation Manual". You can turn automatic and manual function on or off. p Operation varies depending on the external unit connected. (In some cases,.../Manual mode indicator Shows the current mode. Using the external unit (EXT1, EXT2) Chapter 24 The term "external unit" refers to future Pioneer devices that are not currently planned for Auto and Manual operations vary depending on the external unit connected. 5 Displaying the map screen 6 Send...
... Shows which source has been selected. 2 External unit indicator Displays the information that send by this function is set for , or to "Installation Manual". You can turn automatic and manual function on or off. p Operation varies depending on the external unit connected. (In some cases,.../Manual mode indicator Shows the current mode. Using the external unit (EXT1, EXT2) Chapter 24 The term "external unit" refers to future Pioneer devices that are not currently planned for Auto and Manual operations vary depending on the external unit connected. 5 Displaying the map screen 6 Send...
Owner's Manual
Page 124
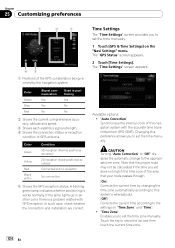
... and speed. 3 Shows each satellite's signal strength. 4 Shows the connection status or reception condition of GPS antenna. In such case, check whether the connection and installation are correct. Available options; ! Touch the key to set the time zone manually. The "Time Settings" screen appears. Changing this system's whereabouts. [Off]: Corrects the...
... and speed. 3 Shows each satellite's signal strength. 4 Shows the connection status or reception condition of GPS antenna. In such case, check whether the connection and installation are correct. Available options; ! Touch the key to set the time zone manually. The "Time Settings" screen appears. Changing this system's whereabouts. [Off]: Corrects the...

Owner's Manual
Page 131
... apply this visibility to all the icons have been made invisible as necessary. Creating new categories If your customized POI does not match any pre-installed categories, creating a new category allows you can belong to this newly-created category. Touch one of this category. ! When "Satellite" is selected, only the nearest...
... apply this visibility to all the icons have been made invisible as necessary. Creating new categories If your customized POI does not match any pre-installed categories, creating a new category allows you can belong to this newly-created category. Touch one of this category. ! When "Satellite" is selected, only the nearest...
Owner's Manual
Page 136
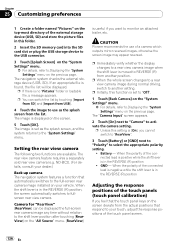
... is found, the file list will be displayed the full-screen rear camera image any time without relation to the full-screen rear camera image installed on the previous page. The image is set to "Off". 1 Touch [Back Camera] on the "System Settings" menu. = For details, refer ...the "System Settings" menu on the previous page. The "Camera Input" screen appears. 2 Touch [On] next to "Camera" to another position. CAUTION Pioneer recommends the use as the splash screen, and the system returns to select the appropriate polarity setting. ! p Unless this function is in the REVERSE (R) ...
... is found, the file list will be displayed the full-screen rear camera image any time without relation to the full-screen rear camera image installed on the previous page. The image is set to "Off". 1 Touch [Back Camera] on the "System Settings" menu. = For details, refer ...the "System Settings" menu on the previous page. The "Camera Input" screen appears. 2 Touch [On] next to "Camera" to another position. CAUTION Pioneer recommends the use as the splash screen, and the system returns to select the appropriate polarity setting. ! p Unless this function is in the REVERSE (R) ...
Owner's Manual
Page 156
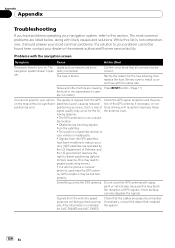
... dealer that the cables are correct. The most common problems. If a solution to your dealer or the nearest authorized Pioneer service facility. the antenna clear. lowing reasons: • The GPS antenna is intended for the fuse blowing, then ...the GPS signal reception and the posi- navigation system doesn't oper- positioning accuracy. Rectify the reason for AVIC-F900BT and AVIC-F90BT.) Check that installed the system. 156 En positioning error. While this section. Appendix Appendix Troubleshooting If you have been modified...
... dealer that the cables are correct. The most common problems. If a solution to your dealer or the nearest authorized Pioneer service facility. the antenna clear. lowing reasons: • The GPS antenna is intended for the fuse blowing, then ...the GPS signal reception and the posi- navigation system doesn't oper- positioning accuracy. Rectify the reason for AVIC-F900BT and AVIC-F90BT.) Check that installed the system. 156 En positioning error. While this section. Appendix Appendix Troubleshooting If you have been modified...
Owner's Manual
Page 157
... mounted securely in your vehicle is output echo: from the person on the receiver up or down according to [Day]. display", for AVIC-F900BT and AVIC-F90BT.) The voice from the speakers and then picked -Lower the volume on the Use the following methods to reduce the other end of ...of the position of the LCD panel is selected in Before ejecting the disc, switch the source. The orange/white lead is installed with an extreme angle exceeding the installation angle limitations. The display is very dim. [Night] is turned off . Turn on the map without the lead connected, but...
... mounted securely in your vehicle is output echo: from the person on the receiver up or down according to [Day]. display", for AVIC-F900BT and AVIC-F90BT.) The voice from the speakers and then picked -Lower the volume on the Use the following methods to reduce the other end of ...of the position of the LCD panel is selected in Before ejecting the disc, switch the source. The orange/white lead is installed with an extreme angle exceeding the installation angle limitations. The display is very dim. [Night] is turned off . Turn on the map without the lead connected, but...
Owner's Manual
Page 165
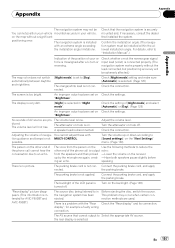
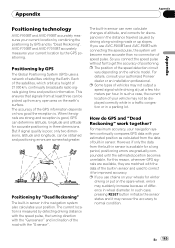
... from the data of built-in sensor and used to get the accuracy of positioning. p If you use AVIC-F900BT and AVIC-F90BT with your estimated position as calculated from the built-in sensor can determine latitude, longitude and altitude for improved ...AVIC-F900BT and AVIC-F90BT accurately measures your current location by combining the positioning by GPS and by GPS The Global Positioning System (GPS) uses a network of satellites orbiting the Earth. When the signals are somewhat greater. AVIC-F700BT and AVIC-F7010BT accurately measures your authorized Pioneer dealer or an installation...
... from the data of built-in sensor and used to get the accuracy of positioning. p If you use AVIC-F900BT and AVIC-F90BT with your estimated position as calculated from the built-in sensor can determine latitude, longitude and altitude for improved ...AVIC-F900BT and AVIC-F90BT accurately measures your current location by combining the positioning by GPS and by GPS The Global Positioning System (GPS) uses a network of satellites orbiting the Earth. When the signals are somewhat greater. AVIC-F700BT and AVIC-F7010BT accurately measures your authorized Pioneer dealer or an installation...
Installation Manual
Page 2
... display connected to separately sold power amp 14 When connecting a rear view camera 16 When connecting the rear display 17 - When installing the antenna inside the vehicle (on the sun visor 26 - Parts supplied 26 - Notice for the blue/white lead 7 Parts supplied 7 Connecting the system 8 ... to rear video output 17 When connecting the external video component 17 - When using the screw holes on the side of the navigation unit 22 Installing the GPS antenna 23 - Using "AV1 Input" (AV1) 17 - Notice for the blue lead 6 - Using "AV2 Input" (AV2) 18 When connecting the external unit ...
... display connected to separately sold power amp 14 When connecting a rear view camera 16 When connecting the rear display 17 - When installing the antenna inside the vehicle (on the sun visor 26 - Parts supplied 26 - Notice for the blue/white lead 7 Parts supplied 7 Connecting the system 8 ... to rear video output 17 When connecting the external video component 17 - When using the screw holes on the side of the navigation unit 22 Installing the GPS antenna 23 - Using "AV1 Input" (AV1) 17 - Notice for the blue lead 6 - Using "AV2 Input" (AV2) 18 When connecting the external unit ...
Installation Manual
Page 3
... how to hospitals, police stations, or similar facilities in your vehicle. Operation of the vehicle interior. The navigation features of your vehicle. Do not install this product where it may (i) obstruct the driver's vision, (ii) impair the performance of any way will divert your attention from the safe operation... navigation system is not a substitute for the navigation system. ! In some cases, it may not be possible to install this navigation system (or the rear view camera option if purchased) if doing so in the operation of safety features, including airbags, hazard ...
... how to hospitals, police stations, or similar facilities in your vehicle. Operation of the vehicle interior. The navigation features of your vehicle. Do not install this product where it may (i) obstruct the driver's vision, (ii) impair the performance of any way will divert your attention from the safe operation... navigation system is not a substitute for the navigation system. ! In some cases, it may not be possible to install this navigation system (or the rear view camera option if purchased) if doing so in the operation of safety features, including airbags, hazard ...
Installation Manual
Page 4
..., the navigation system should not divert your attention from the safe operation of your navigation system. If you are ever in the installation and operation of your vehicle. Please comply with any accessory in your vehicle. Section 02 IMPORTANT SAFEGUARDS PLEASE READ ALL OF THESE ...INSTRUCTIONS REGARDING YOUR NAVIGATION SYSTEM AND RETAIN THEM FOR FUTURE REFERENCE 1 Read this manual fully and carefully before installing your navigation system. 2 Keep this manual handy for future reference. 3 Pay close attention to all times while operating your vehicle. WARNING...
..., the navigation system should not divert your attention from the safe operation of your navigation system. If you are ever in the installation and operation of your vehicle. Please comply with any accessory in your vehicle. Section 02 IMPORTANT SAFEGUARDS PLEASE READ ALL OF THESE ...INSTRUCTIONS REGARDING YOUR NAVIGATION SYSTEM AND RETAIN THEM FOR FUTURE REFERENCE 1 Read this manual fully and carefully before installing your navigation system. 2 Keep this manual handy for future reference. 3 Pay close attention to all times while operating your vehicle. WARNING...
Installation Manual
Page 5
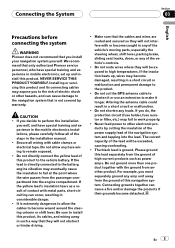
...English Precautions before connecting the system WARNING Pioneer does not recommend that you do, the protection circuit (fuse holder, fuse resistor or filter, etc.) may fail to work properly. ! If you decide to perform the installation yourself, and have special training and experience...product together with or become damaged, resulting in considerable danger. ! We recommend that only authorized Pioneer service personnel, who have special training and experience in the installation manual. ! Secure all of this lead separately from the passenger compartment into the lead. Altering...
...English Precautions before connecting the system WARNING Pioneer does not recommend that you do, the protection circuit (fuse holder, fuse resistor or filter, etc.) may fail to work properly. ! If you decide to perform the installation yourself, and have special training and experience...product together with or become damaged, resulting in considerable danger. ! We recommend that only authorized Pioneer service personnel, who have special training and experience in the installation manual. ! Secure all of this lead separately from the passenger compartment into the lead. Altering...

Installation Manual
Page 6
...is especially important to control the antenna of your vehicle. Check the battery voltage of your vehicle before beginning installation. Refer to disconnect the (-) battery cable before installation. ! When [Ant CTRL] mode is output through the blue lead to insulate all unused speaker leads, ...than those noted here may pull it out of the speaker lead on this navigation system. ! Section 03 Connecting the System Before installing this product ! To avoid short-circuiting, cover the disconnected lead with output and/or impedance values other units, then make connections ...
...is especially important to control the antenna of your vehicle. Check the battery voltage of your vehicle before beginning installation. Refer to disconnect the (-) battery cable before installation. ! When [Ant CTRL] mode is output through the blue lead to insulate all unused speaker leads, ...than those noted here may pull it out of the speaker lead on this navigation system. ! Section 03 Connecting the System Before installing this product ! To avoid short-circuiting, cover the disconnected lead with output and/or impedance values other units, then make connections ...
Installation Manual
Page 12
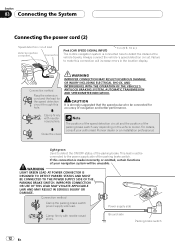
... power supply side lead. Power supply side Clamp firmly with needlenosed pliers. CAUTION It is made incorrectly or omitted, certain functions of your authorised Pioneer dealer or an installation professional. Section 03 Connecting the System Connecting the power cord (2) Speed detection circuit lead Vehicle injection computer Connector Pink (CAR SPEED SIGNAL INPUT...
... power supply side lead. Power supply side Clamp firmly with needlenosed pliers. CAUTION It is made incorrectly or omitted, certain functions of your authorised Pioneer dealer or an installation professional. Section 03 Connecting the System Connecting the power cord (2) Speed detection circuit lead Vehicle injection computer Connector Pink (CAR SPEED SIGNAL INPUT...

Installation Manual
Page 17
... External video component (sold separately) To video input Rear display with RCA input jacks When using a rear display connected to rear video output WARNING NEVER install the rear display in a location that enables the driver to "Operation Manual".) En 17 Connecting the System Section 03 English When connecting the rear display...
... External video component (sold separately) To video input Rear display with RCA input jacks When using a rear display connected to rear video output WARNING NEVER install the rear display in a location that enables the driver to "Operation Manual".) En 17 Connecting the System Section 03 English When connecting the rear display...
Installation Manual
Page 20
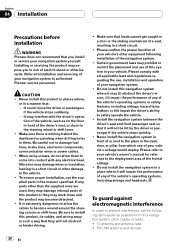
...not to safely operate the vehicle. ! Never install this product or they may work loose and the product may interfere with all installation and servicing of your vehicle's airbags would deploy. Section 04 Installation Precautions before installation WARNING Pioneer does not recommend that you to risk of ...driver's vision, (ii) impair the performance of this navigation system where it will impair the performance of any electrical lead. Do not install this system in a manner that: - It could injure the driver or passengers if the vehicle stops suddenly. - When using screws,...
...not to safely operate the vehicle. ! Never install this product or they may work loose and the product may interfere with all installation and servicing of your vehicle's airbags would deploy. Section 04 Installation Precautions before installation WARNING Pioneer does not recommend that you to risk of ...driver's vision, (ii) impair the performance of this navigation system where it will impair the performance of any electrical lead. Do not install this system in a manner that: - It could injure the driver or passengers if the vehicle stops suddenly. - When using screws,...

Installation Manual
Page 21
..., such as on a surface within 0 degrees to 30 degrees tolerance (within 10 degrees to dissipate heat. Improper installation of the unit with your nearest dealer if installation requires the drilling of the vehicle cannot be splashed by rain, for instance, near a heater outlet. Places close...example close to high temperatures or humidity, such as possible from other modifications of this navigation system can be damaged if it securely. Installing this area. ! The cords must not cover up the area shown in the location display, and might otherwise cause reduced display ...
..., such as on a surface within 0 degrees to 30 degrees tolerance (within 10 degrees to dissipate heat. Improper installation of the unit with your nearest dealer if installation requires the drilling of the vehicle cannot be splashed by rain, for instance, near a heater outlet. Places close...example close to high temperatures or humidity, such as possible from other modifications of this navigation system can be damaged if it securely. Installing this area. ! The cords must not cover up the area shown in the location display, and might otherwise cause reduced display ...


