Owner's Manual
Page 2
...The operation of creating your home 34 Setting a route by recalling a saved route 34 After you have finished reading the instructions, keep this Pioneer product. Searching for POIs along the current route 28 - Ejecting an SD memory card 15 Plugging and unplugging a USB storage device 15 -... cursor 27 - Please read through these operating instructions so you will know how to your route 23 The operations of terminology 8 Features 9 Map coverage 11 Protecting the LCD panel and screen 11 Viewing the LCD comfortably 11 Notes for recently 33 - Introduction Manual overview 8 - Unplugging ...
...The operation of creating your home 34 Setting a route by recalling a saved route 34 After you have finished reading the instructions, keep this Pioneer product. Searching for POIs along the current route 28 - Ejecting an SD memory card 15 Plugging and unplugging a USB storage device 15 -... cursor 27 - Please read through these operating instructions so you will know how to your route 23 The operations of terminology 8 Features 9 Map coverage 11 Protecting the LCD panel and screen 11 Viewing the LCD comfortably 11 Notes for recently 33 - Introduction Manual overview 8 - Unplugging ...
Owner's Manual
Page 3
... call 56 - Checking your cellular phone 52 - Searching for a movie title by scrolling the map 35 After the location is decided (Map Confirmation Screen) What you can do with the "Map Confirmation Screen" 36 Route... 36 Save as... 37 Setting the location as a new destination 37...41 - Deleting the entry in "Saved Routes" 45 Deleting the current route 45 Browsing information on the "Map Confirmation Screen" 58 - Subscribing to read traffic information on the map 42 Checking the current itinerary 42 Editing waypoints and the destination Editing waypoints 44 - Searching for a specified...
... call 56 - Checking your cellular phone 52 - Searching for a movie title by scrolling the map 35 After the location is decided (Map Confirmation Screen) What you can do with the "Map Confirmation Screen" 36 Route... 36 Save as... 37 Setting the location as a new destination 37...41 - Deleting the entry in "Saved Routes" 45 Deleting the current route 45 Browsing information on the "Map Confirmation Screen" 58 - Subscribing to read traffic information on the map 42 Checking the current itinerary 42 Editing waypoints and the destination Editing waypoints 44 - Searching for a specified...
Owner's Manual
Page 6
Using "My Mix" function 116 - Map Settings 125 - Manage POI 127 - Warnings 128 - Recording your customized POI 132 - Changing the splash screen 135 - Using balance adjustment 139 - Enhancing bass (Bass Booster) ...
Using "My Mix" function 116 - Map Settings 125 - Manage POI 127 - Warnings 128 - Recording your customized POI 132 - Changing the splash screen 135 - Using balance adjustment 139 - Enhancing bass (Bass Booster) ...
Owner's Manual
Page 8
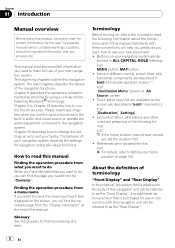
... to as the "Rear Display". 8 En The later chapters describe the details of your navigation system are described in ALL CAPITAL, BOLD lettering: e.g.) MENU button, MAP button. ! Chapter 01 Introduction Manual overview Before using a cellular phone featuring Bluetooth® technology. Buttons on page 134.
... to as the "Rear Display". 8 En The later chapters describe the details of your navigation system are described in ALL CAPITAL, BOLD lettering: e.g.) MENU button, MAP button. ! Chapter 01 Introduction Manual overview Before using a cellular phone featuring Bluetooth® technology. Buttons on page 134.

Owner's Manual
Page 9
...the route from that point so that is deleted, set up as a splash screen You can be selected for navigation guidance. 2D map screen 3D map screen A wide variety of Points of Interest (POI) information More than 100 types of POI categories are included in memory, but the...moving images of playable file formats ! These imported images can also create your original image data is connected to the destination. Built-in DVD drive (AVIC-F900BTand AVIC-F90BT) DVD-Video (commercial-release DVDVideo), DVD-R/-RW/-R DL (DVD-Video, DVD-VR, Data), CD (commercial-release audio CD), CD-R/RW (CD...
...the route from that point so that is deleted, set up as a splash screen You can be selected for navigation guidance. 2D map screen 3D map screen A wide variety of Points of Interest (POI) information More than 100 types of POI categories are included in memory, but the...moving images of playable file formats ! These imported images can also create your original image data is connected to the destination. Built-in DVD drive (AVIC-F900BTand AVIC-F90BT) DVD-Video (commercial-release DVDVideo), DVD-R/-RW/-R DL (DVD-Video, DVD-VR, Data), CD (commercial-release audio CD), CD-R/RW (CD...
Owner's Manual
Page 11
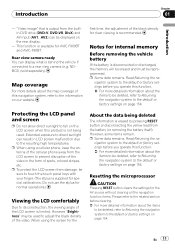
Map coverage For more details about the items to be deleted, refer to Returning the navigation system to the information on page 154. first time, the ... to the related section before clearing. = For more detailed information about the map coverage of this function. = For more detailed information about the items to be used . Resetting the microprocessor CAUTION Pressing RESET button clears the settings for AVIC-F900BT and AVIC-F90BT. NDBC2) (sold separately). However, "Brightness" may be deleted, refer to Returning...
Map coverage For more details about the items to be deleted, refer to Returning the navigation system to the information on page 154. first time, the ... to the related section before clearing. = For more detailed information about the map coverage of this function. = For more detailed information about the items to be used . Resetting the microprocessor CAUTION Pressing RESET button clears the settings for AVIC-F900BT and AVIC-F90BT. NDBC2) (sold separately). However, "Brightness" may be deleted, refer to Returning...

Owner's Manual
Page 12
If the product fails to the navigation system. ! eration of the equipment. ! When adding/removing additional pro- If your vehicle position shown on the map with a significant positioning error. 1 Turn the ignition switch OFF. 2 Press RESET button with the op- RESET button p If you have connected other equipment to using ...
If the product fails to the navigation system. ! eration of the equipment. ! When adding/removing additional pro- If your vehicle position shown on the map with a significant positioning error. 1 Turn the ignition switch OFF. 2 Press RESET button with the op- RESET button p If you have connected other equipment to using ...

Owner's Manual
Page 13
... 7 8 9 a Checking part names and functions This chapter gives information about the names of the touch panels (touch panel calibration) on page 136. 6 MAP button Press to view the map screen. Moving upward or downward once; Press and hold to display the "Picture Adjustment" screen. = For details concerning operations, refer to Adjusting the... screen brightness on page 11. 5 MENU button Press MENU button to display the "Top Menu". Changes the map scale one step at a time. Adjusts the AV (Audio and Video) source volume.
... 7 8 9 a Checking part names and functions This chapter gives information about the names of the touch panels (touch panel calibration) on page 136. 6 MAP button Press to view the map screen. Moving upward or downward once; Press and hold to display the "Picture Adjustment" screen. = For details concerning operations, refer to Adjusting the... screen brightness on page 11. 5 MENU button Press MENU button to display the "Top Menu". Changes the map scale one step at a time. Adjusts the AV (Audio and Video) source volume.
Owner's Manual
Page 14
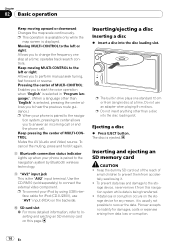
...technology. 9 "AV2" input jack This is paired to the naviga- Inserting and ejecting an SD memory card CAUTION ! p This operation is available only while the map screen is ejected. To cancel the muting, press and hold it again. 8 Bluetooth connection status indicator Lights up when your phone is the "AV2" input... it is being transferred. ! Keep the dummy SD card out of the reach of MULTI-CONTROL; Enables you to connect the external video component. Pioneer accepts no liability for any reason, it . ! The disc is displayed. Pressing the center of MULTI-CONTROL;
...technology. 9 "AV2" input jack This is paired to the naviga- Inserting and ejecting an SD memory card CAUTION ! p This operation is available only while the map screen is ejected. To cancel the muting, press and hold it again. 8 Bluetooth connection status indicator Lights up when your phone is the "AV2" input... it is being transferred. ! Keep the dummy SD card out of the reach of MULTI-CONTROL; Enables you to connect the external video component. Pioneer accepts no liability for any reason, it . ! The disc is displayed. Pressing the center of MULTI-CONTROL;
Owner's Manual
Page 19
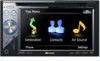
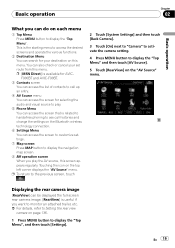
...Basic operation Chapter 02 Basic operation What you can also check or cancel your destination on page 136. 1 Press MENU button to display the navigation map screen. 8 AV operation screen When you play . 5 Phone Menu You can access the screen that is related to hands-free phoning to see... on the Bluetooth wireless technology connection. 6 Settings Menu You can be displayed the full-screen rear camera image. [RearView] is available for AVICF900BT and AVIC-F90BT. 3 Contacts screen You can access the list of contacts to call up an entry. 4 AV Source menu You can access the screen for your...
...Basic operation Chapter 02 Basic operation What you can also check or cancel your destination on page 136. 1 Press MENU button to display the navigation map screen. 8 AV operation screen When you play . 5 Phone Menu You can access the screen that is related to hands-free phoning to see... on the Bluetooth wireless technology connection. 6 Settings Menu You can be displayed the full-screen rear camera image. [RearView] is available for AVICF900BT and AVIC-F90BT. 3 Contacts screen You can access the list of contacts to call up an entry. 4 AV Source menu You can access the screen for your...

Owner's Manual
Page 20
... When you can be used (or next guidance point)* 4 Current time d cb 5 Compass The red arrow indicates north. 6 Map mode selector = For details, refer to Switching the map between 2D and 3D on page 36. 8 Stop key for the dummy run 20 En You need to become familiar with...hear the previous guidance again. Chapter 02 Basic operation How to use the map Most of a 2D map screen. 1 2 3 4 5 6 h 7 g 8 f 9 a e p Information with the mark (*) appears only when the route is set. How to read the map screen This example shows an example of the information provided by your navigation ...
... When you can be used (or next guidance point)* 4 Current time d cb 5 Compass The red arrow indicates north. 6 Map mode selector = For details, refer to Switching the map between 2D and 3D on page 36. 8 Stop key for the dummy run 20 En You need to become familiar with...hear the previous guidance again. Chapter 02 Basic operation How to use the map Most of a 2D map screen. 1 2 3 4 5 6 h 7 g 8 f 9 a e p Information with the mark (*) appears only when the route is set. How to read the map screen This example shows an example of the information provided by your navigation ...

Owner's Manual
Page 21
...activate the dummy run . = For details, refer to Demo Mode on page 129. = For details, refer to briefly view the current status on the map. Meaning of arrival is set to "On". = For details, refer to there. vel at the time indicated. Touching it again retracts the bar. ... roads exist when you to display the "Route Information" screen. = For details, refer to Displayed Info on page 126. = For details, refer to Map Settings on page 41. a Shortcut to this area allows you are driving on "Displayed Info". h Second Maneuver Arrow* Shows the turning direction after the ...
...activate the dummy run . = For details, refer to Demo Mode on page 129. = For details, refer to briefly view the current status on the map. Meaning of arrival is set to "On". = For details, refer to there. vel at the time indicated. Touching it again retracts the bar. ... roads exist when you to display the "Route Information" screen. = For details, refer to Displayed Info on page 126. = For details, refer to Map Settings on page 41. a Shortcut to this area allows you are driving on "Displayed Info". h Second Maneuver Arrow* Shows the turning direction after the ...

Owner's Manual
Page 22
... p Zooming out will reduce the size of traffic information. Switching the map between 2D and 3D 2D map screen 3D map screen 1 Press MAP button to display the navigation map screen. 2 Touch or to display the navigation map screen. Note regarding the route highlighted in purple p A route highlighted ...in "Route"; Use it . "Unpaved Roads", "Highways", "Ferries", "U-turns", "Permit Needed", "Toll Roads". Scrolling the map to the position you to change the map scale one step at a time. Chapter 02 Basic operation p This information is not resized and keeps displayed. Changing the scale...
... p Zooming out will reduce the size of traffic information. Switching the map between 2D and 3D 2D map screen 3D map screen 1 Press MAP button to display the navigation map screen. 2 Touch or to display the navigation map screen. Note regarding the route highlighted in purple p A route highlighted ...in "Route"; Use it . "Unpaved Roads", "Highways", "Ferries", "U-turns", "Permit Needed", "Toll Roads". Scrolling the map to the position you to change the map scale one step at a time. Chapter 02 Basic operation p This information is not resized and keeps displayed. Changing the scale...

Owner's Manual
Page 23
...adjust the tilt and rotation angle. j 4 Enter the information for tilt and rotation angle 4 Touch the controls to switch the 2D map mode. 3 Touch the map briefly. j 6 The navigation system calculates the route to one. j 7 After releasing the parking brake, drive in accordance with ...street name and other information for your destination, and then shows the route on the map. Changing the tilt and rotation angle of screen, with navigation guidance. j 5 Touch [Go Here Now] on your vehicle in the desired direction...
...adjust the tilt and rotation angle. j 4 Enter the information for tilt and rotation angle 4 Touch the controls to switch the 2D map mode. 3 Touch the map briefly. j 6 The navigation system calculates the route to one. j 7 After releasing the parking brake, drive in accordance with ...street name and other information for your destination, and then shows the route on the map. Changing the tilt and rotation angle of screen, with navigation guidance. j 5 Touch [Go Here Now] on your vehicle in the desired direction...

Owner's Manual
Page 26
... is already set, touching [Street Center] allows you want to list the options matching to the "Map Confirmation Screen". ! After entering the second street name and selecting the desired intersection, the "Map Confirmation Screen" appears. In that you to search for and selecting a location 5 Touch the key ...name. 7 Enter the city name or Zip code. ! The screen returns to the previous screen. 6 Touch the key next to "City:" to the "Map Confirmation Screen". 9 Enter the street name and touch the desired one from the list. ! When a city is already set , touching [City Center] allows...
... is already set, touching [Street Center] allows you want to list the options matching to the "Map Confirmation Screen". ! After entering the second street name and selecting the desired intersection, the "Map Confirmation Screen" appears. In that you to search for and selecting a location 5 Touch the key ...name. 7 Enter the city name or Zip code. ! The screen returns to the previous screen. 6 Touch the key next to "City:" to the "Map Confirmation Screen". 9 Enter the street name and touch the desired one from the list. ! When a city is already set , touching [City Center] allows...

Owner's Manual
Page 27
... move the cursor to the desired position and touch [OK]. The number of nearby POIs will appear at the bottom of the "Map Confirmation Screen" to search for a POI by entering the POI name in the selected category. Searching for a POI. Touch [Search] to select ...En 27 POI), such as gas stations, parkings or restaurants, is an undesirable location, touch to retry with the "Map Confirmation Screen" on the "Map Confirmation Screen", refer to the "Map Confirmation Screen" directly and the process of Interest (POI) Information about various facilities (Points Of Interest - Chapter 03 ...
... move the cursor to the desired position and touch [OK]. The number of nearby POIs will appear at the bottom of the "Map Confirmation Screen" to search for a POI by entering the POI name in the selected category. Searching for a POI. Touch [Search] to select ...En 27 POI), such as gas stations, parkings or restaurants, is an undesirable location, touch to retry with the "Map Confirmation Screen" on the "Map Confirmation Screen", refer to the "Map Confirmation Screen" directly and the process of Interest (POI) Information about various facilities (Points Of Interest - Chapter 03 ...
Owner's Manual
Page 28
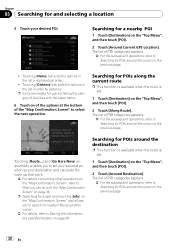
... around the cursor. = For details, refer to Viewing the information of a specified location on of the options at the bottom of the "Map Confirmation Screen" to select the next operation. p Icons are helpful for quickly telling the category of POI categories appears. = For the subsequent ... Touch [Destination] on the previous page. 28 En Searching for POIs around the cursor on the previous page. The list of facilities with the "Map Confirmation Screen" on the "Top Menu", and then touch [POI]. 2 Touch [Around Current GPS Location]. Touching [Name] tab sorts the options in...
... around the cursor. = For details, refer to Viewing the information of a specified location on of the options at the bottom of the "Map Confirmation Screen" to select the next operation. p Icons are helpful for quickly telling the category of POI categories appears. = For the subsequent ... Touch [Destination] on the previous page. 28 En Searching for POIs around the cursor on the previous page. The list of facilities with the "Map Confirmation Screen" on the "Top Menu", and then touch [POI]. 2 Touch [Around Current GPS Location]. Touching [Name] tab sorts the options in...

Owner's Manual
Page 30
... and calculate the route up that point. = For details concerning other operations on of the options at the bottom of the "Map Confirmation Screen" to store only your selected position as the currently selected category. To know the states of the current sequence, refer...POI shortcuts 1 Touch [Destination] on "Saved Criteria". Touching [Save Criteria] without selecting a category allows you can search for POIs with the "Map Confirmation Screen" on the list. Touching [Route...] and [Go Here Now] sequentially enables you to What you to select the next operation. Searching...
... and calculate the route up that point. = For details concerning other operations on of the options at the bottom of the "Map Confirmation Screen" to store only your selected position as the currently selected category. To know the states of the current sequence, refer...POI shortcuts 1 Touch [Destination] on "Saved Criteria". Touching [Save Criteria] without selecting a category allows you can search for POIs with the "Map Confirmation Screen" on the list. Touching [Route...] and [Go Here Now] sequentially enables you to What you to select the next operation. Searching...

Owner's Manual
Page 31
...for POIs by using the data on external storage devices (USB, SD) Creating a customized POI is possible by using the utility programme "AVIC FEEDS" which is available separately, on your destination and calculate the route up that you want to delete. 4 Touch the folder that ... storage that point. = For details concerning other operations on the "Map Confirmation Screen", refer to What you can do with the "Map Confirmation Screen" on page 36. Searching for and selecting a location 5 Touch one of the "Map Confirmation Screen" to select the next operation. Searching for and selecting ...
...for POIs by using the data on external storage devices (USB, SD) Creating a customized POI is possible by using the utility programme "AVIC FEEDS" which is available separately, on your destination and calculate the route up that you want to delete. 4 Touch the folder that ... storage that point. = For details concerning other operations on the "Map Confirmation Screen", refer to What you can do with the "Map Confirmation Screen" on page 36. Searching for and selecting a location 5 Touch one of the "Map Confirmation Screen" to select the next operation. Searching for and selecting ...

Owner's Manual
Page 32
The "Map Confirmation Screen" appears. 7 Touch on the "Top Menu", and then touch [Route Function]. 4 Touch to delete the current value and enter the desired coordinate. 2 Touch [... selecting a location Searching for a location by coordinates Entering a latitude and longitude pinpoints the location. 1 Touch [Destination] on of the options at the bottom of the "Map Confirmation Screen" to select the next operation. The values on the latitude key or longitude key shows the coordinates on the cursor just before entering...
The "Map Confirmation Screen" appears. 7 Touch on the "Top Menu", and then touch [Route Function]. 4 Touch to delete the current value and enter the desired coordinate. 2 Touch [... selecting a location Searching for a location by coordinates Entering a latitude and longitude pinpoints the location. 1 Touch [Destination] on of the options at the bottom of the "Map Confirmation Screen" to select the next operation. The values on the latitude key or longitude key shows the coordinates on the cursor just before entering...


