User manual
Page 1
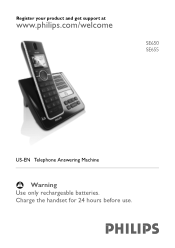
Register your product and get support at www.philips.com/welcome SE650 SE655 US-EN Telephone Answering Machine Warning Use only rechargeable batteries. Charge the handset for 24 hours before use.
Register your product and get support at www.philips.com/welcome SE650 SE655 US-EN Telephone Answering Machine Warning Use only rechargeable batteries. Charge the handset for 24 hours before use.
User manual
Page 3
... Direct Access Memory 33 Enter a Dialing Pause 33 Answer a call 33 Handsfree answering 33 End a call 33 Use more of your phone 34 Switch the handset off/on 34 Keypad lock/unlock 34 1
... Direct Access Memory 33 Enter a Dialing Pause 33 Answer a call 33 Handsfree answering 33 End a call 33 Use more of your phone 34 Switch the handset off/on 34 Keypad lock/unlock 34 1
User manual
Page 4
... entry into the phonebook 40 Delete a call list entry 41 Delete all call list entries 41 Using the Intercom 41 Intercom another handset 41 Transfer an external call to another handset 41 Answer an external call during intercom 42 8.10.4 8.10.5 8.11 8.12 8.12.1 8.12.2 8.12.3 8.12.4 9 9.1 9.2 9.2.1 9.2.2 9.2.3 9.3 9.4 9.5 9.6 9.7 ...and Time 43 Set Time and Date Format 43 Set Alarm 43 Set Alarm Tone 44 Personal settings 44 Change the Handset Name 44 Handset Tones 44 Set the Ring Volume 44 Set the Ring Tones 45 Activate/Deactivate Key Beep 45 Change the Display ...
... entry into the phonebook 40 Delete a call list entry 41 Delete all call list entries 41 Using the Intercom 41 Intercom another handset 41 Transfer an external call to another handset 41 Answer an external call during intercom 42 8.10.4 8.10.5 8.11 8.12 8.12.1 8.12.2 8.12.3 8.12.4 9 9.1 9.2 9.2.1 9.2.2 9.2.3 9.3 9.4 9.5 9.6 9.7 ...and Time 43 Set Time and Date Format 43 Set Alarm 43 Set Alarm Tone 44 Personal settings 44 Change the Handset Name 44 Handset Tones 44 Set the Ring Volume 44 Set the Ring Tones 45 Activate/Deactivate Key Beep 45 Change the Display ...
User manual
Page 5
... 59 Activating Withhold ID 59 Set the Withhold ID Code 59 Telephone answering machine (TAM) 60 Playing Messages 60 Playback of messages via handset 60 Functions available during playback 60 Delete all messages 61 Turn the Answering Machine On/Off 61 Play, Record, or Delete an Outgoing ...Message 61 Set the Answer mode 62 Answering Machine Settings 62 Ring Delay 62 Remote Access 62 Handset Screening 63 Setting the Outgoing Message Language 64 Technical data 64 Frequently asked questions 65 Connection 65 Table of contents 3
... 59 Activating Withhold ID 59 Set the Withhold ID Code 59 Telephone answering machine (TAM) 60 Playing Messages 60 Playback of messages via handset 60 Functions available during playback 60 Delete all messages 61 Turn the Answering Machine On/Off 61 Play, Record, or Delete an Outgoing ...Message 61 Set the Answer mode 62 Answering Machine Settings 62 Ring Delay 62 Remote Access 62 Handset Screening 63 Setting the Outgoing Message Language 64 Technical data 64 Frequently asked questions 65 Connection 65 Table of contents 3

User manual
Page 7
Do not locate this can cause electric shock when the appliance is required. Immersion of the telephone or handset in water could result in a hot car. 12 Do not place lighted candles, cigarettes, cigars, etc., on the telephone. 13 Never touch uninsulated telephone wires ...
Do not locate this can cause electric shock when the appliance is required. Immersion of the telephone or handset in water could result in a hot car. 12 Do not place lighted candles, cigarettes, cigars, etc., on the telephone. 13 Never touch uninsulated telephone wires ...
User manual
Page 9
... damage the product. 10 Discard "dead" battery(ies) as soon as defined in the standard UL Environment and safety 7 Use only Philips Multi-Life 600mAh rechargeable NimH batteries. Batteries that may result in leakage or explosion. 9 Remove battery(ies) from this product, the proper...an electrical supply of 120 volts, single phase alternating current, excluding IT installations defined in standard UL 60950. 2.3 Battery requirements The handset requires power source of extending shelf life should be made available for use after cold storage. 12 If your product uses rechargeable battery...
... damage the product. 10 Discard "dead" battery(ies) as soon as defined in the standard UL Environment and safety 7 Use only Philips Multi-Life 600mAh rechargeable NimH batteries. Batteries that may result in leakage or explosion. 9 Remove battery(ies) from this product, the proper...an electrical supply of 120 volts, single phase alternating current, excluding IT installations defined in standard UL 60950. 2.3 Battery requirements The handset requires power source of extending shelf life should be made available for use after cold storage. 12 If your product uses rechargeable battery...
User manual
Page 10
... the phone wall socket during a storm. • Because the phone works by sending radio signals between the base unit and the handset, wearers of hearing aids may be particularly important in rural areas. 2.5 Environmental care Please remember to observe the local regulations regarding the...number signifies that Industry Canada technical specifications were met.This certification means that you to high voltages. • Do not allow the handset to come into contact with electrical equipment such as answering machines, TV and radio sets, clock radios and computers if placed too close...
... the phone wall socket during a storm. • Because the phone works by sending radio signals between the base unit and the handset, wearers of hearing aids may be particularly important in rural areas. 2.5 Environmental care Please remember to observe the local regulations regarding the...number signifies that Industry Canada technical specifications were met.This certification means that you to high voltages. • Do not allow the handset to come into contact with electrical equipment such as answering machines, TV and radio sets, clock radios and computers if placed too close...
User manual
Page 14
... not allow objects to fall on your phone. • Do not use any other battery than the one delivered with the product or recommended by Philips: risk of explosion. • Always use the product in places where there are explosive hazards. • Do not let small metal objects come ...into contact with the product. • Handsfree activation could suddenly increase the volume in the earpiece to a very high level: make sure the handset is not too close to your phone or allow the charger to 158º F). • Battery life may be shortened in low temperature conditions. ...
... not allow objects to fall on your phone. • Do not use any other battery than the one delivered with the product or recommended by Philips: risk of explosion. • Always use the product in places where there are explosive hazards. • Do not let small metal objects come ...into contact with the product. • Handsfree activation could suddenly increase the volume in the earpiece to a very high level: make sure the handset is not too close to your phone or allow the charger to 158º F). • Battery life may be shortened in low temperature conditions. ...
User manual
Page 18
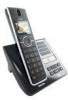
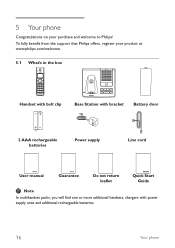
To fully benefit from the support that Philips offers, register your purchase and welcome to Philips! 5 Your phone Congratulations on your product at www.philips.com/welcome. 5.1 What's in the box Handset with belt clip Base Station with bracket Battery door 2 AAA rechargeable batteries Power supply Line cord User manual Guarantee Do not return leaflet Quick Start Guide Note In multihandset packs, you will find one or more additional handsets, chargers with power supply units and additional rechargeable batteries. 16 Your phone
To fully benefit from the support that Philips offers, register your purchase and welcome to Philips! 5 Your phone Congratulations on your product at www.philips.com/welcome. 5.1 What's in the box Handset with belt clip Base Station with bracket Battery door 2 AAA rechargeable batteries Power supply Line cord User manual Guarantee Do not return leaflet Quick Start Guide Note In multihandset packs, you will find one or more additional handsets, chargers with power supply units and additional rechargeable batteries. 16 Your phone
User manual
Page 19
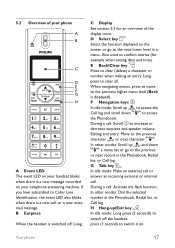
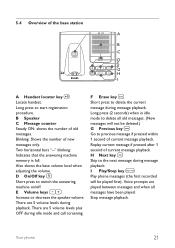
... Phonebook, Redial list, or Call log. 5.2 Overview of the display icons. B Earpiece When the handset is a new message recorded on the screen or go to switch it on your handset blinks when there is switched off the handset. In other modes: Dial the selected number in a menu. If you have subscribed to increase...
... Phonebook, Redial list, or Call log. 5.2 Overview of the display icons. B Earpiece When the handset is a new message recorded on the screen or go to switch it on your handset blinks when there is switched off the handset. In other modes: Dial the selected number in a menu. If you have subscribed to increase...
User manual
Page 20
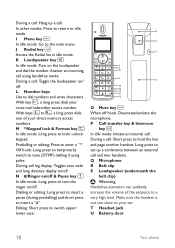
... L U M N O P Q O Mute key s When off . With keys 3 to 9, a long press dials one of the earpiece to hold the line and page another handset. Dialling or editing: Long press to insert a pause (during predialling) and short press to switch upper/ lower case. Long press to turn the ringer on... pulse. Predialling or editing: Press to tone (DTMF) dialling if using handsfree mode. During a call: Hang up a conference between an external call and two handsets. K Loudspeaker key l In idle mode: Turn on /off & Pause key # In idle mode: Long press to set up a call. Q Microphone ...
... L U M N O P Q O Mute key s When off . With keys 3 to 9, a long press dials one of the earpiece to hold the line and page another handset. Dialling or editing: Long press to insert a pause (during predialling) and short press to switch upper/ lower case. Long press to turn the ringer on... pulse. Predialling or editing: Press to tone (DTMF) dialling if using handsfree mode. During a call: Hang up a conference between an external call and two handsets. K Loudspeaker key l In idle mode: Turn on /off & Pause key # In idle mode: Long press to set up a call. Q Microphone ...
User manual
Page 21
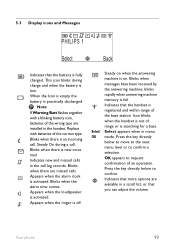
...next menu level or to confirm a selection. Note If Warning Batt flashes together with batteries of the wrong type are available in the handset. Blinks when there is practically discharged. Blinks when the alarm time comes. Select appears when in the call . Indicates that more ...a blinking battery icon, batteries of the correct type. Blinks when messages have been received by the answering machine; Icon blinks when the handset is out of an operation. blinks rapidly when answering machine memory is searching for a base. Press the key directly below to request confirmation...
...next menu level or to confirm a selection. Note If Warning Batt flashes together with batteries of the wrong type are available in the handset. Blinks when there is practically discharged. Blinks when the alarm time comes. Select appears when in the call . Indicates that more ...a blinking battery icon, batteries of the correct type. Blinks when messages have been received by the answering machine; Icon blinks when the handset is out of an operation. blinks rapidly when answering machine memory is searching for a base. Press the key directly below to request confirmation...
User manual
Page 23
... base volume level when adjusting the volume. F Erase key x Short press to start registration procedure. H Next key f Skip to switch the answering machine on/off. I A Handset locator key a Locate handset. Stop message playback. D On/Off key e Short press to the next message during playback.
... base volume level when adjusting the volume. F Erase key x Short press to start registration procedure. H Next key f Skip to switch the answering machine on/off. I A Handset locator key a Locate handset. Stop message playback. D On/Off key e Short press to the next message during playback.
User manual
Page 25
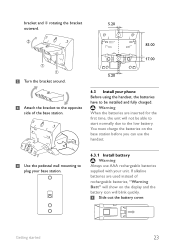
.... 3 Attach the bracket to the opposite side of rechargeable batteries, "Warning Batt" will show on the base station before you can use the handset. 4 Use the pedestal wall mounting to plug your base station. 6.3.1 Install battery Warning Always use AAA rechargeable batteries supplied with your phone Before... using the handset, the batteries have to be able to start normally due to the low battery. You must charge the batteries on the display and...
.... 3 Attach the bracket to the opposite side of rechargeable batteries, "Warning Batt" will show on the base station before you can use the handset. 4 Use the pedestal wall mounting to plug your base station. 6.3.1 Install battery Warning Always use AAA rechargeable batteries supplied with your phone Before... using the handset, the batteries have to be able to start normally due to the low battery. You must charge the batteries on the display and...

User manual
Page 26
...battery level becomes low, the low battery sensor warns you reach the range limit the conversation may become crackly. A beep is emitted if the handset is low. If the battery level becomes exceedingly low, the phone automatically switches off shortly after 3 cycles of the base station. If this ... clip into the slots at least 24 hours before using it for at the back of stand-by blinking the battery icon. When the handset moves beyond the operation range, the antenna icon will not be charged for the first time. hours) and discharging, allowing approximately 12 hours...
...battery level becomes low, the low battery sensor warns you reach the range limit the conversation may become crackly. A beep is emitted if the handset is low. If the battery level becomes exceedingly low, the phone automatically switches off shortly after 3 cycles of the base station. If this ... clip into the slots at least 24 hours before using it for at the back of stand-by blinking the battery icon. When the handset moves beyond the operation range, the antenna icon will not be charged for the first time. hours) and discharging, allowing approximately 12 hours...

User manual
Page 27
Your phone is ready for hands-free conversations. To use this feature, insert the headset plug into the handsets. 3 Place the handsets on the chargers to charge the batteries. Getting started 25 Diameter: 2.5 mm 6.6 Using multipacks If you have purchased a multipack you will have additional handsets, chargers, power adaptors and AAA rechargeable batteries. 1 Plug the chargers into a power socket. 2 Install the batteries supplied into the headset jack. 6.5 Install optional headset Your phone may be used with an optional headset (not included in the box).
Your phone is ready for hands-free conversations. To use this feature, insert the headset plug into the handsets. 3 Place the handsets on the chargers to charge the batteries. Getting started 25 Diameter: 2.5 mm 6.6 Using multipacks If you have purchased a multipack you will have additional handsets, chargers, power adaptors and AAA rechargeable batteries. 1 Plug the chargers into a power socket. 2 Install the batteries supplied into the headset jack. 6.5 Install optional headset Your phone may be used with an optional headset (not included in the box).

User manual
Page 29
Color 4 Level 1 ... Name of tones 1 ... Level 5 20 Seconds 40 Seconds 60 Seconds On Off No bar (off Color 1 ... Five bars Progressive Name of tones 15 On Off Getting started 27 Personal Settings Personal Set Handset Name Handset Tones Language Wallpaper Color Theme Contrast Backlight Time Auto Hang-up Enter name Ring Volume Ring Tones Key Beep List of languages Wallpaper 1 Wallpaper 2 Wallpaper 3 Wallpaper off ) One bar ...
Color 4 Level 1 ... Name of tones 1 ... Level 5 20 Seconds 40 Seconds 60 Seconds On Off No bar (off Color 1 ... Five bars Progressive Name of tones 15 On Off Getting started 27 Personal Settings Personal Set Handset Name Handset Tones Language Wallpaper Color Theme Contrast Backlight Time Auto Hang-up Enter name Ring Volume Ring Tones Key Beep List of languages Wallpaper 1 Wallpaper 2 Wallpaper 3 Wallpaper off ) One bar ...
User manual
Page 34
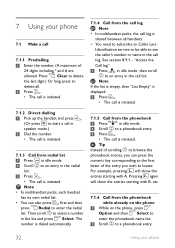
... show the entries starting with B, etc. 7.1.6 Call from the call log Note • In multihandset packs, the call log is shared between all handsets. • You need to subscribe to Caller Line Identification service to be able to an entry in the call log. 7 Using your phone Press ...to locate. Note If the list is empty, then "List Empty" is displayed. 2 Press t. • The call is initiated. 7.1.2 Direct dialling 1 Pick up the handset and press t. (Or press l to start a call in speaker mode.) 2 Dial the number. • The call is initiated. For example, pressing 2 will show ...
... show the entries starting with B, etc. 7.1.6 Call from the call log Note • In multihandset packs, the call log is shared between all handsets. • You need to subscribe to Caller Line Identification service to be able to an entry in the call log. 7 Using your phone Press ...to locate. Note If the list is empty, then "List Empty" is displayed. 2 Press t. • The call is initiated. 7.1.2 Direct dialling 1 Pick up the handset and press t. (Or press l to start a call in speaker mode.) 2 Dial the number. • The call is initiated. For example, pressing 2 will show ...
User manual
Page 35
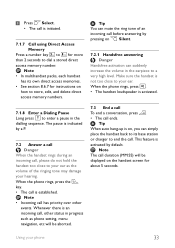
.... • The call is initiated. 7.1.7 Call using Direct Access Memory Press a number key 3 to 9 for more than 2 seconds to your ear. Make sure the handset is activated. 7.1.8 Enter a Dialing Pause Long press # to end the call ends. Note The call duration (MM:SS) will be displayed on , you can suddenly... priority over other status in the earpiece to store, edit, and delete direct access memory numbers. When the phone rings, press l. • The handset loudspeaker is not too close to your phone 33 Tip When auto hang-up is activated by a P. 7.2 Answer a call Danger When the...
.... • The call is initiated. 7.1.7 Call using Direct Access Memory Press a number key 3 to 9 for more than 2 seconds to your ear. Make sure the handset is activated. 7.1.8 Enter a Dialing Pause Long press # to end the call ends. Note The call duration (MM:SS) will be displayed on , you can suddenly... priority over other status in the earpiece to store, edit, and delete direct access memory numbers. When the phone rings, press l. • The handset loudspeaker is not too close to your phone 33 Tip When auto hang-up is activated by a P. 7.2 Answer a call Danger When the...

User manual
Page 36
To switch it on, press and hold h for at least one second. 8 Use more of your phone 8.1 Switch the handset off/on To switch the handset off the microphone. 2 Press s again to turn on the microphone. 8.4.3 Activate/Deactivate loudspeaker mode Danger Handsfree activation can enter the letters that are available to ...
To switch it on, press and hold h for at least one second. 8 Use more of your phone 8.1 Switch the handset off/on To switch the handset off the microphone. 2 Press s again to turn on the microphone. 8.4.3 Activate/Deactivate loudspeaker mode Danger Handsfree activation can enter the letters that are available to ...


