
Dlp Projector - English/ French
Page 22
Installation If the projector is used with a screen size not listed in this manual, check the diagonal dimension (inch) of projection lens Aspect ratio Projection distance (L) formula Units: m ET-D75LE1 (1.5-2.0 :1) 4:3 Minimal distance: L=0.0307 x Screen diagonal (inch) - 0.0760 Maximal ...lens ET-D75LE5 (0.8:1) 4:3 L= 0.0158 x Screen diagonal (inch) - 0.0835 16:9 L= 0.0172 x Screen diagonal (inch) - 0.0835 22 Calculation formulas for projection distance by lens types (for PT-D7700U) Model number of your screen and calculate the projection distance using the following formulas.
Installation If the projector is used with a screen size not listed in this manual, check the diagonal dimension (inch) of projection lens Aspect ratio Projection distance (L) formula Units: m ET-D75LE1 (1.5-2.0 :1) 4:3 Minimal distance: L=0.0307 x Screen diagonal (inch) - 0.0760 Maximal ...lens ET-D75LE5 (0.8:1) 4:3 L= 0.0158 x Screen diagonal (inch) - 0.0835 16:9 L= 0.0172 x Screen diagonal (inch) - 0.0835 22 Calculation formulas for projection distance by lens types (for PT-D7700U) Model number of your screen and calculate the projection distance using the following formulas.
Dlp Projector - English/ French
Page 24
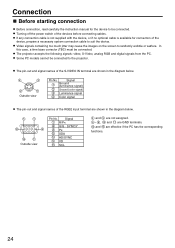
... has the corresponding functions. 24 and are GND terminals. In this case, a time base corrector (TBC) must be connected to the projector. Some PC models cannot be connected. Outside view Pin No. Signal Ground (luminance signal) Ground (color signal) Luminance signal Color signal... of the RGB2 input terminal are shown in the diagram below . Connection Before starting connection Before connection, read carefully the instruction manual for connection of the device, prepare a necessary system connection cable to suit the device. If any connection cable is not supplied...
... has the corresponding functions. 24 and are GND terminals. In this case, a time base corrector (TBC) must be connected to the projector. Some PC models cannot be connected. Outside view Pin No. Signal Ground (luminance signal) Ground (color signal) Luminance signal Color signal... of the RGB2 input terminal are shown in the diagram below . Connection Before starting connection Before connection, read carefully the instruction manual for connection of the device, prepare a necessary system connection cable to suit the device. If any connection cable is not supplied...
Dlp Projector - English/ French
Page 27
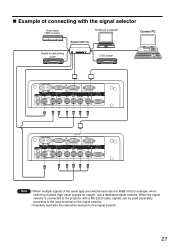
... are switched and input to the input terminal on the signal selector. • Carefully read also the instruction manual for usage), use a dedicated signal selector. When the signal selector is connected to the projector with the signal selector Video deck (TBC built-in) Notebook computer Control PC Signal selector Digital broadcasting tuner...
... are switched and input to the input terminal on the signal selector. • Carefully read also the instruction manual for usage), use a dedicated signal selector. When the signal selector is connected to the projector with the signal selector Video deck (TBC built-in) Notebook computer Control PC Signal selector Digital broadcasting tuner...
Dlp Projector - English/ French
Page 43
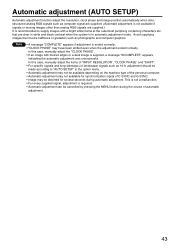
... supplied.) It is recommended to "AUTO SETUP" in automatic adjustment mode. that involve halftones or gradation such as photographs and computer graphics. In this case, manually adjust the "CLOCK PHASE". • If an image with a bright white frame at the outermost periphery containing characters etc. This is not a malfunction. • For... signals and long-sideways (or landscape) signals such as 16:9, adjustment should be cancelled by pressing the MENU button during automatic adjustment. In this case, manually adjust the items of automatic adjustment. 43
... supplied.) It is recommended to "AUTO SETUP" in automatic adjustment mode. that involve halftones or gradation such as photographs and computer graphics. In this case, manually adjust the "CLOCK PHASE". • If an image with a bright white frame at the outermost periphery containing characters etc. This is not a malfunction. • For... signals and long-sideways (or landscape) signals such as 16:9, adjustment should be cancelled by pressing the MENU button during automatic adjustment. In this case, manually adjust the items of automatic adjustment. 43
Dlp Projector - English/ French
Page 54
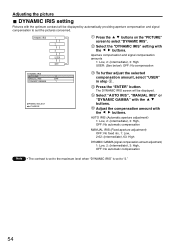
... will be displayed by automatically providing aperture compensation and signal compensation to select "DYNAMIC IRIS". Select "AUTO IRIS", "MANUAL IRIS" or "DYNAMIC GAMMA" with the buttons. Select the "DYNAMIC IRIS" setting with the buttons. Aperture compensation ...pictures concerned. Press the "ENTER" button. AUTO IRIS (Automatic aperture adjustment) 1: Low, 2: (Intermediate), 3: High, OFF: No automatic compensation MANUAL IRIS (Fixed aperture adjustment) OFF: No fixed iris, 1: Low, 2-62: (Intermediate), 63: High DYNAMIC GAMMA (signal compensation amount adjustment) ...
... will be displayed by automatically providing aperture compensation and signal compensation to select "DYNAMIC IRIS". Select "AUTO IRIS", "MANUAL IRIS" or "DYNAMIC GAMMA" with the buttons. Select the "DYNAMIC IRIS" setting with the buttons. Aperture compensation ...pictures concerned. Press the "ENTER" button. AUTO IRIS (Automatic aperture adjustment) 1: Low, 2: (Intermediate), 3: High, OFF: No automatic compensation MANUAL IRIS (Fixed aperture adjustment) OFF: No fixed iris, 1: Low, 2-62: (Intermediate), 63: High DYNAMIC GAMMA (signal compensation amount adjustment) ...
Dlp Projector - English/ French
Page 103
Before asking for notebook computer screen image? Use Fn and F3 keys for setting. (For details, refer to the instruction manual of ID setting made in a correctly way? (Refer to pages 16 and 71.) No image appears on screen • Is the lens covered with...• Was operation of ID setting made in battery setting? (Refer to page 15.) • Are there any external light interfering with the projector? (Refer to the projector adjusted correctly? try to page 48.) Screen image is not compatible with the remote control operation? • Was operation of the computer.) 103 ...
Before asking for notebook computer screen image? Use Fn and F3 keys for setting. (For details, refer to the instruction manual of ID setting made in a correctly way? (Refer to pages 16 and 71.) No image appears on screen • Is the lens covered with...• Was operation of ID setting made in battery setting? (Refer to page 15.) • Are there any external light interfering with the projector? (Refer to the projector adjusted correctly? try to page 48.) Screen image is not compatible with the remote control operation? • Was operation of the computer.) 103 ...


