
Dlp Projector - English/ French
Page 1
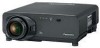
Operating Instructions DLPTM Based Projector Commercial Use PT-D7700U Model No. PT-DW7000U ON POWER OFF AUTO SETUP RGB 1 VIDEO RGB 2 S-VIDEO AUX SHUTTER SHUT MENU FREEZE PAGE UP ENTER PAGE DOWN ON SCREEN 1 2 3 STD OSD SYSTEM SEL D.ZOOM 4 FUNC 1 5 6 BRIGHT CONTRAST 7 LENS 8 9 NEXT ASPECT 0 USER LIGHT ID ALL ID SET Computer Numetric LASER ON/OFF Projector Read these instructions completely before operating this unit. TQBJ 0146-1
Operating Instructions DLPTM Based Projector Commercial Use PT-D7700U Model No. PT-DW7000U ON POWER OFF AUTO SETUP RGB 1 VIDEO RGB 2 S-VIDEO AUX SHUTTER SHUT MENU FREEZE PAGE UP ENTER PAGE DOWN ON SCREEN 1 2 3 STD OSD SYSTEM SEL D.ZOOM 4 FUNC 1 5 6 BRIGHT CONTRAST 7 LENS 8 9 NEXT ASPECT 0 USER LIGHT ID ALL ID SET Computer Numetric LASER ON/OFF Projector Read these instructions completely before operating this unit. TQBJ 0146-1
Dlp Projector - English/ French
Page 2
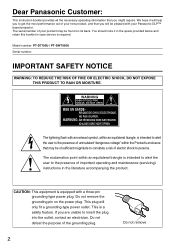
...the literature accompanying the product. The serial number of your product may be of sufficient magnitude to constitute a risk of your Panasonic DLPTM based projector. This plug will help you to get the most performance out of electric shock to persons. The lightning flash with arrowhead...note it will only fit a grounding-type power outlet. ZUR VERMEIDUNG EINES ELEKTRISCHEN SCHLAGES GERÄT NICHT ÖFFNEN. Model number: PT-D7700U / PT-DW7000U Serial number: IMPORTANT SAFETY NOTICE WARNING: TO REDUCE THE RISK OF FIRE OR ELECTRIC SHOCK, DO NOT EXPOSE THIS PRODUCT TO ...
...the literature accompanying the product. The serial number of your product may be of sufficient magnitude to constitute a risk of your Panasonic DLPTM based projector. This plug will help you to get the most performance out of electric shock to persons. The lightning flash with arrowhead...note it will only fit a grounding-type power outlet. ZUR VERMEIDUNG EINES ELEKTRISCHEN SCHLAGES GERÄT NICHT ÖFFNEN. Model number: PT-D7700U / PT-DW7000U Serial number: IMPORTANT SAFETY NOTICE WARNING: TO REDUCE THE RISK OF FIRE OR ELECTRIC SHOCK, DO NOT EXPOSE THIS PRODUCT TO ...
Dlp Projector - English/ French
Page 4
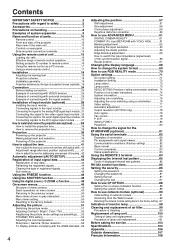
...-mounted connection terminals 14 Using the remote control unit 15 Loading dry cells 15 Effective range of remote control operation 15 Setting projector ID number to remote control 16 Using the remote control as presettings......53 DYNAMIC IRIS setting 54 Adjusting the color temperature 55 ...System information 74 Adjusting color matching 75 Adjusting the color matching using a colorimeter............76 Video setting 77 Automatic adjustment 77 Output resolution (D7700U only 78 Auto signal 78 Fan control 78 P IN P 79 Setting FUNC1 80 Password 80 How to the factory setting ..97 ...
...-mounted connection terminals 14 Using the remote control unit 15 Loading dry cells 15 Effective range of remote control operation 15 Setting projector ID number to remote control 16 Using the remote control as presettings......53 DYNAMIC IRIS setting 54 Adjusting the color temperature 55 ...System information 74 Adjusting color matching 75 Adjusting the color matching using a colorimeter............76 Video setting 77 Automatic adjustment 77 Output resolution (D7700U only 78 Auto signal 78 Fan control 78 P IN P 79 Setting FUNC1 80 Password 80 How to the factory setting ..97 ...

Dlp Projector - English/ French
Page 5
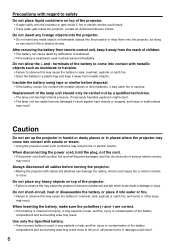
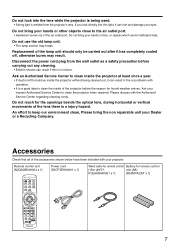
... or wall outlets which are coming out, and then contact an Authorized Service Center for repairs. • Do not attempt to repair the projector yourself, as ceiling suspension) should only be necessary. Clean the power cord plug regularly to prevent it may fall down or tip over ,...as this condition may result. Do not overload the wall outlet. • If the power supply is not strong enough to use of the projector in such cases, otherwise fire or electric shocks could result. • Installation work , please contact an Authorized Service Center. Pull the power cord...
... or wall outlets which are coming out, and then contact an Authorized Service Center for repairs. • Do not attempt to repair the projector yourself, as ceiling suspension) should only be necessary. Clean the power cord plug regularly to prevent it may fall down or tip over ,...as this condition may result. Do not overload the wall outlet. • If the power supply is not strong enough to use of the projector in such cases, otherwise fire or electric shocks could result. • Installation work , please contact an Authorized Service Center. Pull the power cord...
Dlp Projector - English/ French
Page 6
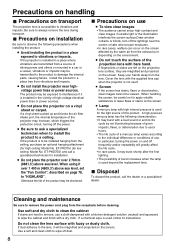
... Store the battery in fire or electric shocks. Insulate the battery using tape or similar before moving the projector. • Moving the projector with smoke or steam. • Using the projector under such conditions may result in a plastic bag and keep it into contact with metallic objects such as... might result. • The lamp unit can damage the cables, which could result. • If any heavy objects on top of the projector. • Failure to observe this may cause the battery to become unbalanced and fall, which could result. 6 After removing the battery from the...
... Store the battery in fire or electric shocks. Insulate the battery using tape or similar before moving the projector. • Moving the projector with smoke or steam. • Using the projector under such conditions may result in a plastic bag and keep it into contact with metallic objects such as... might result. • The lamp unit can damage the cables, which could result. • If any heavy objects on top of the projector. • Failure to observe this may cause the battery to become unbalanced and fall, which could result. 6 After removing the battery from the...
Dlp Projector - English/ French
Page 7
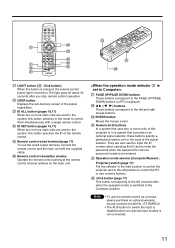
... D.ZOOM 4 FUNC 1 5 6 BRIGHT CONTRAST 7 LENS 8 9 NEXT ASPECT 0 USER LIGHT ID ALL ID SET Computer Numetric LASER ON/OFF Projector 7 Accessories Check that all of the lens there is not done. Do not bring the non repairable unit your eyes. Ask an Authorized Service Center...1] Power cord [K2CF3EH00001 x 1] Wired cable for remote control Battery for humid weather arrives. Disconnect the power cord plug from the projector's lens. Do not reach for the openings beside the optical lens, during horizontal or vertical movements of the accessories shown below have been...
... D.ZOOM 4 FUNC 1 5 6 BRIGHT CONTRAST 7 LENS 8 9 NEXT ASPECT 0 USER LIGHT ID ALL ID SET Computer Numetric LASER ON/OFF Projector 7 Accessories Check that all of the lens there is not done. Do not bring the non repairable unit your eyes. Ask an Authorized Service Center...1] Power cord [K2CF3EH00001 x 1] Wired cable for remote control Battery for humid weather arrives. Disconnect the power cord plug from the projector's lens. Do not reach for the openings beside the optical lens, during horizontal or vertical movements of the accessories shown below have been...
Dlp Projector - English/ French
Page 8
...neutral) and squeezed to wipe the cabinet and finish with fuzzy or dusty cloth. Cleaning and maintenance Be sure to "HIGHLAND". If the projector is used . The product may burst shortly after the first lighting. • The possibility of high-voltage electrical power lines or power ...technician when to install the product to vibrations or impacts. If the product is susceptible to vibrations and impacts. Do not place the projector on the environment. A high-pressure mercury lamp has the following precautions when installing the product. Be sure to wipe off frequently and...
...neutral) and squeezed to wipe the cabinet and finish with fuzzy or dusty cloth. Cleaning and maintenance Be sure to "HIGHLAND". If the projector is used . The product may burst shortly after the first lighting. • The possibility of high-voltage electrical power lines or power ...technician when to install the product to vibrations or impacts. If the product is susceptible to vibrations and impacts. Do not place the projector on the environment. A high-pressure mercury lamp has the following precautions when installing the product. Be sure to wipe off frequently and...
Dlp Projector - English/ French
Page 9
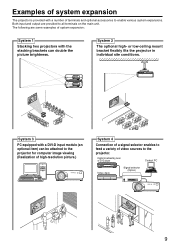
... Connection of a signal selector enables to feed a variety of video sources to the projector. Both input and output are some examples of system expansion: System 1 Stacking two projectors with a DVI-D input module (an optional item) can double the picture brightness. ...OFF Signal Selector TW-SWS 9 or low-ceiling mount bracket flexibly fits the projector in individual site conditions. The following are provided to enable various system expansions. Examples of system expansion The projector is provided with a number of terminals and optional accessories to all terminals ...
... Connection of a signal selector enables to feed a variety of video sources to the projector. Both input and output are some examples of system expansion: System 1 Stacking two projectors with a DVI-D input module (an optional item) can double the picture brightness. ...OFF Signal Selector TW-SWS 9 or low-ceiling mount bracket flexibly fits the projector in individual site conditions. The following are provided to enable various system expansions. Examples of system expansion The projector is provided with a number of terminals and optional accessories to all terminals ...

Dlp Projector - English/ French
Page 10
... DOWN ON SCREEN 1 STD 2 OSD 3 SYSTEM SEL D.ZOOM 4 FUNC 1 5 6 BRIGHT CONTRAST 7 LENS 8 9 NEXT ASPECT 0 USER LIGHT ID ALL ID SET Computer Numetric LASER ON/OFF Projector < When the operation mode selector is set to restore the default factory setting. AUTO SET UP button (page 43) Pressing this button to the main...selector or beyond. FREEZE button (page 48) Press this button to the mode of the picture can be zoomed in the system, this button to Projector > Remote control operation indicator lamp The lamp flashes when any remote control button is pressed.
... DOWN ON SCREEN 1 STD 2 OSD 3 SYSTEM SEL D.ZOOM 4 FUNC 1 5 6 BRIGHT CONTRAST 7 LENS 8 9 NEXT ASPECT 0 USER LIGHT ID ALL ID SET Computer Numetric LASER ON/OFF Projector < When the operation mode selector is set to restore the default factory setting. AUTO SET UP button (page 43) Pressing this button to the main...selector or beyond. FREEZE button (page 48) Press this button to the mode of the picture can be zoomed in the system, this button to Projector > Remote control operation indicator lamp The lamp flashes when any remote control button is pressed.
Dlp Projector - English/ French
Page 11
... SEL D.ZOOM 4 FUNC 1 5 6 BRIGHT CONTRAST 7 LENS 8 9 NEXT ASPECT 0 USER LIGHT ID ALL ID SET Computer Numetric LASER ON/OFF Projector 1RGB POWEROFF ON LIGHT button ( Click button) When this button is pressed, the remote control button light is switched to the Computer position. Remote control...units are also used in a system that uses two or more units of the signal selector. Operation mode selector (Computer/Numeric, Projector) switch (page 17) Put this button specifies the ID of the signal registration. PAGE UP/PAGE DOWN buttons These buttons correspond...
... SEL D.ZOOM 4 FUNC 1 5 6 BRIGHT CONTRAST 7 LENS 8 9 NEXT ASPECT 0 USER LIGHT ID ALL ID SET Computer Numetric LASER ON/OFF Projector 1RGB POWEROFF ON LIGHT button ( Click button) When this button is pressed, the remote control button light is switched to the Computer position. Remote control...units are also used in a system that uses two or more units of the signal selector. Operation mode selector (Computer/Numeric, Projector) switch (page 17) Put this button specifies the ID of the signal registration. PAGE UP/PAGE DOWN buttons These buttons correspond...
Dlp Projector - English/ French
Page 12
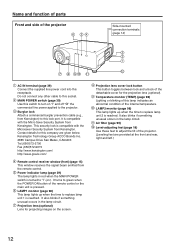
... "o" the commercial line power applied to green when the POWER ON button of the detachable cover for this lamp indicates an abnormal condition of the projector. (Leveling feet are given below. LAMP2 monitor (page 98) This lamp lights up when the time to this lock port. It is reached. This ... blinking of this company are provided at the front and rear, right and left.) 12 Name and function of parts Front and side of the projector Side-mounted connection terminals (page 14) AC IN terminal (page 39) Connect the supplied line power cord into this socket. MAIN POWER switch (page ...
... "o" the commercial line power applied to green when the POWER ON button of the detachable cover for this lamp indicates an abnormal condition of the projector. (Leveling feet are given below. LAMP2 monitor (page 98) This lamp lights up when the time to this lock port. It is reached. This ... blinking of this company are provided at the front and rear, right and left.) 12 Name and function of parts Front and side of the projector Side-mounted connection terminals (page 14) AC IN terminal (page 39) Connect the supplied line power cord into this socket. MAIN POWER switch (page ...
Dlp Projector - English/ French
Page 15
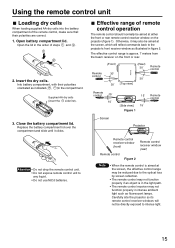
...˚ 30˚ Remote control Remote control 15˚ 15˚ 15˚ Remote control [Side view] 15˚ Figure 1 Screen Projector Remote control receiver window (front) Remote control Figure 2 Remote control receiver window (rear) Note • When the remote control is aimed at either..., the effective control range may not function properly in figure 2. Insert the dry cells. Otherwise, it clicks. Carefully site the projector so its remote control receiver windows will reflect commands back to any liquid. • Do not use NiCd batteries. Into battery compartment...
...˚ 30˚ Remote control Remote control 15˚ 15˚ 15˚ Remote control [Side view] 15˚ Figure 1 Screen Projector Remote control receiver window (front) Remote control Figure 2 Remote control receiver window (rear) Note • When the remote control is aimed at either..., the effective control range may not function properly in figure 2. Insert the dry cells. Otherwise, it clicks. Carefully site the projector so its remote control receiver windows will reflect commands back to any liquid. • Do not use NiCd batteries. Into battery compartment...
Dlp Projector - English/ French
Page 16
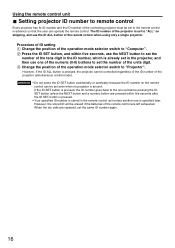
... Procedure of ID setting Change the position of the operation mode selector switch to "Computer". Change the position of the operation mode selector switch to "Projector". If the ID SET button is pressed, the ID number goes back to the one of the numeric (0-9) buttons to set even when no... projector is specified later. The ID number of the projector is set to "ALL" on the remote control can be controlled regardless of the ID number of the tens digit in...
... Procedure of ID setting Change the position of the operation mode selector switch to "Computer". Change the position of the operation mode selector switch to "Projector". If the ID SET button is pressed, the ID number goes back to the one of the numeric (0-9) buttons to set even when no... projector is specified later. The ID number of the projector is set to "ALL" on the remote control can be controlled regardless of the ID number of the tens digit in...
Dlp Projector - English/ French
Page 17
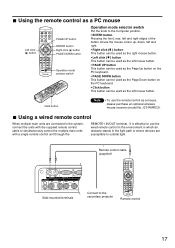
...SYSTEM SEL D.ZOOM 4 FUNC 1 5 6 BRIGHT CONTRAST 7 LENS 8 9 NEXT ASPECT 0 USER LIGHT ID ALL ID SET Computer Numetric LASER ON/OFF Projector PAGE UP button ENTER button Right click ( ) button PAGE DOWN button Operation mode selector switch D.ZOOM CONTRAST STD BRIGHT 9 1 1FUNC 5 0 USER ...8 4 ASPECT LENS Proj LeAcStEoRrONI/DOFSFET 7 NEXT ID ALL NuCometmripcutLIerGHT Operation mode selector switch Put the knob to the secondary projector ON POWER OFF AUTO SETUP RGB 1 VIDEO RGB 2 S-VIDEO AUX SHUTTER SHUT MENU FREEZE PAGE UP ENTER PAGE DOWN ON SCREEN 1...
...SYSTEM SEL D.ZOOM 4 FUNC 1 5 6 BRIGHT CONTRAST 7 LENS 8 9 NEXT ASPECT 0 USER LIGHT ID ALL ID SET Computer Numetric LASER ON/OFF Projector PAGE UP button ENTER button Right click ( ) button PAGE DOWN button Operation mode selector switch D.ZOOM CONTRAST STD BRIGHT 9 1 1FUNC 5 0 USER ...8 4 ASPECT LENS Proj LeAcStEoRrONI/DOFSFET 7 NEXT ID ALL NuCometmripcutLIerGHT Operation mode selector switch Put the knob to the secondary projector ON POWER OFF AUTO SETUP RGB 1 VIDEO RGB 2 S-VIDEO AUX SHUTTER SHUT MENU FREEZE PAGE UP ENTER PAGE DOWN ON SCREEN 1...
Dlp Projector - English/ French
Page 18
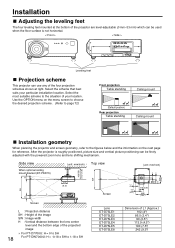
... projection scheme. (Refer to page 72) Front projection Table standing (Default position) Rear projection Table standing Ceiling mount Ceiling mount ;Installation geometry When planning the projector and screen geometry, refer to 1.18 x SH Side view When optional ceiling mount bracket (ET-PKD75) ; ;H L (unit: mm/inch) 237 (9.3") L H ... ET-D75LE5 190 (7.5") image ET-D75LE8 242 (9.5") SH 438-558 (17.2"-21.9") SW 86 (3.4") 140 (5.5") 314 (12.3") For PT-D7700U: H = 0 to SH 18 For PT-DW7000U: H = -0.18 x SH to the figures below and the information on the next page for reference.
... projection scheme. (Refer to page 72) Front projection Table standing (Default position) Rear projection Table standing Ceiling mount Ceiling mount ;Installation geometry When planning the projector and screen geometry, refer to 1.18 x SH Side view When optional ceiling mount bracket (ET-PKD75) ; ;H L (unit: mm/inch) 237 (9.3") L H ... ET-D75LE5 190 (7.5") image ET-D75LE8 242 (9.5") SH 438-558 (17.2"-21.9") SW 86 (3.4") 140 (5.5") 314 (12.3") For PT-D7700U: H = 0 to SH 18 For PT-DW7000U: H = -0.18 x SH to the figures below and the information on the next page for reference.

Dlp Projector - English/ French
Page 22
Installation If the projector is used with a screen size not listed in this manual, check the diagonal dimension (inch) of projection lens Aspect ratio Projection distance (L) formula Units: m ET-... Fixedfocus lens ET-D75LE5 (0.8:1) 4:3 L= 0.0158 x Screen diagonal (inch) - 0.0835 16:9 L= 0.0172 x Screen diagonal (inch) - 0.0835 22 Calculation formulas for projection distance by lens types (for PT-D7700U) Model number of your screen and calculate the projection distance using the following formulas.
Installation If the projector is used with a screen size not listed in this manual, check the diagonal dimension (inch) of projection lens Aspect ratio Projection distance (L) formula Units: m ET-... Fixedfocus lens ET-D75LE5 (0.8:1) 4:3 L= 0.0158 x Screen diagonal (inch) - 0.0835 16:9 L= 0.0172 x Screen diagonal (inch) - 0.0835 22 Calculation formulas for projection distance by lens types (for PT-D7700U) Model number of your screen and calculate the projection distance using the following formulas.
Dlp Projector - English/ French
Page 24
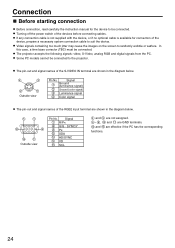
... be connected. If any connection cable is not supplied with the device, or if no optional cable is available for the device to the projector. Outside view Pin No. Signal Ground (luminance signal) Ground (color signal) Luminance signal Color signal The pin-out and signal names of ...the S-VIDEO IN terminal are effective if the PC has the corresponding functions. 24 The projector accepts the following signals: video, S-Video, analog RGB and digital signals from the PC. Turning off the power switch of the device, ...
... be connected. If any connection cable is not supplied with the device, or if no optional cable is available for the device to the projector. Outside view Pin No. Signal Ground (luminance signal) Ground (color signal) Luminance signal Color signal The pin-out and signal names of ...the S-VIDEO IN terminal are effective if the PC has the corresponding functions. 24 The projector accepts the following signals: video, S-Video, analog RGB and digital signals from the PC. Turning off the power switch of the device, ...

Dlp Projector - English/ French
Page 25
... to Y terminal) Control PC Video deck (TBC built-in time base corrector (TBC) or use a TBC between the projector and the video deck. 25 If this is the case, connect a TBC between the projector and the video deck. • If nonstandard burst signals are connected, the image may be sure to use...
... to Y terminal) Control PC Video deck (TBC built-in time base corrector (TBC) or use a TBC between the projector and the video deck. 25 If this is the case, connect a TBC between the projector and the video deck. • If nonstandard burst signals are connected, the image may be sure to use...
Dlp Projector - English/ French
Page 27
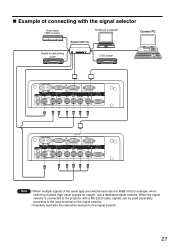
... on the signal selector. • Carefully read also the instruction manual for usage), use a dedicated signal selector. When the signal selector is connected to the projector with the signal selector Video deck (TBC built-in) Notebook computer Control PC Signal selector Digital broadcasting tuner POWER ON OFF INPUT SELECT OFF 1 2 3 4 5 6 VP...
... on the signal selector. • Carefully read also the instruction manual for usage), use a dedicated signal selector. When the signal selector is connected to the projector with the signal selector Video deck (TBC built-in) Notebook computer Control PC Signal selector Digital broadcasting tuner POWER ON OFF INPUT SELECT OFF 1 2 3 4 5 6 VP...
Dlp Projector - English/ French
Page 29
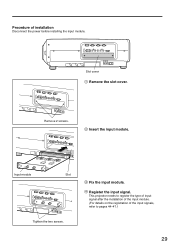
Slot cover Remove the slot cover. Register the input signal. Remove 2 screws. Input module Slot Tighten the two screws. Fix the input module. This projector needs to register the type of input signal after the installation of the input module. (For details on the registration of installation Disconnect the power before installing the input module. Insert the input module. Procedure of the input signals, refer to pages 44-47.) 29
Slot cover Remove the slot cover. Register the input signal. Remove 2 screws. Input module Slot Tighten the two screws. Fix the input module. This projector needs to register the type of input signal after the installation of the input module. (For details on the registration of installation Disconnect the power before installing the input module. Insert the input module. Procedure of the input signals, refer to pages 44-47.) 29


