Dlp Projector - English/ French
Page 4
...parts 10 Remote control 10 Front and side of the projector 12 Rear view of the main unit 13 Controls on -screen indication function 88 Setting the system format 89 How to adjust the lens for service 103 Specifications 104 Appendix 106 Outside dimensions 107 Français ... 74 System information 74 Adjusting color matching 75 Adjusting the color matching using a colorimeter............76 Video setting 77 Automatic adjustment 77 Output resolution (D7700U only 78 Auto signal 78 Fan control 78 P IN P 79 Setting FUNC1 80 Password 80 How to change the signal for the ET...
...parts 10 Remote control 10 Front and side of the projector 12 Rear view of the main unit 13 Controls on -screen indication function 88 Setting the system format 89 How to adjust the lens for service 103 Specifications 104 Appendix 106 Outside dimensions 107 Français ... 74 System information 74 Adjusting color matching 75 Adjusting the color matching using a colorimeter............76 Video setting 77 Automatic adjustment 77 Output resolution (D7700U only 78 Auto signal 78 Fan control 78 P IN P 79 Setting FUNC1 80 Password 80 How to change the signal for the ET...
Dlp Projector - English/ French
Page 26
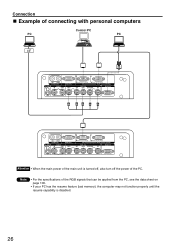
...-422 (R) IN OUT RGB 1 IN G/Y B/PB SYNC/HD VD SERIAL RGB 2 IN Attention • When the main power of the PC. Note • For the specifications of the RGB signals that can be applied from the PC, see the data sheet on page 106. • If your PC has the resume...
...-422 (R) IN OUT RGB 1 IN G/Y B/PB SYNC/HD VD SERIAL RGB 2 IN Attention • When the main power of the PC. Note • For the specifications of the RGB signals that can be applied from the PC, see the data sheet on page 106. • If your PC has the resume...
Dlp Projector - English/ French
Page 34
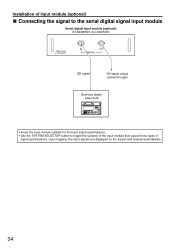
Installation of input module (optional) Connecting the signal to the serial digital signal input module Serial digital input module (optional) ET-MD95SD1 (for 480i/576i) 480i Module ET-MD95SD1 IN OUT SERIAL SD signal SD signal output (active through) Business digital video deck • Insert the input module suitable for the input signal specifications. • Use the SYSTEM SELECTOR button to toggle the systems of the input module that supports two types of signal specifications. Upon toggling, the input signals are displayed on the screen and cleared automatically. 34
Installation of input module (optional) Connecting the signal to the serial digital signal input module Serial digital input module (optional) ET-MD95SD1 (for 480i/576i) 480i Module ET-MD95SD1 IN OUT SERIAL SD signal SD signal output (active through) Business digital video deck • Insert the input module suitable for the input signal specifications. • Use the SYSTEM SELECTOR button to toggle the systems of the input module that supports two types of signal specifications. Upon toggling, the input signals are displayed on the screen and cleared automatically. 34

Dlp Projector - English/ French
Page 35
... to SUB IN/OUT terminals. Business-use digital video deck SD signal output (active through ) • Insert the input module that meets the input signal specifications. • Use the SYSTEM SELECTOR button to a system that meets desired one of the above or if any other way than listed above four types...
... to SUB IN/OUT terminals. Business-use digital video deck SD signal output (active through ) • Insert the input module that meets the input signal specifications. • Use the SYSTEM SELECTOR button to a system that meets desired one of the above or if any other way than listed above four types...

Dlp Projector - English/ French
Page 36
...1080/24sF 1080/25p 1080/30p • Normally, use digital video deck • Insert the input module that meets the input signal specifications. • Use the SYSTEM SELECTOR button to select the input module that is compatible with the signal format using the SYSTEM SELECTOR button... unstable signal is connected. If this happens, switch to a system that meets desired one of the eight types (14 formats) of signal specifications (SMPTE292M). While toggling through ) Business-use SYSTEM SELECTOR in "AUTO". 1080/50i • Automatic detection may malfunction if connection is made...
...1080/24sF 1080/25p 1080/30p • Normally, use digital video deck • Insert the input module that meets the input signal specifications. • Use the SYSTEM SELECTOR button to select the input module that is compatible with the signal format using the SYSTEM SELECTOR button... unstable signal is connected. If this happens, switch to a system that meets desired one of the eight types (14 formats) of signal specifications (SMPTE292M). While toggling through ) Business-use SYSTEM SELECTOR in "AUTO". 1080/50i • Automatic detection may malfunction if connection is made...
Dlp Projector - English/ French
Page 43
... the machine type of the personal computer. • Automatic adjustment may not available for synchronization signal of "INPUT RESOLUTION", "CLOCK PHASE" and "SHIFT". • For specific signals and long-sideways (or landscape) signals such as 16:9, adjustment should be made according to supply images with blurred edges or a dark image is...
... the machine type of the personal computer. • Automatic adjustment may not available for synchronization signal of "INPUT RESOLUTION", "CLOCK PHASE" and "SHIFT". • For specific signals and long-sideways (or landscape) signals such as 16:9, adjustment should be made according to supply images with blurred edges or a dark image is...
Dlp Projector - English/ French
Page 48
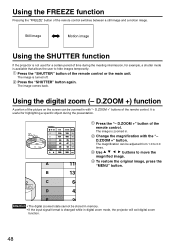
Still image Motion image Using the SHUTTER function If the projector is not used for example, a shutter mode is available that allows the user to 3.0 times. Press the "SHUTTER" button of the remote control. Change the ... the remote control or the main unit. D.ZOOM +" button. The image is changed while in digital zoom mode, the projector will exit digital zoom function. 48 The image is useful for highlighting a specific object during the meeting intermission, for a certain period of the picture on the screen can be adjusted from 1.0 to...
Still image Motion image Using the SHUTTER function If the projector is not used for example, a shutter mode is available that allows the user to 3.0 times. Press the "SHUTTER" button of the remote control. Change the ... the remote control or the main unit. D.ZOOM +" button. The image is changed while in digital zoom mode, the projector will exit digital zoom function. 48 The image is useful for highlighting a specific object during the meeting intermission, for a certain period of the picture on the screen can be adjusted from 1.0 to...
Dlp Projector - English/ French
Page 65
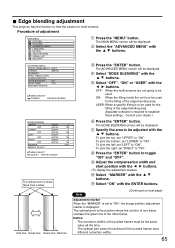
..." button. Select "EDGE BLENDING" with the buttons. The ADVANCED MENU screen will be displayed. USER: When a specific tilting is required to be adjusted with the buttons. The optimal point is displayed. Edge blending adjustment This projector has the function to toggle "ON" and "OFF". OFF: When the multi-screens are not going...
..." button. Select "EDGE BLENDING" with the buttons. The ADVANCED MENU screen will be displayed. USER: When a specific tilting is required to be adjusted with the buttons. The optimal point is displayed. Edge blending adjustment This projector has the function to toggle "ON" and "OFF". OFF: When the multi-screens are not going...
Dlp Projector - English/ French
Page 70
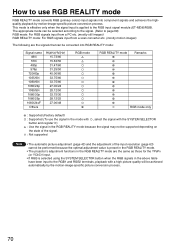
...RGB REALITY mode RGB REALITY mode converts RGB (primary colors) input signals into component signals and achieves the highquality playback by the motion-image-specific picture conversion process. 70 How to use the signal in the mode with , select the signal with the SYSTEM SELECTOR button and register ...of the input resolution (page 63) cannot be performed because the optimal adjustment value is preset in the RGB REALITY mode. • The projector's adjustment functions in the above table have been input to the RGB1 and RGB2 terminals, playback with a high picture quality will be achieved...
...RGB REALITY mode RGB REALITY mode converts RGB (primary colors) input signals into component signals and achieves the highquality playback by the motion-image-specific picture conversion process. 70 How to use the signal in the mode with , select the signal with the SYSTEM SELECTOR button and register ...of the input resolution (page 63) cannot be performed because the optimal adjustment value is preset in the RGB REALITY mode. • The projector's adjustment functions in the above table have been input to the RGB1 and RGB2 terminals, playback with a high picture quality will be achieved...
Dlp Projector - English/ French
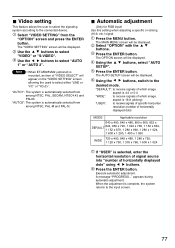
Page 77
...the used to select either "LINE or Y/C" or "YCbCr". Automatic adjustment (Only for RGB input) Use this setting when adjusting a specific or oblong (16:9, etc.) signal. Using the SETUP". The AUTO SETUP screen will be displayed. appears during automatic adjustment. Select ... x 720, 1 120 x 750, 1 376 x 768, 1 600 x 1 024 If "USER" is complete, the system returns to receive signals of specific horizontal resolution (number of horizontally displayed dots" using buttons. Use the buttons to the connected device. Press the ENTER button. Press the MENU button. "DEFAULT...
...the used to select either "LINE or Y/C" or "YCbCr". Automatic adjustment (Only for RGB input) Use this setting when adjusting a specific or oblong (16:9, etc.) signal. Using the SETUP". The AUTO SETUP screen will be displayed. appears during automatic adjustment. Select ... x 720, 1 120 x 750, 1 376 x 768, 1 600 x 1 024 If "USER" is complete, the system returns to receive signals of specific horizontal resolution (number of horizontally displayed dots" using buttons. Use the buttons to the connected device. Press the ENTER button. Press the MENU button. "DEFAULT...

Dlp Projector - English/ French
Page 82
... length Stop bit X parameter S parameter RS-232C-compliant Start-stop synchronization 9 600bps None 8 bits 1 bit None None Basic format Transmission from the projector before sending the next command. C1 C2 C3 : P1 P2 Pn ETX (2 bytes) Two ID characters (2 bytes) Semicolon (1 byte) Colon (1 ... return answer back only in the following cases: If it coincides with the projector ID, ID specification is ALL and VPS-SYSTEM is the master, or ID specification is group and Group is provided to enable plural projector control. STX A D I 1 I 2 ; Add parameters according to 60 seconds ...
... length Stop bit X parameter S parameter RS-232C-compliant Start-stop synchronization 9 600bps None 8 bits 1 bit None None Basic format Transmission from the projector before sending the next command. C1 C2 C3 : P1 P2 Pn ETX (2 bytes) Two ID characters (2 bytes) Semicolon (1 byte) Colon (1 ... return answer back only in the following cases: If it coincides with the projector ID, ID specification is ALL and VPS-SYSTEM is the master, or ID specification is group and Group is provided to enable plural projector control. STX A D I 1 I 2 ; Add parameters according to 60 seconds ...

Dlp Projector - English/ French
Page 83
Cable specifications Projector 1 NC 2 3 4 NC 5 6 NC 7 8 9 NC Computer (DTE specifications) NC 1 2 3 NC 4 5 NC 6 7 8 NC 9 Attention • To connect the computer to the SERIAL terminal, prepare an adequate communication cable that fits to your..." will not be accepted. Note • If you need a detailed command list, please contact your personal computer. 83 Control commands When controlling the projector from a computer, the following commands are available: Command Function of command Remarks PON Power "ON" POF Power "OFF" In standby mode, commands other...
Cable specifications Projector 1 NC 2 3 4 NC 5 6 NC 7 8 9 NC Computer (DTE specifications) NC 1 2 3 NC 4 5 NC 6 7 8 NC 9 Attention • To connect the computer to the SERIAL terminal, prepare an adequate communication cable that fits to your..." will not be accepted. Note • If you need a detailed command list, please contact your personal computer. 83 Control commands When controlling the projector from a computer, the following commands are available: Command Function of command Remarks PON Power "ON" POF Power "OFF" In standby mode, commands other...
Dlp Projector - English/ French
Page 104
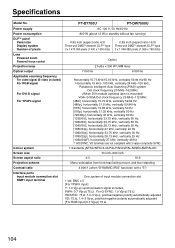
Specifications Model No. Power supply Power consumption DLPTM panel Panel size Display system Number...For YPBPR signal Colour system Screen size Screen aspect ratio Projection scheme Contrast ratio Interface ports Input module connection slot RGB1 input terminal PT-D7700U PT-DW7000U AC 120 V, 50 Hz/60 Hz 800 W (about 12 W in standby without fan running) 0.95 inch (... kHz/15.63 kHz, vertically 59.94 Hz/50 Hz Horizontally 15 kHz-100 kHz, vertically 24 kHz-120 kHz, Panasonic Intelligent Auto Scanning (PIAS) system Dot clock frequency 20 MHz-162 MHz (When DVI module (optional item) is mounted)...
Specifications Model No. Power supply Power consumption DLPTM panel Panel size Display system Number...For YPBPR signal Colour system Screen size Screen aspect ratio Projection scheme Contrast ratio Interface ports Input module connection slot RGB1 input terminal PT-D7700U PT-DW7000U AC 120 V, 50 Hz/60 Hz 800 W (about 12 W in standby without fan running) 0.95 inch (... kHz/15.63 kHz, vertically 59.94 Hz/50 Hz Horizontally 15 kHz-100 kHz, vertically 24 kHz-120 kHz, Panasonic Intelligent Auto Scanning (PIAS) system Dot clock frequency 20 MHz-162 MHz (When DVI module (optional item) is mounted)...