Dlp Projector - English/ French
Page 3
... if not installed and used in a residential installation. NOTICE: This product has a High Intensity Discharge (HID) lamp that may cause harmful interference to radio communications. These limits are designed to provide reasonable protection against harmful interference in...information please contact your community due to environmental considerations. Declaration of Conformity Model Number: PT-D7700U / PT-DW7000U Trade Name: Panasonic Responsible Party: Matsushita Electric Corporation of America One Panasonic Way, Secaucus, NJ 07094 Telephone Number: 1-800-524-1448 or 1-800-526-...
... if not installed and used in a residential installation. NOTICE: This product has a High Intensity Discharge (HID) lamp that may cause harmful interference to radio communications. These limits are designed to provide reasonable protection against harmful interference in...information please contact your community due to environmental considerations. Declaration of Conformity Model Number: PT-D7700U / PT-DW7000U Trade Name: Panasonic Responsible Party: Matsushita Electric Corporation of America One Panasonic Way, Secaucus, NJ 07094 Telephone Number: 1-800-524-1448 or 1-800-526-...
Dlp Projector - English/ French
Page 4
... control unit 15 Loading dry cells 15 Effective range of remote control operation 15 Setting projector ID number to remote control 16 Using the remote control as presettings......53 DYNAMIC IRIS...RGB REALITY mode 70 Option settings 71 ID number setting 71 Installation Setting 72 Lamp select 73 Lamp power 73 RS232C SETTING (Procedure of setting communication conditions) ..74 Position of... the color matching using a colorimeter............76 Video setting 77 Automatic adjustment 77 Output resolution (D7700U only 78 Auto signal 78 Fan control 78 P IN P 79 Setting FUNC1 80 Password...
... control unit 15 Loading dry cells 15 Effective range of remote control operation 15 Setting projector ID number to remote control 16 Using the remote control as presettings......53 DYNAMIC IRIS...RGB REALITY mode 70 Option settings 71 ID number setting 71 Installation Setting 72 Lamp select 73 Lamp power 73 RS232C SETTING (Procedure of setting communication conditions) ..74 Position of... the color matching using a colorimeter............76 Video setting 77 Automatic adjustment 77 Output resolution (D7700U only 78 Auto signal 78 Fan control 78 P IN P 79 Setting FUNC1 80 Password...

Dlp Projector - English/ French
Page 5
..., as this condition may cause the projector to overheat, which can damage the insulation, which is not strong enough to take the full weight of a surface which can be dangerous. Do not disassemble the lamp unit. • If the lamp section breaks, it may result in fire or electric ...shocks. Insert the power cord plug securely into water or let it become wet. • Failure to observe this projector in a place which could result in fire. ...
..., as this condition may cause the projector to overheat, which can damage the insulation, which is not strong enough to take the full weight of a surface which can be dangerous. Do not disassemble the lamp unit. • If the lamp section breaks, it may result in fire or electric ...shocks. Insert the power cord plug securely into water or let it become wet. • Failure to observe this projector in a place which could result in fire. ...
Dlp Projector - English/ French
Page 6
... with smoke or steam. • Using the projector under such conditions may result. terminals of the battery to come into contact with metallic objects such as doing so can cause death by a qualified technician. • The lamp unit has high internal pressure. Precautions with regard... to safety Do not place liquid containers on top of the projector. • Failure to observe this may cause the projector to become unbalanced and fall, which could result. 6 ...
... with smoke or steam. • Using the projector under such conditions may result. terminals of the battery to come into contact with metallic objects such as doing so can cause death by a qualified technician. • The lamp unit has high internal pressure. Precautions with regard... to safety Do not place liquid containers on top of the projector. • Failure to observe this may cause the projector to become unbalanced and fall, which could result. 6 ...
Dlp Projector - English/ French
Page 7
...clean, Please bring your Dealer or a Recycling Company. Do not use the old lamp unit. • The lamp section may result. Do not reach for humid weather arrives. Do not look directly into the lens while the projector is being cleaned out, it has completely cooled off, otherwise burns may break. Do... to the air outlet port. • Heated air comes out of the lens there is a good idea to clean the projector when required. Accessories Check that all of the lamp unit should only be carried out after it can result in fire or problems with operation. • It is a injury ...
...clean, Please bring your Dealer or a Recycling Company. Do not use the old lamp unit. • The lamp section may result. Do not reach for humid weather arrives. Do not look directly into the lens while the projector is being cleaned out, it has completely cooled off, otherwise burns may break. Do... to the air outlet port. • Heated air comes out of the lens there is a good idea to clean the projector when required. Accessories Check that all of the lamp unit should only be carried out after it can result in fire or problems with operation. • It is a injury ...
Dlp Projector - English/ French
Page 8
... to remove, use . When handling the screen, be shortened. Do not place the projector over 1 400 m (4605.3') above sea level. Keep your hands away from the receptacle before cleaning. Lamp A mercury lamp with the supplied lens cap when the projector is installed in a place exposed to vibrations or impacts. When using it is not...
... to remove, use . When handling the screen, be shortened. Do not place the projector over 1 400 m (4605.3') above sea level. Keep your hands away from the receptacle before cleaning. Lamp A mercury lamp with the supplied lens cap when the projector is installed in a place exposed to vibrations or impacts. When using it is not...

Dlp Projector - English/ French
Page 10
... 1 STD 2 OSD 3 SYSTEM SEL D.ZOOM 4 FUNC 1 5 6 BRIGHT CONTRAST 7 LENS 8 9 NEXT ASPECT 0 USER LIGHT ID ALL ID SET Computer Numetric LASER ON/OFF Projector < When the operation mode selector is set to black out the image temporarily. D.ZOOM +) buttons (page 48) Any portion of the picture can control the... functions set in the ten's place. AUTO SET UP button (page 43) Pressing this button to Projector > Remote control operation indicator lamp The lamp flashes when any remote control button is active, a message "PROGRESS..."
... 1 STD 2 OSD 3 SYSTEM SEL D.ZOOM 4 FUNC 1 5 6 BRIGHT CONTRAST 7 LENS 8 9 NEXT ASPECT 0 USER LIGHT ID ALL ID SET Computer Numetric LASER ON/OFF Projector < When the operation mode selector is set to black out the image temporarily. D.ZOOM +) buttons (page 48) Any portion of the picture can control the... functions set in the ten's place. AUTO SET UP button (page 43) Pressing this button to Projector > Remote control operation indicator lamp The lamp flashes when any remote control button is active, a message "PROGRESS..."
Dlp Projector - English/ French
Page 12
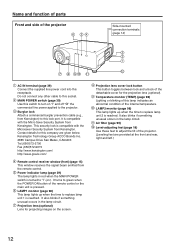
... POWER switch is reached. It also blinks if something unusual occurs in the lamp circuit. Do not connect any other cable to replace lamp unit 1 is turned to the projector. LAMP1 monitor (page 98) This lamp lights up when the time to adjust the tilt of the detachable cover for.... Projection lens (optional) Lens for this socket. Temperature monitor (TEMP) (page 98) Lighting or blinking of this lamp indicates an abnormal condition of the projector Side-mounted connection terminals (page 14) AC IN terminal (page 39) Connect the supplied line power cord into this lock port. Air ...
... POWER switch is reached. It also blinks if something unusual occurs in the lamp circuit. Do not connect any other cable to replace lamp unit 1 is turned to the projector. LAMP1 monitor (page 98) This lamp lights up when the time to adjust the tilt of the detachable cover for.... Projection lens (optional) Lens for this socket. Temperature monitor (TEMP) (page 98) Lighting or blinking of this lamp indicates an abnormal condition of the projector Side-mounted connection terminals (page 14) AC IN terminal (page 39) Connect the supplied line power cord into this lock port. Air ...
Dlp Projector - English/ French
Page 13
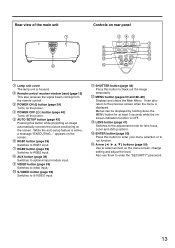
... while projecting an image automatically corrects the picture positioning on rear panel RGB 1 RGB 2 VIDEO S-VIDEO AUTO SETUP AUX SHUTTER LENS MENU ENTER Lamp unit cover The lamp unit is displayed. MENU button (pages 50 and 88-89) Displays and clears the Main Menu. It can be displayed by holding down the...
... while projecting an image automatically corrects the picture positioning on rear panel RGB 1 RGB 2 VIDEO S-VIDEO AUTO SETUP AUX SHUTTER LENS MENU ENTER Lamp unit cover The lamp unit is displayed. MENU button (pages 50 and 88-89) Displays and clears the Main Menu. It can be displayed by holding down the...
Dlp Projector - English/ French
Page 15
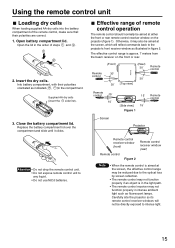
.... 1. Replace the battery compartment lid over the compartment and slide until it may not function properly in intense ambient light such as fluorescent lamps. Effective range of steps and . 2. The effective control range is in the compartment. Remote control (Front) 30˚ 30˚...˚ 30˚ Remote control Remote control 15˚ 15˚ 15˚ Remote control [Side view] 15˚ Figure 1 Screen Projector Remote control receiver window (front) Remote control Figure 2 Remote control receiver window (rear) Note • When the remote control is aimed at ...
.... 1. Replace the battery compartment lid over the compartment and slide until it may not function properly in intense ambient light such as fluorescent lamps. Effective range of steps and . 2. The effective control range is in the compartment. Remote control (Front) 30˚ 30˚...˚ 30˚ Remote control Remote control 15˚ 15˚ 15˚ Remote control [Side view] 15˚ Figure 1 Screen Projector Remote control receiver window (front) Remote control Figure 2 Remote control receiver window (rear) Note • When the remote control is aimed at ...
Dlp Projector - English/ French
Page 39
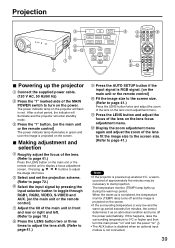
... turn on the screen. up at about 0˚C, a warm- After a short period, the indicator will illuminate and the projector will flash in green and soon the image is completed, the temperature monitor (TEMP) lamp turns off the power automatically. Pressing buttons to start projection. The power indicator...the lens on the projector will enter standby mode. If this happens, raise the surrounding temperature to page 41.) Press the AUTO SETUP button if the input signal is RGB signal. [on the main unit or the remote control] The power indicator lamp illuminates in red. ...
... turn on the screen. up at about 0˚C, a warm- After a short period, the indicator will illuminate and the projector will flash in green and soon the image is completed, the temperature monitor (TEMP) lamp turns off the power automatically. Pressing buttons to start projection. The power indicator...the lens on the projector will enter standby mode. If this happens, raise the surrounding temperature to page 41.) Press the AUTO SETUP button if the input signal is RGB signal. [on the main unit or the remote control] The power indicator lamp illuminates in red. ...

Dlp Projector - English/ French
Page 40
...) While the cooling fan is in the process of power even in standby mode after the cooling fan stops. (Power indicator lamp lit in red) • If you re-power the projector after a while. 40 Press the "O" marked side of the main unit turns to remove all power from the outlet. Note... • Turning on again after shutting off the MAIN POWER switch, nor unplug the projector from the projector. To light up the lamp, turn the power on the power supply will not light up orange. (The cooling fan keeps running , never turn off the main...
...) While the cooling fan is in the process of power even in standby mode after the cooling fan stops. (Power indicator lamp lit in red) • If you re-power the projector after a while. 40 Press the "O" marked side of the main unit turns to remove all power from the outlet. Note... • Turning on again after shutting off the MAIN POWER switch, nor unplug the projector from the projector. To light up the lamp, turn the power on the power supply will not light up orange. (The cooling fan keeps running , never turn off the main...
Dlp Projector - English/ French
Page 49
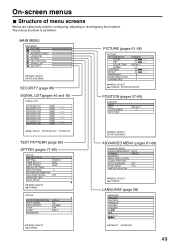
...RGB1 RGB1 RGB1 RGB1 RGB1 RGB1 :SELECT ENTER:DETAILS STD:DELETE TEST PATTERN (page 85) OPTION (pages 71-80) OPTION PROJECTOR ID SETTING LAMP SELECT LAMP POWER RS232C SETTING OSD POSITION SYSTEM INFORMATION COLOR MATCHING VIDEO SETTING AUTO SETUP 2 FRONT-F DUAL HIGH 2 OFF :MENU SELECT ...:CHANGE OPTION OUTPUT RESOLUTION AUTO SIGNAL FAN CONTROL P IN P FUNC1 PASSWORD SXGA+ ON NORMAL OFF P IN P PICTURE (pages 51-56) PICTURE ...
...RGB1 RGB1 RGB1 RGB1 RGB1 RGB1 :SELECT ENTER:DETAILS STD:DELETE TEST PATTERN (page 85) OPTION (pages 71-80) OPTION PROJECTOR ID SETTING LAMP SELECT LAMP POWER RS232C SETTING OSD POSITION SYSTEM INFORMATION COLOR MATCHING VIDEO SETTING AUTO SETUP 2 FRONT-F DUAL HIGH 2 OFF :MENU SELECT ...:CHANGE OPTION OUTPUT RESOLUTION AUTO SIGNAL FAN CONTROL P IN P FUNC1 PASSWORD SXGA+ ON NORMAL OFF P IN P PICTURE (pages 51-56) PICTURE ...
Dlp Projector - English/ French
Page 71
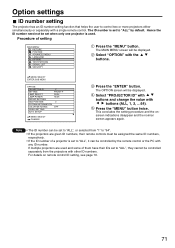
... POSITION ADVANCED MENU LANGUAGE OPTION TEST PATTERN SIGNAL LIST SECURITY Press the "MENU" button. Select "PROJECTOR ID" with buttons and change the value with the buttons. :MENU SELECT ENTER:SUB MENU OPTION PROJECTOR ID SETTING LAMP SELECT LAMP POWER RS232C SETTING OSD POSITION SYSTEM INFORMATION COLOR MATCHING VIDEO SETTING AUTO SETUP 2 FRONT-F DUAL HIGH...
... POSITION ADVANCED MENU LANGUAGE OPTION TEST PATTERN SIGNAL LIST SECURITY Press the "MENU" button. Select "PROJECTOR ID" with buttons and change the value with the buttons. :MENU SELECT ENTER:SUB MENU OPTION PROJECTOR ID SETTING LAMP SELECT LAMP POWER RS232C SETTING OSD POSITION SYSTEM INFORMATION COLOR MATCHING VIDEO SETTING AUTO SETUP 2 FRONT-F DUAL HIGH...
Dlp Projector - English/ French
Page 72
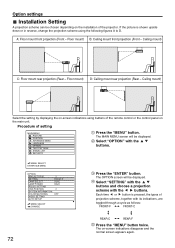
... figures A to D. Each time or button is shown upside down or in reverse, change the projection scheme using buttons of the projector. Floor mount) B: Ceiling mount front projection (Front - The MAIN MENU screen will be chosen depending on the installation of the ...the main unit. Select "SETTING" with the buttons and choose a projection scheme with the buttons. :MENU SELECT ENTER:SUB MENU OPTION PROJECTOR ID SETTING LAMP SELECT LAMP POWER RS232C SETTING OSD POSITION SYSTEM INFORMATION COLOR MATCHING VIDEO SETTING AUTO SETUP 2 FRONT-F DUAL HIGH 2 OFF :MENU SELECT :CHANGE ...
... figures A to D. Each time or button is shown upside down or in reverse, change the projection scheme using buttons of the projector. Floor mount) B: Ceiling mount front projection (Front - The MAIN MENU screen will be chosen depending on the installation of the ...the main unit. Select "SETTING" with the buttons and choose a projection scheme with the buttons. :MENU SELECT ENTER:SUB MENU OPTION PROJECTOR ID SETTING LAMP SELECT LAMP POWER RS232C SETTING OSD POSITION SYSTEM INFORMATION COLOR MATCHING VIDEO SETTING AUTO SETUP 2 FRONT-F DUAL HIGH 2 OFF :MENU SELECT :CHANGE ...
Dlp Projector - English/ French
Page 73
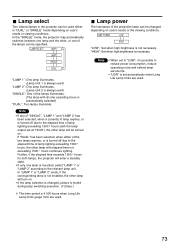
... SINGLE DUAL "LAMP 1": One lamp illuminates. (Lamp Unit 1 is always used) "LAMP 2": One lamp illuminates. (Lamp Unit 2 is set at "HIGH"), the other lamp will turn on . "HIGH": Set when high brightness is not necessary. Lamp select Two internal lamps in the projector can be used either of the two lamps expires, or is 4 000 hours when Long Life Lamp Units (page...
... SINGLE DUAL "LAMP 1": One lamp illuminates. (Lamp Unit 1 is always used) "LAMP 2": One lamp illuminates. (Lamp Unit 2 is set at "HIGH"), the other lamp will turn on . "HIGH": Set when high brightness is not necessary. Lamp select Two internal lamps in the projector can be used either of the two lamps expires, or is 4 000 hours when Long Life Lamp Units (page...
Dlp Projector - English/ French
Page 74
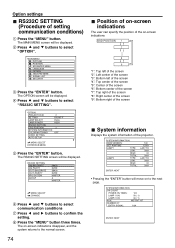
...LAD7700 300h 0h 300h ENTER: NEXT • Pressing the "ENTER" button will be displayed. Option settings RS232C SETTING (Procedure of the projector. The OPTION screen will move on to the next page. The MAIN MENU screen will be displayed. The RS232C SETTING screen will be...indications The user can specify the position of the on -screen indications disappear, and the system returns to select "OPTION". OPTION PROJECTOR ID SETTING LAMP SELECT LAMP POWER RS232C SETTING OSD POSITION SYSTEM INFORMATION COLOR MATCHING VIDEO SETTING AUTO SETUP 2 FRONT-F DUAL HIGH 2 OFF :MENU SELECT ...
...LAD7700 300h 0h 300h ENTER: NEXT • Pressing the "ENTER" button will be displayed. Option settings RS232C SETTING (Procedure of the projector. The OPTION screen will move on to the next page. The MAIN MENU screen will be displayed. The RS232C SETTING screen will be...indications The user can specify the position of the on -screen indications disappear, and the system returns to select "OPTION". OPTION PROJECTOR ID SETTING LAMP SELECT LAMP POWER RS232C SETTING OSD POSITION SYSTEM INFORMATION COLOR MATCHING VIDEO SETTING AUTO SETUP 2 FRONT-F DUAL HIGH 2 OFF :MENU SELECT ...
Dlp Projector - English/ French
Page 75
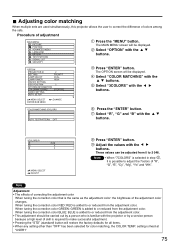
... color When tuning the correction color that is possible to adjust the 7colors of the adjustment color changes. These values can be displayed. OPTION PROJECTOR ID SETTING LAMP SELECT LAMP POWER RS232C SETTING OSD POSITION SYSTEM INFORMATION COLOR MATCHING VIDEO SETTING AUTO SETUP 2 FRONT-F DUAL HIGH 2 3COLORS Press "ENTER" button. Select "R", "G" and "B" with...
... color When tuning the correction color that is possible to adjust the 7colors of the adjustment color changes. These values can be displayed. OPTION PROJECTOR ID SETTING LAMP SELECT LAMP POWER RS232C SETTING OSD POSITION SYSTEM INFORMATION COLOR MATCHING VIDEO SETTING AUTO SETUP 2 FRONT-F DUAL HIGH 2 3COLORS Press "ENTER" button. Select "R", "G" and "B" with...
Dlp Projector - English/ French
Page 80
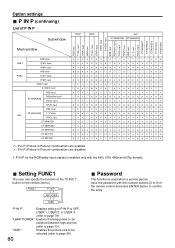
... P IN P for the RGBreality input signals is used when a service person. Input the password with the 480i, 576i, 480p and 576p formats. FUNC1 P IN P LAMP POWER SIZE "P IN P": Enables setting of P IN P to OFF, USER 1, USER 2, or USER 3. (refer to confirm the entry. "SIZE": Enables the picture...refer to page 73). Setting FUNC1 The user can specify the function of the remote control and press ENTER button to page 79). "LAMP POWER": Enables the lamp power to be selected (refer to page 58). 80 Password This function is enabled only with the numeric buttons (0 to 9) of ...
... P IN P for the RGBreality input signals is used when a service person. Input the password with the 480i, 576i, 480p and 576p formats. FUNC1 P IN P LAMP POWER SIZE "P IN P": Enables setting of P IN P to OFF, USER 1, USER 2, or USER 3. (refer to confirm the entry. "SIZE": Enables the picture...refer to page 73). Setting FUNC1 The user can specify the function of the remote control and press ENTER button to page 79). "LAMP POWER": Enables the lamp power to be selected (refer to page 58). 80 Password This function is enabled only with the numeric buttons (0 to 9) of ...
Dlp Projector - English/ French
Page 81
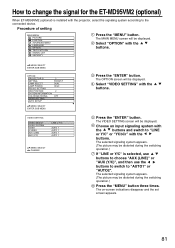
... signaling system with the buttons and switch to "LINE or Y/C" or "YCbCr" with the buttons. :MENU SELECT ENTER:SUB MENU OPTION PROJECTOR ID SETTING LAMP SELECT LAMP POWER RS232C SETTING OSD POSITION SYSTEM INFORMATION COLOR MATCHING VIDEO SETTING AUTO SETUP 2 FRONT-F DUAL HIGH 2 OFF :MENU SELECT ENTER:SUB MENU...or Y/C AUTO 1 AUTO 1 AUTO 1 AUTO 1 :MENU SELECT :CHANGE Press the "ENTER" button. The OPTION screen will be displayed. Select "VIDEO SETTING" with the projector, select the signaling system according to the connected device. The MAIN MENU screen will be displayed.
... signaling system with the buttons and switch to "LINE or Y/C" or "YCbCr" with the buttons. :MENU SELECT ENTER:SUB MENU OPTION PROJECTOR ID SETTING LAMP SELECT LAMP POWER RS232C SETTING OSD POSITION SYSTEM INFORMATION COLOR MATCHING VIDEO SETTING AUTO SETUP 2 FRONT-F DUAL HIGH 2 OFF :MENU SELECT ENTER:SUB MENU...or Y/C AUTO 1 AUTO 1 AUTO 1 AUTO 1 :MENU SELECT :CHANGE Press the "ENTER" button. The OPTION screen will be displayed. Select "VIDEO SETTING" with the projector, select the signaling system according to the connected device. The MAIN MENU screen will be displayed.


