User's Manual
Page 1
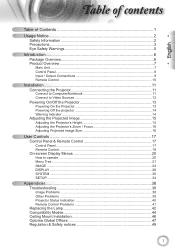
...14 Warning Indicator 14 Adjusting the Projected Image 15 Adjusting the Projector's Height 15 Adjusting the Projector's Zoom / Focus 16 Adjusting Projected Image Size 16 User Controls 17 Control Panel & Remote Control 17 Control Panel ...17 Remote Control...18 On-screen Display Menus 20 How to operate ...20 Menu Tree...21 IMAGE ...24 DISPLAY ...26 SYSTEM ...30 SETUP ...34 Appendices 38 Troubleshooting 38 Image Problems 38 Other Problems 39 Projector Status Indication 40 Remote Control Problems 41 Replacing the Lamp 42 Compatibility Modes 44 Ceiling Mount Installation 46 Optoma...
...14 Warning Indicator 14 Adjusting the Projected Image 15 Adjusting the Projector's Height 15 Adjusting the Projector's Zoom / Focus 16 Adjusting Projected Image Size 16 User Controls 17 Control Panel & Remote Control 17 Control Panel ...17 Remote Control...18 On-screen Display Menus 20 How to operate ...20 Menu Tree...21 IMAGE ...24 DISPLAY ...26 SYSTEM ...30 SETUP ...34 Appendices 38 Troubleshooting 38 Image Problems 38 Other Problems 39 Projector Status Indication 40 Remote Control Problems 41 Replacing the Lamp 42 Compatibility Modes 44 Ceiling Mount Installation 46 Optoma...

User's Manual
Page 2
WARNING: TO REDUCE THE RISK OF FIRE OR ELECTRIC SHOCK, DO NOT EXPOSE THIS APPLIANCE TO RAIN OR MOISTURE. Important Safety Instruction 1. To ensure reliable operation of the projector and to rain or moisture. 3. Clean only with arrow head within an equilateral triangle is loose inside. Do not attempt to persons. Opening or removing covers may expose you send...
WARNING: TO REDUCE THE RISK OF FIRE OR ELECTRIC SHOCK, DO NOT EXPOSE THIS APPLIANCE TO RAIN OR MOISTURE. Important Safety Instruction 1. To ensure reliable operation of the projector and to rain or moisture. 3. Clean only with arrow head within an equilateral triangle is loose inside. Do not attempt to persons. Opening or removing covers may expose you send...
User's Manual
Page 3
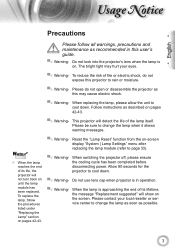
... to cool down . Please be sure to change the lamp as soon as described on -screen display "System | Lamp Settings" menu after replacing the lamp module (refer to page 33). ▀■ Warning- Do not use lens cap when projector is in this user's guide. ▀■ Warning- Please do not expose this may hurt your local reseller or service center to rain or moisture. ▀■...
... to cool down . Please be sure to change the lamp as soon as described on -screen display "System | Lamp Settings" menu after replacing the lamp module (refer to page 33). ▀■ Warning- Do not use lens cap when projector is in this user's guide. ▀■ Warning- Please do not expose this may hurt your local reseller or service center to rain or moisture. ▀■...
User's Manual
Page 13
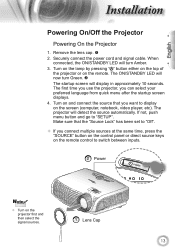
... power cord and signal cable. Make sure that you want to switch between inputs. Turn on the lamp by pressing " " button either on the top of the projector or on the remote control to display on the projector first and then select the signal sources. 1 Lens Cap 13 The projector will display in approximately 10 seconds. SOURCE 2 Power POWER POWER SOURCE Noottee Turn on the screen (computer, notebook, video player, etc). The first time you use...
... power cord and signal cable. Make sure that you want to switch between inputs. Turn on the lamp by pressing " " button either on the top of the projector or on the remote control to display on the projector first and then select the signal sources. 1 Lens Cap 13 The projector will display in approximately 10 seconds. SOURCE 2 Power POWER POWER SOURCE Noottee Turn on the screen (computer, notebook, video player, etc). The first time you use...
User's Manual
Page 14
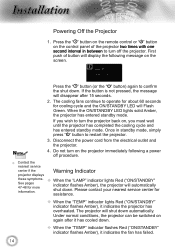
... the projector two times with one second interval in standby mode, simply press " " button to turn the projector back on the control panel of button will display the following a power off the projector. Please contact your nearest service center for more information. When the "LAMP" indicator lights Red ("ON/STANDBY" indicator flashes Amber), the projector will shut down . When the "TEMP" indicator flashes Red ("ON/STANDBY" indicator flashes Amber), it indicates the fan has...
... the projector two times with one second interval in standby mode, simply press " " button to turn the projector back on the control panel of button will display the following a power off the projector. Please contact your nearest service center for more information. When the "LAMP" indicator lights Red ("ON/STANDBY" indicator flashes Amber), the projector will shut down . When the "TEMP" indicator flashes Red ("ON/STANDBY" indicator flashes Amber), it indicates the fan has...
User's Manual
Page 17
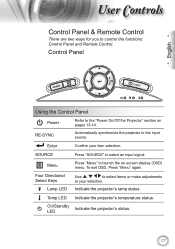
... control the functions: Control Panel and Remote Control. Temp LED Indicate the projector's temperature status. Control Panel English SOURCE POWER Using the Control Panel Power Refer to your item selection. Indicate the projector's lamp status. RE-SYNC Automatically synchronize the projector to launch the on pages 13-14. Four Directional Select Keys Lamp LED Use to select items or make adjustments to the "Power On/Off the Projector" section on -screen display (OSD) menu. On/Standby LED Indicate the projector's status. 17 Menu Press "Menu" to the input...
... control the functions: Control Panel and Remote Control. Temp LED Indicate the projector's temperature status. Control Panel English SOURCE POWER Using the Control Panel Power Refer to your item selection. Indicate the projector's lamp status. RE-SYNC Automatically synchronize the projector to launch the on pages 13-14. Four Directional Select Keys Lamp LED Use to select items or make adjustments to the "Power On/Off the Projector" section on -screen display (OSD) menu. On/Standby LED Indicate the projector's status. 17 Menu Press "Menu" to the input...
User's Manual
Page 18
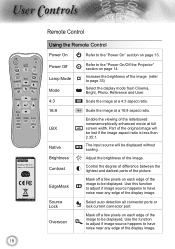
... and User. Use this function to adjust if image source happens to have noise near any edge of the display image. Increase the brightness of the image. Scale the image at a 4:3 aspect ratio. 16:9 Scale the image at full screen width. ser ontrols Lamp 18 Remote Control Using the Remote Control Power On Refer to the "Power On/Off the Projector" section on page 14. Power Off Lamp Mode Mode 4:3 Refer to the "Power On...
... and User. Use this function to adjust if image source happens to have noise near any edge of the display image. Increase the brightness of the image. Scale the image at a 4:3 aspect ratio. 16:9 Scale the image at full screen width. ser ontrols Lamp 18 Remote Control Using the Remote Control Power On Refer to the "Power On/Off the Projector" section on page 14. Power Off Lamp Mode Mode 4:3 Refer to the "Power On...
User's Manual
Page 24
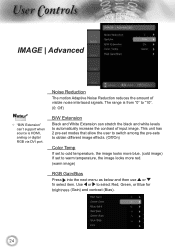
This unit has 2 pre-set modes that allow the user to switch among the pre-sets to obtain different image effects. (Off/On) Color Temp If set to cold temperature, the image looks more blue. (cold image) If set to warm temperature, the image looks more red. (warm image) RGB Gain/Bias Press into the next menu as below and then use or to select Red, Green, or Blue for brightness (Gain) and contrast...
This unit has 2 pre-set modes that allow the user to switch among the pre-sets to obtain different image effects. (Off/On) Color Temp If set to cold temperature, the image looks more blue. (cold image) If set to warm temperature, the image looks more red. (warm image) RGB Gain/Bias Press into the next menu as below and then use or to select Red, Green, or Blue for brightness (Gain) and contrast...
User's Manual
Page 28
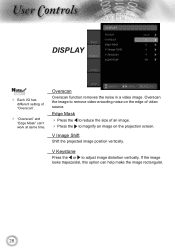
... size of an image. Press the to remove video encoding noise on the projection screen. Overscan the image to magnify an image on the edge of video source. If the image looks trapezoidal, this option can 't work at same time. ser ontrols DISPLAY Noottee Each I/O has different setting of "Overscan". "Overscan" and "Edge Mask" can help make the image rectangular. 28 V Image Shift Shift the projected image...
... size of an image. Press the to remove video encoding noise on the projection screen. Overscan the image to magnify an image on the edge of video source. If the image looks trapezoidal, this option can 't work at same time. ser ontrols DISPLAY Noottee Each I/O has different setting of "Overscan". "Overscan" and "Edge Mask" can help make the image rectangular. 28 V Image Shift Shift the projected image...
User's Manual
Page 30
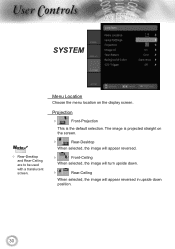
The image is the default selection. Menu Location Choose the menu location on the screen. Rear-Desktop When selected, the image will appear reversed. Front-Ceiling When selected, the image will turn upside down. Rear-Ceiling When selected, the image will appear reversed in upside down position. 30 Projection Front-Projection This is projected straight on the display screen. ser ontrols SYSTEM Noottee Rear-Desktop and Rear-Ceiling are to be used with a translucent screen.
The image is the default selection. Menu Location Choose the menu location on the screen. Rear-Desktop When selected, the image will appear reversed. Front-Ceiling When selected, the image will turn upside down. Rear-Ceiling When selected, the image will appear reversed in upside down position. 30 Projection Front-Projection This is projected straight on the display screen. ser ontrols SYSTEM Noottee Rear-Desktop and Rear-Ceiling are to be used with a translucent screen.
User's Manual
Page 33
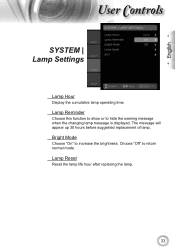
The message will appear up 30 hours before suggested replacement of lamp. Choose "Off" to increase the brightness. Bright Mode Choose "On" to return normal mode. Lamp Reminder Choose this function to show or to hide the warning message when the changing lamp message is displayed. Lamp Reset Reset the lamp life hour after replacing the lamp. 33 English ser ontrols SYSTEM | Lamp Settings Lamp Hour Display the cumulative lamp operating time.
The message will appear up 30 hours before suggested replacement of lamp. Choose "Off" to increase the brightness. Bright Mode Choose "On" to return normal mode. Lamp Reminder Choose this function to show or to hide the warning message when the changing lamp message is displayed. Lamp Reset Reset the lamp life hour after replacing the lamp. 33 English ser ontrols SYSTEM | Lamp Settings Lamp Hour Display the cumulative lamp operating time.

User's Manual
Page 35
... factory default values. 35 Auto Power Off (min) Set the interval of power-off , the projector will search for a specified connection port. English ser ontrols SETUP Source Lock When this function is turned on High Altitude mode. Reset Return the adjustments and settings to factory default values. Current : Return the current menu's settings to turn on , it will search for other signals if the current input signal is lost. High Altitude Choose "On" to factory default...
... factory default values. 35 Auto Power Off (min) Set the interval of power-off , the projector will search for a specified connection port. English ser ontrols SETUP Source Lock When this function is turned on High Altitude mode. Reset Return the adjustments and settings to factory default values. Current : Return the current menu's settings to turn on , it will search for other signals if the current input signal is lost. High Altitude Choose "On" to factory default...
User's Manual
Page 37
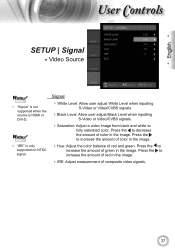
... color in the image. Press the to increase the amount of composite video signals. 37 Noottee "IRE" is HDMI or DVI-D. Video Source Noottee "Signal" is not supported when the source is only supported on NTSC signal. Press the to increase the amount of red in the image. IRE: Adjust measurement of green in the image. English ser ontrols SETUP | Signal - Signal White Level: Allow user adjust White Level when inputting S-Video...
... color in the image. Press the to increase the amount of composite video signals. 37 Noottee "IRE" is HDMI or DVI-D. Video Source Noottee "Signal" is not supported when the source is only supported on NTSC signal. Press the to increase the amount of red in the image. IRE: Adjust measurement of green in the image. English ser ontrols SETUP | Signal - Signal White Level: Allow user adjust White Level when inputting S-Video...

User's Manual
Page 38
... titles, please change the format to the following information. Image is out of connectors are not bent or broken. Check if the projection lamp has been securely installed. If a problem persists, please contact your projector, please refer to 9.96 meters) from the projector. Image Problems No image appears on the projector lens. Make sure the projection screen is removed. Adjust the Focus Ring on -screen Ensure...
... titles, please change the format to the following information. Image is out of connectors are not bent or broken. Check if the projection lamp has been securely installed. If a problem persists, please contact your projector, please refer to 9.96 meters) from the projector. Image Problems No image appears on the projector lens. Make sure the projection screen is removed. Adjust the Focus Ring on -screen Ensure...
User's Manual
Page 40
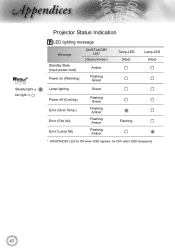
ppendices Noottee Steady light No light Projector Status Indication LED lighting message Message Standby State (Input power cord) Power on (Warming) ON/STANDBY LED (Green/Amber) Amber Flashing Green Temp-LED (Red) Lamp-LED (Red) Lamp lighting Green Power off (Cooling) Error (Over Temp.) Error (Fan fail) Error (Lamp fail) Flashing Green Flashing Amber Flashing Amber Flashing Amber Flashing * ON/STANDBY LED be ON when OSD appears, be OFF when OSD disappears. 40
ppendices Noottee Steady light No light Projector Status Indication LED lighting message Message Standby State (Input power cord) Power on (Warming) ON/STANDBY LED (Green/Amber) Amber Flashing Green Temp-LED (Red) Lamp-LED (Red) Lamp lighting Green Power off (Cooling) Error (Over Temp.) Error (Fan fail) Error (Lamp fail) Flashing Green Flashing Amber Flashing Amber Flashing Amber Flashing * ON/STANDBY LED be ON when OSD appears, be OFF when OSD disappears. 40

User's Manual
Page 41
... Screen Messages Fan failed: The projector will switch off automatically. Over temperature: The projector will switch off automatically. Replacing the lamp: Lamp is within 8 m of it's rated life. Move to within ±15° both horizontally and vertically of one of the IR receivers on the projector. Make sure there are exhausted. 41 Remote Control Problems If the remote control does not work Check the operating...
... Screen Messages Fan failed: The projector will switch off automatically. Over temperature: The projector will switch off automatically. Replacing the lamp: Lamp is within 8 m of it's rated life. Move to within ±15° both horizontally and vertically of one of the IR receivers on the projector. Make sure there are exhausted. 41 Remote Control Problems If the remote control does not work Check the operating...
User's Manual
Page 42
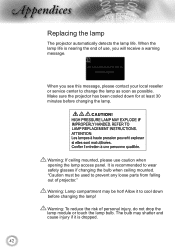
... opening the lamp access panel. Make sure the projector has been cooled down before changing the lamp. Warning: To reduce the risk of projector." The bulb may be used to cool down for at least 30 minutes before changing the lamp! Warning: If ceiling mounted, please use , you see this message, please contact your local reseller or service center to wear safety glasses if changing the bulb when ceiling mounted. ppendices Replacing the lamp...
... opening the lamp access panel. Make sure the projector has been cooled down before changing the lamp. Warning: To reduce the risk of projector." The bulb may be used to cool down for at least 30 minutes before changing the lamp! Warning: If ceiling mounted, please use , you see this message, please contact your local reseller or service center to wear safety glasses if changing the bulb when ceiling mounted. ppendices Replacing the lamp...
User's Manual
Page 43
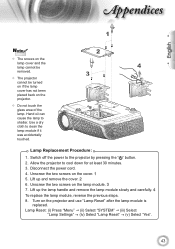
... the lamp to clean the lamp module if it was accidentally touched. 2 4 3 Lamp Replacement Procedure: 1. Disconnect the power cord. 4. Unscrew the two screws on the projector and use "Lamp Reset" after the lamp module is replaced. Use a dry cloth to shatter. Lamp Reset: (i) Press "Menu" (ii) Select "SYSTEM" (iii) Select "Lamp Settings" (iv) Select "Lamp Reset" (v) Select "Yes". 43 Turn on the lamp module. 3 7. Lift up the lamp handle and remove the lamp...
... the lamp to clean the lamp module if it was accidentally touched. 2 4 3 Lamp Replacement Procedure: 1. Disconnect the power cord. 4. Unscrew the two screws on the projector and use "Lamp Reset" after the lamp module is replaced. Use a dry cloth to shatter. Lamp Reset: (i) Press "Menu" (ii) Select "SYSTEM" (iii) Select "Lamp Settings" (iv) Select "Lamp Reset" (v) Select "Yes". 43 Turn on the lamp module. 3 7. Lift up the lamp handle and remove the lamp...
Datasheet
Page 1
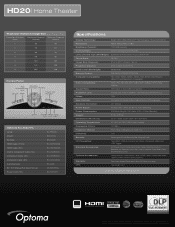
...) Lamp Life and Type 4000/3000 Hours (STD/Bright) 230W P-VIP Throw Ratio 1.5 to 1.8:1 (Distance/Width) Projection Distance 4.92' to 32.8' (1.5 to 10m) Image Size (Diagonal) 37.6" to 301.1" (0.95 to 7.64m) Aspect Ratio 16:9 Native, 4:3 and LBX Compatible Displayable Colors 1.07 Billion Uniformity 70% Remote Control Backlit Remote Control User Controls Complete On-Screen Menu Adjustments in 21 Languages Computer Compatibility HD, UXGA, WXGA, SXGA+, SXGA, XGA, SVGA, VGA Resized...
...) Lamp Life and Type 4000/3000 Hours (STD/Bright) 230W P-VIP Throw Ratio 1.5 to 1.8:1 (Distance/Width) Projection Distance 4.92' to 32.8' (1.5 to 10m) Image Size (Diagonal) 37.6" to 301.1" (0.95 to 7.64m) Aspect Ratio 16:9 Native, 4:3 and LBX Compatible Displayable Colors 1.07 Billion Uniformity 70% Remote Control Backlit Remote Control User Controls Complete On-Screen Menu Adjustments in 21 Languages Computer Compatibility HD, UXGA, WXGA, SXGA+, SXGA, XGA, SVGA, VGA Resized...
Brochure
Page 2
... Projection Distance/Image Size Projection Distance (Feet) Maximum Diagonal (Inches) Minimum Diagonal (Inches) 6 55 46 8 73 61 10 92 76 12 110 92 14 129 107 16 147 122 18 165 138 Control Panel Four Directional Keys Source Menu Keystone Correction Re-Sync Power and Standby Enter Power Lamp Temp LED LED LED Optional Accessories Lamp: Mount: Remote: HDMI Cable (7.5m): HDMI Cable (5m): VGA to Component Cable (5m): Component Cable (2m): Composite Cable (2m): Carrying Case: 92" 16:9 Manual Pull-Down Screen: Power Cord...
... Projection Distance/Image Size Projection Distance (Feet) Maximum Diagonal (Inches) Minimum Diagonal (Inches) 6 55 46 8 73 61 10 92 76 12 110 92 14 129 107 16 147 122 18 165 138 Control Panel Four Directional Keys Source Menu Keystone Correction Re-Sync Power and Standby Enter Power Lamp Temp LED LED LED Optional Accessories Lamp: Mount: Remote: HDMI Cable (7.5m): HDMI Cable (5m): VGA to Component Cable (5m): Component Cable (2m): Composite Cable (2m): Carrying Case: 92" 16:9 Manual Pull-Down Screen: Power Cord...


