

User's Manual
Page 2
...intended to alert the user to the presence of important operating and maintenance (servicing) instructions in fire or electric shock. 8. Do not use attachments/accessories specified by appropriate service personnel. 2 Do not attempt to rain or moisture. 3. WARNING: TO REDUCE THE RISK OF ...61554; Power supply cord or plug has been damaged. Liquid has been spilled on a crowded coffee table, sofa, bed, etc. Please call Optoma before you to dangerous voltages or other apparatus such as a book case or a cabinet that restricts air flow. 2. Do not let objects ...
...intended to alert the user to the presence of important operating and maintenance (servicing) instructions in fire or electric shock. 8. Do not use attachments/accessories specified by appropriate service personnel. 2 Do not attempt to rain or moisture. 3. WARNING: TO REDUCE THE RISK OF ...61554; Power supply cord or plug has been damaged. Liquid has been spilled on a crowded coffee table, sofa, bed, etc. Please call Optoma before you to dangerous voltages or other apparatus such as a book case or a cabinet that restricts air flow. 2. Do not let objects ...
User's Manual
Page 3
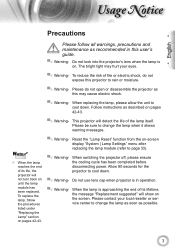
...;■ Warning- Follow instructions as this may hurt your local reseller or service center to change the lamp when it shows warning messages. Do not use lens cap when projector is on the screen. This projector will show on . To replace the lamp, follow all warnings, precautions and maintenance as possible...
...;■ Warning- Follow instructions as this may hurt your local reseller or service center to change the lamp when it shows warning messages. Do not use lens cap when projector is on the screen. This projector will show on . To replace the lamp, follow all warnings, precautions and maintenance as possible...

User's Manual
Page 4
... environments. Ensure that the ambient room temperature is within 5 - 35°C. Relative Humidity is not being used for ventilation. Use abrasive cleaners, waxes or solvents to clean the display housing. Disconnect the power plug from the AC outlet before cleaning the product.... and openings on the unit provided for a long period of time. Near any appliance generating a strong magnetic field. - Use a soft dry cloth with mild detergent to clean the unit. Use under the following conditions: - In areas susceptible to excessive dust and dirt. -
... environments. Ensure that the ambient room temperature is within 5 - 35°C. Relative Humidity is not being used for ventilation. Use abrasive cleaners, waxes or solvents to clean the display housing. Disconnect the power plug from the AC outlet before cleaning the product.... and openings on the unit provided for a long period of time. Near any appliance generating a strong magnetic field. - Use a soft dry cloth with mild detergent to clean the unit. Use under the following conditions: - In areas susceptible to excessive dust and dirt. -

User's Manual
Page 5
English sage otice Eye Safety Warnings ▀■ Avoid staring/facing directly into the projector beam at all times. Keep your back to the beam as much as possible. ▀■ When projector is used in a classroom, adequately supervise students when they are asked to point out something on the screen. ▀■ In order to minimize the lamp power, use room blinds to reduce ambient light levels. 5
English sage otice Eye Safety Warnings ▀■ Avoid staring/facing directly into the projector beam at all times. Keep your back to the beam as much as possible. ▀■ When projector is used in a classroom, adequately supervise students when they are asked to point out something on the screen. ▀■ In order to minimize the lamp power, use room blinds to reduce ambient light levels. 5

User's Manual
Page 13
... will now turn Amber. 3. English nstallation Powering On/Off the Projector Powering On the Projector 1. Remove the lens cap. 2. The first time you use the projector, you can select your preferred language from quick menu after the startup screen displays. 4.
... will now turn Amber. 3. English nstallation Powering On/Off the Projector Powering On the Projector 1. Remove the lens cap. 2. The first time you use the projector, you can select your preferred language from quick menu after the startup screen displays. 4.

User's Manual
Page 17
...screen display (OSD) menu. Indicate the projector's lamp status. To exit OSD, Press "Menu" again. Four Directional Select Keys Lamp LED Use to select items or make adjustments to select an input signal. Enter Confirm your selection. Temp LED Indicate the projector's temperature status.... 17 RE-SYNC Automatically synchronize the projector to control the functions: Control Panel and Remote Control. Control Panel English SOURCE POWER Using the Control Panel Power Refer to launch the on pages 13-14. ser ontrols Control Panel & Remote Control There are two ways...
...screen display (OSD) menu. Indicate the projector's lamp status. To exit OSD, Press "Menu" again. Four Directional Select Keys Lamp LED Use to select items or make adjustments to select an input signal. Enter Confirm your selection. Temp LED Indicate the projector's temperature status.... 17 RE-SYNC Automatically synchronize the projector to control the functions: Control Panel and Remote Control. Control Panel English SOURCE POWER Using the Control Panel Power Refer to launch the on pages 13-14. ser ontrols Control Panel & Remote Control There are two ways...
User's Manual
Page 18
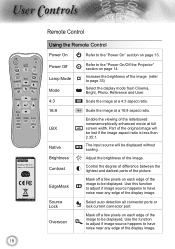
Control the degree of difference between the lightest and darkest parts of the image. Use the function to adjust if image source happens to have noise near any edge of the... the image at a 4:3 aspect ratio. 16:9 Scale the image at full screen width. The input source will be displayed. Use this function to adjust if image source happens to have noise near any edge of the image to be lost if the image ...to the "Power On/Off the Projector" section on page 13. ser ontrols Lamp 18 Remote Control Using the Remote Control Power On Refer to the "Power On" section on page 14.
Control the degree of difference between the lightest and darkest parts of the image. Use the function to adjust if image source happens to have noise near any edge of the... the image at a 4:3 aspect ratio. 16:9 Scale the image at full screen width. The input source will be displayed. Use this function to adjust if image source happens to have noise near any edge of the image to be lost if the image ...to the "Power On/Off the Projector" section on page 13. ser ontrols Lamp 18 Remote Control Using the Remote Control Power On Refer to the "Power On" section on page 14.

User's Manual
Page 19
... 2" to choose source from HDMI 2 connector. Press "D-Sub" to choose source from VGA/SCART/YPbPr connector. English ser ontrols Remote Control Using the Remote Control Enter Confirm your selection. 19 Lamp Source Press "Source" to choose source from HDMI 1 connector. Press "HDMI...source. Display or exit the on-screen display menus for projector. Press "YPbPr" to choose Composite video source. Four Directional Select Keys Use to select items or make adjustments to the input source. Re-sync Menu HDMI 1 HDMI 2 D-Sub YPbPr Video Automatically synchronizes the ...
... 2" to choose source from HDMI 2 connector. Press "D-Sub" to choose source from VGA/SCART/YPbPr connector. English ser ontrols Remote Control Using the Remote Control Enter Confirm your selection. 19 Lamp Source Press "Source" to choose source from HDMI 1 connector. Press "HDMI...source. Display or exit the on-screen display menus for projector. Press "YPbPr" to choose Composite video source. Four Directional Select Keys Use to select items or make adjustments to the input source. Re-sync Menu HDMI 1 HDMI 2 D-Sub YPbPr Video Automatically synchronizes the ...

User's Manual
Page 20
... next item to make image adjustments and change a variety of settings. While making a selection on the Remote Control or Projector Keypad. 2 When OSD is displayed, use keys to select the desired item and adjust the settings key. 4. To exit, press "Menu" again. The OSD menu will close and the projector will... source. ser ontrols On-screen Display Menus The Projector has multilingual On-screen Display menus that allow you to be adjusted in the main menu. Use using keys to select any item in the sub menu and adjust as described above. 5.
... next item to make image adjustments and change a variety of settings. While making a selection on the Remote Control or Projector Keypad. 2 When OSD is displayed, use keys to select the desired item and adjust the settings key. 4. To exit, press "Menu" again. The OSD menu will close and the projector will... source. ser ontrols On-screen Display Menus The Projector has multilingual On-screen Display menus that allow you to be adjusted in the main menu. Use using keys to select any item in the sub menu and adjust as described above. 5.
User's Manual
Page 24
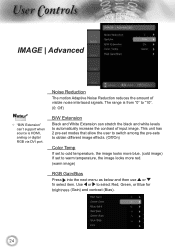
Use or to select item. ser ontrols IMAGE | Advanced Noottee "B/W Extension" can stretch the black and white levels to automatically increase the contrast of visible ... image) If set to warm temperature, the image looks more red. (warm image) RGB Gain/Bias Press into the next menu as below and then use or to select Red, Green, or Blue for brightness (Gain) and contrast (Bias). 24 Noise Reduction The motion Adaptive Noise Reduction reduces the amount of...
Use or to select item. ser ontrols IMAGE | Advanced Noottee "B/W Extension" can stretch the black and white levels to automatically increase the contrast of visible ... image) If set to warm temperature, the image looks more red. (warm image) RGB Gain/Bias Press into the next menu as below and then use or to select Red, Green, or Blue for brightness (Gain) and contrast (Bias). 24 Noise Reduction The motion Adaptive Noise Reduction reduces the amount of...

User's Manual
Page 26
ser ontrols DISPLAY Format Use this function to choose your desired aspect ratio. 4:3: This format is for 4x3 input sources. 16:9: This format is for 16x9 input sources, like HDTV and DVD enhanced for Widescreen TV. Native: This format displays the original image without any scaling. LBX: This format is for non-16x9, letterbox source and for users who use external anamorphic lens to display 2.35:1 aspect ratio using full resolution. 26
ser ontrols DISPLAY Format Use this function to choose your desired aspect ratio. 4:3: This format is for 4x3 input sources. 16:9: This format is for 16x9 input sources, like HDTV and DVD enhanced for Widescreen TV. Native: This format displays the original image without any scaling. LBX: This format is for non-16x9, letterbox source and for users who use external anamorphic lens to display 2.35:1 aspect ratio using full resolution. 26
User's Manual
Page 27
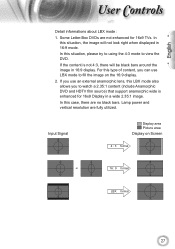
... ser ontrols Detail informations about LBX mode : 1. Input Signal Display area Picture area Display on the 16:9 display. 2. In this situation, please try to using the 4:3 mode to watch a 2.35:1 content (include Anamorphic DVD and HDTV film source) that support anamorphic wide is not 4:3, there will not ...Letter-Box DVDs are fully utilized. For this type of content, you to view the DVD. In this LBX mode also allows you can use an external anamorphic lens, this situation, the image will be black bars around the image in 16:9 mode. If the content is enhanced for...
... ser ontrols Detail informations about LBX mode : 1. Input Signal Display area Picture area Display on the 16:9 display. 2. In this situation, please try to using the 4:3 mode to watch a 2.35:1 content (include Anamorphic DVD and HDTV film source) that support anamorphic wide is not 4:3, there will not ...Letter-Box DVDs are fully utilized. For this type of content, you to view the DVD. In this LBX mode also allows you can use an external anamorphic lens, this situation, the image will be black bars around the image in 16:9 mode. If the content is enhanced for...
User's Manual
Page 29
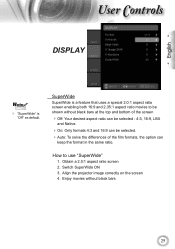
... 2.0:1 aspect ratio screen enabling both 16:9 and 2.35:1 aspect ratio movies to use "SuperWide" 1. How to be selected. Auto: To solve the differences of the film formats, the option can keep the format in the same ...
... 2.0:1 aspect ratio screen enabling both 16:9 and 2.35:1 aspect ratio movies to use "SuperWide" 1. How to be selected. Auto: To solve the differences of the film formats, the option can keep the format in the same ...
User's Manual
Page 30
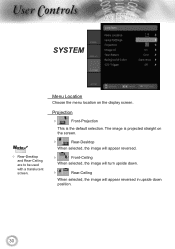
ser ontrols SYSTEM Noottee Rear-Desktop and Rear-Ceiling are to be used with a translucent screen. Menu Location Choose the menu location on the screen. Rear-Desktop When selected, the image will appear reversed. Front-Ceiling When selected, the image will turn upside down. Rear-Ceiling When selected, the image will appear reversed in upside down position. 30 The image is the default selection. Projection Front-Projection This is projected straight on the display screen.
ser ontrols SYSTEM Noottee Rear-Desktop and Rear-Ceiling are to be used with a translucent screen. Menu Location Choose the menu location on the screen. Rear-Desktop When selected, the image will appear reversed. Front-Ceiling When selected, the image will turn upside down. Rear-Ceiling When selected, the image will appear reversed in upside down position. 30 The image is the default selection. Projection Front-Projection This is projected straight on the display screen.
User's Manual
Page 32
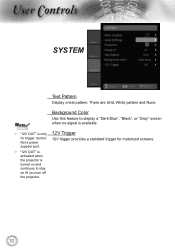
Background Color Use this feature to stay on till you turn off the projector. Noottee "12V OUT" is available. 12V Trigger 12V trigger provides a standard trigger for trigger control. There are Grid, White pattern and None. Not a power supplier port. "12V OUT" is activated when the projector is turned on and continues to display a "Dark Blue", "Black", or "Gray" screen when no signal is only for motorized screens. 32 ser ontrols SYSTEM Test Pattern Display a test pattern.
Background Color Use this feature to stay on till you turn off the projector. Noottee "12V OUT" is available. 12V Trigger 12V trigger provides a standard trigger for trigger control. There are Grid, White pattern and None. Not a power supplier port. "12V OUT" is activated when the projector is turned on and continues to display a "Dark Blue", "Black", or "Gray" screen when no signal is only for motorized screens. 32 ser ontrols SYSTEM Test Pattern Display a test pattern.

User's Manual
Page 34
Input Source Use this option to enter the sub menu and select which sources you require. Press to enable / disable input sources. The projector will not search for inputs that are not selected. 34 Press "Select (Enter)" to select your preferred language. ser ontrols SETUP Language Choose the multilingual OSD menu. Press or into the sub menu and then use the or key to finalize the selection. Press "Enter" to finalize the selection.
Input Source Use this option to enter the sub menu and select which sources you require. Press to enable / disable input sources. The projector will not search for inputs that are not selected. 34 Press "Select (Enter)" to select your preferred language. ser ontrols SETUP Language Choose the multilingual OSD menu. Press or into the sub menu and then use the or key to finalize the selection. Press "Enter" to finalize the selection.

User's Manual
Page 36
... card. RGB Source Noottee "Signal" is not supported when the source is HDMI or DVI-D. When you experience an unstable or flickering image, use this function to match the frequency of the display with the graphics card. Signal Phase: Change the display data frequency to correct it. ...
... card. RGB Source Noottee "Signal" is not supported when the source is HDMI or DVI-D. When you experience an unstable or flickering image, use this function to match the frequency of the display with the graphics card. Signal Phase: Change the display data frequency to correct it. ...
User's Manual
Page 42
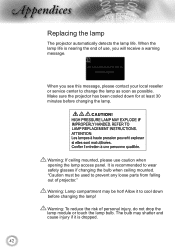
... you will receive a warning message. Make sure the projector has been cooled down before changing the lamp. Warning: If ceiling mounted, please use , you see this message, please contact your local reseller or service center to wear safety glasses if changing the bulb when ceiling mounted. ...compartment may shatter and cause injury if it to prevent any loose parts from falling out of projector." Warning: To reduce the risk of use caution when opening the lamp access panel. ppendices Replacing the lamp The projector automatically detects the lamp life. It is nearing the end of...
... you will receive a warning message. Make sure the projector has been cooled down before changing the lamp. Warning: If ceiling mounted, please use , you see this message, please contact your local reseller or service center to wear safety glasses if changing the bulb when ceiling mounted. ...compartment may shatter and cause injury if it to prevent any loose parts from falling out of projector." Warning: To reduce the risk of use caution when opening the lamp access panel. ppendices Replacing the lamp The projector automatically detects the lamp life. It is nearing the end of...

User's Manual
Page 43
Switch off the power to cool down for at least 30 minutes. 3. Unscrew the two screws on the projector and use "Lamp Reset" after the lamp module is replaced. Turn on the cover. 1 5. Allow the projector to the projector by pressing the " " button. 2. English ... (v) Select "Yes". 43 Hand oil can cause the lamp to clean the lamp module if it was accidentally touched. 2 4 3 Lamp Replacement Procedure: 1. Use a dry cloth to shatter. Disconnect the power cord. 4. Lift up and remove the cover. 2 6. Unscrew the two screws on the projector. Do not touch...
Switch off the power to cool down for at least 30 minutes. 3. Unscrew the two screws on the projector and use "Lamp Reset" after the lamp module is replaced. Turn on the cover. 1 5. Allow the projector to the projector by pressing the " " button. 2. English ... (v) Select "Yes". 43 Hand oil can cause the lamp to clean the lamp module if it was accidentally touched. 2 4 3 Lamp Replacement Procedure: 1. Use a dry cloth to shatter. Disconnect the power cord. 4. Lift up and remove the cover. 2 6. Unscrew the two screws on the projector. Do not touch...

User's Manual
Page 46
... damage to your projector, please use the Optoma ceiling mount. 2. Screw size will invalidate the warranty. 1. Be sure to keep at least 10 cm gap between the ceiling and the bottom of the mounting plate. 2. If you wish to use a third party ceiling mount kit, please ensure the screws used to attach a mount to... depending on the thickness of the projector. 3. ppendices Ceiling Mount Installation Noottee Please note that damage resulting from another company, please be sure to use the correct screw size.
... damage to your projector, please use the Optoma ceiling mount. 2. Screw size will invalidate the warranty. 1. Be sure to keep at least 10 cm gap between the ceiling and the bottom of the mounting plate. 2. If you wish to use a third party ceiling mount kit, please ensure the screws used to attach a mount to... depending on the thickness of the projector. 3. ppendices Ceiling Mount Installation Noottee Please note that damage resulting from another company, please be sure to use the correct screw size.


