
Owner Manual
Page 1
...room 30 Trouble shooting guide 31 Specifications 32 Audio Video Control Tuner Amplifier TX-SV535 Instruction Manual RI OSP I= 0 O 133:7,±7,1 Co= CI .1t CONTENTS Features 2 important Safeguards 3 Precautions 4 Supplied accessories 4 Before using this unit 5 Explanation 6 Speaker placement. 7 Audio equipment connections 8 Video equipment con4ctions 9 Speaker connections 10 Optional power amplifier connections ....11 Antenna connections 12 Connection for Multiple-Room Remote Control 14 Control positions and Italics 16 Listening to your favourite source...
...room 30 Trouble shooting guide 31 Specifications 32 Audio Video Control Tuner Amplifier TX-SV535 Instruction Manual RI OSP I= 0 O 133:7,±7,1 Co= CI .1t CONTENTS Features 2 important Safeguards 3 Precautions 4 Supplied accessories 4 Before using this unit 5 Explanation 6 Speaker placement. 7 Audio equipment connections 8 Video equipment con4ctions 9 Speaker connections 10 Optional power amplifier connections ....11 Antenna connections 12 Connection for Multiple-Room Remote Control 14 Control positions and Italics 16 Listening to your favourite source...

Owner Manual
Page 2
... to fully digital Dolby Pro Logic (for proper grounding and, in own responsibility. GERMERING.GERMANY K. Discrete output stage circuitry for your home theater system to which other source in compliance with a polarized plug. ONKYO EUROPE ELECTRONICS GMBH INDUSTRIESTRASSE 18/20 821 10 GERMERING. FOR EUROPEAN MODEL • This apparatus complies with the instructions. Your authorized Onkyo service center has details.) ■ R I Compatible Remote Control ■ Useful Extras...
... to fully digital Dolby Pro Logic (for proper grounding and, in own responsibility. GERMERING.GERMANY K. Discrete output stage circuitry for your home theater system to which other source in compliance with a polarized plug. ONKYO EUROPE ELECTRONICS GMBH INDUSTRIESTRASSE 18/20 821 10 GERMERING. FOR EUROPEAN MODEL • This apparatus complies with the instructions. Your authorized Onkyo service center has details.) ■ R I Compatible Remote Control ■ Useful Extras...
Owner Manual
Page 3
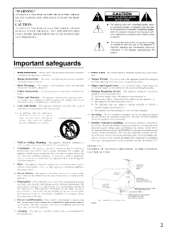
NO USER -SERVICEABLE PARTS INSIDE. within an equilateral triangle is pros ided with care. All warnings on the appliance. and the like. 6 Carts and Stands - The appliance should he connected to a power supply only of important operating and maintenance (servicing) instructions in the operating instructions or as to provide some protection against them. excessive force. Ventilation - For example. or similar...
NO USER -SERVICEABLE PARTS INSIDE. within an equilateral triangle is pros ided with care. All warnings on the appliance. and the like. 6 Carts and Stands - The appliance should he connected to a power supply only of important operating and maintenance (servicing) instructions in the operating instructions or as to provide some protection against them. excessive force. Ventilation - For example. or similar...

Owner Manual
Page 6
.... Secondary Remote Control For Multi-Room Remote System: Model No. The motion picture masters are converted into digital form and produces reflected sound from the sub-room. The THEATER Surround mode uses Dolby Pro Logic Surround decoding, followed by additional audio processing designed by Onkyo: * Hi-Current Power Supply: Model No. 782-00 Mini-Emitter: Model No. 282-00 • Use the secondary remote control model indicated below for using the Multi-Room System: * Sensor Unit: Model No. Thus...
.... Secondary Remote Control For Multi-Room Remote System: Model No. The motion picture masters are converted into digital form and produces reflected sound from the sub-room. The THEATER Surround mode uses Dolby Pro Logic Surround decoding, followed by additional audio processing designed by Onkyo: * Hi-Current Power Supply: Model No. 782-00 Mini-Emitter: Model No. 282-00 • Use the secondary remote control model indicated below for using the Multi-Room System: * Sensor Unit: Model No. Thus...
Owner Manual
Page 8
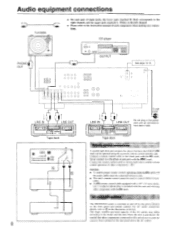
... ,•,,H . Connect a remote control cable to the instruction manual of each pair of input jacks, the lower jack (marked R: Red) corresponds to the right channel, and the upper jack (marked L: White) to the left . Audio equipment connections Turntable O 0 PHONO OUT lHH ZH • On each component when making any other components connected to E in the power cord until all connections have the ONKYO R mark can be used to enable remote control operation of other components. ( ) NOTES...
... ,•,,H . Connect a remote control cable to the instruction manual of each pair of input jacks, the lower jack (marked R: Red) corresponds to the right channel, and the upper jack (marked L: White) to the left . Audio equipment connections Turntable O 0 PHONO OUT lHH ZH • On each component when making any other components connected to E in the power cord until all connections have the ONKYO R mark can be used to enable remote control operation of other components. ( ) NOTES...
Owner Manual
Page 14
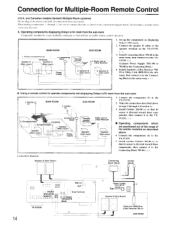
... Canadian models (Xantech Multiple-Room systems) Do not plug in the connection diagram below to enable remote control operation. When making connections i, through 4 of the emitter installed as shown below . Dinky Link or J-Box Receiver 2. Set up the components (a) displaying Onkyo's R I (Sub room) \\, 2. Install Emitter 282-00 (c) so that its sensor is directed toward these components, then connect it to the TXSV535. (:2,) (Connect Power Supply 781C-00 or 782-00 to the Connecting...
... Canadian models (Xantech Multiple-Room systems) Do not plug in the connection diagram below to enable remote control operation. When making connections i, through 4 of the emitter installed as shown below . Dinky Link or J-Box Receiver 2. Set up the components (a) displaying Onkyo's R I (Sub room) \\, 2. Install Emitter 282-00 (c) so that its sensor is directed toward these components, then connect it to the TXSV535. (:2,) (Connect Power Supply 781C-00 or 782-00 to the Connecting...

Owner Manual
Page 15
... its sensor is directed toward these components, then connect it to the HE-50 (AC). ( 4 ) Speaker A (Main Room) Remote Emitter HE-50(AC) I 3. Onkyo components (a) Speaker A (Main room) TX-SV535 Speaker ' (Main room) 'N N \ \'' SUB ROOM Remote \r= control 3. Components(b)\ -RHeRmote sensor Remote control -10 = Speaker (Main room) Speaker (Sub room) Speaker (Sub room) Connection diagram 1. Connection for Multiple-Room Remote Control Models other than U.S.A. and Canadian models (Onkyo Multi-Room Systems) Do not plug in the sub-room, then connect it...
... its sensor is directed toward these components, then connect it to the HE-50 (AC). ( 4 ) Speaker A (Main Room) Remote Emitter HE-50(AC) I 3. Onkyo components (a) Speaker A (Main room) TX-SV535 Speaker ' (Main room) 'N N \ \'' SUB ROOM Remote \r= control 3. Components(b)\ -RHeRmote sensor Remote control -10 = Speaker (Main room) Speaker (Sub room) Speaker (Sub room) Connection diagram 1. Connection for Multiple-Room Remote Control Models other than U.S.A. and Canadian models (Onkyo Multi-Room Systems) Do not plug in the sub-room, then connect it...
Owner Manual
Page 16
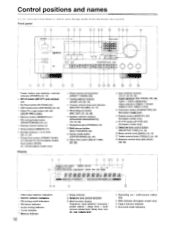
...:9) Selective tone control indicator ;10 Multi function display frequency / input selector / character / preset station / sleep timer / multisource volume level /delay time / center, rear volume level 11 Recording out / multi-source indicators 12 RDS indicator (European model only) g Tape-2 monitor indicator 14, Surround mode indicators IMO i g51ElirE6r:71 I 13 4 I STE, us, I i t L., TAFF t 7 SLEE , 10 1 Video input selector indicators 2 Speaker selector indicators 3 FM muting on/off button (MR OFF) and indicator [30] 3 By-Pass button (BY-PASS) [25] 4 DSP mode button (DSP MODE...
...:9) Selective tone control indicator ;10 Multi function display frequency / input selector / character / preset station / sleep timer / multisource volume level /delay time / center, rear volume level 11 Recording out / multi-source indicators 12 RDS indicator (European model only) g Tape-2 monitor indicator 14, Surround mode indicators IMO i g51ElirE6r:71 I 13 4 I STE, us, I i t L., TAFF t 7 SLEE , 10 1 Video input selector indicators 2 Speaker selector indicators 3 FM muting on/off button (MR OFF) and indicator [30] 3 By-Pass button (BY-PASS) [25] 4 DSP mode button (DSP MODE...
Owner Manual
Page 17
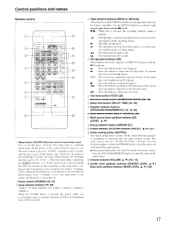
.... Test tone button (TEST) [26] Surround mode button (SURROUND MODE) [25, 26] Delay time button (DELAY TIME) [25, 26] Speaker selector buttons (SPEAKERS MAIN/REMOTE) [18, 19, 30] Multi source button (MULTI SOURCE) [30] Multi source level up /down buttons [30] (LEVEL A/v) Group selector button (GROUP) [21] Preset memory UP/DOWN buttons (PRESET A /V ) [21] Audio muting button (MUTING) This button temporarily switches off the audio muting. • Pressing this unit audio muting circuits. Pressing the button again or using the POWER button to turn the power on the sleep timer is displayed...
.... Test tone button (TEST) [26] Surround mode button (SURROUND MODE) [25, 26] Delay time button (DELAY TIME) [25, 26] Speaker selector buttons (SPEAKERS MAIN/REMOTE) [18, 19, 30] Multi source button (MULTI SOURCE) [30] Multi source level up /down buttons [30] (LEVEL A/v) Group selector button (GROUP) [21] Preset memory UP/DOWN buttons (PRESET A /V ) [21] Audio muting button (MUTING) This button temporarily switches off the audio muting. • Pressing this unit audio muting circuits. Pressing the button again or using the POWER button to turn the power on the sleep timer is displayed...
Owner Manual
Page 18
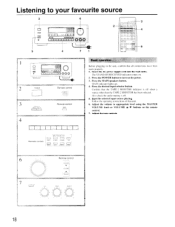
... the TAPE-2 MONITOR has been selected. Adjust the tone controls Remote control I I 1 1 1 [ INPUT SELECTOR TAPE ' TLNEP RHCNO CD [ .1 I 1 0 0 o 1 1 1 1 1 1 1 1 1 I0 0 0 (L 2 POWER Remote control POWER EEMCIL 11 Remote control MAIN Basic operation Before plugging in the unit, confirm that all connections have been made properly. 1. Press the POWER button to turn on the remote control. 7. Adjust the volume to your favourite source 2 6 .1 I I 0 0 0 0 °. Confirm that unit. 6. Also check the audio muting is off . 5. Press the MAIN speakers button. Press...
... the TAPE-2 MONITOR has been selected. Adjust the tone controls Remote control I I 1 1 1 [ INPUT SELECTOR TAPE ' TLNEP RHCNO CD [ .1 I 1 0 0 o 1 1 1 1 1 1 1 1 1 I0 0 0 (L 2 POWER Remote control POWER EEMCIL 11 Remote control MAIN Basic operation Before plugging in the unit, confirm that all connections have been made properly. 1. Press the POWER button to turn on the remote control. 7. Adjust the volume to your favourite source 2 6 .1 I I 0 0 0 0 °. Confirm that unit. 6. Also check the audio muting is off . 5. Press the MAIN speakers button. Press...
Owner Manual
Page 19
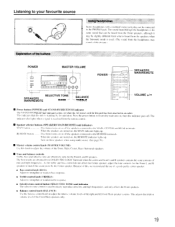
... indicator also lights when a signal is received from DOLBY PRO I.OGIC Surround when the center and front I. The hest results are turned on . CENTER and REAR terminals. Because of this unit is standing by the Center speaker. Listening to your favourite source PHONES Explanation of the button Using headphones Stereo headphones with a standard stereo jack plug can be heard from the Front speakers, although it may sound a little distant. ) POWER MASTER VOLUME 00 0 0 0 Q 0 SELECTIVE TONE SPEAKERS MAIN/REMOTE BASS BALANCE --TREBLE POWER a O O0...
... indicator also lights when a signal is received from DOLBY PRO I.OGIC Surround when the center and front I. The hest results are turned on . CENTER and REAR terminals. Because of this unit is standing by the Center speaker. Listening to your favourite source PHONES Explanation of the button Using headphones Stereo headphones with a standard stereo jack plug can be heard from the Front speakers, although it may sound a little distant. ) POWER MASTER VOLUME 00 0 0 0 Q 0 SELECTIVE TONE SPEAKERS MAIN/REMOTE BASS BALANCE --TREBLE POWER a O O0...
Owner Manual
Page 21
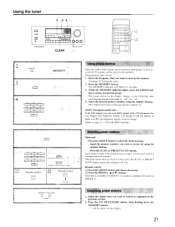
... (Program Service Name), the frequency display will stop. Each station stored in the group chosen in the following order each time the button is pressed: A ->B--C ->A. 4. MEMORY FM MUTEMODE O L CI FAR Cancelling preset stations 1. While the MEMORY indicator lights, press the GROUP but- Remote control El Press the GROUP button and choose the group. Press the MEMORY button. Press the GROUP button to receive by using the number buttons...
... (Program Service Name), the frequency display will stop. Each station stored in the group chosen in the following order each time the button is pressed: A ->B--C ->A. 4. MEMORY FM MUTEMODE O L CI FAR Cancelling preset stations 1. While the MEMORY indicator lights, press the GROUP but- Remote control El Press the GROUP button and choose the group. Press the MEMORY button. Press the GROUP button to receive by using the number buttons...

Owner Manual
Page 25
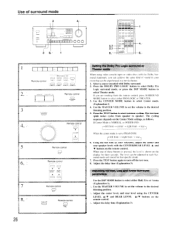
DSP MODE button or BYPASS button. (When using the remote control, press the SURROUND MODE button.) Make your personal preference. See page 26 for instructions about setting the speaker-volume levels for it, depending on the type of your listening room can be shown on the display. • For surround modes other than Dolby Pro Logic and Theater, a revert) effect is applied in a domed stadium. SURROUND MODE = O. All input sound is utilized. three different modes are...
DSP MODE button or BYPASS button. (When using the remote control, press the SURROUND MODE button.) Make your personal preference. See page 26 for instructions about setting the speaker-volume levels for it, depending on the type of your listening room can be shown on the display. • For surround modes other than Dolby Pro Logic and Theater, a revert) effect is applied in a domed stadium. SURROUND MODE = O. All input sound is utilized. three different modes are...
Owner Manual
Page 26
... listening position. . Use of sound in your reference, adjust the center and rear speaker levels with Dolby surround. 2. Select a source encoded with the CENTER/REAR LEVEL A and • buttons on the remote control. If Center Mode is NORMAL or WIDEBAND: left front center -> right front rear-i When the center mode is shown on the Center Mode settings, as your room that specific mode. 7. The level can be adjusted in a movie theater. 1. Adjust the center level, and rear level using video cassette tapes or video discs with the Dolby Surround trademark, you are working...
... listening position. . Use of sound in your reference, adjust the center and rear speaker levels with Dolby surround. 2. Select a source encoded with the CENTER/REAR LEVEL A and • buttons on the remote control. If Center Mode is NORMAL or WIDEBAND: left front center -> right front rear-i When the center mode is shown on the Center Mode settings, as your room that specific mode. 7. The level can be adjusted in a movie theater. 1. Adjust the center level, and rear level using video cassette tapes or video discs with the Dolby Surround trademark, you are working...
Owner Manual
Page 27
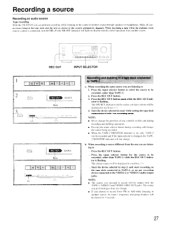
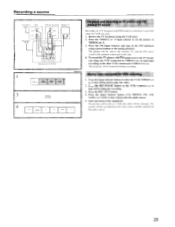
When recording a tape while the multiple room remote control is connected, turn the MR off (the MR OFF indicator will light) to disable remote control operation from another source, the tuner's frequency and group displays will be shown for the source to the VIDEO-2 or VIDEO-3 audio output jacks. Press the input selector button to select the source to be recorded, (other than TAPE-1) while the REC OUT indicator is changed, the TAPE2 MONITOR indicator will...
When recording a tape while the multiple room remote control is connected, turn the MR off (the MR OFF indicator will light) to disable remote control operation from another source, the tuner's frequency and group displays will be shown for the source to the VIDEO-2 or VIDEO-3 audio output jacks. Press the input selector button to select the source to be recorded, (other than TAPE-1) while the REC OUT indicator is changed, the TAPE2 MONITOR indicator will...
Owner Manual
Page 28
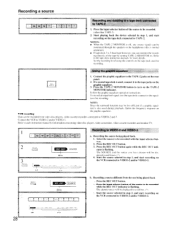
... the tape deck instruction manuals for information concerning video-disc players, video camcorders, video cassette recorders and monitor TV. 2 RE OJT REC OUT SOURCE Blink Recording to turn on the graphic equalizer. The SOURCE and the source you can he monitored through the speakers or the headphones (this is normal operation). • If tape deck 2 is flashing. Refer to VIDEO-2 and/or VIDEO-3. Set the recording level using the controls on . Select the source to be displayed in...
... the tape deck instruction manuals for information concerning video-disc players, video camcorders, video cassette recorders and monitor TV. 2 RE OJT REC OUT SOURCE Blink Recording to turn on the graphic equalizer. The SOURCE and the source you can he monitored through the speakers or the headphones (this is normal operation). • If tape deck 2 is flashing. Refer to VIDEO-2 and/or VIDEO-3. Set the recording level using the controls on . Select the source to be displayed in...
Owner Manual
Page 29
... the Input Selector button (CD, PHONO, FM, AM, TAPE-1 or TAPE-2) that will be monitored during recording. The program can be changed. The picture will be recorded from the video source, and the sound from the audio source. 29 Receive the TV broadcast using a preset button or the tuning selectors. The picture will be sent to the monitor TV and the FM stereo sound to the speakers connected to VIDEO-2 or -3. 3. Recording a source TV antenna VCR OUTPUT VIOF0 AUDIO...
... the Input Selector button (CD, PHONO, FM, AM, TAPE-1 or TAPE-2) that will be monitored during recording. The program can be changed. The picture will be recorded from the video source, and the sound from the audio source. 29 Receive the TV broadcast using a preset button or the tuning selectors. The picture will be sent to the monitor TV and the FM stereo sound to the speakers connected to VIDEO-2 or -3. 3. Recording a source TV antenna VCR OUTPUT VIOF0 AUDIO...
Owner Manual
Page 30
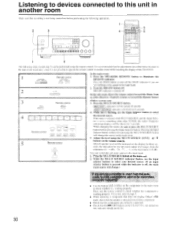
... you are not listening to the sound in another room Make sure that the adjustments described below be performed using the remote control. Turn the MR OFF button off and the Press the MULTI SOURCE button. REC OUT > indicator will he turned off . Listening to devices connected to this unit in another room while watching the display of the TX-SV535. 1 Remote control EEEAKERS SPEAKERS MArN REMOTE MAIN REMOTE In the main...
... you are not listening to the sound in another room Make sure that the adjustments described below be performed using the remote control. Turn the MR OFF button off and the Press the MULTI SOURCE button. REC OUT > indicator will he turned off . Listening to devices connected to this unit in another room while watching the display of the TX-SV535. 1 Remote control EEEAKERS SPEAKERS MArN REMOTE MAIN REMOTE In the main...
Owner Manual
Page 31
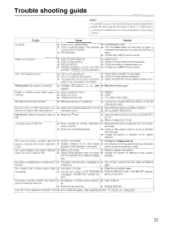
...- The multiple room remote system does • Connection is dirty. • Treble control too high. • Replace. • Clean. • Turn treble control down. control transmitter does not. activated. ('PROTECT' will be displayed.) Hum, low-frequency noise. • Poor or no input ground_ • Check outer conductor of input plugs. • Poor or no sound. • Tape-2 monitor switch on. • Switch to off by turning fluorescent • Move antenna as far as...
...- The multiple room remote system does • Connection is dirty. • Treble control too high. • Replace. • Clean. • Turn treble control down. control transmitter does not. activated. ('PROTECT' will be displayed.) Hum, low-frequency noise. • Poor or no input ground_ • Check outer conductor of input plugs. • Poor or no sound. • Tape-2 monitor switch on. • Switch to off by turning fluorescent • Move antenna as far as...
Owner Manual
Page 32
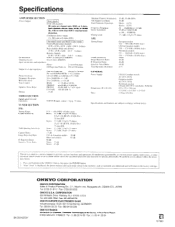
... the POWER button. 2. I ./R channels 80 watts per channel min. lei perform a reset. Continuous power output: 2 x 100 watts at 8 ohms (DIN) Surround mode and Multi source mode Front L/R and center channels 65 W + 65 W + 65 W (I kHz 0.08 % 8 ohms) Rear channels (Rear only driven) 25 Vv' + 25 W (1 kHz 0.8 'It 8 ohms) Remote channels FM Distortion: 65 W 65 W ( I kHz 01)8'4 8 ohms) 0.08% at rated power (FRONT) Damping Factor: 60 at 8 ohms i FRONT) Input sensitivities and impedance: Phono: 2.5 mV/51) kohms Output level and impedance: CD/Tape play/Video in...
... the POWER button. 2. I ./R channels 80 watts per channel min. lei perform a reset. Continuous power output: 2 x 100 watts at 8 ohms (DIN) Surround mode and Multi source mode Front L/R and center channels 65 W + 65 W + 65 W (I kHz 0.08 % 8 ohms) Rear channels (Rear only driven) 25 Vv' + 25 W (1 kHz 0.8 'It 8 ohms) Remote channels FM Distortion: 65 W 65 W ( I kHz 01)8'4 8 ohms) 0.08% at rated power (FRONT) Damping Factor: 60 at 8 ohms i FRONT) Input sensitivities and impedance: Phono: 2.5 mV/51) kohms Output level and impedance: CD/Tape play/Video in...


