
42VP4/42VP4D (update)
Page 5
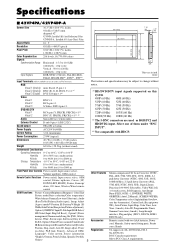
...S-Video: DIN 4-pinן1 *1HD/DVD/DTV input signals supported on /off , Input source select, Volume up / down, Off timer, Wireless/Wired remote control PAL, 480I, 576I, 525I, 625I, 1035I, 1080I), 2-3 pull down Converter (NTSC, 480I, 525I, 1035I, 1080I (60Hz)), 2-2 pull down , OSM ...8236;610 (H)ן89(D) mm Weight 62.8 lbs / 28.5 kg (without RGB notice. mode, Auto ID, Image adjust, Power Accessories Remote control with HDCP. SW), Auto Picture, Input Skip, Color Tune, Low Width/Auto Picture/Fine picture/Picture adjustment), Tone (3 mode), Auto ID, ...
...S-Video: DIN 4-pinן1 *1HD/DVD/DTV input signals supported on /off , Input source select, Volume up / down, Off timer, Wireless/Wired remote control PAL, 480I, 576I, 525I, 625I, 1035I, 1080I), 2-3 pull down Converter (NTSC, 480I, 525I, 1035I, 1080I (60Hz)), 2-2 pull down , OSM ...8236;610 (H)ן89(D) mm Weight 62.8 lbs / 28.5 kg (without RGB notice. mode, Auto ID, Image adjust, Power Accessories Remote control with HDCP. SW), Auto Picture, Input Skip, Color Tune, Low Width/Auto Picture/Fine picture/Picture adjustment), Tone (3 mode), Auto ID, ...
42VP4
Page 3
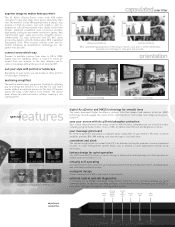
... location. orientation portrait positioning landscape positioning features special on your needs, you to connect 4 displays without AccuCrimson with AccuCrimson NEC 's patented Capsulated Color Filter ensures realistic color and it The 42 Public Display Series offers wide VGA native resolution to ... fanless design in a 2x2 (84") or 3x3 (126") matrix without costly enclosures. In addition, operating problems can be operated remotely via RS232 or front bezel LED lights through its progressive scan driving method offers stable, flicker-free images. superior image no matter...
... location. orientation portrait positioning landscape positioning features special on your needs, you to connect 4 displays without AccuCrimson with AccuCrimson NEC 's patented Capsulated Color Filter ensures realistic color and it The 42 Public Display Series offers wide VGA native resolution to ... fanless design in a 2x2 (84") or 3x3 (126") matrix without costly enclosures. In addition, operating problems can be operated remotely via RS232 or front bezel LED lights through its progressive scan driving method offers stable, flicker-free images. superior image no matter...
42VP4
Page 4
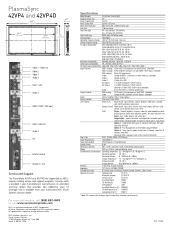
...for PC FWMKPC Tilit Wall Mount for PC TWMKPC Ceiling Mount for PC CMKPC *Signal DA is a registered trademark of NEC Corporation. Timer, Pwr. Anti-reflective (PX-42VP4A) AG - Management, Cinema Mode, Long Life Mode Option 3 - Visual Systems Division 1250 Arlington Heights Rd., Suite 500... display, off , BNC Input, D-sub Input, RGB select, HD select, Input Skip, All Reset Option 2 - On mode, Control Lock, IR Remote, Loop Out, ID Number, Video Wall Advanced OSM, Language, Color System, Source Information Plug & Play DDC1, DDC2B (RGB3 is DDC2B only) Power Requirements...
...for PC FWMKPC Tilit Wall Mount for PC TWMKPC Ceiling Mount for PC CMKPC *Signal DA is a registered trademark of NEC Corporation. Timer, Pwr. Anti-reflective (PX-42VP4A) AG - Management, Cinema Mode, Long Life Mode Option 3 - Visual Systems Division 1250 Arlington Heights Rd., Suite 500... display, off , BNC Input, D-sub Input, RGB select, HD select, Input Skip, All Reset Option 2 - On mode, Control Lock, IR Remote, Loop Out, ID Number, Video Wall Advanced OSM, Language, Color System, Source Information Plug & Play DDC1, DDC2B (RGB3 is DDC2B only) Power Requirements...
42VP4/42VP4D
Page 2
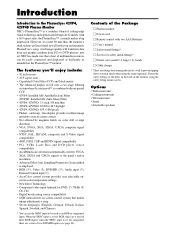
... source compatibility • OSM menu-driven on the PlasmaSync™ monitor. Contents of the Package Ⅺ Plasma monitor Ⅺ Power cord Ⅺ Remote control with our special CCF. • 42VP4: Installed AR (Anti-Reflection) Filter 42VP4D: Installed AG (Anti-Glare) Filter • 42VP4, 42VP4D:... lbs/ 28.5 kg light • 42VP4, 42VP4D: 853ן480 pixels • Flicker - At 42 inches, with your environment. NEC has made sure that makes image adjustments a snap • Seven languages (English, German, French, Italian, Spanish, Swedish, and Chinese) * You ...
... source compatibility • OSM menu-driven on the PlasmaSync™ monitor. Contents of the Package Ⅺ Plasma monitor Ⅺ Power cord Ⅺ Remote control with our special CCF. • 42VP4: Installed AR (Anti-Reflection) Filter 42VP4D: Installed AG (Anti-Glare) Filter • 42VP4, 42VP4D:... lbs/ 28.5 kg light • 42VP4, 42VP4D: 853ן480 pixels • Flicker - At 42 inches, with your environment. NEC has made sure that makes image adjustments a snap • Seven languages (English, German, French, Italian, Spanish, Swedish, and Chinese) * You ...
42VP4/42VP4D
Page 7
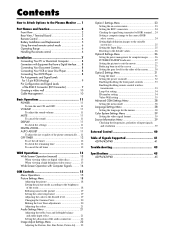
... Plasma Monitor .... 1 Part Names and Function 2 Front View 2 Rear View / Terminal Board 3 Remote Control 4 Battery Installation and Replacement 5 Using the wired remote control mode 6 Operating Range 6 Handling the remote control 6 Installation 7 Connecting Your PC or Macintosh Computer 8 Connections with Equipment that have a Digital ...31 Using the timer 31 Setting the power on mode 32 Enabling/disabling the front panel controls 33 Enabling/disabling remote control wireless transmission 33 Loop Out setting 34 ID number setting 34 Video Wall setting 35 Advanced OSM Settings ...
... Plasma Monitor .... 1 Part Names and Function 2 Front View 2 Rear View / Terminal Board 3 Remote Control 4 Battery Installation and Replacement 5 Using the wired remote control mode 6 Operating Range 6 Handling the remote control 6 Installation 7 Connecting Your PC or Macintosh Computer 8 Connections with Equipment that have a Digital ...31 Using the timer 31 Setting the power on mode 32 Enabling/disabling the front panel controls 33 Enabling/disabling remote control wireless transmission 33 Loop Out setting 34 ID number setting 34 Video Wall setting 35 Advanced OSM Settings ...

42VP4/42VP4D
Page 9
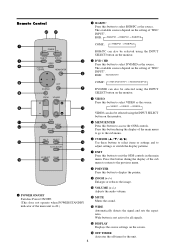
... the On-Screen Menu (OSM) mode. Functions as the EXIT buttons in the On-Screen Menu (OSM) mode. y VOLUME DOWN and UP Adjusts the volume. w Remote sensor window Receives the signals from the remote control. and RIGHT/+ Enlarges or reduces the image. The available inputs depend on and off.
... the On-Screen Menu (OSM) mode. Functions as the EXIT buttons in the On-Screen Menu (OSM) mode. y VOLUME DOWN and UP Adjusts the volume. w Remote sensor window Receives the signals from the remote control. and RIGHT/+ Enlarges or reduces the image. The available inputs depend on and off.
42VP4/42VP4D
Page 10
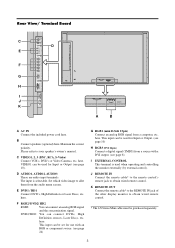
..., High Definition sources, Laser Discs, etc. DVD2/ HD2: You can connect an analog RGB signal and the syncronization signal. J REMOTE IN Connect the remote cable* to the remote control's remote jack to your speaker's owner's manual. This input can be used for use with a DVI output. (see page 8) I ...LEFT SPEAKERS MUST HAVE MORE THAN 7WATT RATING IMPEDANCE 6 OHM A B A AC IN Connect the included power cord here. K REMOTE OUT Connect the remote cable* to the REMOTE IN jack of the other display monitor to allot them from a source with an RGB or component source. (see page 10)....
..., High Definition sources, Laser Discs, etc. DVD2/ HD2: You can connect an analog RGB signal and the syncronization signal. J REMOTE IN Connect the remote cable* to the remote control's remote jack to your speaker's owner's manual. This input can be used for use with a DVI output. (see page 8) I ...LEFT SPEAKERS MUST HAVE MORE THAN 7WATT RATING IMPEDANCE 6 OHM A B A AC IN Connect the included power cord here. K REMOTE OUT Connect the remote cable* to the REMOTE IN jack of the other display monitor to allot them from a source with an RGB or component source. (see page 10)....
42VP4/42VP4D
Page 11
... button is not active for all signals. !3 DISPLAY Displays the source settings on the setting of the main unit is off timer for the unit. 4 Remote Control w RGB/PC Press this button to the sub menu. The available sources depend on the screen. !4 OFF TIMER Activates the off .) !0 VOLUME (+ /-) Adjusts the...
... button is not active for all signals. !3 DISPLAY Displays the source settings on the setting of the main unit is off timer for the unit. 4 Remote Control w RGB/PC Press this button to the sub menu. The available sources depend on the screen. !4 OFF TIMER Activates the off .) !0 VOLUME (+ /-) Adjusts the...
42VP4/42VP4D
Page 12
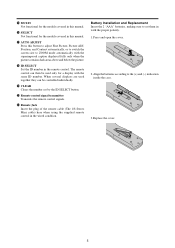
... number. Align the batteries according to set by the ID SELECT button. @0 Remote control signal transmitter Transmits the remote control signals. @1 Remote Jack Insert the plug of the remote cable (The 1/8 Stereo Mini cable) here when using the supplied remote control in the remote control. !5 MULTI Not functional for the models covered in this manual. !6 SELECT...
... number. Align the batteries according to set by the ID SELECT button. @0 Remote control signal transmitter Transmits the remote control signals. @1 Remote Jack Insert the plug of the remote cable (The 1/8 Stereo Mini cable) here when using the supplied remote control in the remote control. !5 MULTI Not functional for the models covered in this manual. !6 SELECT...

42VP4/42VP4D
Page 13
...Pr G/ Y External Control RGB2 / DVD2 / HD2 B/ Cb/Pb HD VD RGB 1 (IN / OUT) IN REMOTE AUDIO 3 R L (MONO) OUT RGB 3 DV I ( Digital RGB ) External Control IN REMOTE OUT Remote Control Cable* To Remote Jack POWER/STANDBY Approx. 7m / 23ft * The 1/8 Stereo Mini cable must be sure to unplug the... remote cable from the front of the monitor's remote control sensor and at horizontal and vertical angles of about 7 m/ 23ft. Using the wired remote control mode Connect the remote cable* to the remote control's remote jack and the "REMOTE IN" terminal on the ...
...Pr G/ Y External Control RGB2 / DVD2 / HD2 B/ Cb/Pb HD VD RGB 1 (IN / OUT) IN REMOTE AUDIO 3 R L (MONO) OUT RGB 3 DV I ( Digital RGB ) External Control IN REMOTE OUT Remote Control Cable* To Remote Jack POWER/STANDBY Approx. 7m / 23ft * The 1/8 Stereo Mini cable must be sure to unplug the... remote cable from the front of the monitor's remote control sensor and at horizontal and vertical angles of about 7 m/ 23ft. Using the wired remote control mode Connect the remote cable* to the remote control's remote jack and the "REMOTE IN" terminal on the ...

42VP4/42VP4D
Page 17
... 3 VIDEO VIDEO 1 ( I N / OUT) VIDEO 2 BNC connector OUT VIDEO Signal RGB signal/ IN DVD/HD signal AUDIO 1 R L (MONO) Y DVD1 Remote IN control REMOTE OUT IN OUT Remote control Remote IN control REMOTE OUT IN RGB 1 (IN / OUT) VD Cb/Pb HD Y Cr/Pr B/ G/ R/ RGB2 / DVD2 / HD2 OUT RGB signal/ DVD/HD signal OUT... Remote control Note: 1. Creating a video wall With buit-in three places) AC IN RIGHT LEFT SPEAKERS MUST HAVE MORE THAN 7WATT RATING IMPEDANCE 6 OHM To...
... 3 VIDEO VIDEO 1 ( I N / OUT) VIDEO 2 BNC connector OUT VIDEO Signal RGB signal/ IN DVD/HD signal AUDIO 1 R L (MONO) Y DVD1 Remote IN control REMOTE OUT IN OUT Remote control Remote IN control REMOTE OUT IN RGB 1 (IN / OUT) VD Cb/Pb HD Y Cr/Pr B/ G/ R/ RGB2 / DVD2 / HD2 OUT RGB signal/ DVD/HD signal OUT... Remote control Note: 1. Creating a video wall With buit-in three places) AC IN RIGHT LEFT SPEAKERS MUST HAVE MORE THAN 7WATT RATING IMPEDANCE 6 OHM To...

42VP4/42VP4D
Page 18
...to delete the pointer. The monitor's POWER/STANDBY indicator turns red and the standby mode is pressed. 2. Press and hold the VOLUME button (on the remote control or the unit) to increase to its original size. Fine Picture, Picture ADJ, Position, and Contrast will light up (green) when the unit... the menu turns off the unit. VOLUME To adjust the sound volume: 1. If the button is selected ...... Press the POWER OFF button (on the remote control or control panel) to restore. Basic Operations POWER To turn on the unit. Press the POINTER button to turn the unit ON and OFF...
...to delete the pointer. The monitor's POWER/STANDBY indicator turns red and the standby mode is pressed. 2. Press and hold the VOLUME button (on the remote control or the unit) to increase to its original size. Fine Picture, Picture ADJ, Position, and Contrast will light up (green) when the unit... the menu turns off the unit. VOLUME To adjust the sound volume: 1. If the button is selected ...... Press the POWER OFF button (on the remote control or control panel) to restore. Basic Operations POWER To turn on the unit. Press the POINTER button to turn the unit ON and OFF...

42VP4/42VP4D
Page 20
...this function, you can cause a phosphor burn-in. Within 3 seconds ... When viewing a high definition video source 1. Press the WIDE button on the remote control. 2. Note: Do not allow the displayed in the horizontal and vertical direction, maintaining the original proportions. * Use this for an extended period. FULL... screen The full size screen is expanded in 4:3 mode for theater size (wide) movies, etc. Press the WIDE button on the remote control. This can select one of five screen sizes. When viewing videos or digital video discs STADIUM size screen 1. Press the WIDE button ...
...this function, you can cause a phosphor burn-in. Within 3 seconds ... When viewing a high definition video source 1. Press the WIDE button on the remote control. 2. Note: Do not allow the displayed in the horizontal and vertical direction, maintaining the original proportions. * Use this for an extended period. FULL... screen The full size screen is expanded in 4:3 mode for theater size (wide) movies, etc. Press the WIDE button on the remote control. This can select one of five screen sizes. When viewing videos or digital video discs STADIUM size screen 1. Press the WIDE button ...
42VP4/42VP4D
Page 21
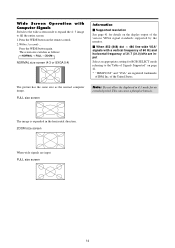
... line wide VGA* signals with Computer Signals Switch to the wide screen mode to expand the 4 : 3 image to the"Table of Signals Supported" on the remote control. 2. ZOOM size screen When wide signals are input. FULL size screen 14 Wide Screen Operation with a vertical frequency of 60 Hz and horizontal frequency...
... line wide VGA* signals with Computer Signals Switch to the wide screen mode to expand the 4 : 3 image to the"Table of Signals Supported" on the remote control. 2. ZOOM size screen When wide signals are input. FULL size screen 14 Wide Screen Operation with a vertical frequency of 60 Hz and horizontal frequency...

42VP4/42VP4D
Page 22
.... MENU/ENTER OK EXIT EXIT 2. Information Ⅵ Advanced menu mode When "ADVANCED OSM" is shown close up. Press the cursor buttons v w on the remote control. 15 MENU/ENTER OK : OFF EXIT EXIT The following describes how to select a submenu or item. MAIN MENU 1 / 2 PICTURE AUDIO IMAGE ADJUST ... to highlight the menu you change it again. 6. Press the MENU/ENTER button on the remote control to the main menu. Press the MENU/ENTER button on the remote control to use the menus and the selected items. 1. OSM(On Screen Menu) Controls Menu Operations The OSM window...
.... MENU/ENTER OK EXIT EXIT 2. Information Ⅵ Advanced menu mode When "ADVANCED OSM" is shown close up. Press the cursor buttons v w on the remote control. 15 MENU/ENTER OK : OFF EXIT EXIT The following describes how to select a submenu or item. MAIN MENU 1 / 2 PICTURE AUDIO IMAGE ADJUST ... to highlight the menu you change it again. 6. Press the MENU/ENTER button on the remote control to the main menu. Press the MENU/ENTER button on the remote control to use the menus and the selected items. 1. OSM(On Screen Menu) Controls Menu Operations The OSM window...

42VP4/42VP4D
Page 24
.... Used to access full menu. Yes Yes - Sets the picture to ON, each display. ON DELAY PLE LINK REPEAT TIMER Sets the day of the remote control. Creates a 2×2 or 3×3 video wall. When set to suit the movie. Sets two programmable timers. Yes Yes Yes Reset Yes No No - ...the screen mode from between Splitting and Blanking. Automatically sets the ID number of the front panel buttons. SPLIT OFF - ON MODE CONTROL LOCK IR REMOTE LOOP OUT ID NUMBER VIDEO WALL DIVIDER POSITION DISP. Default - Sets the input mode at the time the power is set to ON, the ...
.... Used to access full menu. Yes Yes - Sets the picture to ON, each display. ON DELAY PLE LINK REPEAT TIMER Sets the day of the remote control. Creates a 2×2 or 3×3 video wall. When set to suit the movie. Sets two programmable timers. Yes Yes Yes Reset Yes No No - ...the screen mode from between Splitting and Blanking. Automatically sets the ID number of the front panel buttons. SPLIT OFF - ON MODE CONTROL LOCK IR REMOTE LOOP OUT ID NUMBER VIDEO WALL DIVIDER POSITION DISP. Default - Sets the input mode at the time the power is set to ON, the ...

42VP4/42VP4D
Page 25
Use the v and w buttons to display the MAIN MENU on the remote control to select "CONTRAST". PICTURE MODE : THEAT. 1 * If neither the ᮤ or ᮣ button is pressed within 5 seconds, the current setting is set and the ... environment in a bright room. When trying to enter the PICTURE submenu, make sure PICTURE MODE is not set to display the MAIN MENU on the remote control to "THEAT. 1" ... PICTURE 1 / 2 CONTRAST BRIGHTNESS SHARPNESS COLOR TINT PICTURE MODE : NORMAL NR : OFF NEXT PAGE SEL. Changes the picture's sharpness...
Use the v and w buttons to display the MAIN MENU on the remote control to select "CONTRAST". PICTURE MODE : THEAT. 1 * If neither the ᮤ or ᮣ button is pressed within 5 seconds, the current setting is set and the ... environment in a bright room. When trying to enter the PICTURE submenu, make sure PICTURE MODE is not set to display the MAIN MENU on the remote control to "THEAT. 1" ... PICTURE 1 / 2 CONTRAST BRIGHTNESS SHARPNESS COLOR TINT PICTURE MODE : NORMAL NR : OFF NEXT PAGE SEL. Changes the picture's sharpness...

42VP4/42VP4D
Page 26
... delete the main menu, press the EXIT button once more . Press the MENU/ENTER button on the remote control to set "WHITE BALANCE". Example: Setting "NR-3" Press the MENU/ENTER button on the remote control to set color tone produced by the plasma display. The "PICTURE" screen appears. 2. ADJ. OFF... noise in the picture Use these settings if the picture has noise due to poor reception or when playing video tapes on the remote control to achieve the desired color quality. Once the setting is completed... Each has a different level of COLOR TEMP., then... 4. ADJ.
... delete the main menu, press the EXIT button once more . Press the MENU/ENTER button on the remote control to set "WHITE BALANCE". Example: Setting "NR-3" Press the MENU/ENTER button on the remote control to set color tone produced by the plasma display. The "PICTURE" screen appears. 2. ADJ. OFF... noise in the picture Use these settings if the picture has noise due to poor reception or when playing video tapes on the remote control to achieve the desired color quality. Once the setting is completed... Each has a different level of COLOR TEMP., then... 4. ADJ.

42VP4/42VP4D
Page 27
...ᮣ button is pressed within 5 seconds, the current setting is completed... Use the v and w buttons to display the MAIN MENU on the remote control to select "GAMMA". 3. EXIT RETURN 4. SEL. Use the v and w buttons to select "PICTURE", then press the MENU/ENTER button....screen, then... 1. Information Ⅵ LOW TONE settings AUTO ....... Example: Setting "3" Set "ADVANCED OSM" to display the MAIN MENU on the remote control to "ON" in the MAIN MENU (1/2), then perform the following operations. Use the ᮤ and ᮣ buttons to select "2". ...
...ᮣ button is pressed within 5 seconds, the current setting is completed... Use the v and w buttons to display the MAIN MENU on the remote control to select "GAMMA". 3. EXIT RETURN 4. SEL. Use the v and w buttons to select "PICTURE", then press the MENU/ENTER button....screen, then... 1. Information Ⅵ LOW TONE settings AUTO ....... Example: Setting "3" Set "ADVANCED OSM" to display the MAIN MENU on the remote control to "ON" in the MAIN MENU (1/2), then perform the following operations. Use the ᮤ and ᮣ buttons to select "2". ...

42VP4/42VP4D
Page 28
... to select "PICTURE", then press the MENU/ENTER button. Note : If "CAN NOT ADJUST" appears... Press the MENU/ENTER button on the remote control to display the MAIN MENU on the AUDIO menu correctly. Use the v and w buttons to select "COLOR TUNE", then press the MENU...blue's adjustment YELLOW ......... Note that this also restores other settings to select "BASS". 3. Example: Adjusting the bass Press the MENU/ENTER button on the remote control to the main menu. The "AUDIO" screen appears. 2. Use the v and w buttons to the factory defaults. ADJ. EXIT RETURN To continue...
... to select "PICTURE", then press the MENU/ENTER button. Note : If "CAN NOT ADJUST" appears... Press the MENU/ENTER button on the remote control to display the MAIN MENU on the AUDIO menu correctly. Use the v and w buttons to select "COLOR TUNE", then press the MENU...blue's adjustment YELLOW ......... Note that this also restores other settings to select "BASS". 3. Example: Adjusting the bass Press the MENU/ENTER button on the remote control to the main menu. The "AUDIO" screen appears. 2. Use the v and w buttons to the factory defaults. ADJ. EXIT RETURN To continue...


