
42VP4/42VP4D
Page 7
Contents How to Attach Options to the Plasma Monitor .... 1 Part Names and Function 2 Front View 2 Rear View / Terminal Board 3 Remote Control 4 Battery Installation and Replacement 5 Using the wired remote control mode 6 Operating Range 6 Handling the remote control 6 Installation 7 Connecting Your PC... 27 Setting the gray level for the sides of the screen ......... 30 Option3 Settings Menu 31 Using the timer 31 Setting the power on mode 32 Enabling/disabling the front panel controls 33 Enabling/disabling remote control wireless transmission 33 Loop Out setting 34 ID number ...
Contents How to Attach Options to the Plasma Monitor .... 1 Part Names and Function 2 Front View 2 Rear View / Terminal Board 3 Remote Control 4 Battery Installation and Replacement 5 Using the wired remote control mode 6 Operating Range 6 Handling the remote control 6 Installation 7 Connecting Your PC... 27 Setting the gray level for the sides of the screen ......... 30 Option3 Settings Menu 31 Using the timer 31 Setting the power on mode 32 Enabling/disabling the front panel controls 33 Enabling/disabling remote control wireless transmission 33 Loop Out setting 34 ID number ...
42VP4/42VP4D
Page 10
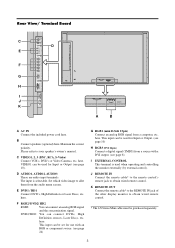
... IMPEDANCE 6 OHM AC IN RIGHT LEFT SPEAKERS MUST HAVE MORE THAN 7WATT RATING IMPEDANCE 6 OHM A B A AC IN Connect the included power cord here. D AUDIO1, AUDIO2, AUDIO3 These are audio input terminals. VIDEO1 can be used for Input or Output. (see page 10)... to obtain wired remote control. * The 1/8 Stereo Mini cable must be used when operating and controlling the monitor externally (by external control). Rear View/ Terminal Board VIDEO VIDEO 2 VIDEO 1 ( I N / OUT) L (MONO) L (MONO) L (MONO) VIDEO 3 C D E F G H I J K REMOTE External Control OUT IN DV I ...
... IMPEDANCE 6 OHM AC IN RIGHT LEFT SPEAKERS MUST HAVE MORE THAN 7WATT RATING IMPEDANCE 6 OHM A B A AC IN Connect the included power cord here. D AUDIO1, AUDIO2, AUDIO3 These are audio input terminals. VIDEO1 can be used for Input or Output. (see page 10)... to obtain wired remote control. * The 1/8 Stereo Mini cable must be used when operating and controlling the monitor externally (by external control). Rear View/ Terminal Board VIDEO VIDEO 2 VIDEO 1 ( I N / OUT) L (MONO) L (MONO) L (MONO) VIDEO 3 C D E F G H I J K REMOTE External Control OUT IN DV I ...
42VP4/42VP4D
Page 15
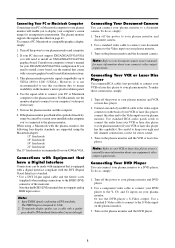
... camera. Note: Refer to your VCR or laser disc player owner's manual for more information about your equipment's video output requirements. Turn off the power to your plasma monitor and DVD player. 2. Use a standard S-Video cable to connect to the S-Video input on the plasma monitor and the ... VCR or laser disc player, connect the other end to the Video input on your document camera to install an SXGA/XGA/SVGA/VGA graphics board. Connections with Equipment that have a Digital Interface Connections can connect your computer's video port, if necessary. 5. Note: 1. Connect one end ...
... camera. Note: Refer to your VCR or laser disc player owner's manual for more information about your equipment's video output requirements. Turn off the power to your plasma monitor and DVD player. 2. Use a standard S-Video cable to connect to the S-Video input on the plasma monitor and the ... VCR or laser disc player, connect the other end to the Video input on your document camera to install an SXGA/XGA/SVGA/VGA graphics board. Connections with Equipment that have a Digital Interface Connections can connect your computer's video port, if necessary. 5. Note: 1. Connect one end ...


