
42VP4/42VP4D (update)
Page 5
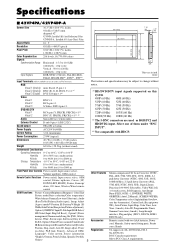
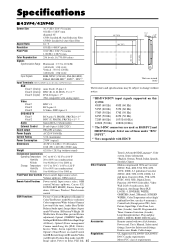
...;1 *1HD/DVD/DTV input signals supported on mode/Control lock/ IR Remote/Loop out/ID number/Video wall [Divider, Position, Disp. SW), Auto Picture, Input Skip, Color Tune, Low Width/Auto Picture/Fine picture/Picture adjustment), Tone (3 mode), Auto ID, Programmable Timer, Option1 (OSM/BNC Input/D-Sub Input/RGB Select/ Gamma Correction (4 mode), Loop through HD Select/Input Skip/All Reset), Option2 (Power interface, Plug and play (DDC1, DDC2b, RGB3: management/Cinema mode/Long life [PLE, Orbiter, DDC2b only) Inverse, White, Screen wiper, Soft...
...;1 *1HD/DVD/DTV input signals supported on mode/Control lock/ IR Remote/Loop out/ID number/Video wall [Divider, Position, Disp. SW), Auto Picture, Input Skip, Color Tune, Low Width/Auto Picture/Fine picture/Picture adjustment), Tone (3 mode), Auto ID, Programmable Timer, Option1 (OSM/BNC Input/D-Sub Input/RGB Select/ Gamma Correction (4 mode), Loop through HD Select/Input Skip/All Reset), Option2 (Power interface, Plug and play (DDC1, DDC2b, RGB3: management/Cinema mode/Long life [PLE, Orbiter, DDC2b only) Inverse, White, Screen wiper, Soft...

42VP4/42VP4D (update)
Page 8
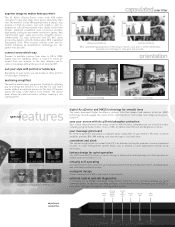
... VGA: 600 dotsן480 lines). *5 Normally the RGB select mode suite for the input signals is not displayed properly, set automatically. If the picture is set the RGB mode prepared for the input signals listed in the table above , you are connecting a composite sync signal, use the monitor adapter (D-Sub 15-pin) to "MOTION". To view 480I@60Hz (480 interlaced lines, 60Hz refresh rate) or 576I@50Hz (567...
... VGA: 600 dotsן480 lines). *5 Normally the RGB select mode suite for the input signals is not displayed properly, set automatically. If the picture is set the RGB mode prepared for the input signals listed in the table above , you are connecting a composite sync signal, use the monitor adapter (D-Sub 15-pin) to "MOTION". To view 480I@60Hz (480 interlaced lines, 60Hz refresh rate) or 576I@50Hz (567...
42VP4
Page 3
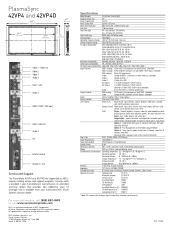
...-White, Pixel Refresh and Brightness Limiter. external control and self diagnostics A complete set up cursor left cursor right input select adjustment capabilities The monitor 's wide VGA panel provides a sharp, crisp display of source equipment location. And sophisticated video signal processing, including motioncompensated 3D scan conversion and 3/2 pull down volume up/ cursor up to arrange the monitors in the industry. The Auto ID feature allows the setup of an external...
...-White, Pixel Refresh and Brightness Limiter. external control and self diagnostics A complete set up cursor left cursor right input select adjustment capabilities The monitor 's wide VGA panel provides a sharp, crisp display of source equipment location. And sophisticated video signal processing, including motioncompensated 3D scan conversion and 3/2 pull down volume up/ cursor up to arrange the monitors in the industry. The Auto ID feature allows the setup of an external...
42VP4
Page 4
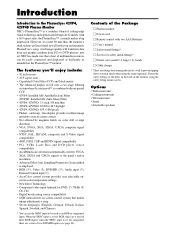
..., input select, volume, mute, wide, display, off , BNC Input, D-sub Input, RGB select, HD select, Input Skip, All Reset Option 2 - All other trademarks are supported by NEC's industry leading service and support programs. It comes with Video1, selectable) Audio Internal amplifier, 8W x 2 output power External Control 9-pin mini D-Sub, RS232 User Controls Direct Access Power on/off, input selection, volume up/down, OSM access, (Control Lock Switch located on input panel) Remote Control Power on /off -timer, OSM control, cursor, pointer, zoom, auto, select OSM Picture - NEC...
..., input select, volume, mute, wide, display, off , BNC Input, D-sub Input, RGB select, HD select, Input Skip, All Reset Option 2 - All other trademarks are supported by NEC's industry leading service and support programs. It comes with Video1, selectable) Audio Internal amplifier, 8W x 2 output power External Control 9-pin mini D-Sub, RS232 User Controls Direct Access Power on/off, input selection, volume up/down, OSM access, (Control Lock Switch located on input panel) Remote Control Power on /off -timer, OSM control, cursor, pointer, zoom, auto, select OSM Picture - NEC...
42VP4/42VP4D
Page 2
...; Stand • Attachable speakers and warp - Fasten the safety fittings to external shock when using the safety fitting mount screws. when the 5BNC input is employed. • RGB (3*), Video (3), DVD/HD (2*), Audio input (3), External Control input (1) • AccuColor control system provides user selectable onscreen color temperature settings • New Drive Technology • Component video input terminal for fastening the unit to a wall to prevent tipping due to the holes in red uses a two...
...; Stand • Attachable speakers and warp - Fasten the safety fittings to external shock when using the safety fitting mount screws. when the 5BNC input is employed. • RGB (3*), Video (3), DVD/HD (2*), Audio input (3), External Control input (1) • AccuColor control system provides user selectable onscreen color temperature settings • New Drive Technology • Component video input terminal for fastening the unit to a wall to prevent tipping due to the holes in red uses a two...
42VP4/42VP4D
Page 3
... frequency energy and, if not installed and used over a long period. 6. For operating safety and to avoid damage to authorized Service Centers. If the problem persists, contact your plasma monitor and keep the manual handy for a Class A digital device, pursuant to Part 15 of this unit. Avoid damage to the power cord, and do not produce light or remain lit. These limits...
... frequency energy and, if not installed and used over a long period. 6. For operating safety and to avoid damage to authorized Service Centers. If the problem persists, contact your plasma monitor and keep the manual handy for a Class A digital device, pursuant to Part 15 of this unit. Avoid damage to the power cord, and do not produce light or remain lit. These limits...

42VP4/42VP4D
Page 4
... continuous display of a static image over the life of a Plasma Display Panel. 8. To protect your investment in which the plasma monitor is strongly recommended to use a trained, authorized dealer. 7. Attaching the ferrite cores: Set the ferrite cores on both ends of the DVI cable (not supplied), and both ends of the cable. Use only with minimal contrast between colors. * Note: Burn-in : Like all phosphor-based display devices...
... continuous display of a static image over the life of a Plasma Display Panel. 8. To protect your investment in which the plasma monitor is strongly recommended to use a trained, authorized dealer. 7. Attaching the ferrite cores: Set the ferrite cores on both ends of the DVI cable (not supplied), and both ends of the cable. Use only with minimal contrast between colors. * Note: Burn-in : Like all phosphor-based display devices...
42VP4/42VP4D
Page 7
... screen ......... 30 Option3 Settings Menu 31 Using the timer 31 Setting the power on mode 32 Enabling/disabling the front panel controls 33 Enabling/disabling remote control wireless transmission 33 Loop Out setting 34 ID number setting 34 Video Wall setting 35 Advanced OSM Settings Menu 38 Setting the menu mode 38 Language Settings Menu 38 Setting the language for the menus 38 Color System Settings Menu 39 Setting the video signal format 39 Source Information Menu 39 Checking the frequencies, polarities of input signals, and resolution 39 External Control 40 Table...
... screen ......... 30 Option3 Settings Menu 31 Using the timer 31 Setting the power on mode 32 Enabling/disabling the front panel controls 33 Enabling/disabling remote control wireless transmission 33 Loop Out setting 34 ID number setting 34 Video Wall setting 35 Advanced OSM Settings Menu 38 Setting the menu mode 38 Language Settings Menu 38 Setting the language for the menus 38 Color System Settings Menu 39 Setting the video signal format 39 Source Information Menu 39 Checking the frequencies, polarities of input signals, and resolution 39 External Control 40 Table...
42VP4/42VP4D
Page 10
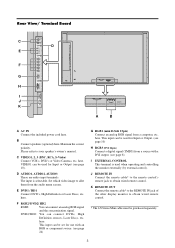
... wired remote control. * The 1/8 Stereo Mini cable must be used when operating and controlling the monitor externally (by external control). This input can be used for Input or Output. (see page 10). C VIDEO1, 2, 3 (BNC, RCA, S-Video) Connect VCR's, DVD's or Video Cameras, etc. VIDEO1 can be set for Input or Output (see page 10) H RGB3 (DVI 24pin) Connect a digital signal (TMDS) from the audio menu screen. DVD2/ HD2: You can connect an analog RGB signal and the syncronization signal. B Connect speakers (optional...
... wired remote control. * The 1/8 Stereo Mini cable must be used when operating and controlling the monitor externally (by external control). This input can be used for Input or Output. (see page 10). C VIDEO1, 2, 3 (BNC, RCA, S-Video) Connect VCR's, DVD's or Video Cameras, etc. VIDEO1 can be set for Input or Output (see page 10) H RGB3 (DVI 24pin) Connect a digital signal (TMDS) from the audio menu screen. DVD2/ HD2: You can connect an analog RGB signal and the syncronization signal. B Connect speakers (optional...
42VP4/42VP4D
Page 12
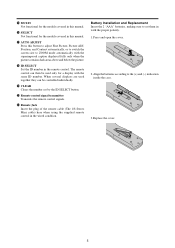
... to switch the screen size to set by the ID SELECT button. @0 Remote control signal transmitter Transmits the remote control signals. @1 Remote Jack Insert the plug of the remote cable (The 1/8 Stereo Mini cable) here when using the supplied remote control in the wired condition. Align the batteries according to the (+) and (-) indication inside the case. 3.Replace the cover. 5 The remote control can be used only for the models covered in this manual. !7 AUTO ADJUST Press this manual. !6 SELECT...
... to switch the screen size to set by the ID SELECT button. @0 Remote control signal transmitter Transmits the remote control signals. @1 Remote Jack Insert the plug of the remote cable (The 1/8 Stereo Mini cable) here when using the supplied remote control in the wired condition. Align the batteries according to the (+) and (-) indication inside the case. 3.Replace the cover. 5 The remote control can be used only for the models covered in this manual. !7 AUTO ADJUST Press this manual. !6 SELECT...
42VP4/42VP4D
Page 15
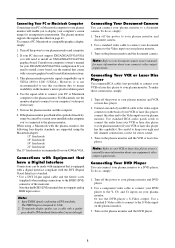
... installation instructions. 3. Use a component video cable to connect your DVD player to your document camera owner's manual for stereo sound. 3. Turn off the power to DVI standards. However, it may be made with the DVI (Digital Visual Interface) standard. * Use a DVI 24-pin signal cable and the ferrite cores (supplied) when making connections to a DVD player. Use the signal cable to connect your PC or Macintosh computer to your plasma monitor and computer. 2. Turn off the power to display your computer's screen image for your plasma monitor. 3. Connecting...
... installation instructions. 3. Use a component video cable to connect your DVD player to your document camera owner's manual for stereo sound. 3. Turn off the power to DVI standards. However, it may be made with the DVI (Digital Visual Interface) standard. * Use a DVI 24-pin signal cable and the ferrite cores (supplied) when making connections to a DVD player. Use the signal cable to connect your PC or Macintosh computer to your plasma monitor and computer. 2. Turn off the power to display your computer's screen image for your plasma monitor. 3. Connecting...

42VP4/42VP4D
Page 18
... the picture. 11 Press the POINTER button to restore. The screen size switches to ZOOM mode automatically with the vwᮤ ᮣ buttons. 2. Press and hold the VOLUME button (on the remote control or control panel) to turn off . The monitor's POWER/STANDBY indicator turns red and the standby mode is selected ...... DISPLAY To check the settings: 1. If the button is selected ...... The pointer will light up (green) when the unit is pressed. 2. button will be adjusted automatically...
... the picture. 11 Press the POINTER button to restore. The screen size switches to ZOOM mode automatically with the vwᮤ ᮣ buttons. 2. Press and hold the VOLUME button (on the remote control or control panel) to turn off . The monitor's POWER/STANDBY indicator turns red and the standby mode is selected ...... DISPLAY To check the settings: 1. If the button is selected ...... The pointer will light up (green) when the unit is pressed. 2. button will be adjusted automatically...

42VP4/42VP4D
Page 25
... screen reappears. Once the adjustment is connected. Changes the picture's black level. Use the v and w buttons to select "THEAT. 1". Example: Adjusting the contrast Press the MENU/ENTER button on the remote control to the factory default settings. Ⅵ Restoring the factory default settings Select "DEFAULT" under the "PICTURE MODE" settings. 18 Use the ᮤ and ᮣ buttons to select "PICTURE", then press the MENU/ENTER button. Note: If "CAN NOT ADJUST" appears ... Use this mode when watching video in which you are viewing...
... screen reappears. Once the adjustment is connected. Changes the picture's black level. Use the v and w buttons to select "THEAT. 1". Example: Adjusting the contrast Press the MENU/ENTER button on the remote control to the factory default settings. Ⅵ Restoring the factory default settings Select "DEFAULT" under the "PICTURE MODE" settings. 18 Use the ᮤ and ᮣ buttons to select "PICTURE", then press the MENU/ENTER button. Note: If "CAN NOT ADJUST" appears ... Use this mode when watching video in which you are viewing...

42VP4/42VP4D
Page 32
..." signal format 1080A Special Digital broadcasts (for the INPUT SELECT button on the screen, then... 1. Example: Setting the "1080B" mode to "1035I" Press the MENU/ENTER button on the remote control to display the following signals correctly. Once the setting is completed ... WIDE2 When an 848 dot ן480 line signal with a horizontal frequency of the above settings. Ⅵ Restoring the factory default settings Select "ALL RESET" under the OPTION1 menu...
..." signal format 1080A Special Digital broadcasts (for the INPUT SELECT button on the screen, then... 1. Example: Setting the "1080B" mode to "1035I" Press the MENU/ENTER button on the remote control to display the following signals correctly. Once the setting is completed ... WIDE2 When an 848 dot ן480 line signal with a horizontal frequency of the above settings. Ⅵ Restoring the factory default settings Select "ALL RESET" under the OPTION1 menu...

42VP4/42VP4D
Page 36
... be displayed. The white vertical bar appears. THE "SCREEN WIPER" screen appears. 5. Once the setting is pressed: OFF ↔ ON LONG LIFE PLE : ORBITER : INVERSE : SCREEN WIPER : AUTO OFF OFF ON SEL. When the WORKING TIME is set to 0M. EXIT RETURN Information Ⅵ SCREEN WIPER ON ......... EXIT RETURN 6. Perform Steps 1-3 of LONG LIFE, then... 3. Adjust the time using the vwᮤ and ᮣ buttons. Example: Setting "SCREEN...
... be displayed. The white vertical bar appears. THE "SCREEN WIPER" screen appears. 5. Once the setting is pressed: OFF ↔ ON LONG LIFE PLE : ORBITER : INVERSE : SCREEN WIPER : AUTO OFF OFF ON SEL. When the WORKING TIME is set to 0M. EXIT RETURN Information Ⅵ SCREEN WIPER ON ......... EXIT RETURN 6. Perform Steps 1-3 of LONG LIFE, then... 3. Adjust the time using the vwᮤ and ᮣ buttons. Example: Setting "SCREEN...

42VP4/42VP4D
Page 44
MODE : SPLIT AUTO ID : OFF IMAGE ADJUST P. OFF .... Turns on the main power of all displays at the same time. * Once this function to "ON", POWER ON/ OFF button on delay. The mode switches as follows each time the ᮤ or ᮣ button is set to set "ON", connect your plasma displays with the remote cable (optional) in a 2×2 video wall. See the drawing below. * If there are changes in a 3×3 video wall. * When this function to...
MODE : SPLIT AUTO ID : OFF IMAGE ADJUST P. OFF .... Turns on the main power of all displays at the same time. * Once this function to "ON", POWER ON/ OFF button on delay. The mode switches as follows each time the ᮤ or ᮣ button is set to set "ON", connect your plasma displays with the remote cable (optional) in a 2×2 video wall. See the drawing below. * If there are changes in a 3×3 video wall. * When this function to...
42VP4/42VP4D
Page 50
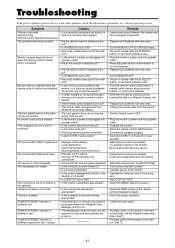
... panel buttons of the main unit do not function during Control Lock. • Is the monitor's power cord plugged into a power outlet. • Increase the volume. • Press the remote control's MUTE button. • Connect the speakers properly. • Set AUDIO INPUT on when the remote control's power button is blinking in green and red, or green. • Improper control setting. Tint is noisy. POWER/STANDBY indicator is pressed. • Is the monitor's power cord plugged into a power outlet? • Are all connections are secure. • Adjust picture controls...
... panel buttons of the main unit do not function during Control Lock. • Is the monitor's power cord plugged into a power outlet. • Increase the volume. • Press the remote control's MUTE button. • Connect the speakers properly. • Set AUDIO INPUT on when the remote control's power button is blinking in green and red, or green. • Improper control setting. Tint is noisy. POWER/STANDBY indicator is pressed. • Is the monitor's power cord plugged into a power outlet? • Are all connections are secure. • Adjust picture controls...
42VP4/42VP4D
Page 52
... (Timer/Power on /off, Input source select, OSM control,Volume up/down, Cursor (UP, DOWN,LEFT, RIGHT), Pointer, Zoom up/ down Converter (PAL, 576I, 625I, NTSC, 480I, 525I), Digital Zoom Function (100-900% Selectable), Video Wall 2×2/3×3 multi screen, Self Diagnosis, Anti Image Burn (PLE LOCK1~3, INVERSE, WHITE, ORBITER (Auto1,2/Manual), SCREEN WIPER), Color Temperature select (high/ mid/mid low/low, user has 4 memories), Control lock (Except power SW), Auto Picture, Input...
... (Timer/Power on /off, Input source select, OSM control,Volume up/down, Cursor (UP, DOWN,LEFT, RIGHT), Pointer, Zoom up/ down Converter (PAL, 576I, 625I, NTSC, 480I, 525I), Digital Zoom Function (100-900% Selectable), Video Wall 2×2/3×3 multi screen, Self Diagnosis, Anti Image Burn (PLE LOCK1~3, INVERSE, WHITE, ORBITER (Auto1,2/Manual), SCREEN WIPER), Color Temperature select (high/ mid/mid low/low, user has 4 memories), Control lock (Except power SW), Auto Picture, Input...
42VP4/42VP4D
Page 55
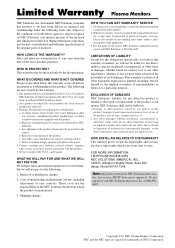
.... Any shipment of the product (claims must be presented as specified below , agrees to follow instructions supplied with the product. 5. Costs of initial technical adjustments (set-up), including adjustment of the nearest NEC Solutions authorized service center, call NEC Solutions (America), Inc. For the name of user controls. EXCLUSION OF DAMAGES NEC Solutions' liability for (1) one year from the date of the...
.... Any shipment of the product (claims must be presented as specified below , agrees to follow instructions supplied with the product. 5. Costs of initial technical adjustments (set-up), including adjustment of the nearest NEC Solutions authorized service center, call NEC Solutions (America), Inc. For the name of user controls. EXCLUSION OF DAMAGES NEC Solutions' liability for (1) one year from the date of the...
42VP4/42VP4D/42XM2
Page 1
...supply useful information for millimeters multiply by step procedure for installation. ƒ Any ceilings or walls must be in accordance with bars on the 16:9 screen in inches, for a design or installation. 42VP4/42VP4D/42XM2 Installation Guide 42" Plasma Displays Contents Product Description and Notes Ventilation Requirements Display Dimensions Front, Top & Bottom Rear Left & Right Side Display Dimensions w/Optional Speakers and Stand Dimensions w/Optional Flat Wall Mount Dimensions w/Optional Tilt Wall Mount Dimensions w/Optional Ceiling Mount Portrait Mode Connections Control Codes...
...supply useful information for millimeters multiply by step procedure for installation. ƒ Any ceilings or walls must be in accordance with bars on the 16:9 screen in inches, for a design or installation. 42VP4/42VP4D/42XM2 Installation Guide 42" Plasma Displays Contents Product Description and Notes Ventilation Requirements Display Dimensions Front, Top & Bottom Rear Left & Right Side Display Dimensions w/Optional Speakers and Stand Dimensions w/Optional Flat Wall Mount Dimensions w/Optional Tilt Wall Mount Dimensions w/Optional Ceiling Mount Portrait Mode Connections Control Codes...


