
User Manual
Page 3
... Chargers Safety Information 6 Operational Safety Guidelines 7 Radio Overview 8 Parts of the radio 8 ON/OFF/Volume Knob 9 Microphone 9 Antenna 9 Accessory Connector 9 Model Label 9 LED Indicator 9 Side Buttons 10 The Lithium-Ion (Li-Ion) Battery . . . . . 10 Batteries and Chargers 12 Battery Features and Charging Options . .12 About the Li-Ion Battery 12 Battery Recycling and Disposal . . . . . .13 Installing the...
... Chargers Safety Information 6 Operational Safety Guidelines 7 Radio Overview 8 Parts of the radio 8 ON/OFF/Volume Knob 9 Microphone 9 Antenna 9 Accessory Connector 9 Model Label 9 LED Indicator 9 Side Buttons 10 The Lithium-Ion (Li-Ion) Battery . . . . . 10 Batteries and Chargers 12 Battery Features and Charging Options . .12 About the Li-Ion Battery 12 Battery Recycling and Disposal . . . . . .13 Installing the...
User Manual
Page 4
... Indicators . 23 Estimated Charging Time 24 Charging a Radio and Battery Using a MultiUnit Charger-MUC (Optional Accessory 24 Getting Started 26 Turning radio ON/OFF 26 Adjusting volume 26 Reading the Display 26 Selecting a Channel 27 Talking and Monitoring 27 Receiving a Call 27 Signal Strength Indicator and Channel Busy Indicators 28 Talk Range 28 Hands-Free Use...
... Indicators . 23 Estimated Charging Time 24 Charging a Radio and Battery Using a MultiUnit Charger-MUC (Optional Accessory 24 Getting Started 26 Turning radio ON/OFF 26 Adjusting volume 26 Reading the Display 26 Selecting a Channel 27 Talking and Monitoring 27 Receiving a Call 27 Signal Strength Indicator and Channel Busy Indicators 28 Talk Range 28 Hands-Free Use...

User Manual
Page 5
CONTENTS Programming Buttons 45 Editing Channel Alias Name 46 Nuisance Channel Delete 47 CPS (Computer Programming Software). 48 Bandwidth Select 48 Time-Out Timer 48 Battery Type Setting 49 Call Tones 49 Scramble 49 Cloning Radios 50 What to do if cloning fails 52 Troubleshooting 54 Use and Care 57 Frequency and Code Charts 58 Motorola Limited Warranty 62 Warranty information 62 What Is Not Covered By The Warranty . . 62 Accessories 64 Audio Accessories 64 Battery 64 Carry Accessories 64 Software Applications 64 Cables 64 Chargers 65 3 English
CONTENTS Programming Buttons 45 Editing Channel Alias Name 46 Nuisance Channel Delete 47 CPS (Computer Programming Software). 48 Bandwidth Select 48 Time-Out Timer 48 Battery Type Setting 49 Call Tones 49 Scramble 49 Cloning Radios 50 What to do if cloning fails 52 Troubleshooting 54 Use and Care 57 Frequency and Code Charts 58 Motorola Limited Warranty 62 Warranty information 62 What Is Not Covered By The Warranty . . 62 Accessories 64 Audio Accessories 64 Battery 64 Carry Accessories 64 Software Applications 64 Cables 64 Chargers 65 3 English
User Manual
Page 7
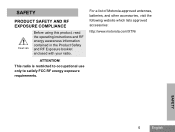
SAFETY 5 English SAFETY PRODUCT SAFETY AND RF EXPOSURE COMPLIANCE ! For a list of Motorola-approved antennas, batteries, and other accessories, visit the following website which lists approved accessories: http://www.motorola.com/XTNi ATTENTION! C a u t i o n Before using this product, read the operating instructions and RF energy awareness information contained in the Product Safety and RF Exposure booklet enclosed with your radio. This radio is restricted to occupational use only to satisfy FCC RF energy exposure requirements.
SAFETY 5 English SAFETY PRODUCT SAFETY AND RF EXPOSURE COMPLIANCE ! For a list of Motorola-approved antennas, batteries, and other accessories, visit the following website which lists approved accessories: http://www.motorola.com/XTNi ATTENTION! C a u t i o n Before using this product, read the operating instructions and RF energy awareness information contained in the Product Safety and RF Exposure booklet enclosed with your radio. This radio is restricted to occupational use only to satisfy FCC RF energy exposure requirements.

User Manual
Page 8
...way. To reduce risk of electrical shock or fire. 7. it to 9.8 feet (3.0 m). 5. An extension cord should not be used unless absolutely necessary. Take it is 18AWG for lengths up to a qualified Motorola service representative. 6. BATTERIES AND CHARGERS SAFETY INFORMATION BATTERIES... m), and 16AWG for future reference. Before using the battery charger, read all the instructions and cautionary markings on • the charger, • the battery, and • the radio using the battery. 1. Disassembly of injury, charge only the rechargeable Motorola-authorised batteries.
...way. To reduce risk of electrical shock or fire. 7. it to 9.8 feet (3.0 m). 5. An extension cord should not be used unless absolutely necessary. Take it is 18AWG for lengths up to a qualified Motorola service representative. 6. BATTERIES AND CHARGERS SAFETY INFORMATION BATTERIES... m), and 16AWG for future reference. Before using the battery charger, read all the instructions and cautionary markings on • the charger, • the battery, and • the radio using the battery. 1. Disassembly of injury, charge only the rechargeable Motorola-authorised batteries.
User Manual
Page 9
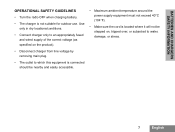
... SAFETY INFORMATION OPERATIONAL SAFETY GUIDELINES • Turn the radio OFF when charging battery. • The charger is located where it will not be stepped on the product). • Disconnect charger from line voltage by removing main plug. • ...
... SAFETY INFORMATION OPERATIONAL SAFETY GUIDELINES • Turn the radio OFF when charging battery. • The charger is located where it will not be stepped on the product). • Disconnect charger from line voltage by removing main plug. • ...

User Manual
Page 10
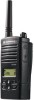
RADIO OVERVIEW RADIO OVERVIEW PARTS OF THE RADIO Antenna Microphone LED Indicator Use 'Menu' button to lock keypad Front Buttons English 8 LED Indicator ON/ OFF/ Volume Accessory Connector Model Label Use / to scroll up/down through channels and menu setting Lithium-Ion Battery PTT (Push-toTalk) Button SB1 - Monitor Button SB2 - Scan/ Nuisance Channel Delete
RADIO OVERVIEW RADIO OVERVIEW PARTS OF THE RADIO Antenna Microphone LED Indicator Use 'Menu' button to lock keypad Front Buttons English 8 LED Indicator ON/ OFF/ Volume Accessory Connector Model Label Use / to scroll up/down through channels and menu setting Lithium-Ion Battery PTT (Push-toTalk) Button SB1 - Monitor Button SB2 - Scan/ Nuisance Channel Delete

User Manual
Page 11
...; M E N U Button This button gives you to scroll up/down buttons Allows you access to give battery status, power-up status, radio call information and scan status. • / Toggle up / down the menu options or set up programming values. It also allows ...Programming Mode LED Indicator Used to set up features like VOX/iVOX levels, battery type, etc. Antenna The radio's antenna is non-removable. These buttons are not programmable buttons. Accessory Connector Used to adjust the radio's volume. RADIO OVERVIEW 9 English ON/OFF/Volume Knob Front Buttons Used to turn the...
...; M E N U Button This button gives you to scroll up/down buttons Allows you access to give battery status, power-up status, radio call information and scan status. • / Toggle up / down the menu options or set up programming values. It also allows ...Programming Mode LED Indicator Used to set up features like VOX/iVOX levels, battery type, etc. Antenna The radio's antenna is non-removable. These buttons are not programmable buttons. Accessory Connector Used to adjust the radio's volume. RADIO OVERVIEW 9 English ON/OFF/Volume Knob Front Buttons Used to turn the...

User Manual
Page 12
...-Ion) Battery XTNi™ Series provides different types of batteries. For example: Backlight Time Out, Reverse Burst, Power Select, Scan/ Nuisance Channel Delete, Monitor and Call Tones. The default setting of the SB1 button is "Monitor". • Side Button 2 (SB2) The Side Button 2 is a general button that can be configured by the CPS. RADIO OVERVIEW...
...-Ion) Battery XTNi™ Series provides different types of batteries. For example: Backlight Time Out, Reverse Burst, Power Select, Scan/ Nuisance Channel Delete, Monitor and Call Tones. The default setting of the SB1 button is "Monitor". • Side Button 2 (SB2) The Side Button 2 is a general button that can be configured by the CPS. RADIO OVERVIEW...
User Manual
Page 14
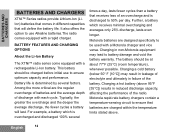
... the radio. Battery life is discharged to battery damage and void the battery warranty. Further, a battery which is overcharged and discharged 100% several times a day, lasts fewer cycles than a battery that receives less of an overcharge and is determined by several factors. BATTERY FEATURES AND CHARGING OPTIONS About the Li-Ion Battery The XTNi™ radio series come equipped with a Motorola...
... the radio. Battery life is discharged to battery damage and void the battery warranty. Further, a battery which is overcharged and discharged 100% several times a day, lasts fewer cycles than a battery that receives less of an overcharge and is determined by several factors. BATTERY FEATURES AND CHARGING OPTIONS About the Li-Ion Battery The XTNi™ radio series come equipped with a Motorola...
User Manual
Page 15
... various U.S. This internet site and telephone number also provides other countries, batteries must be recycled and cannot be recycled. state laws and the laws of several other useful information concerning recycling options for consumers, businesses and governmental agencies. 13 English However, recycling facilities may not be available in this program. Motorola fully endorses and...
... various U.S. This internet site and telephone number also provides other countries, batteries must be recycled and cannot be recycled. state laws and the laws of several other useful information concerning recycling options for consumers, businesses and governmental agencies. 13 English However, recycling facilities may not be available in this program. Motorola fully endorses and...
User Manual
Page 16
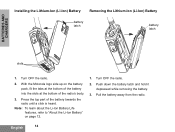
... bottom of the battery towards the radio until a click is heard. BATTERIES AND CHARGERS Installing the Lithium-Ion (Li-Ion) Battery Removing the Lithium-Ion (Li-Ion) Battery battery latch battery latch slots 1. Press the top part of the radio's body. 3. Turn OFF the radio. 2. Turn OFF the radio. 2. Pull the battery away from the radio. English 14 With the Motorola logo side...
... bottom of the battery towards the radio until a click is heard. BATTERIES AND CHARGERS Installing the Lithium-Ion (Li-Ion) Battery Removing the Lithium-Ion (Li-Ion) Battery battery latch battery latch slots 1. Press the top part of the radio's body. 3. Turn OFF the radio. 2. Turn OFF the radio. 2. Pull the battery away from the radio. English 14 With the Motorola logo side...
User Manual
Page 17
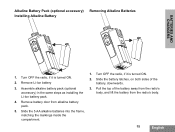
... markings inside the compartment. 1. Pull the top of the battery, downwards. 3. Remove Li-Ion battery 3. Turn OFF the radio, if it is turned ON. 2. Slide the battery latches, on both sides of the battery away from the radio's body, and lift the battery from alkaline battery pack. 5. Assemble alkaline battery pack (optional accessory) in the same steps as installing...
... markings inside the compartment. 1. Pull the top of the battery, downwards. 3. Remove Li-Ion battery 3. Turn OFF the radio, if it is turned ON. 2. Slide the battery latches, on both sides of the battery away from the radio's body, and lift the battery from alkaline battery pack. 5. Assemble alkaline battery pack (optional accessory) in the same steps as installing...
User Manual
Page 18
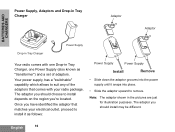
... the adaptor that comes with your electrical outlet, proceed to install it as "transformer") and a set of the adaptors that matches your radio package. Once you should choose to install depends on the region you're located. Your power supply, has a "switchable" capability which ...allows to suit any of adaptors. The adaptor you should install may be different. BATTERIES AND CHARGERS Power Supply, Adaptors and Drop-in Tray Charger Adaptor Adaptor Drop-in Tray Charger Power Supply Your radio comes with one Drop-in the pictures are just for illustration purposes. English 16...
... the adaptor that comes with your electrical outlet, proceed to install it as "transformer") and a set of the adaptors that matches your radio package. Once you should choose to install depends on the region you're located. Your power supply, has a "switchable" capability which ...allows to suit any of adaptors. The adaptor you should install may be different. BATTERIES AND CHARGERS Power Supply, Adaptors and Drop-in Tray Charger Adaptor Adaptor Drop-in Tray Charger Power Supply Your radio comes with one Drop-in the pictures are just for illustration purposes. English 16...
User Manual
Page 19
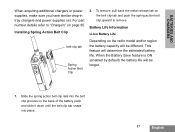
...metal release tab on page 65. When the Battery Save feature is ON (enabled by default) the battery life will determine the estimated battery life. Slide the spring action belt clip rails into place. 17 English Battery Life Information Li-Ion Battery Life belt clip tab Spring Action Belt Clip... Depending on the back of the battery pack and slide it down until the belt clip tab snaps into the belt clip grooves on the radio model and/or region the battery capacity will be longer. 1. BATTERIES AND CHARGERS When acquiring additional chargers or power supplies,...
...metal release tab on page 65. When the Battery Save feature is ON (enabled by default) the battery life will determine the estimated battery life. Slide the spring action belt clip rails into place. 17 English Battery Life Information Li-Ion Battery Life belt clip tab Spring Action Belt Clip... Depending on the back of the battery pack and slide it down until the belt clip tab snaps into the belt clip grooves on the radio model and/or region the battery capacity will be longer. 1. BATTERIES AND CHARGERS When acquiring additional chargers or power supplies,...
User Manual
Page 20
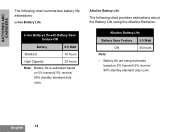
... Battery Life Li-Ion Battery Life with Battery Save feature ON Battery 0.5 Watt Standard 16 hours High Capacity 32 hours Note: Battery life is estimated based on 5% transmit/ 5% receive/ 90% standby standard duty cycle. BATTERIES AND CHARGERS The following chart provides estimations about the Battery Life using the Alkaline Batteries: Alkaline Battery Life Battery Save Feature 0.5 Watt ON 35 hours Note: • Battery...
... Battery Life Li-Ion Battery Life with Battery Save feature ON Battery 0.5 Watt Standard 16 hours High Capacity 32 hours Note: Battery life is estimated based on 5% transmit/ 5% receive/ 90% standby standard duty cycle. BATTERIES AND CHARGERS The following chart provides estimations about the Battery Life using the Alkaline Batteries: Alkaline Battery Life Battery Save Feature 0.5 Watt ON 35 hours Note: • Battery...
User Manual
Page 21
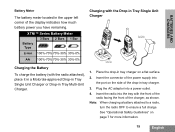
... of the charger, as shown. Insert the radio into the tray with the radio attached), place it in a Motorola-approved Drop-in Tray Single Unit Charger or Drop-in Tray Multi-Unit Charger. BATTERIES AND CHARGERS Battery Meter The battery meter located in tray charger. 3. Insert the...Guidelines" on a flat surface. 2. Place the drop-in Tray Charger Port 1. Note: When charging a battery attached to a radio, turn the radio OFF to ensure a full charge. XTNi™ Series Battery Meter 3 Bars 2 Bars 1 Bar Battery Type Li-Ion 100%-70% 70%-30% 30%-0% AA 100%-70% 70%-30% 30%-0% Charging the...
... of the charger, as shown. Insert the radio into the tray with the radio attached), place it in a Motorola-approved Drop-in Tray Single Unit Charger or Drop-in Tray Multi-Unit Charger. BATTERIES AND CHARGERS Battery Meter The battery meter located in tray charger. 3. Insert the...Guidelines" on a flat surface. 2. Place the drop-in Tray Charger Port 1. Note: When charging a battery attached to a radio, turn the radio OFF to ensure a full charge. XTNi™ Series Battery Meter 3 Bars 2 Bars 1 Bar Battery Type Li-Ion 100%-70% 70%-30% 30%-0% AA 100%-70% 70%-30% 30%-0% Charging the...
User Manual
Page 22
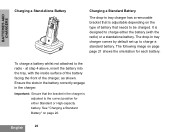
... to charge either Standard or High-capacity battery. at step 4 above, insert the battery into the tray, with the radio) or a standalone battery. English 20 The following image on page page 21 shows the orientation for either the battery (with the inside surface of the battery facing the front of battery that needs to be charged. See...
... to charge either Standard or High-capacity battery. at step 4 above, insert the battery into the tray, with the radio) or a standalone battery. English 20 The following image on page page 21 shows the orientation for either the battery (with the inside surface of the battery facing the front of battery that needs to be charged. See...
User Manual
Page 23
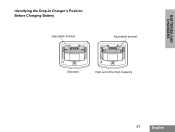
BATTERIES AND CHARGERS Identifying the Drop-In Charger's Position Before Charging Battery Adjustable bracket Adjustable bracket Standard High and Ultra High Capacity 21 English
BATTERIES AND CHARGERS Identifying the Drop-In Charger's Position Before Charging Battery Adjustable bracket Adjustable bracket Standard High and Ultra High Capacity 21 English
User Manual
Page 24
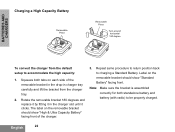
...by fitting it in charger tray carefully and lift the bracket from the default setup to accommodate the high capacity: 1. English 22 BATTERIES AND CHARGERS Charging a High Capacity Battery Removable Piece Removable Piece Turn around horizontal 180 degree To convert the charger from the charger tray. 2. Label on each side ...position back to be properly charged. Note: Make sure the bracket is assembled correctly for both tabs on the removable bracket should show "Standard Battery" facing front. Squeeze both standalone battery and battery (with radio) to charging a Standard...
...by fitting it in charger tray carefully and lift the bracket from the default setup to accommodate the high capacity: 1. English 22 BATTERIES AND CHARGERS Charging a High Capacity Battery Removable Piece Removable Piece Turn around horizontal 180 degree To convert the charger from the charger tray. 2. Label on each side ...position back to be properly charged. Note: Make sure the bracket is assembled correctly for both tabs on the removable bracket should show "Standard Battery" facing front. Squeeze both standalone battery and battery (with radio) to charging a Standard...


