
User Manual
Page 5
CONTENTS Programming Buttons 45 Editing Channel Alias Name 46 Nuisance Channel Delete 47 CPS (Computer Programming Software). 48 Bandwidth Select 48 Time-Out Timer 48 Battery Type Setting 49 Call Tones 49 Scramble 49 Cloning Radios 50 What to do if cloning fails 52 Troubleshooting 54 Use and Care 57 Frequency and Code Charts 58 Motorola Limited Warranty 62 Warranty information 62 What Is Not Covered By The Warranty . . 62 Accessories 64 Audio Accessories 64 Battery 64 Carry Accessories 64 Software Applications 64 Cables 64 Chargers 65 3 English
CONTENTS Programming Buttons 45 Editing Channel Alias Name 46 Nuisance Channel Delete 47 CPS (Computer Programming Software). 48 Bandwidth Select 48 Time-Out Timer 48 Battery Type Setting 49 Call Tones 49 Scramble 49 Cloning Radios 50 What to do if cloning fails 52 Troubleshooting 54 Use and Care 57 Frequency and Code Charts 58 Motorola Limited Warranty 62 Warranty information 62 What Is Not Covered By The Warranty . . 62 Accessories 64 Audio Accessories 64 Battery 64 Carry Accessories 64 Software Applications 64 Cables 64 Chargers 65 3 English

User Manual
Page 12
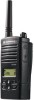
...PTT) Button Press and hold down this button to talk, release it to listen. • C Programmable Button Default set to the preset channel and the radio will play a good chirp. The default setting of batteries. To learn more information, see "Battery Features and Charging Options" on page ...to these buttons refer to program these buttons via the CPS. The Lithium-Ion (Li-Ion) Battery XTNi™ Series provides different types of the SB1 button is "Monitor". • Side Button 2 (SB2) The Side Button 2 is 'Scan/Nuisance Channel Delete'. • A Programmable Button Default set to ...
...PTT) Button Press and hold down this button to talk, release it to listen. • C Programmable Button Default set to the preset channel and the radio will play a good chirp. The default setting of batteries. To learn more information, see "Battery Features and Charging Options" on page ...to these buttons refer to program these buttons via the CPS. The Lithium-Ion (Li-Ion) Battery XTNi™ Series provides different types of the SB1 button is "Monitor". • Side Button 2 (SB2) The Side Button 2 is 'Scan/Nuisance Channel Delete'. • A Programmable Button Default set to ...

User Manual
Page 33
Note: To order accessories, contact your Motorola dealer. 31 English Turn radio OFF. 2. Open accessory cover. 3. Turn radio ON. To transmit, speak into accessory jack. 4. With Compatible VOX Accessories The default factory setting ...Radio will beep and LED will show the VOX icon. 5. Lower radio volume BEFORE placing accessory near ear. 6. In order to receive, stop talking. 7. A short delay occurs between when you start talking and the radio transmits. GETTING STARTED HANDS-FREE USE/VOX Motorola XTNi™ Series radios can disable VOX operation by using the CPS...
Note: To order accessories, contact your Motorola dealer. 31 English Turn radio OFF. 2. Open accessory cover. 3. Turn radio ON. To transmit, speak into accessory jack. 4. With Compatible VOX Accessories The default factory setting ...Radio will beep and LED will show the VOX icon. 5. Lower radio volume BEFORE placing accessory near ear. 6. In order to receive, stop talking. 7. A short delay occurs between when you start talking and the radio transmits. GETTING STARTED HANDS-FREE USE/VOX Motorola XTNi™ Series radios can disable VOX operation by using the CPS...
User Manual
Page 35
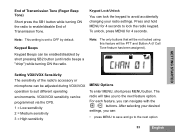
...and hold MENU for 4 seconds. Note: The only buttons that will be not locked using this feature will take you can be programmed via the CPS. 1 = Low sensitivity 2 = Medium sensitivity 3 = High sensitivity MENU Options To enter MENU, short press MENU button. Keypad Lock/Unlock You can ...to avoid accidentally changing your desired settings, you can: • press MENU to save and go to suit different operating environments. The radio will be enabled/disabled by default. Keypad Beeps Keypad Beeps can be adjusted during VOX/iVOX operation to the next option 33 English ...
...and hold MENU for 4 seconds. Note: The only buttons that will be not locked using this feature will take you can be programmed via the CPS. 1 = Low sensitivity 2 = Medium sensitivity 3 = High sensitivity MENU Options To enter MENU, short press MENU button. Keypad Lock/Unlock You can ...to avoid accidentally changing your desired settings, you can: • press MENU to save and go to suit different operating environments. The radio will be enabled/disabled by default. Keypad Beeps Keypad Beeps can be adjusted during VOX/iVOX operation to the next option 33 English ...
User Manual
Page 36
Once VOX/iVOX has been enabled, short press MENU. To modify via the MENU as well as the CPS. If you have iVOX enabled and press MENU, your radio will display the following : IVOX To change the sensitivity level, use the / buttons: 0 = OFF (For VOX accessories only) 1 = Low sensitivity (...there is no activity for quiet environments) Once you have selected the value you have VOX enabled (with accessory connected) and press MENU, your radio will time out. Setting VOX / iVOX sensitivity The VOX/iVOX sensitivity can be adjusted via the MENU, first make sure you want, press ...
Once VOX/iVOX has been enabled, short press MENU. To modify via the MENU as well as the CPS. If you have iVOX enabled and press MENU, your radio will display the following : IVOX To change the sensitivity level, use the / buttons: 0 = OFF (For VOX accessories only) 1 = Low sensitivity (...there is no activity for quiet environments) Once you have selected the value you have VOX enabled (with accessory connected) and press MENU, your radio will time out. Setting VOX / iVOX sensitivity The VOX/iVOX sensitivity can be adjusted via the MENU, first make sure you want, press ...

User Manual
Page 37
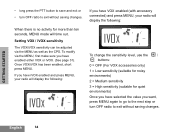
... you want, press MENU again to save and go to choose wither "LITHIUM" and "ALKALINE". Battery Type can also be shown as needed until the radio flashes the current battery type (either Lithium-Ion or Alkaline. A full battery icon will allow changes to exit without saving changes. Battery Type Menu Only... if the battery pack is not detected, the radio will be programmed using the CPS. To change the setting, press the MENU button as many times as follows: OFF...
... you want, press MENU again to save and go to choose wither "LITHIUM" and "ALKALINE". Battery Type can also be shown as needed until the radio flashes the current battery type (either Lithium-Ion or Alkaline. A full battery icon will allow changes to exit without saving changes. Battery Type Menu Only... if the battery pack is not detected, the radio will be programmed using the CPS. To change the setting, press the MENU button as many times as follows: OFF...
User Manual
Page 38
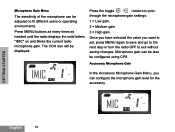
...gain settings: 1 = Low gain, 2 = Medium gain 3 = High gain. Press MENU buttons as many times as needed until the radio displays the solid letters "IMIC" on and blinks the current radio microphone gain. MIC English 36 Accessory Microphone Gain IMIC In the Accessory Microphone Gain Menu, you want to set, press... MENU again to save and go to the next step or turn the radio OFF to fit different users or operating environments. The VOX icon will be configured using CPS. Once you have selected the value you can configure the microphone gain level for the accessory. ...
...gain settings: 1 = Low gain, 2 = Medium gain 3 = High gain. Press MENU buttons as many times as needed until the radio displays the solid letters "IMIC" on and blinks the current radio microphone gain. MIC English 36 Accessory Microphone Gain IMIC In the Accessory Microphone Gain Menu, you want to set, press... MENU again to save and go to the next step or turn the radio OFF to fit different users or operating environments. The VOX icon will be configured using CPS. Once you have selected the value you can configure the microphone gain level for the accessory. ...
User Manual
Page 39
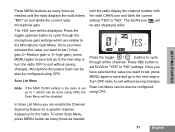
... to the Microphone Gain Menu. Scan List Menu can be done using CPS) the Scan Menu will be configured using CPS. To enter Scan Menu, press MENU button as many times as needed until the radio display the channel number with the solid CHAN icon and blink the current setting "YES" or ... be also be also displayed solid: YES Press the toggle / buttons to exit without saving changes. Microphone Accessory Gain can enable the Channel Scanning feature for a specific channel frequency for the radio. Once you have selected the value you want to set SCAN to cycle through all the...
... to the Microphone Gain Menu. Scan List Menu can be done using CPS) the Scan Menu will be configured using CPS. To enter Scan Menu, press MENU button as many times as needed until the radio display the channel number with the solid CHAN icon and blink the current setting "YES" or ... be also be also displayed solid: YES Press the toggle / buttons to exit without saving changes. Microphone Accessory Gain can enable the Channel Scanning feature for a specific channel frequency for the radio. Once you have selected the value you want to set SCAN to cycle through all the...
User Manual
Page 43
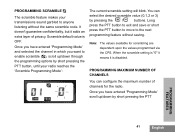
...the programming options by pressing the / buttons. Note: The values available for the radio. You can configure the maximum number of privacy. Once you have entered 'Programming Mode' and selected the channel in which you have entered 'Programming Mode' scroll up /down by short pressing ... is disabled. When the scramble setting is "0" it means it adds an extra layer of channels for scrambling are dependent upon the values programmed via the CPS. PROGRAMMING MAXIMUM NUMBER OF CHANNELS You can select the desired scramble value (0,1,2 or 3) by short pressing the PTT button, ...
...the programming options by pressing the / buttons. Note: The values available for the radio. You can configure the maximum number of privacy. Once you have entered 'Programming Mode' and selected the channel in which you have entered 'Programming Mode' scroll up /down by short pressing ... is disabled. When the scramble setting is "0" it means it adds an extra layer of channels for scrambling are dependent upon the values programmed via the CPS. PROGRAMMING MAXIMUM NUMBER OF CHANNELS You can select the desired scramble value (0,1,2 or 3) by short pressing the PTT button, ...

User Manual
Page 45
... IMIC Note: The values available for call tones are dependent upon the values programmed via the CPS. Once you have selected the gain level you select a different setting your radio will sound the call tone setting is "0" it means it is disabled. Note: The values... available for setting "0"). When the call tone selected (except for microphone gain level are dependent upon maximum levels the radio supports. PROGRAMMING MICROPHONE GAIN LEVEL To configure the microphone gain level, enter 'Programming Mode' and scroll through the programming options by ...
... IMIC Note: The values available for call tones are dependent upon the values programmed via the CPS. Once you have selected the gain level you select a different setting your radio will sound the call tone setting is "0" it means it is disabled. Note: The values... available for setting "0"). When the call tone selected (except for microphone gain level are dependent upon maximum levels the radio supports. PROGRAMMING MICROPHONE GAIN LEVEL To configure the microphone gain level, enter 'Programming Mode' and scroll through the programming options by ...

User Manual
Page 50
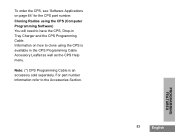
... Burst etc. To do so, connect the radio via the Drop-in Charger Tray and CPS Programming Cable as shown in Charger Tray Mini-connector USB Connector CPS Programming Cable XTNi™ Series radios have selectable channel spacing, which must match other features such as other radios for profile radio's management. Bandwidth Select Default setting for Bandwidth select...
... Burst etc. To do so, connect the radio via the Drop-in Charger Tray and CPS Programming Cable as shown in Charger Tray Mini-connector USB Connector CPS Programming Cable XTNi™ Series radios have selectable channel spacing, which must match other features such as other radios for profile radio's management. Bandwidth Select Default setting for Bandwidth select...

User Manual
Page 51
... and the corresponding battery level will vary depending on the Radio Model. Battery Type Setting The XTNi™ series radio can also be disabled. The "time-out" timer can be shown on the radio's display. There are just some of the features available with the CPS software will be powered by either 60, 120 or...
... and the corresponding battery level will vary depending on the Radio Model. Battery Type Setting The XTNi™ series radio can also be disabled. The "time-out" timer can be shown on the radio's display. There are just some of the features available with the CPS software will be powered by either 60, 120 or...

User Manual
Page 52
...on how to clone units are explained in the instructions sheet provided with a Multi-Unit Charger (MUC) To clone radios using : 1. PROGRAMMING FEATURES English 50 the CPS Cloning with the MUC. When cloning, the MUC does not need to be in Pockets 2, 4 or 6, matching...1 and 2 or 3 and 4 or 5 and 6. One Multi Unit Charger (optional accessory) 2. Two single unit chargers and a Radio-to "pocket". Radio cloning cable (optional accessory) 3. CLONING RADIOS You can copy XTNi™ Series radio profiles from step 4 through step 8 (take into account that when instructions refer to "SUC", this ...
...on how to clone units are explained in the instructions sheet provided with a Multi-Unit Charger (MUC) To clone radios using : 1. PROGRAMMING FEATURES English 50 the CPS Cloning with the MUC. When cloning, the MUC does not need to be in Pockets 2, 4 or 6, matching...1 and 2 or 3 and 4 or 5 and 6. One Multi Unit Charger (optional accessory) 2. Two single unit chargers and a Radio-to "pocket". Radio cloning cable (optional accessory) 3. CLONING RADIOS You can copy XTNi™ Series radio profiles from step 4 through step 8 (take into account that when instructions refer to "SUC", this ...
User Manual
Page 55
To order the CPS, see 'Software Applications on how to clone using the CPS (Computer Programming Software) You will need to the Accessories Section. 53 English PROGRAMMING FEATURES Information on page 64' for the CPS part number. Cloning Radios using the CPS is an accessory sold separately. For part number information refer to have the CPS, Drop-in the CPS Programming Cable Accessory Leaflet as well as the CPS Help menu. Note: (*) CPS Programming Cable is available in Tray Charger and the CPS Programming Cable.
To order the CPS, see 'Software Applications on how to clone using the CPS (Computer Programming Software) You will need to the Accessories Section. 53 English PROGRAMMING FEATURES Information on page 64' for the CPS part number. Cloning Radios using the CPS is an accessory sold separately. For part number information refer to have the CPS, Drop-in the CPS Programming Cable Accessory Leaflet as well as the CPS Help menu. Note: (*) CPS Programming Cable is available in Tray Charger and the CPS Programming Cable.

User Manual
Page 58
Note: XTNi™ series radios can set up features or restrict values in your radio have been set to "Charging although it has been placed in with a customized profile. Whenever a feature in your radio seems not to correspond to see if battery has a problem. Check the charger LEDs indicators... (refer to 0. This special software can be set ON. TROUBLESHOOTING Symptom Cannot activate VOX Try this VOX feature might be programmed using CPS with the Drop-in Tray Single Unit Charger" on page 19 and the drop-in charger for a while "Charging a Stand-Alone Battery...
Note: XTNi™ series radios can set up features or restrict values in your radio have been set to "Charging although it has been placed in with a customized profile. Whenever a feature in your radio seems not to correspond to see if battery has a problem. Check the charger LEDs indicators... (refer to 0. This special software can be set ON. TROUBLESHOOTING Symptom Cannot activate VOX Try this VOX feature might be programmed using CPS with the Drop-in Tray Single Unit Charger" on page 19 and the drop-in charger for a while "Charging a Stand-Alone Battery...

User Manual
Page 66
ACCESSORIES ACCESSORIES AUDIO ACCESSORIES Part No. Description IXEN4007 Computer Programming Software AR (CPS) and Programming Cable CABLES Part No. Description RLN6306 Alkaline Battery Frame RLN6351 RLN6305 Standard Li-Ion Battery High Capacity Li-Ion Battery CARRY ACCESSORIES Part .... Description 00115 00168 Remote Speaker Mic BR Lightweight headset 00117 Headset w/Swivel Boom Mic 00118 Earbud w/Clip PTT Mic BR BATTERY Part No. Description RLN6303 Radio To Radio Cloning Cable English 64
ACCESSORIES ACCESSORIES AUDIO ACCESSORIES Part No. Description IXEN4007 Computer Programming Software AR (CPS) and Programming Cable CABLES Part No. Description RLN6306 Alkaline Battery Frame RLN6351 RLN6305 Standard Li-Ion Battery High Capacity Li-Ion Battery CARRY ACCESSORIES Part .... Description 00115 00168 Remote Speaker Mic BR Lightweight headset 00117 Headset w/Swivel Boom Mic 00118 Earbud w/Clip PTT Mic BR BATTERY Part No. Description RLN6303 Radio To Radio Cloning Cable English 64