
User Manual
Page 3
... 5 Batteries and Chargers Safety Information 6 Operational Safety Guidelines 7 Radio Overview 8 Parts of the radio 8 ON/OFF/Volume Knob 9 Microphone 9 Antenna 9 Accessory Connector 9 Model Label 9 LED Indicator 9 Side Buttons 10 The Lithium-Ion (Li-Ion) Battery . . . . . 10 Batteries and Chargers 12 Battery Features and...Pack (optional accessory 15 Installing Alkaline Battery 15 Removing Alkaline Batteries 15 Power Supply, Adaptors and Drop-in Tray Charger 16 Installing Spring Action Belt Clip. . . . . .17 Battery Life Information 17 Charging the Battery 19 Charging with...
... 5 Batteries and Chargers Safety Information 6 Operational Safety Guidelines 7 Radio Overview 8 Parts of the radio 8 ON/OFF/Volume Knob 9 Microphone 9 Antenna 9 Accessory Connector 9 Model Label 9 LED Indicator 9 Side Buttons 10 The Lithium-Ion (Li-Ion) Battery . . . . . 10 Batteries and Chargers 12 Battery Features and...Pack (optional accessory 15 Installing Alkaline Battery 15 Removing Alkaline Batteries 15 Power Supply, Adaptors and Drop-in Tray Charger 16 Installing Spring Action Belt Clip. . . . . .17 Battery Life Information 17 Charging the Battery 19 Charging with...
User Manual
Page 4
... 24 Charging a Radio and Battery Using a MultiUnit Charger-MUC (Optional Accessory 24 Getting Started 26 Turning radio ON/OFF 26 Adjusting volume 26 Reading the Display 26 Selecting a Channel 27 Talking and Monitoring 27 Receiving a Call 27 Signal Strength Indicator and Channel Busy Indicators 28 Talk...) Codes (CTCSS/ DPL 39 Programming RX (Reception) Bandwidth .40 Programming Scramble L 41 Programming Maximum Number of Channels 41 Programming Call Tones 42 Programming Microphone Gain Level . . . .43 Programming Microphone Accessory Gain Level 44 Programming Scan List 44 English...
... 24 Charging a Radio and Battery Using a MultiUnit Charger-MUC (Optional Accessory 24 Getting Started 26 Turning radio ON/OFF 26 Adjusting volume 26 Reading the Display 26 Selecting a Channel 27 Talking and Monitoring 27 Receiving a Call 27 Signal Strength Indicator and Channel Busy Indicators 28 Talk...) Codes (CTCSS/ DPL 39 Programming RX (Reception) Bandwidth .40 Programming Scramble L 41 Programming Maximum Number of Channels 41 Programming Call Tones 42 Programming Microphone Gain Level . . . .43 Programming Microphone Accessory Gain Level 44 Programming Scan List 44 English...

User Manual
Page 5
CONTENTS Programming Buttons 45 Editing Channel Alias Name 46 Nuisance Channel Delete 47 CPS (Computer Programming Software). 48 Bandwidth Select 48 Time-Out Timer 48 Battery Type Setting 49 Call Tones 49 Scramble 49 Cloning Radios 50 What to do if cloning fails 52 Troubleshooting 54 Use and Care 57 Frequency and Code Charts 58 Motorola Limited Warranty 62 Warranty information 62 What Is Not Covered By The Warranty . . 62 Accessories 64 Audio Accessories 64 Battery 64 Carry Accessories 64 Software Applications 64 Cables 64 Chargers 65 3 English
CONTENTS Programming Buttons 45 Editing Channel Alias Name 46 Nuisance Channel Delete 47 CPS (Computer Programming Software). 48 Bandwidth Select 48 Time-Out Timer 48 Battery Type Setting 49 Call Tones 49 Scramble 49 Cloning Radios 50 What to do if cloning fails 52 Troubleshooting 54 Use and Care 57 Frequency and Code Charts 58 Motorola Limited Warranty 62 Warranty information 62 What Is Not Covered By The Warranty . . 62 Accessories 64 Audio Accessories 64 Battery 64 Carry Accessories 64 Software Applications 64 Cables 64 Chargers 65 3 English

User Manual
Page 8
... to the electric plug and cord, pull by Motorola may result in risk of the charger may explode, causing personal injury and damage. 2. BATTERIES AND CHARGERS SAFETY INFORMATION BATTERIES AND CHARGERS SAFETY INFORMATION This document contains important safety and operating...charger, read all the instructions and cautionary markings on • the charger, • the battery, and • the radio using the battery. 1. To reduce risk of electric shock, unplug the charger from the AC outlet before attempting any way. To reduce risk of injury, charge only the rechargeable Motorola...
... to the electric plug and cord, pull by Motorola may result in risk of the charger may explode, causing personal injury and damage. 2. BATTERIES AND CHARGERS SAFETY INFORMATION BATTERIES AND CHARGERS SAFETY INFORMATION This document contains important safety and operating...charger, read all the instructions and cautionary markings on • the charger, • the battery, and • the radio using the battery. 1. To reduce risk of electric shock, unplug the charger from the AC outlet before attempting any way. To reduce risk of injury, charge only the rechargeable Motorola...
User Manual
Page 9
... to an appropriately fused and wired supply of the correct voltage (as specified on the product). • Disconnect charger from line voltage by removing main plug. • The outlet to which this equipment is connected should be stepped on, tripped over,... or subjected to water, damage, or stress. 7 English BATTERIES AND CHARGERS SAFETY INFORMATION OPERATIONAL SAFETY GUIDELINES • Turn the radio OFF when charging battery. • The charger is located where it will not be nearby and easily accessible. • Maximum ambient temperature around the ...
... to an appropriately fused and wired supply of the correct voltage (as specified on the product). • Disconnect charger from line voltage by removing main plug. • The outlet to which this equipment is connected should be stepped on, tripped over,... or subjected to water, damage, or stress. 7 English BATTERIES AND CHARGERS SAFETY INFORMATION OPERATIONAL SAFETY GUIDELINES • Turn the radio OFF when charging battery. • The charger is located where it will not be nearby and easily accessible. • Maximum ambient temperature around the ...
User Manual
Page 14
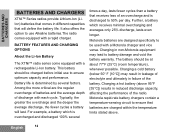
... a battery that receives less of an overcharge and is overcharged and discharged 100% several factors. English 12 BATTERIES AND CHARGERS BATTERIES AND CHARGERS XTNi™ Series radios provide Lithium-Ion (LiIon) batteries that comes in non-Motorola equipment may result in leakage of electrolyte and ultimately in reduced discharge capacity, affecting the performance of the...
... a battery that receives less of an overcharge and is overcharged and discharged 100% several factors. English 12 BATTERIES AND CHARGERS BATTERIES AND CHARGERS XTNi™ Series radios provide Lithium-Ion (LiIon) batteries that comes in non-Motorola equipment may result in leakage of electrolyte and ultimately in reduced discharge capacity, affecting the performance of the...
User Manual
Page 15
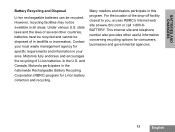
...management agency for Li-Ion battery collection and recycling. Motorola fully endorses and encourages the recycling of the drop-off facility closest to you, access RBRC's Internet web site at www.rbrc.com or call 1-800-8BATTERY. ...Under various U.S. state laws and the laws of in this program. For the location of Li-Ion batteries. However, recycling facilities may not be disposed of several other useful information concerning recycling options for consumers, businesses and governmental agencies. 13 English BATTERIES AND CHARGERS...
...management agency for Li-Ion battery collection and recycling. Motorola fully endorses and encourages the recycling of the drop-off facility closest to you, access RBRC's Internet web site at www.rbrc.com or call 1-800-8BATTERY. ...Under various U.S. state laws and the laws of in this program. For the location of Li-Ion batteries. However, recycling facilities may not be disposed of several other useful information concerning recycling options for consumers, businesses and governmental agencies. 13 English BATTERIES AND CHARGERS...
User Manual
Page 16
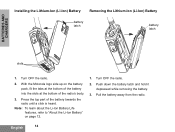
Push down the battery latch and hold it depressed while removing the battery. 3. With the Motorola logo side up on page 12. 1. Note: To learn about the Li-Ion Battery Life features, refer to "About the Li-Ion Battery" on the ...battery pack, fit the tabs at the bottom of the battery into the slots at the bottom of the battery towards the radio until a click is heard. BATTERIES AND CHARGERS Installing the Lithium-Ion (Li-Ion) Battery Removing the Lithium-Ion (Li-Ion) Battery battery latch battery latch slots 1. Turn OFF the...
Push down the battery latch and hold it depressed while removing the battery. 3. With the Motorola logo side up on page 12. 1. Note: To learn about the Li-Ion Battery Life features, refer to "About the Li-Ion Battery" on the ...battery pack, fit the tabs at the bottom of the battery into the slots at the bottom of the battery towards the radio until a click is heard. BATTERIES AND CHARGERS Installing the Lithium-Ion (Li-Ion) Battery Removing the Lithium-Ion (Li-Ion) Battery battery latch battery latch slots 1. Turn OFF the...
User Manual
Page 17
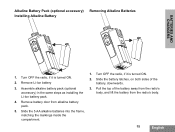
... it is turned ON. 2. Slide the battery latches, on both sides of the battery away from the radio's body, and lift the battery from alkaline battery pack. 5. Pull the top of the battery, downwards. 3. Slide the 5 AA alkaline batteries into the frame, matching ...the markings inside the compartment. 1. Remove battery door from the radio's body. 15 English Alkaline Battery Pack (optional accessory) Removing Alkaline Batteries Installing Alkaline Battery BATTERIES AND...
... it is turned ON. 2. Slide the battery latches, on both sides of the battery away from the radio's body, and lift the battery from alkaline battery pack. 5. Pull the top of the battery, downwards. 3. Slide the 5 AA alkaline batteries into the frame, matching ...the markings inside the compartment. 1. Remove battery door from the radio's body. 15 English Alkaline Battery Pack (optional accessory) Removing Alkaline Batteries Installing Alkaline Battery BATTERIES AND...
User Manual
Page 18
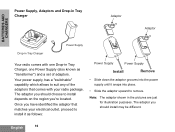
... supply until it as "transformer") and a set of the adaptors that matches your radio package. The adaptor you have identified the adaptor that comes with one Drop-in Tray Charger, one Power Supply (also known as follows: Power Supply Power Supply Install Remove •... adaptor grooves into place. • Slide the adaptor upward to remove. BATTERIES AND CHARGERS Power Supply, Adaptors and Drop-in Tray Charger Adaptor Adaptor Drop-in Tray Charger Power Supply Your radio comes with your electrical outlet, proceed to install depends on the region you should install...
... supply until it as "transformer") and a set of the adaptors that matches your radio package. The adaptor you have identified the adaptor that comes with one Drop-in Tray Charger, one Power Supply (also known as follows: Power Supply Power Supply Install Remove •... adaptor grooves into place. • Slide the adaptor upward to remove. BATTERIES AND CHARGERS Power Supply, Adaptors and Drop-in Tray Charger Adaptor Adaptor Drop-in Tray Charger Power Supply Your radio comes with your electrical outlet, proceed to install depends on the region you should install...
User Manual
Page 19
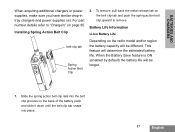
...default) the battery life will determine the estimated battery life. Slide the spring action belt clip rails into the belt clip grooves on the radio model and/or region the battery capacity will be longer. 1. To remove, pull back the metal release tab on the belt clip ...tab and push the spring action belt clip upward to "Chargers" on page 65. For part number details refer to remove. BATTERIES AND CHARGERS When acquiring additional chargers or power supplies, make sure you have similar drop-in tray chargers and power supplies set. Installing Spring Action Belt Clip 2.
...default) the battery life will determine the estimated battery life. Slide the spring action belt clip rails into the belt clip grooves on the radio model and/or region the battery capacity will be longer. 1. To remove, pull back the metal release tab on the belt clip ...tab and push the spring action belt clip upward to "Chargers" on page 65. For part number details refer to remove. BATTERIES AND CHARGERS When acquiring additional chargers or power supplies, make sure you have similar drop-in tray chargers and power supplies set. Installing Spring Action Belt Clip 2.
User Manual
Page 20
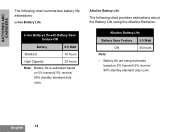
...with Battery Save feature ON Battery 0.5 Watt Standard 16 hours High Capacity 32 hours Note: Battery life is estimated based on 5% transmit/ 5% receive/ 90% standby standard duty cycle. English 18 BATTERIES AND CHARGERS The following chart provides estimations about the... Battery Life using the Alkaline Batteries: Alkaline Battery Life Battery Save Feature 0.5 Watt ON 35 hours Note: • Battery life are being estimated based on ...
...with Battery Save feature ON Battery 0.5 Watt Standard 16 hours High Capacity 32 hours Note: Battery life is estimated based on 5% transmit/ 5% receive/ 90% standby standard duty cycle. English 18 BATTERIES AND CHARGERS The following chart provides estimations about the... Battery Life using the Alkaline Batteries: Alkaline Battery Life Battery Save Feature 0.5 Watt ON 35 hours Note: • Battery life are being estimated based on ...
User Manual
Page 21
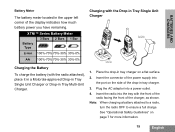
...the Drop-in Tray Single Unit Charger Power Supply (Transformer) Drop-in tray charger on a flat surface. 2. Plug the AC adaptor into the tray with the radio attached), place it in a Motorola-approved Drop-in Tray Single Unit Charger or Drop-in Tray Multi-Unit Charger. See "Operational Safety Guidelines" ...Insert the connector of the power supply into the port on page 7 for more information. 19 English Insert the radio into a power outlet. 4. Place the drop-in Tray Charger Port 1. XTNi™ Series Battery Meter 3 Bars 2 Bars 1 Bar Battery Type Li-Ion 100%-70% 70%-30% 30%-0% AA ...
...the Drop-in Tray Single Unit Charger Power Supply (Transformer) Drop-in tray charger on a flat surface. 2. Plug the AC adaptor into the tray with the radio attached), place it in a Motorola-approved Drop-in Tray Single Unit Charger or Drop-in Tray Multi-Unit Charger. See "Operational Safety Guidelines" ...Insert the connector of the power supply into the port on page 7 for more information. 19 English Insert the radio into a power outlet. 4. Place the drop-in Tray Charger Port 1. XTNi™ Series Battery Meter 3 Bars 2 Bars 1 Bar Battery Type Li-Ion 100%-70% 70%-30% 30%-0% AA ...
User Manual
Page 22
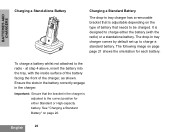
...page 20. English 20 at step 4 above, insert the battery into the tray, with the radio) or a standalone battery. Important: Ensure that needs to be charged. The drop-in the charger. It is adjusted to the correct position for each battery: To charge a battery whilst not ...attached to the radio - BATTERIES AND CHARGERS Charging a Stand-Alone Battery Charging a Standard Battery The drop-in tray charger has a removable bracket that is adjustable...
...page 20. English 20 at step 4 above, insert the battery into the tray, with the radio) or a standalone battery. Important: Ensure that needs to be charged. The drop-in the charger. It is adjusted to the correct position for each battery: To charge a battery whilst not ...attached to the radio - BATTERIES AND CHARGERS Charging a Stand-Alone Battery Charging a Standard Battery The drop-in tray charger has a removable bracket that is adjustable...
User Manual
Page 23
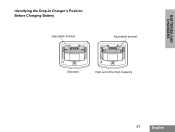
BATTERIES AND CHARGERS Identifying the Drop-In Charger's Position Before Charging Battery Adjustable bracket Adjustable bracket Standard High and Ultra High Capacity 21 English
BATTERIES AND CHARGERS Identifying the Drop-In Charger's Position Before Charging Battery Adjustable bracket Adjustable bracket Standard High and Ultra High Capacity 21 English
User Manual
Page 24
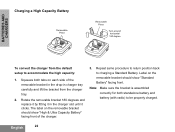
...return position back to be properly charged. Squeeze both standalone battery and battery (with radio) to charging a Standard Battery. Note: Make sure the bracket is assembled correctly for both tabs on each side of the charger. 3. The label on the removable bracket should show "Standard Battery" facing front...on the removable bracket should show "High & Ultra Capacity Battery" facing front of the removable bracket in the drop-in the charger slot until it in charger tray carefully and lift the bracket from the default setup to accommodate the high capacity: 1. BATTERIES AND...
...return position back to be properly charged. Squeeze both standalone battery and battery (with radio) to charging a Standard Battery. Note: Make sure the bracket is assembled correctly for both tabs on each side of the charger. 3. The label on the removable bracket should show "Standard Battery" facing front...on the removable bracket should show "High & Ultra Capacity Battery" facing front of the removable bracket in the drop-in the charger slot until it in charger tray carefully and lift the bracket from the default setup to accommodate the high capacity: 1. BATTERIES AND...
User Manual
Page 25
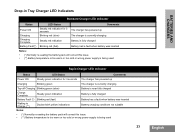
... Fault(*) LED Status Steady red indication for 3 seconds Blinking red (slow) Steady red indication Blinking red (fast) Comments The charger has powered up The charger is currently charging Battery is fully charged Battery had a fault when battery was inserted Notes: • (*) Normally re-seating ... or too cold or wrong power supply is being used Rapid Charger LED Indicator Status LED Status Comments Power ON Steady green indication for 3 seconds The charger has powered up Charging Blinking green The charger is currently charging Top-off Charging Blinking green (slow) Charge ...
... Fault(*) LED Status Steady red indication for 3 seconds Blinking red (slow) Steady red indication Blinking red (fast) Comments The charger has powered up The charger is currently charging Battery is fully charged Battery had a fault when battery was inserted Notes: • (*) Normally re-seating ... or too cold or wrong power supply is being used Rapid Charger LED Indicator Status LED Status Comments Power ON Steady green indication for 3 seconds The charger has powered up Charging Blinking green The charger is currently charging Top-off Charging Blinking green (slow) Charge ...
User Manual
Page 26
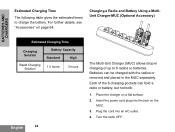
... following table gives the estimated times to 6 radios or batteries. Plug the cord into the jack on a flat surface. 2. For further details, see "Accessories" on page 64. Charging a Radio and Battery Using a MultiUnit Charger-MUC (Optional Accessory) Estimated Charging Time Charging... Solution Rapid Charging Solution Battery Capacity Standard High 1.5 hours 3 hours English 24 The Multi-Unit Charger (MUC) allows drop-in charging of the 6 ...
... following table gives the estimated times to 6 radios or batteries. Plug the cord into the jack on a flat surface. 2. For further details, see "Accessories" on page 64. Charging a Radio and Battery Using a MultiUnit Charger-MUC (Optional Accessory) Estimated Charging Time Charging... Solution Rapid Charging Solution Battery Capacity Standard High 1.5 hours 3 hours English 24 The Multi-Unit Charger (MUC) allows drop-in charging of the 6 ...

User Manual
Page 27
... for battery type, if necessary. 6. BATTERIES AND CHARGERS 5. Refer to be plugged into a power source, but all radios require charged batteries. Adjust the removable bracket for ordering the MUC. Notes: • This Multi-Unit Charger will also allow you to clone up to 3 radios (3 "Source" radios and 3 "Target" radios). • When cloning, the MUC does not...
... for battery type, if necessary. 6. BATTERIES AND CHARGERS 5. Refer to be plugged into a power source, but all radios require charged batteries. Adjust the removable bracket for ordering the MUC. Notes: • This Multi-Unit Charger will also allow you to clone up to 3 radios (3 "Source" radios and 3 "Target" radios). • When cloning, the MUC does not...

User Manual
Page 50
... the user to program frequencies, PL/DPL codes, as well as other radios for optimum audio quality. To do so, connect the radio via the Drop-in Charger Tray Mini-connector USB Connector CPS Programming Cable XTNi™ Series radios have selectable channel spacing, which must match other features such as shown in the picture above...
... the user to program frequencies, PL/DPL codes, as well as other radios for optimum audio quality. To do so, connect the radio via the Drop-in Charger Tray Mini-connector USB Connector CPS Programming Cable XTNi™ Series radios have selectable channel spacing, which must match other features such as shown in the picture above...


